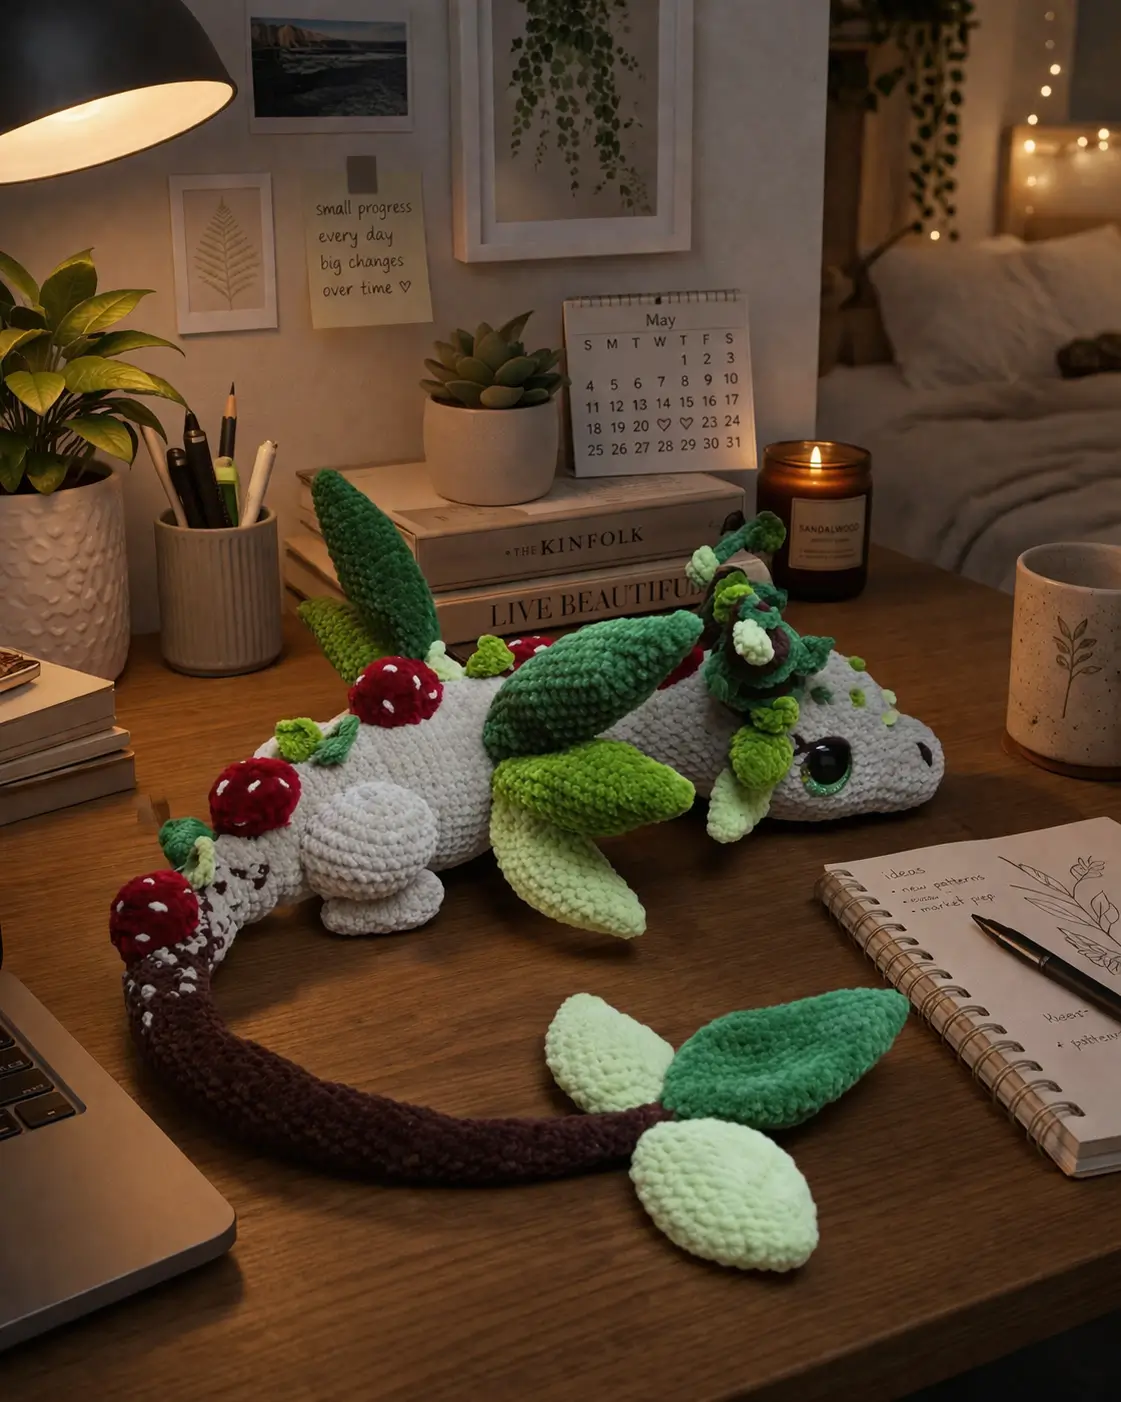
A forest dragon needs a back line that can carry mushrooms without collapsing. This forest dragon amigurumi crochet pattern uses super bulky plush yarn, a 4 mm hook, and a long low body structure based on the photo reference, with an intermediate-to-advanced build and a finished plush profile suited to shelf display, gift makes, or fantasy market stock.
The Design: What Makes Forest Dragon Different
This character is not built like a standard baby dragon. The body is longer, lower, and more serpentine, which gives the mushrooms room to sit on a stable spine rather than on a round back that tips sideways. The head is wedge-shaped instead of spherical. That matters because the eye sits forward, while the snout stays narrow.
Leaf structures also change the engineering. The back wings are soft leaf paddles, not rigid bat wings, so they read best when sewn along a shallow angle. The side face leaves work like a frill. Too low, and the dragon looks fish-like. Too high, and the eye disappears. In many woodland dragon amigurumi builds, makers place the mushroom caps too close together. That crowds the silhouette and hides the long-body proportion that makes a leaf dragon crochet design recognizable.
Project Info at a Glance
| Skill Level | Time | Finished Size | Hook | Best For |
|---|---|---|---|---|
| Intermediate | 8–12 hrs | ~70 cm long | 4 mm | Display plush, fantasy gifts, market stock |
Project sizing and supply benchmarks here follow the Lyra Lune plush forest dragon listing: 4 mm hook, size 6 super bulky plush yarn, 25 mm eyes, and about 70 cm finished length with the stated materials.
Materials and Tools
Yarn
- Light beige / stone — super bulky plush — 300 g — Hobbii Honey Bunny, Himalaya Dolphin Baby, or similar plush yarn
- Dark green — super bulky plush — under 1 skein — for large leaves and back details
- Leaf green — super bulky plush — under 1 skein
- Pale mint — super bulky plush — small amount
- Burgundy red — super bulky plush — small amount
- Dark brown — super bulky plush — small amount
- White — super bulky plush or smooth yarn scrap — small amount for mushroom spots
Tools
- Hook 4 mm
- 25 mm safety eyes
- Polyfill stuffing
- Yarn needle
- Stitch markers
- Pins or clips
- Optional thin floral wire for antlers only
Abbreviations
- MR = magic ring
- sc = single crochet
- inc = increase
- dec = decrease
- sl st = slip stitch
- ch = chain
- BLO = back loop only
- FLO = front loop only
Use invisible decrease on visible outer curves. It keeps the head and body surface flatter than a standard front-facing decrease.
Pattern — Step by Step
Continuous spiral unless noted.
Head (Make 1)
Yarn: light beige
- R1: 6 sc in MR (6)
- R2: inc x6 (12)
- R3: (sc, inc) x6 (18)
- R4: (2 sc, inc) x6 (24)
- R5: (3 sc, inc) x6 (30)
- R6: (4 sc, inc) x6 (36)
- R7-R10: sc around (36)
- R11: (4 sc, dec) x6 (30)
- Insert safety eyes between R7 and R8, about 8 sts apart.
- R12: (3 sc, dec) x6 (24)
- Stuff firmly at the snout and lightly at the back of the head.
Fasten off. Leave 20 cm tail.
Body (Make 1)
Yarn: light beige
- R1: 6 sc in MR (6)
- R2: inc x6 (12)
- R3: (sc, inc) x6 (18)
- R4: (2 sc, inc) x6 (24)
- R5: (3 sc, inc) x6 (30)
- R6: (4 sc, inc) x6 (36)
- R7-R13: sc around (36)
- R14: (4 sc, dec) x6 (30)
- R15: sc around (30)
- R16: (3 sc, dec) x6 (24)
- R17: sc around (24)
- Stuff more firmly through the center than at the neck edge. Keep the underside flat by pressing the body while filling.
Fasten off. Leave 20 cm tail.
Front Legs (Make 2)
Yarn: light beige
- R1: 6 sc in MR (6)
- R2: inc x6 (12)
- R3-R4: sc around (12)
- R5: (4 sc, dec) x2 (10)
- R6-R7: sc around (10)
- Stuff only the foot section.
- Flatten and sc 5 through both layers to close (5)
Fasten off. Leave 18 cm tail.
Back Legs (Make 2)
Yarn: light beige
- R1: 6 sc in MR (6)
- R2: inc x6 (12)
- R3-R5: sc around (12)
- R6: (4 sc, dec) x2 (10)
- R7-R8: sc around (10)
- Back legs read larger in the photo. Add a touch more stuffing in the foot.
- Flatten and sc 5 through both layers to close (5)
Fasten off. Leave 18 cm tail.
Back Leaf Wings (Make 2)
Yarn: dark green and leaf green
- Ch 9.
- Row 1: sc in 2nd ch from hook and across (8)
- Row 2: ch 1, turn, dec, 4 sc, dec (6)
- Row 3: ch 1, turn, sc across (6)
- Row 4: ch 1, turn, dec, 2 sc, dec (4)
- Row 5: ch 1, turn, sc across (4)
- Row 6: ch 1, turn, dec, 2 sc (3)
- Row 7: ch 1, turn, sc3tog (1)
Work a round of sc evenly around the leaf edge with 3 sc in the tip. Make one in dark green and one in leaf green for the layered look. Fasten off. Leave 20 cm tail.
Face Leaf Frills (Make 2)
Yarn: pale mint
- Ch 7.
- Row 1: sc in 2nd ch from hook and across (6)
- Row 2: ch 1, turn, dec, 2 sc, dec (4)
- Row 3: ch 1, turn, sc across (4)
- Row 4: ch 1, turn, dec, 2 sc (3)
- Row 5: ch 1, turn, sc3tog (1)
Work 1 round of sc around the edge. Fasten off. Leave 15 cm tail.
Tail (Make 1)
Yarn: dark brown
- R1: 6 sc in MR (6)
- R2: (sc, inc) x3 (9)
- R3: sc around (9)
- R4: (2 sc, inc) x3 (12)
- R5-R10: sc around (12)
- R11: (3 sc, inc) x3 (15)
- R12-R22: sc around (15)
- R23: (3 sc, dec) x3 (12)
- R24-R28: sc around (12)
- Stuff lightly and keep the tail flexible. Do not overfill.
Fasten off. Leave 25 cm tail.
Tail Leaves (Make 3)
Yarn: 2 pale mint, 1 dark green
- Ch 8.
- Row 1: sc in 2nd ch from hook and across (7)
- Row 2: ch 1, turn, dec, 3 sc, dec (5)
- Row 3: ch 1, turn, sc across (5)
- Row 4: ch 1, turn, dec, sc, dec (3)
- Row 5: ch 1, turn, sc3tog (1)
Work a round of sc evenly around each leaf. Fasten off. Leave 15 cm tail.
Branch Antlers (Make 2)
Yarn: dark brown
- Main stem: ch 8.
- Row 1: sl st in 2nd ch from hook and across (7)
- Branch 1: ch 3, sl st back down 2
- Branch 2: ch 4, sl st back down 3
- Branch 3: ch 3, sl st back down 2
Fasten off. Leave 12 cm tail.
Leaf Blossoms for Crown (Make 4 small leaves)
Yarn: leaf green
- Ch 5.
- Row 1: sc in 2nd ch from hook and across (4)
- Row 2: ch 1, turn, dec, sc, dec (2)
- Row 3: ch 1, turn, sc2tog (1)
Fasten off. Leave 10 cm tail.
Mushroom Caps (Make 4)
Yarn: burgundy red and white
- R1: 6 sc in MR (6)
- R2: inc x6 (12)
- R3: (sc, inc) x6 (18)
- R4: sc around in BLO (18)
- R5: sc around (18)
Embroider white spots after assembly. Lightly stuff only if a puffier cap is wanted. Fasten off. Leave 15 cm tail.
Mushroom Stems (Make 4)
Yarn: light beige
- R1: 6 sc in MR (6)
- R2-R3: sc around (6)
Fasten off. Leave 12 cm tail.
Cheek Patches (Make 2)
Yarn: pale mint
- R1: 6 sc in MR (6)
- R2: inc x6 (12)
- Sl st to close.
Fasten off. Leave 10 cm tail.
Assembly
- Sew the head to the narrowed end of the body, angling the snout slightly downward.
- Attach the front legs under the body at about R5-R7 from the neck edge.
- Attach the back legs under the body at about R10-R12.
- Sew the cheek patches low and slightly behind the eye line.
- Add the face leaf frills under each cheek patch so they point backward.
- Stitch the two back leaf wings on the upper spine with a small overlap.
- Sew the mushroom stems to the back, spacing them evenly, then attach the caps over the stems.
- Attach the tail centered at the rear body opening.
- Sew the three tail leaves near the tail tip in a fan arrangement.
- Add the branch antlers above the eyes and stitch the small crown leaves around their base.
The build is complete when the back line stays low, the mushrooms read as separate shapes, and the tail still curves without kinking.
7 Technical Tips
- Mark the top spine before sewing anything on. If the mushroom line drifts by even 1 stitch per cap, the back details start to spiral instead of reading as a centered row.
- Do not pack the body like a ball. Overstuffing turns the long torso into a cylinder and the legs will splay outward instead of sitting under the weight line.
- Use invisible decreases on the head and body only. Standard decreases create small corners that show up clearly in plush yarn once the light hits the snout.
- Insert the eyes before the final third of head stuffing. In a 36-stitch head, placing them between R7 and R8 with about 8 stitches between keeps the eye forward and the wedge snout visible.
- Pin both back leaves before sewing. One wing set 5–7 mm higher than the other is enough to make the dragon look twisted from the front.
- Keep tail stuffing light past the midpoint. A dense tail will drag the rear body backward and lift the chest off the table.
- Weave tails back through dense seams, not through open rounds. Plush yarn slips more easily than cotton, so finish tails through at least 3 direction changes inside the body wall.
Conclusion
This forest dragon amigurumi crochet pattern works because the structure stays disciplined: a 36-stitch head, a low 36-stitch body plateau, light tail fill, and separately placed mushrooms that do not crowd the spine. Build the body first, test the silhouette on a flat surface, then add the decorative layers one by one. Save the finished piece to Pinterest, post your version on Instagram, and tag it with #ForestDragonAmigurumi. One useful checkpoint remains: did your mushroom row stay centered once the tail was attached?









