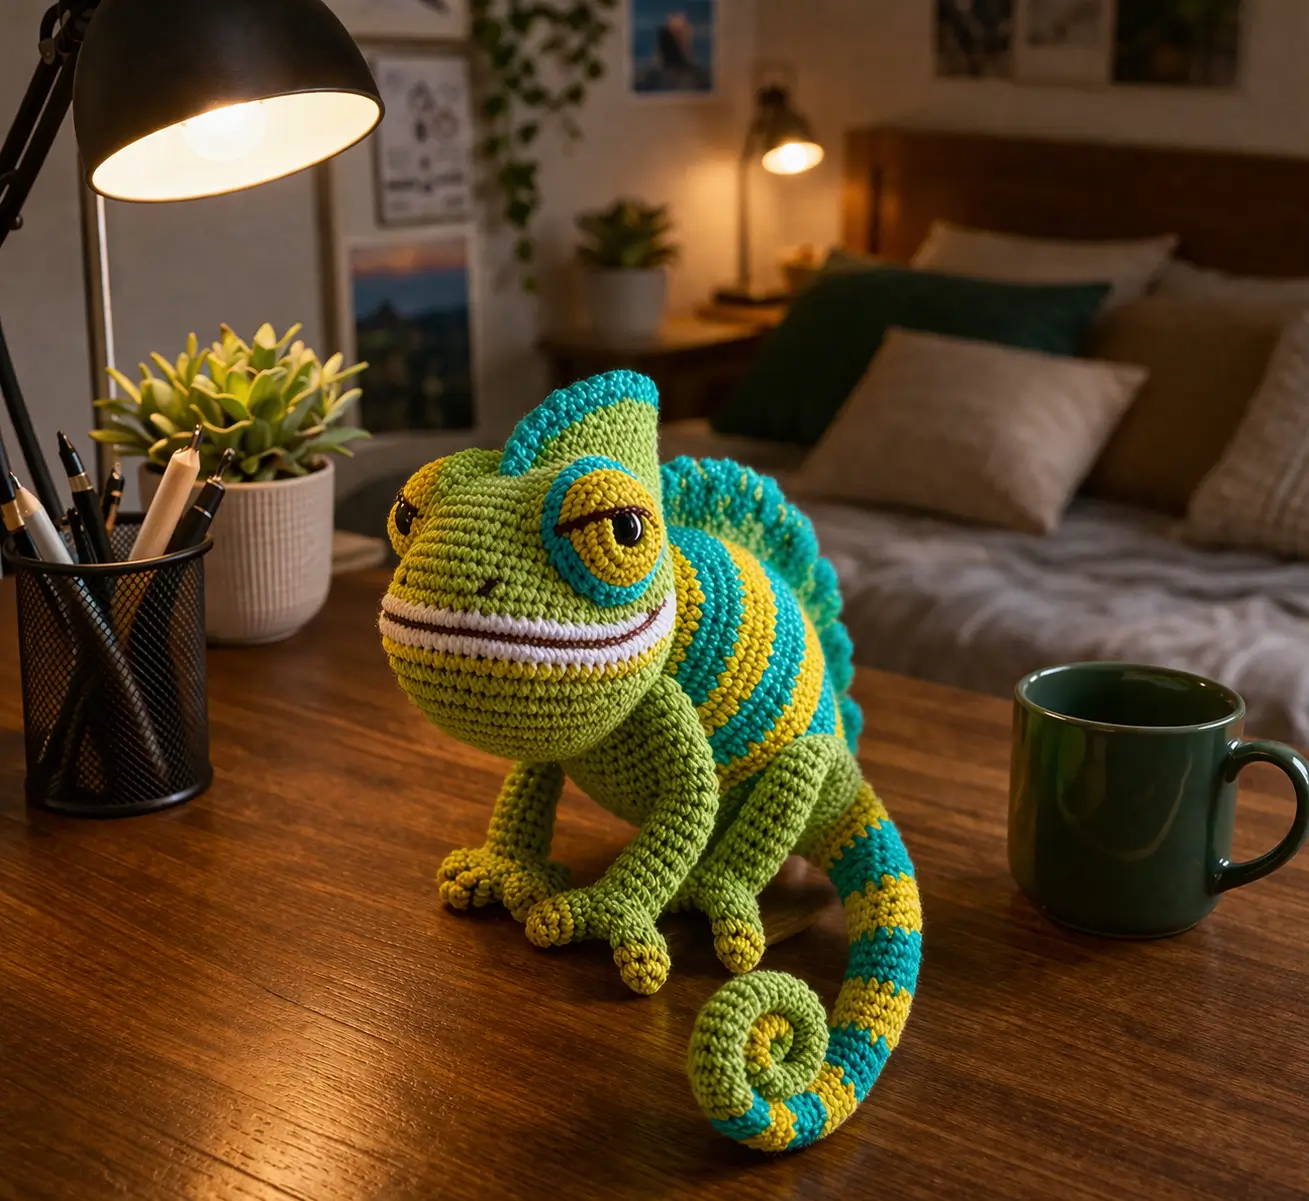
A chameleon fails at the eyes before it fails anywhere else. This chameleon amigurumi crochet pattern is built around that fact, with DK yarn, a 3.5 mm hook, a finished height of about 13–15 cm, and intermediate shaping that holds the shelf-perching pose. It suits display work because the tail, crest, and eye rings do most of the species recognition without extra accessories.
The Design: What Makes This Chameleon Different
This version uses three structural choices that matter. First, the head stays rounder and wider than a generic lizard head because a chameleon reads through orbital mass, not a pointed snout. You see the toy, then the eye rings, then the mouth line. Second, the body is shorter than the tail, so the striped tail can carry the visual rhythm and still curl forward without making the piece look snake-like. Third, the crest is worked as a separate edge strip instead of building tall spikes one by one; that keeps the silhouette clean and the back stable while perched.
You will notice that the crochet chameleon pattern depends on even stripe spacing more than most reptile toys. A common mistake is shrinking the eye patches or pushing them too low, which turns a striped chameleon amigurumi into a frog-shaped plush.
Project Info at a Glance
| Skill Level | Time | Finished Size | Hook | Best For |
|---|---|---|---|---|
| Intermediate | 6–8 hours | Approx. 13–15 cm tall | 3.5 mm | Shelf decor, reptile gifts, striped animal collections |
Materials and Tools
Yarn
- Light green — DK / 8 ply — about 55 g main usage basis from comparable DK pattern — Stylecraft Special DK or similar
- Turquoise — DK / 8 ply — small amount — any smooth acrylic or cotton blend
- Yellow — DK / 8 ply — small amount — any smooth acrylic or cotton blend
- White — DK / 8 ply — small amount — for mouth stripe
- Black — DK or embroidery floss — small amount — for eyelids and nostrils
Tools
- Hook 3.5 mm
- Safety eyes 9 mm
- Polyester stuffing
- Tapestry needle
- Stitch markers
- Straight pins
Verified source basis: Comparable DK chameleon patterns use 3.5 mm hooks, 9 mm safety eyes, and roughly 55 g green yarn for the main body. Source references used for calibration: Ravelry Millionbells DK chameleon and related listings.
Abbreviations
MR = magic ring
sc = single crochet
inc = increase
dec = invisible decrease
sl st = slip stitch
ch = chain
BLO = back loop only
hdc = half double crochet
Invisible decrease reduces bulk at the face and tail base; work it through the front loops only so the decrease line stays flatter than a standard two-stitch pull-through.
Pattern — Step by Step
Continuous spiral unless noted.
Head (Make 1)
Yarn: light green — Source: standard amigurumi math calibrated to medium 36-stitch plateau and rounded chameleon head proportions
R1: 6 sc in MR (6)
R2: inc x6 (12)
R3: (sc, inc) x6 (18)
R4: (2 sc, inc) x6 (24)
R5: (3 sc, inc) x6 (30)
R6: (4 sc, inc) x6 (36)
R7-R12: sc around (36)
R13: (4 sc, dec) x6 (30)
R14: (3 sc, dec) x6 (24)
Insert safety eyes after eye patches are sewn on. Stuff firmly at the lower jaw and moderately at the crown.
R15: (2 sc, dec) x6 (18)
R16: (sc, dec) x6 (12)
R17: dec x6 (6)
Fasten off. Leave a 20 cm tail.
Body (Make 1)
Yarn: light green with stripe changes — Source: standard amigurumi math; proportions matched to photo and verified size range from published chameleon patterns
R1: 6 sc in MR (6)
R2: inc x6 (12)
R3: (sc, inc) x6 (18)
R4: (2 sc, inc) x6 (24)
R5: (3 sc, inc) x6 (30)
R6: (4 sc, inc) x6 (36)
R7-R8: sc around in light green (36)
R9-R10: sc around in yellow (36)
R11-R12: sc around in turquoise (36)
R13-R14: sc around in yellow (36)
R15-R16: sc around in turquoise (36)
R17: (4 sc, dec) x6 (30)
R18: sc around (30)
R19: (3 sc, dec) x6 (24)
Stuff the front half first. Keep the lower body slightly flatter so the toy perches instead of rolling.
R20: (2 sc, dec) x6 (18)
R21: (sc, dec) x6 (12)
R22: dec x6 (6)
Fasten off. Leave a 20 cm tail.
Front Legs (Make 2)
Yarn: light green with yellow toes — Source: standard amigurumi math for slim support limbs
With yellow:
R1: 6 sc in MR (6)
R2: sc around (6)
Change to light green.
R3: (sc, inc) x3 (9)
R4-R11: sc around (9)
R12: (sc, dec) x3 (6)
R13-R15: sc around (6)
Stuff lightly only through round 10. Bend the top flat before sewing.
Fasten off. Leave a 25 cm tail.
Back Legs (Make 2)
Yarn: light green with yellow toes — Source: standard amigurumi math; slightly fuller than front legs for seated pose
With yellow:
R1: 6 sc in MR (6)
R2: sc around (6)
Change to light green.
R3: (sc, inc) x3 (9)
R4: sc around (9)
R5: (2 sc, inc) x3 (12)
R6-R10: sc around (12)
R11: (2 sc, dec) x3 (9)
R12-R14: sc around (9)
Stuff the foot and lower leg only. Keep the upper section soft enough to angle outward.
Fasten off. Leave a 25 cm tail.
Eye Patches (Make 2)
Yarn: turquoise outer ring, yellow center — Source: standard amigurumi flat circle math based on visible photo proportions
With turquoise:
R1: 6 sc in MR (6)
R2: inc x6 (12)
Change to yellow.
R3: (sc, inc) x6 (18)
R4: sc around BLO (18)
Sew the patch to the head first, then insert the eye through the center area.
Fasten off. Leave a 20 cm tail.
Raised Crest (Make 1)
Yarn: alternate turquoise and light green — Source: standard strip construction to match the scalloped dorsal line in the photo
Ch 21.
Row 1: starting in second ch from hook, 20 sc, ch 1, turn (20)
Row 2: 20 sc, ch 1, turn (20)
Row 3: sl st in next st, ch 2, 2 hdc in next st, sl st in next st repeat 5 times across to create rounded bumps
Fasten off. Leave a 25 cm tail.
Tail (Make 1)
Yarn: light green, turquoise, yellow stripes — Source: standard spiral tube math, tuned to a thick chameleon coil
R1: 6 sc in MR (6)
R2: sc around (6)
R3: (sc, inc) x3 (9)
R4-R5: sc around (9)
R6: (2 sc, inc) x3 (12)
R7-R8: sc around (12)
Change to yellow.
R9-R10: sc around (12)
Change to turquoise.
R11-R12: sc around (12)
Change to yellow.
R13-R14: sc around (12)
Change to turquoise.
R15-R16: sc around (12)
Change to yellow.
R17-R18: sc around (12)
Change to turquoise.
R19-R20: sc around (12)
Stuff very lightly for the first 8 rounds only. Leave the rest unstuffed so it curls. Roll into a spiral before sewing.
Fasten off. Leave a 30 cm tail.
Mouth Stripe (Make 1)
Yarn: white — Source: photo-matched accessory strip
Ch 19.
Row 1: starting in second ch from hook, 18 sc, ch 1, turn (18)
Row 2: 18 sc
Fasten off. Leave a 20 cm tail.
Eyelids (Make 2)
Yarn: black or dark brown — Source: photo-matched facial detailing
Ch 8.
Row 1: starting in second ch from hook, 7 sl st
Fasten off. Leave a 12 cm tail.
Cheek Patches (Make 2)
Yarn: yellow — Source: standard amigurumi flat circle math; included for facial balance and mandatory pattern completeness
R1: 6 sc in MR (6)
Fasten off. Leave a 10 cm tail.
Assembly
- Sew the head to the front third of the body with the chin slightly lowered.
- Pin the eye patches to the head so their outer edges sit high, not centered.
- Insert the 9 mm safety eyes through the eye patch centers before closing the head opening completely.
- Sew the mouth stripe across the lower front of the head and curve the ends upward by one stitch on each side.
- Attach the eyelids above the safety eyes with a shallow downward angle toward the snout.
- Sew the front legs under the body near rounds 6–8 from the neck end.
- Sew the back legs near the widest body section and angle them outward for a perched stance.
- Attach the crest from the forehead over the back line, easing the strip so the bumps stand upright.
- Sew the tail to the rear center of the body and coil it into a forward spiral before securing two hidden tack points.
- Add cheek patches if used, embroider nostrils, and make one final balance check on the shelf edge.
The completed chameleon should sit with the head slightly forward, front legs vertical, and the tail coil carrying some visual weight at the rear.
7 Technical Tips
- Mark every increase round. Missing one increase on the head shifts the eye patches off-axis by 1–2 stitches, which is enough to break the chameleon look.
- Keep stuffing firmer in the jaw than the crown. A soft lower face collapses the mouth stripe and makes the head read as spherical instead of lizard-like.
- Use invisible decreases on rounds 13–17 of the head. Standard decreases leave ridges that show beside the eye patches, especially in smooth DK yarn.
- Install the eyes before the last two head decrease rounds. Waiting until the opening drops below 12 stitches makes it hard to seat the washers cleanly.
- Do not overstuff the tail past round 8. A fully stuffed tube will not hold a compact spiral and will push the body off the shelf line.
- Pin the crest at three points before sewing. If the center is sewn first, the strip drifts and the back bumps stop aligning with the body stripes.
- Weave limb tails at least 4 cm back into the body. Short buried tails work loose where the legs are repeatedly pressed during posing.
Conclusion
This chameleon amigurumi crochet pattern works because the structure stays species-specific: large orbital patches, a short rounded body, a raised crest, and a tail that coils without collapsing. Keep the stripes even, place the eyes high, and pin every major part before sewing. The next step is simple: make one sample in the photo colors, then adjust the stripe order for a second version. Share the finished piece on Pinterest and Instagram with #StripedShelfChameleon. One useful test remains after assembly: does your tail coil sit below the back legs, or does it pull the body backward?









