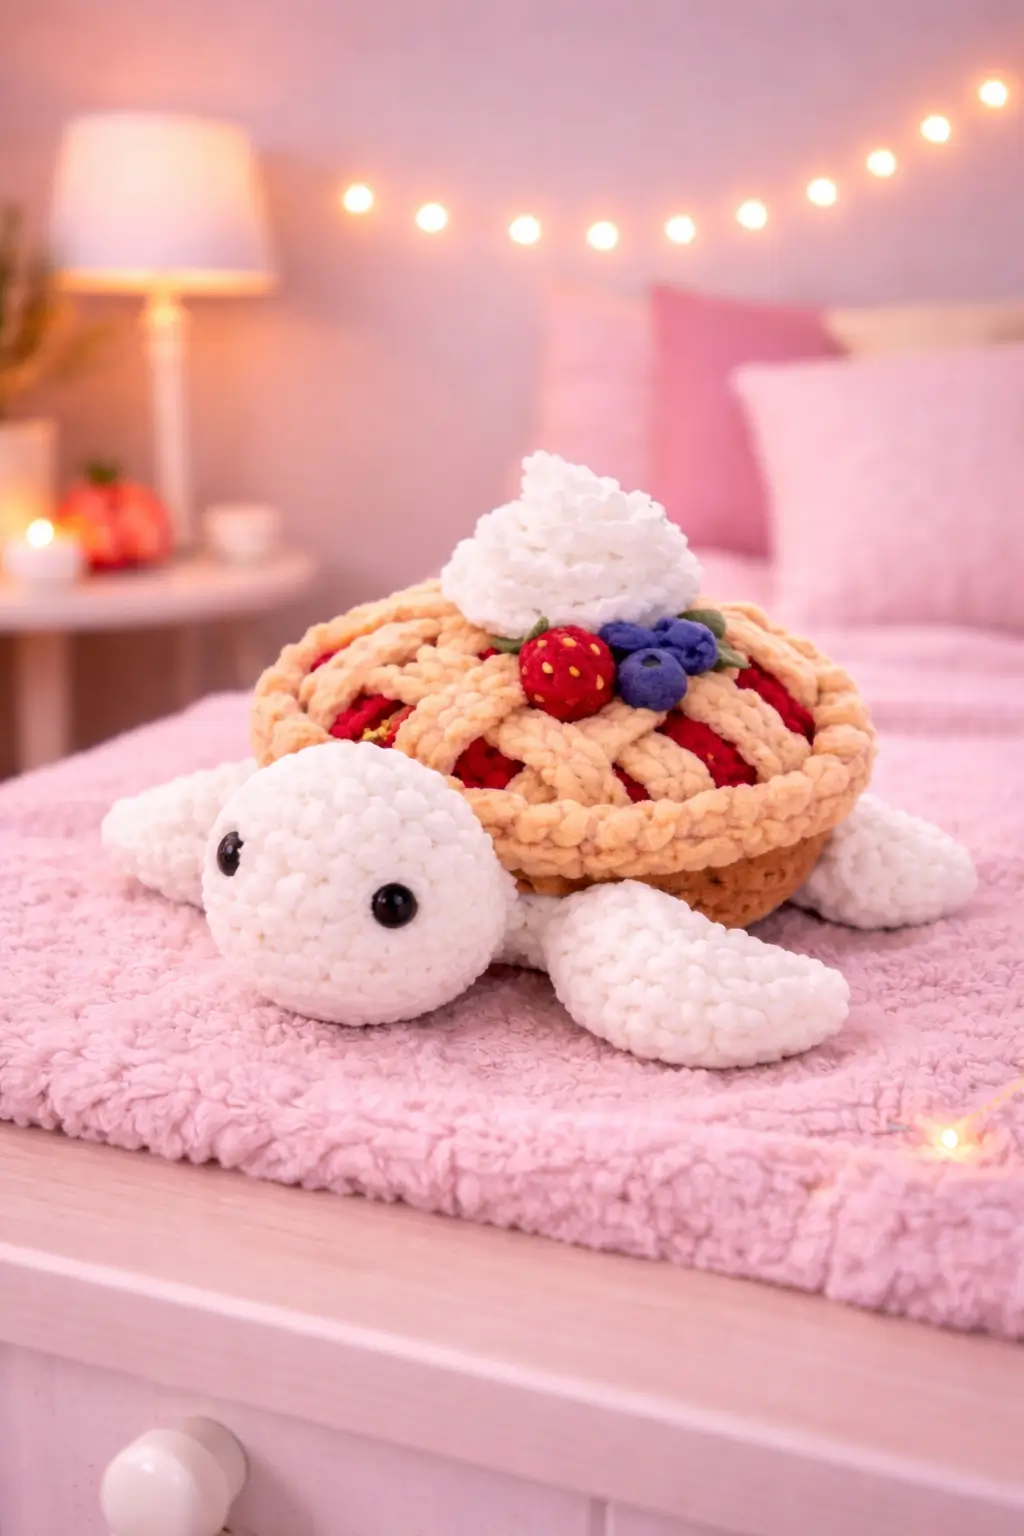
A pie turtle only works when the shell reads as dessert before it reads as a normal turtle shell. This berry pie turtle crochet pattern gives you the full plush build for the turtle in the photo, including head, flippers, pie base, berry filling, lattice strips, whipped cream, and fruit toppings. It is useful because the same turtle body can become blueberry, strawberry, cherry, or pumpkin pie with only surface changes.
The Design: What Makes This Pie Turtle Different
This turtle is built around contrast. The body stays simple and soft, while the shell carries nearly all of the concept work. That matters. A realistic shell texture would compete with the dessert styling and weaken the pie illusion. Here, the shell is treated like a pie dish with a raised crust edge, a bright filling, and a lattice top. The whipped cream dollop finishes the read immediately. Then the fruit toppings push the shell from generic pie to berry pie specifically. One common mistake is flattening the shell too much. Then the turtle stops looking plush and starts looking like a potholder with a head. Another is making the crust edge too thin. The whole dessert effect weakens fast. Current pattern listings confirm that pie turtles are a real and active amigurumi niche, not a one-off novelty. 1
Project Information at a Glance
| Skill Level | Time | Finished Size | Hook | Best For |
|---|---|---|---|---|
| Advanced beginner | 2–4 hours | About 4 in / 10 cm in standard yarn; larger in chenille | 3.75–5 mm | Desk decor, dessert gifts, seasonal market plush |
Materials and Tools
Yarn
- White — plush chenille yarn — 45g — for head and flippers
- Tan — plush chenille yarn — 35g — for crust edge and pie base
- Red — plush chenille yarn — 20g — for berry filling
- Purple — plush chenille or velvet scrap — 3g — for blueberries
- Green — cotton or velvet scrap — 2g — for leaves
- Yellow or cream — scrap yarn — 1g — for berry seed detail if desired
Tools
- 4 mm to 5 mm crochet hook
- 8 mm safety eyes
- Fiberfill stuffing
- Yarn needle
- Stitch markers
- Small sharp scissors
Crochet Abbreviations
MR / sc / inc / dec / sl st / ch / BLO / hdc / dc
Use invisible decrease on the turtle body only. Standard decreases leave dents that show clearly on a smooth plush turtle head.
Step-by-Step Berry Pie Turtle Crochet Pattern
Work in continuous spiral rounds unless noted.
Head (Make 1)
Yarn: white
Source: Standard amigurumi math
R1: 6 sc in MR (6)
R2: inc x6 (12)
R3: (sc, inc) x6 (18)
R4: (2 sc, inc) x6 (24)
R5: (3 sc, inc) x6 (30)
R6: sc around (30)
R7: sc around (30)
R8: sc around (30)
Insert 8 mm safety eyes between R6 and R7, about 8 stitches apart.
R9: (3 sc, dec) x6 (24)
R10: (2 sc, dec) x6 (18)
Stuff firmly but keep the face smooth.
R11: (sc, dec) x6 (12)
R12: dec x6 (6)
Fasten off. Leave 22 cm tail.
Front Flippers (Make 2)
Yarn: white
Source: Standard amigurumi math
R1: 6 sc in MR (6)
R2: inc x6 (12)
R3: sc around (12)
R4: sc around (12)
R5: (4 sc, dec) x2 (10)
Fasten off. Leave 16 cm tail.
Stuff lightly only at the front.
Back Flippers (Make 2)
Yarn: white
Source: Standard amigurumi math
R1: 6 sc in MR (6)
R2: inc x6 (12)
R3: sc around (12)
R4: (4 sc, dec) x2 (10)
Fasten off. Leave 16 cm tail.
Pie Base / Lower Shell (Make 1)
Yarn: tan
Source: Standard amigurumi math
R1: 6 sc in MR (6)
R2: inc x6 (12)
R3: (sc, inc) x6 (18)
R4: (2 sc, inc) x6 (24)
R5: (3 sc, inc) x6 (30)
R6: (4 sc, inc) x6 (36)
R7: sc around (36)
R8: sc around (36)
Fasten off. Leave 24 cm tail.
Berry Filling Top (Make 1)
Yarn: red
Source: Standard amigurumi math
R1: 6 sc in MR (6)
R2: inc x6 (12)
R3: (sc, inc) x6 (18)
R4: (2 sc, inc) x6 (24)
R5: (3 sc, inc) x6 (30)
R6: (4 sc, inc) x6 (36)
Fasten off. Leave 22 cm tail.
Pie Crust Rim (Make 1)
Yarn: tan
Source: Standard amigurumi math
R1: ch 37
R2: join into ring carefully, sc around (36)
R3: (3 sc, inc) x9 (45)
R4: sc around (45)
Fasten off. Leave 20 cm tail.
This rim should sit raised above the filling edge.
Lattice Strips (Make 6)
Yarn: tan
Source: Standard amigurumi math
R1: ch 16
R2: starting in 2nd ch from hook, sc across (15)
Fasten off. Leave 14 cm tail.
Lay 3 strips one way and 3 strips the other way across the red filling.
Whipped Cream Dollop (Make 1)
Yarn: white
Source: Standard amigurumi math
R1: 6 sc in MR (6)
R2: inc x6 (12)
R3: sc around (12)
R4: (sc, dec) x4 (8)
R5: sc around (8)
R6: dec x4 (4)
Fasten off. Leave 14 cm tail.
Stack and spiral the piece slightly while sewing to mimic whipped cream.
Strawberry (Make 1)
Yarn: red and green
Source: Standard amigurumi math
Berry body:
R1: 4 sc in MR (4)
R2: inc x4 (8)
R3: sc around (8)
R4: (sc, dec) x2 (6)
Fasten off. Leave 10 cm tail.
Leaf cap:
R1: 4 sc in MR (4)
Fasten off. Leave 8 cm tail.
Blueberries (Make 2)
Yarn: purple
Source: Standard amigurumi math
R1: 6 sc in MR (6)
R2: sc around (6)
Fasten off. Leave 8 cm tail.
Leaves (Make 3)
Yarn: green
Source: Standard amigurumi math
R1: ch 5
R2: starting in 2nd ch from hook, sl st, sc, hdc, sl st (4)
Fasten off. Leave 8 cm tail.
Assembly Instructions
- Sew the head to the front of the pie base, low and slightly forward.
- Attach the two front flippers near the head and the two back flippers near the rear sides.
- Sew the red berry filling onto the top of the pie base.
- Lay the six lattice strips across the filling in a woven pie pattern and secure each end under the crust edge.
- Attach the crust rim around the outer edge of the shell so it frames the pie top clearly.
- Sew the whipped cream dollop to the shell center, slightly back from the front edge.
- Add the strawberry, blueberries, and green leaves around the whipped cream.
- Check the shell from above before tightening all topping seams.
- Weave every tail at least 4 cm into the stuffing path.
- Trim only after the turtle sits evenly on a flat surface.
The berry pie turtle is complete.
7 Technical Tips for Cleaner Amigurumi
- Mark every increase round. Missing one increase before the 36-stitch shell plateau makes the pie top oval instead of evenly round.
- Stuff the turtle head firmer than the flippers. A soft head loses definition under the shell overhang.
- Pin the lattice strips before sewing any of them permanently. A crooked first strip makes the whole pie top look off-center.
- Keep chenille tension slightly tighter than normal. Loose plush stitches can expose stuffing on the turtle head and distort the pie edge.
- Attach the crust rim after the lattice is fixed. Sewing the rim first makes it harder to hide the strip ends cleanly.
- Use invisible decrease on the turtle body only. Standard decreases leave dents that show clearly on the smooth white head.
- Weave tails at least 4 cm deep. Short tails loosen first around the toppings and shell rim because those seams get handled most.
Conclusion
This pie turtle crochet pattern works because the turtle body stays simple while the berry pie shell carries the entire concept. Use current pie-turtle references as the baseline for approximate scale and hook range, then refine the final look through shell height, lattice spacing, and topping placement rather than random stitch edits. Photograph the finished turtle from a front three-quarter angle so the whipped cream, fruit, lattice shell, and flippers all remain visible in one frame. Share it on Pinterest and Instagram with #BerryPieTurtleAmigurumi. Will your next turtle keep the berry filling, or turn into a blueberry pie version with a darker shell palette?









