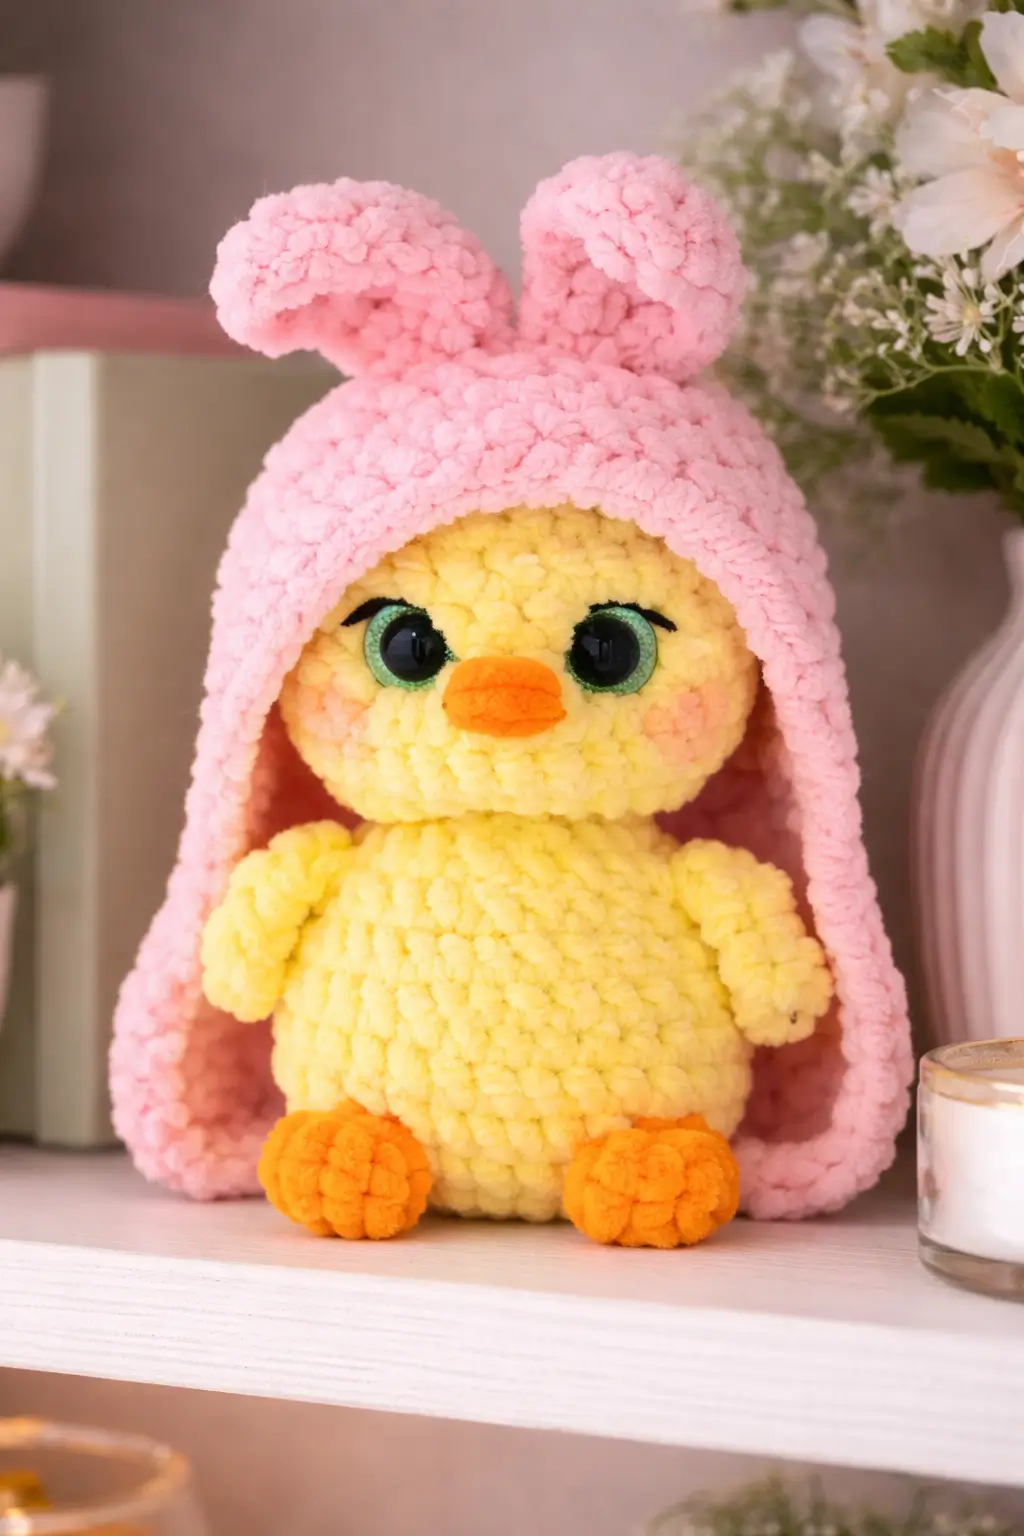
A chick wearing a bunny hood has one obvious failure point: the hood must frame the face without swallowing the chick completely. This baby chick crochet pattern gives you materials, published size, hook baseline, skill level, and a full plush build for the hooded toy in the photo. You get the chick, hood, floppy ears, beak, wings, cheeks, and face layout. It earns its keep as seasonal decor and gift stock.
The Design: What Makes Baby Chick Different
This design depends on two separate silhouettes working together. First, the chick has to read as a chick before the costume reads as a bunny. That means a low beak, compact rounded body, and small side wings. Then the hood has to sit high and loose enough to reveal the face. If the hood drops too low, the plush becomes a pink blob with a beak. If the hood opening is too wide, the bunny concept disappears. Current search results confirm that plain chicks, hooded bunnies, and bunny-bonnet dolls are all active categories, but the combination seen here is less common. That is the useful gap. One frequent mistake is making the hood ears too thin. They stop flopping, and the whole costume loses character.
Project Information at a Glance
| Skill Level | Time | Finished Size | Hook | Best For |
|---|---|---|---|---|
| Advanced beginner | 2–4 hours | 11.5 cm with hood / 9.5 cm without hood | 2.00 mm | Easter decor, nursery gifts, spring market plush |
Materials and Tools
Yarn
- Pastel yellow — DK / light yarn baseline, chenille adaptation for photo — 35g — Himalaya Dolphin Fine or YarnArt Dolce Baby
- Soft pink — DK / light yarn baseline, chenille adaptation for photo — 28g — Himalaya Dolphin Fine or YarnArt Dolce Baby
- Orange — DK / light yarn baseline — 4g — for beak and feet
- Peach — DK / light yarn baseline — 2g — for cheek patches
- Black — embroidery floss or felt scrap — 1g — for lashes and eye edging
- Mint green — felt or yarn scrap — 1g — for iris accent in the appliqué eyes
Tools
- 2.00 mm crochet hook for the published small baseline
- 3.5 mm to 4 mm hook if adapting to chenille like the photo
- 8 mm safety eyes if you are not making appliqué eyes
- Fiberfill stuffing
- Yarn needle
- Stitch markers
- Sharp scissors
- Felt or crocheted eye pieces
Crochet Abbreviations
MR / sc / inc / dec / sl st / ch / BLO / hdc
Use invisible decrease only on the face and body-closing rounds. Standard decreases leave dents that show clearly across a smooth chick forehead.
Step-by-Step Baby Chick Crochet Pattern
Work in continuous spiral rounds unless noted.
Head (Make 1)
Yarn: pastel yellow
Source: Standard amigurumi math
R1: 6 sc in MR (6)
R2: inc x6 (12)
R3: (sc, inc) x6 (18)
R4: (2 sc, inc) x6 (24)
R5: (3 sc, inc) x6 (30)
R6: sc around (30)
R7: sc around (30)
R8: sc around (30)
If using safety eyes instead of appliqué eyes, place 8 mm eyes between R6 and R7, about 8 stitches apart.
R9: (3 sc, dec) x6 (24)
R10: (2 sc, dec) x6 (18)
Stuff firmly through the cheeks and forehead.
R11: (sc, dec) x6 (12)
R12: dec x6 (6)
Fasten off. Leave 25 cm tail.
Body (Make 1)
Yarn: pastel yellow
Source: Standard amigurumi math
R1: 6 sc in MR (6)
R2: inc x6 (12)
R3: (sc, inc) x6 (18)
R4: (2 sc, inc) x6 (24)
R5: (3 sc, inc) x6 (30)
R6: sc around (30)
R7: sc around (30)
R8: (3 sc, dec) x6 (24)
R9: (2 sc, dec) x6 (18)
R10: sc around (18)
Stuff lightly. The belly should stay rounded, not rigid.
Fasten off. Leave 25 cm tail.
Wings (Make 2)
Yarn: pastel yellow
Source: Standard amigurumi math
R1: 6 sc in MR (6)
R2: inc x6 (12)
R3: sc around (12)
R4: (4 sc, dec) x2 (10)
Fasten off. Leave 14 cm tail.
Stuff lightly or leave unstuffed for a flatter wing.
Feet (Make 2)
Yarn: orange
Source: Standard amigurumi math
R1: 6 sc in MR (6)
R2: inc x6 (12)
R3: sc around (12)
Fasten off. Leave 12 cm tail.
Flatten slightly so the feet sit under the body instead of protruding forward.
Beak (Make 1)
Yarn: orange
Source: Standard amigurumi math
R1: 6 sc in MR (6)
R2: sc around (6)
Flatten into a short oval.
Fasten off. Leave 10 cm tail.
Cheek Patches (Make 2)
Yarn: peach
Source: Standard amigurumi math
R1: 6 sc in MR (6)
Fasten off. Leave 8 cm tail.
Eye Appliqué Base (Make 2)
Yarn: dark trim or felt-backed pieces
Source: Standard amigurumi math
R1: ch 5
Row 1: starting in 2nd ch from hook, sc 3, 3 sc in last ch, rotate, sc 2, inc in final stitch (10)
Row 2: sc around (10)
Fasten off. Leave 8 cm tail.
Eye Highlights (Make 2 sets)
Yarn: mint green and white scraps
Source: Standard amigurumi math
Mint piece: ch 2, sl st back across (2)
White piece: ch 2, sl st back across (2)
Fasten off. Leave short tails.
Hood Base (Make 1)
Yarn: soft pink
Source: Standard amigurumi math
R1: 6 sc in MR (6)
R2: inc x6 (12)
R3: (sc, inc) x6 (18)
R4: (2 sc, inc) x6 (24)
R5: (3 sc, inc) x6 (30)
R6: (4 sc, inc) x6 (36)
R7: sc around (36)
R8: sc around (36)
R9: sc around (36)
R10: sc around (36)
R11: sc around (36)
R12: work 24 sc only, turn
R13: ch 1, turn, 24 sc
R14: ch 1, turn, 22 sc
R15: ch 1, turn, 20 sc
R16: ch 1, turn, 18 sc
Fasten off. Leave 30 cm tail.
This creates a hood opening large enough to frame the chick face instead of covering it.
Bunny Ears (Make 2)
Yarn: soft pink
Source: Standard amigurumi math
R1: 6 sc in MR (6)
R2: inc x6 (12)
R3: sc around (12)
R4: sc around (12)
R5: sc around (12)
R6: (4 sc, dec) x2 (10)
R7: sc around (10)
R8: sc around (10)
Fasten off. Leave 16 cm tail.
Do not overstuff. The ears need to flop.
Hood Inner Lining Edge (Make 1 optional)
Yarn: soft pink
Source: Standard amigurumi math
R1: ch 25
R2: starting in 2nd ch from hook, sc across (24)
Fasten off. Leave 15 cm tail.
Assembly Instructions
- Sew the head to the body with the face tilted slightly forward.
- Attach the beak low on the head center, leaving enough forehead above it for the large eye layout.
- Add the cheek patches below and slightly outside the eyes.
- Place and sew the appliqué eyes, then add the mint and white highlight details.
- Embroider the short lash lines after the eyes are fixed.
- Attach the wings low on the body sides so they stay tucked and rounded.
- Sew the two feet to the underside front edge so the chick sits upright.
- Place the hood over the head and sew it around the back and sides, leaving the full face exposed.
- Attach the two bunny ears to the top of the hood, angled outward and slightly forward.
- Weave every tail at least 4 cm into the stuffing path before trimming.
The baby chick in a bunny hood is complete.
7 Technical Tips for Cleaner Amigurumi
- Use a stitch marker on every increase round. Missing one increase before the 30-stitch plateau makes the chick head oval, and the hood opening stops sitting evenly.
- Stuff the head firmer than the body. If both sections are equally packed, the hood collapses inward and crowds the face.
- Place the eyes before the smile and cheek alignment are final. A shift of even 3 mm makes one cheek look lower than the other.
- Keep chenille tension slightly tighter than usual. Loose plush stitches can expose stuffing across the forehead and beak zone.
- Pin the hood before sewing any permanent seam. A hood edge placed 1 cm too low can cover the cheeks and flatten the expression.
- Use invisible decrease on the face rounds only. Standard decreases leave dents that catch light beneath the appliqué eyes.
- Weave tails at least 4 cm deep. Shorter tails loosen first at the hood-ear seam because that area gets handled constantly.
Conclusion
This baby chick crochet pattern works because the chick stays simple while the bunny hood carries the costume identity. Use the published 11.5 cm with-hat baseline and 2.00 mm hook as the small-gauge reference, then scale to chenille only after the hood opening, ear droop, and face spacing feel right. Photograph the finished plush from a straight-on angle so the cheeks, beak, and floppy ears all remain readable in one frame. Share it on Pinterest and Instagram with #BunnyHoodChickAmigurumi. One exact question remains: will your next version keep the pink hood, or switch to lavender and make the chick look more bonnet than bunny?









