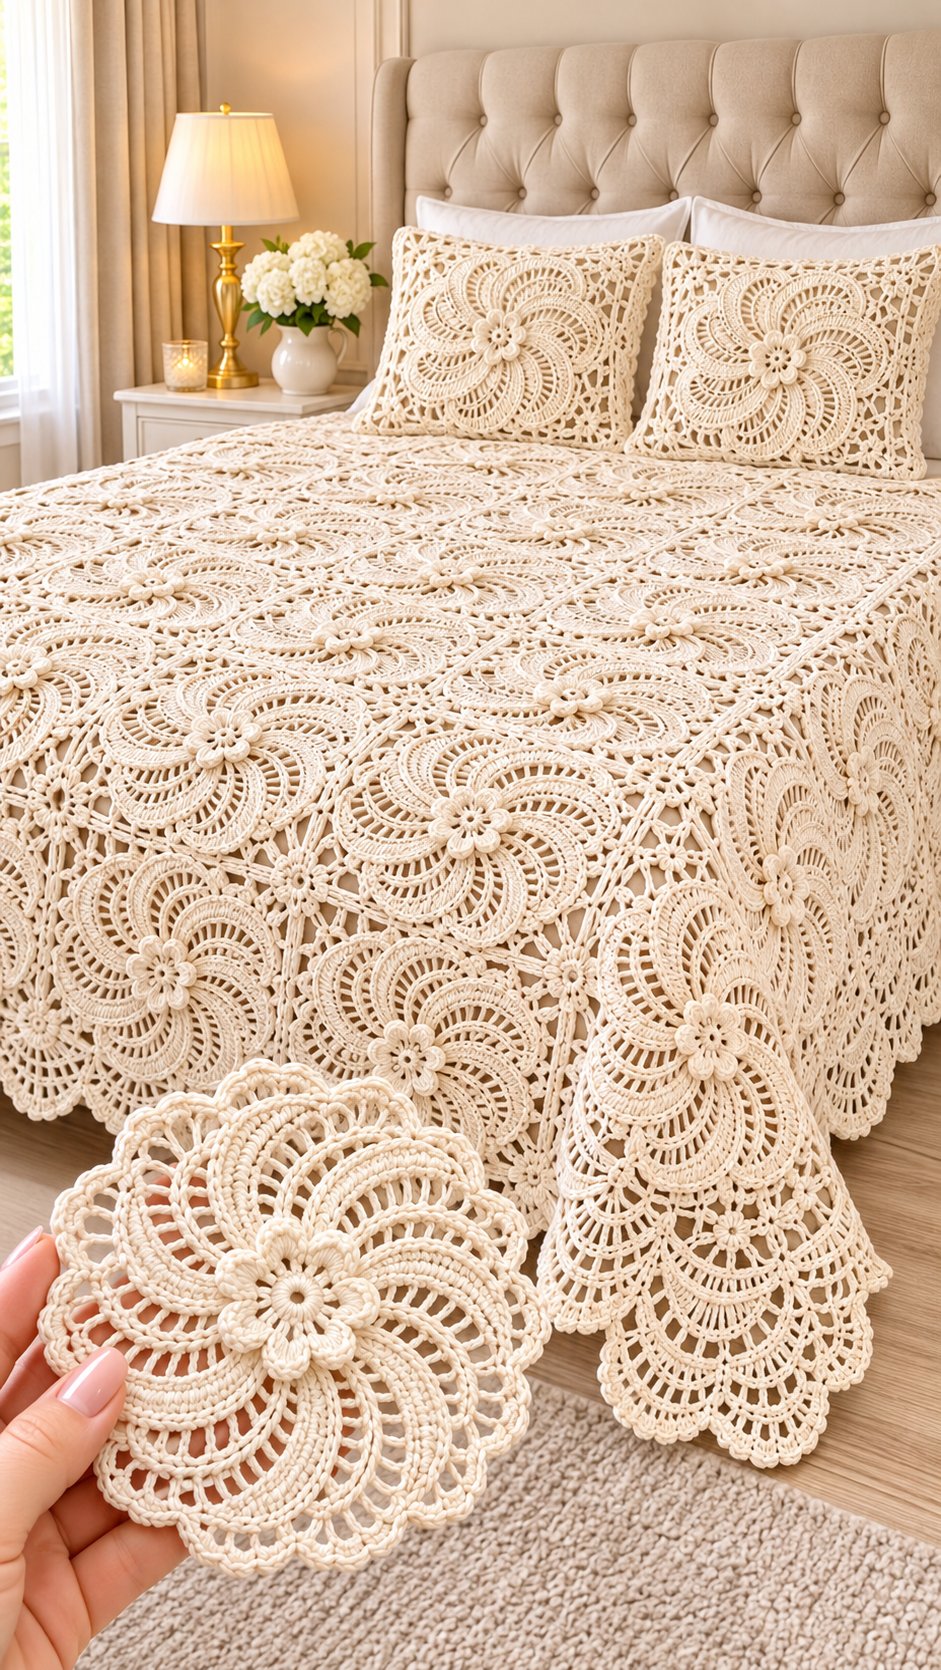
Crochet Floral Lace Bedspread Pattern – Elegant 3D Flower Motif Blanket and Matching Pillow Covers
Pattern type: Original, photo-inspired interpretation
Skill level: Intermediate to advanced
Terminology: US crochet terms
Construction: Raised flower, circular lace motif, square mesh frame
Introduction
Each large flower in this bedspread is built around a raised six-petal center, with radiating lace arches forming the surrounding pattern. This crochet floral lace bedspread pattern uses ivory cotton yarn, a 3.5 mm hook, and joined motifs to create a bed covering measuring approximately 220 × 240 cm at the proposed gauge. Designed for intermediate to advanced crocheters, the modular construction allows individual sections to be completed, measured, and blocked before final assembly. This pattern is an original interpretation of the photographed design and has not been tested on a physical sample — please crochet one motif first and adjust the stitch counts to your yarn and gauge.
The Design: What Makes This Floral Bedspread Different
Three structural features distinguish this design from a conventional granny-square blanket.
First, the flower centers sit above the surrounding fabric. The raised petals are worked separately and attached to the main motif, creating dimensional detail without requiring stuffing.
Second, curved lace arches surround each central flower. Their repeated chain spaces create a circular floral impression, while the outer square frame provides predictable joining edges. This combination is useful in a 3D flower crochet blanket because circular motifs alone leave irregular spaces when arranged in rows.
Third, the outer mesh connects the decorative centers without forming a heavy, solid background. The result resembles a vintage crochet lace bedspread.
A common construction error is stretching the circular center to fit the square frame. Correct blocking dimensions should be established before the crochet flower motifs are joined.
Project Info at a Glance
| Feature | Details |
|---|---|
| Project | Floral lace crochet bedspread with matching pillow covers |
| Skill level | Intermediate–advanced |
| Estimated time | 100–180 hours |
| Finished size | Approx. 220 × 240 cm |
| Hook | 3.5 mm |
| Yarn | DK cotton |
| Main color | Ivory |
| Construction | Joined square floral lace motifs |
| Suggested layout | 10 motifs across × 11 motifs down |
| Individual motif target | 20 × 20 cm |
| Border target | Approx. 10 cm on each side |
| Matching accessories | Two pillow fronts |
| Best for | Decorative bed covering and coordinated bedroom textiles |
All measurements and time estimates in this table are planning targets for the original interpretation. The finished size must be checked against a blocked sample.
Materials and Tools
Yarn
- Ivory cotton yarn, DK weight, approximately 2,500–3,500 g: Choose a smooth, firmly twisted cotton with consistent thickness. Phildar Phil Coton 4 or a comparable DK cotton is a possible option.
- Ivory cotton yarn for raised flowers, approximately 150–250 g within the total allowance: Use the same yarn for consistent texture.
- Ivory cotton yarn for joining and edging, approximately 300–500 g within the total allowance: Reserve this quantity before beginning the final border.
- Optional matching sewing thread, small quantity: Use it to attach fabric pillow backs or concealed closures.
These quantities are estimates, not a tested yarn bill. Make one complete motif, block it, and weigh it before buying the full amount.
For example, if one finished motif weighs 24 g, then 110 motifs require approximately 2,640 g before joining, borders, and pillows.
Tools
- 3.5 mm crochet hook
- 3.0 mm hook, optional for tighter flower centers
- Tapestry needle with a large eye
- Stitch markers, at least eight
- Sharp scissors
- Measuring tape
- Blocking mats and rustproof pins
- Kitchen scale accurate to 1 g
- Two 40 × 40 cm pillow inserts
- Two matching fabric pillow backs, optional
Cotton is recommended because it maintains defined lace openings and tolerates controlled wet blocking. A cotton blend may also work, but changes in elasticity can alter the final motif dimensions.
Abbreviations
All instructions use US crochet terminology.
| Abbreviation | Meaning |
|---|---|
| MR | Magic ring |
| ch | Chain |
| sc | Single crochet |
| hdc | Half double crochet |
| dc | Double crochet |
| tr | Treble crochet |
| sl st | Slip stitch |
| inc | Two stitches in the same stitch |
| dec | Single crochet decrease |
| BLO | Back loop only |
| sp | Space |
| sk | Skip |
| rep | Repeat |
| st(s) | Stitch(es) |
| RS | Right side |
| WS | Wrong side |
| FO | Fasten off |
An invisible decrease is made by inserting the hook through the front loops of the next two stitches before completing one single crochet.
Gauge and Pattern Construction
The proposed main motif measures 20 × 20 cm after blocking.
For the complete bedspread, make 110 motifs and arrange them in 10 columns and 11 rows. The joined motif field should measure approximately 200 × 220 cm. A border extending 10 cm beyond each edge produces an overall target of 220 × 240 cm.
This design uses a layered approach:
- A small raised six-petal flower forms the center.
- A circular lace medallion creates the radiating petal effect.
- An outer square mesh frame establishes four joining corners.
- Motifs are joined into a rectangular panel.
- A decorative border and matching pillow fronts complete the set.
The instructions below are a proposed construction, not a stitch-for-stitch transcription of the photograph. Work one complete sample before committing to the bedspread.
Pattern – Step by Step
Part 1: Raised Six-Petal Flower (Make 110)
Yarn: Ivory cotton. Construction: Original pattern using standard crochet stitches.
These small flowers are attached to the center of the larger lace motifs.
R1: Make a MR. Work 6 sc into the ring. Join with sl st to the first sc. (6 sc)
R2: Ch 1. Work 2 sc in each stitch around. Join. (12 sc)
R3: Repeat [sc in next st, inc in next st] six times. Join. (18 sc)
R4: Repeat [sc in next st, ch 3, sk next 2 sts] six times. Join to first sc. (6 sc, 6 ch-3 spaces)
R5: Into each ch-3 space work [sc, hdc, 3 dc, hdc, sc]. Repeat around. (6 petals, 42 stitches)
Fasten off, leaving a 20 cm tail for attaching the flower to its lace medallion.
The central flower should remain slightly raised. Avoid flattening the petals during blocking.
Part 2: Circular Floral Lace Medallion (Make 110)
Yarn: Ivory cotton. Construction: Original openwork medallion.
This medallion provides the radiating lace effect beneath the dimensional flower.
R1: Make a MR and work 12 dc into the ring. Join. (12 dc)
R2: Ch 3, dc in same stitch, then 2 dc in each remaining stitch. Join to the top of beginning ch 3. (24 dc, counting beginning ch 3 as one dc)
R3: Ch 1, sc in first stitch. Repeat [ch 5, sk next 3 sts, sc in next st] five times, then ch 5, sk final 3 sts and join to first sc. (6 sc, 6 ch-5 spaces)
R4: Sl st into the first ch-5 space. Ch 1, work [sc, 3 hdc, 3 dc, 3 hdc, sc] into each ch-5 space. Join. (6 arches, 66 stitches)
R5: Sl st across the first five stitches of the first arch to reach its central dc. Ch 1, sc in that dc. Repeat [ch 7, sc in the central dc of the next arch] around, replacing the final sc with a join to the first sc. (6 sc, 6 ch-7 spaces)
R6: Sl st into the first ch-7 space. Ch 1, work [sc, 4 hdc, 5 dc, 4 hdc, sc] into each ch-7 space. Join. (6 arches, 90 stitches)
R7: Sl st across the first seven stitches of the first arch to reach its central dc. Ch 1, sc in that dc. Repeat [ch 9, sc in the central dc of the next arch] around, joining after the sixth ch-9 space. (6 sc, 6 ch-9 spaces)
R8: Sl st into the first ch-9 space. Ch 1, work [sc, 5 hdc, 7 dc, 5 hdc, sc] into each space. Join. (6 arches, 114 stitches)
Fasten off and weave the working end into the wrong side. The six arches form a stylized floral medallion; the photograph’s more elaborate swirling petals would require additional shaped lace rounds and a separate chart.
Part 3: Square Lace Frame (Make 110)
Yarn: Ivory cotton. Construction: Original square mesh frame.
This frame is worked separately and the circular medallion is sewn into its center. That method avoids forcing six circular arches into four square corners.
R1: Ch 8 and join into a ring. Ch 3, work 2 dc, ch 2, then repeat [3 dc, ch 2] three more times. Join. (12 dc, 4 corner spaces)
R2: Sl st into first corner space. Work [3 dc, ch 2, 3 dc] in the corner, ch 3. Repeat for all four corners, then join. (24 dc, 4 corner spaces, 4 ch-3 side spaces)
R3: In each corner work [3 dc, ch 2, 3 dc]. Between corners, work ch 3, sc in the previous round’s side ch-3 space, ch 3. Join. (24 dc, 4 sc, 8 side ch-3 spaces, 4 corner spaces)
R4: In each corner work [3 dc, ch 2, 3 dc]. Across each side, work ch 3, sc in each of the two previous side ch-3 spaces, separated by ch 3, then ch 3 to the next corner. Join. (24 dc, 8 sc, 12 side ch-3 spaces, 4 corner spaces)
R5: Repeat the same corner treatment. Work one sc into each side ch-3 space from R4, with ch 3 between successive anchor points and between the anchors and corners. Join. (24 dc, 12 sc, 16 side ch-3 spaces, 4 corner spaces)
R6: Repeat the corner treatment and extend the side mesh in the same manner. Join. (24 dc, 16 sc, 20 side ch-3 spaces, 4 corner spaces)
R7: Repeat the corner treatment and extend the side mesh. Join. (24 dc, 20 sc, 24 side ch-3 spaces, 4 corner spaces)
Continue the same expansion until the square frame measures approximately 20 cm after blocking. Each additional round adds four side anchors and four side chain spaces while retaining four corner spaces.
Fasten off with a 25 cm tail. Block the frame square, then center the circular medallion within it. Attach the medallion at 12 evenly distributed points using small, relaxed sewing stitches.
The final number of frame rounds depends on gauge. The center attachment method should be tested for sagging before producing multiple copies.
Part 4: Raised Flower Attachment (Make 110 Assemblies)
Place one raised six-petal flower over the center of each lace medallion.
Thread the flower’s 20 cm tail onto a tapestry needle. Sew around the central ring, passing through the medallion beneath it. Work six evenly spaced attachment stitches.
Do not sew the outer edges of the petals flat. Their raised profile creates the dimensional center visible in the reference photograph.
Part 5: Lace Joining Mesh
Yarn: Ivory cotton.
Block every completed motif to the same dimensions before joining.
Arrange the squares with their right sides facing upward. For a flexible connection, use a chain-space join rather than a dense seam.
Join yarn to a corner space of the first motif.
Joining Row 1: Ch 3, sc into the corresponding corner space of the second motif, ch 3, sc into the next side chain space of the first motif, ch 3, sc into the corresponding side space of the second motif.
Repeat this alternating connection along the shared edge. Fasten off at the opposite corner.
The number of joining repeats must match the final frame round used for both motifs. Repeat the process for horizontal and vertical seams.
Maintain equal chain lengths throughout the joins. Shorter chains pull the squares together and can produce a ridged surface.
Part 6: Small Lace Intersection Flowers
Yarn: Ivory cotton.
These optional small flowers fill selected spaces where four square motifs meet.
R1: Work 6 sc into a MR. Join. (6 sc)
R2: Repeat [sc in next st, ch 4] six times. Join. (6 sc, 6 ch-4 spaces)
R3: Into each ch-4 space work [sc, 3 dc, sc]. Join. (6 petals, 30 stitches)
Fasten off with a 20 cm tail.
Sew the intersection flowers into the open spaces between four motifs, taking care not to close the surrounding mesh.
Part 7: Scalloped Lace Border
Yarn: Ivory cotton.
The border is worked around the assembled rectangular bedspread.
Border R1: Join yarn at a corner. Work sc evenly around the entire bedspread, placing 3 sc in each outer corner. Join.
Border R2: Ch 3. Work dc in each stitch around, placing 3 dc in each corner stitch. Join.
Border R3: Ch 1. Repeat [sc in next stitch, ch 5, sk next 3 stitches] around. Adjust the last repeat at each corner to maintain an even pattern. Join.
Border R4: Into each ch-5 space work [sc, hdc, 5 dc, hdc, sc]. Repeat around and join.
Border R5: Sl st to the central dc of the first shell. Ch 1, sc in that stitch, ch 5, then sc into the central dc of the next shell. Repeat around. Join.
Border R6: Work [sc, 3 hdc, 5 dc, 3 hdc, sc] into each ch-5 space. Join and fasten off.
For a deeper border, repeat the arch-and-shell sequence after checking that the corners remain flat. The exact 10 cm target depends on the number of repeats and the blocked gauge.
Part 8: Matching Crochet Pillow Covers (Make 2)
Yarn: Ivory cotton.
For each pillow front, make four completed floral squares. Arrange them in a 2 × 2 layout.
Join the squares using the same chain-space method as the bedspread. The resulting panel should measure approximately 40 × 40 cm when each motif is blocked to 20 cm.
For the outer edge, work one round of sc, then one round of small shells:
Edging R1: Work sc evenly around the pillow front, with 3 sc in each corner. Join.
Edging R2: Repeat [sc in next stitch, sk next 2 stitches, 5 dc in next stitch, sk next 2 stitches] around, adjusting the repeats near corners. Join.
Fasten off and weave in all ends.
Attach a matching cotton fabric back, using an envelope closure or concealed zipper. A fabric back provides more stability than an open lace back and helps prevent the pillow insert from showing through the decorative motifs.
Assembly Instructions
- Complete the raised flowers. Make 110 six-petal centers, checking the diameter and stitch consistency of the first sample.
- Crochet the circular medallions. Complete one for each raised flower and block the first medallion before continuing production.
- Make the square lace frames. Match every frame to the same blocked dimensions, with identical numbers of mesh rounds.
- Attach the medallions to the frames. Center each circular component and sew it at 12 evenly distributed points.
- Attach the raised flowers. Position each flower over the medallion center and secure its central ring without flattening the petals.
- Arrange the bedspread. Lay out 110 completed motifs in 10 columns and 11 rows, with the right sides facing upward.
- Join the motif rows. Connect adjacent squares with the chain-space method, maintaining matching stitch positions along every seam.
- Add the intersection flowers. Sew small floral fillers into selected open spaces between motifs without tightening the mesh.
- Crochet the border and pillow fronts. Finish the bedspread with scalloped lace, then assemble the two coordinating pillow covers.
- Block and finish. Weave in loose ends, wet-block the finished bedspread to its measured dimensions, and allow it to dry flat.
The completed project consists of a joined floral lace bedspread and two coordinating decorative pillow fronts.
7 Technical Tips for a Professional Finish
- 1. Mark every corner. Place a stitch marker in each of the four corner spaces of the square frame. A missing corner increase can distort the square and prevent the edges from aligning during assembly.
- 2. Measure after blocking. Block the first complete motif to 20 × 20 cm and allow it to dry before measuring. A 1 cm difference per motif can create a 10 cm width discrepancy across ten columns.
- 3. Control the flower-center tension. Use a 3.0 mm hook for the raised flowers if the centers become loose or develop gaps. Excessively tight stitches, however, can make the petals curl inward.
- 4. Count the lace arches. The circular medallion should retain six evenly spaced arches throughout the main decorative rounds. A missing chain space changes the symmetry and can cause the flower to pull to one side.
- 5. Pin before sewing. Use at least 12 temporary attachment points around each circular medallion before permanently sewing it to the square frame. Uneven attachment tension can produce puckering around the flower.
- 6. Check the joining chains. Keep each joining chain at three stitches unless a measured sample demonstrates that a different length is needed. Chains that are too short create raised seams; chains that are too long allow the motifs to sag.
- 7. Secure the yarn tails. Weave each tail through at least 5–6 stitches, change direction, and weave through another section before trimming. A short, unsecured tail may work loose during washing or repeated handling.
How to Customize the Floral Lace Bedspread
The modular construction allows several changes without redesigning every component.
Make a Smaller Crochet Lace Blanket
Reduce the layout to six motifs across and eight motifs down. With 20 cm square motifs, the joined field measures approximately 120 × 160 cm before adding a border.
This arrangement requires 48 complete floral squares. It is suitable for a decorative throw rather than a full bedspread.
Change the Flower Color
Use cream for the lace frames and a muted accent color for the raised flowers. Dusty rose, sage green, or pale beige can make the flower centers more prominent while preserving the openwork structure.
For a more consistent appearance, select yarns with matching fiber content and similar yardage per gram.
Create a Lighter Bedspread
Replace DK cotton with a finer cotton yarn and a smaller hook. This produces more delicate lace but also reduces the dimensions of each motif.
Make a new gauge sample before calculating the required number of squares. Do not assume that the original 110-motif arrangement will still produce a 220 × 240 cm bedspread.
Add More Dimensional Flowers
A second layer of smaller petals can be attached beneath the central flower. Keep these additional petals within the central medallion so they do not interfere with the lace arches.
Test one complete flower before adding extra layers to the remaining motifs.
Frequently Asked Questions
Is this crochet floral lace bedspread pattern suitable for beginners?
The project is better suited to intermediate or advanced crocheters. It requires working in rounds, maintaining lace stitch counts, forming square corners, blocking motifs, and joining a large number of components.
A crocheter familiar with granny squares and basic lace stitches can practice the individual floral components before attempting the full bedspread.
How many flower motifs are needed for a queen-size bedspread?
The proposed layout uses 110 motifs arranged in ten columns and eleven rows. At a blocked size of 20 cm per motif, the joined field measures approximately 200 × 220 cm.
Adding a 10 cm border on every side gives a target size of 220 × 240 cm. Adjust the number of motifs to match the mattress dimensions and preferred overhang.
What yarn works best for a vintage crochet lace bedspread?
Smooth cotton yarn is a practical choice because it gives the lace stitches definition and responds well to blocking.
Mercerized cotton produces a more polished stitch surface, while softer cotton blends can create a more flexible fabric. Check the yarn’s care label before washing the completed project.
Can I use acrylic yarn instead of cotton?
Yes, although acrylic behaves differently during blocking and may not hold sharply defined lace openings in the same way as cotton.
Make a sample with the selected acrylic yarn and measure it after washing and drying according to the manufacturer’s instructions.
How do I calculate the total yarn required?
Weigh one completed, blocked motif and multiply its weight by the number of motifs.
For example: One complete motif: 24 g. Total motifs: 110. Motif yarn requirement: 2,640 g. Additional yarn: joining, border, pillow fronts, and allowance for waste.
Purchase enough yarn from the same dye lot when possible.
Should the motifs be joined before or after blocking?
Block the motifs before joining so the edges have consistent dimensions.
After assembly, block the entire bedspread again to settle the seams and shape the scalloped border.
How should I wash a crochet lace bedspread?
Follow the yarn manufacturer’s washing instructions. For a delicate cotton bedspread, gentle washing and flat drying help protect the openwork.
Avoid hanging the wet bedspread by one edge because the weight of the water can stretch the lace. Reshape the raised flowers while the fabric is still damp.
Conclusion
This crochet floral lace bedspread pattern combines raised six-petal flowers, circular openwork medallions, square mesh frames, and scalloped edging into a modular bed covering. The construction allows individual motifs to be measured and corrected before they are joined, reducing the risk of dimensional problems during final assembly.
Begin by crocheting one complete flower motif, attaching its lace frame, and blocking it to the intended dimensions. Record its finished measurements and weight before calculating the total yarn requirement.
Save the project reference to Pinterest and share completed motif samples on Instagram using #FloralLaceBedspread. For this particular design, would you keep the raised six-petal flowers in ivory or make them a contrasting color?









