Introduction
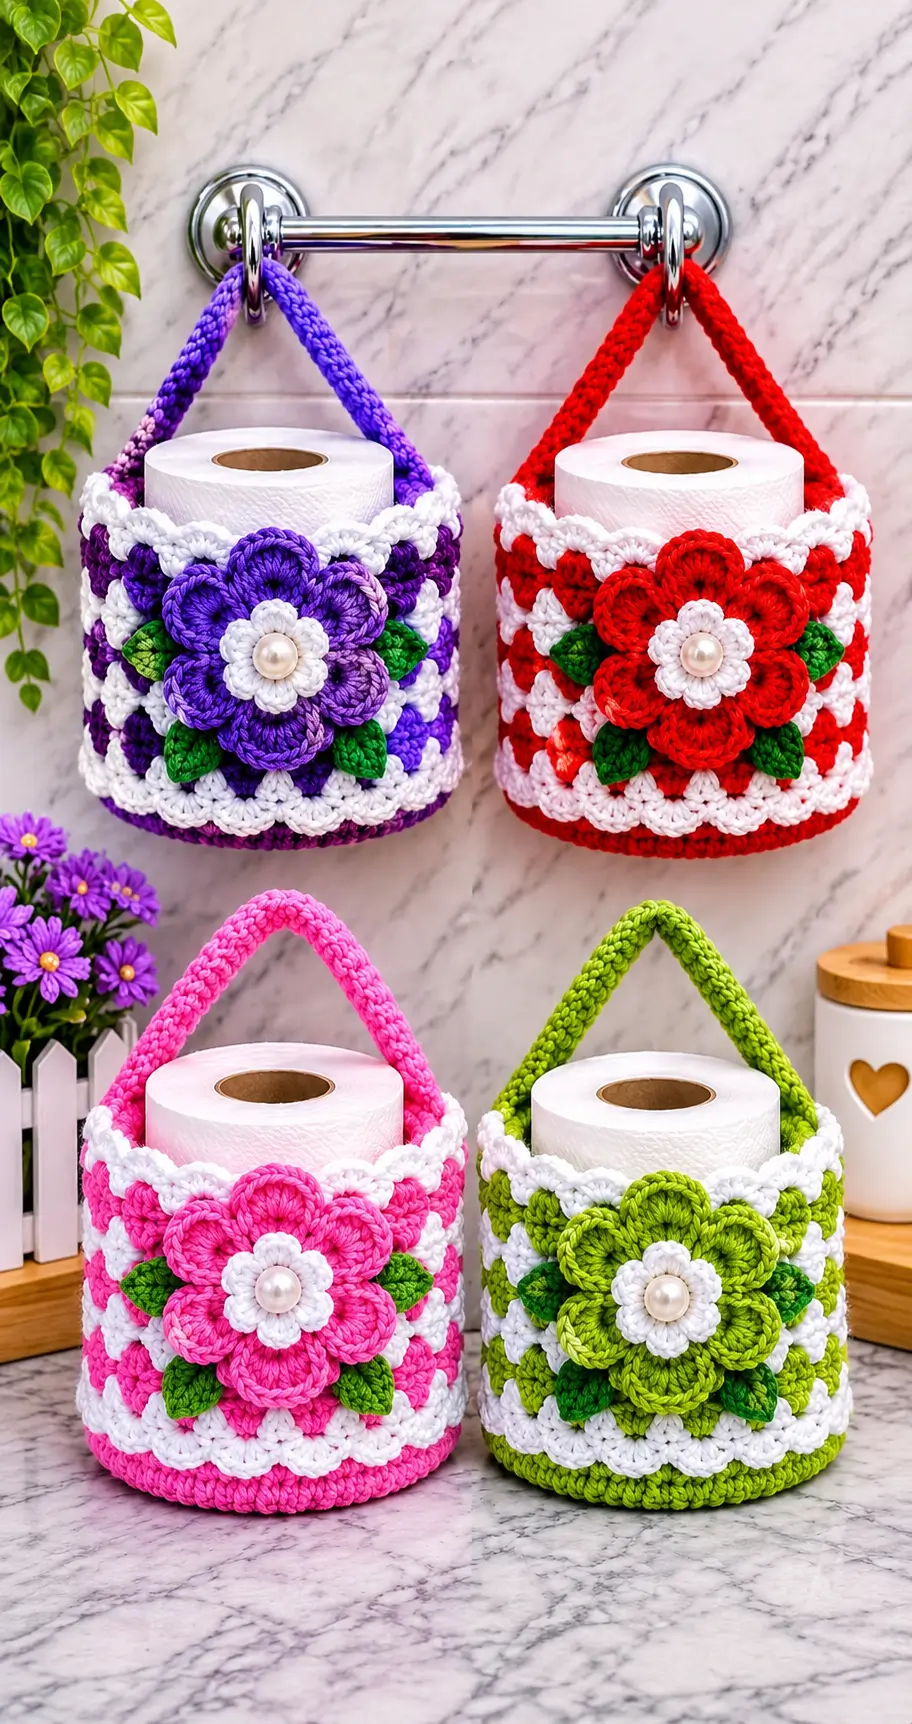
A spare toilet roll sits upright behind a five-petal blossom, so its holder needs a closed base and an unobstructed top. This crochet hanging toilet paper holder uses worsted cotton, a 5 mm hook, and a separate layered flower to make a single-roll basket roughly 13 cm across. The project suits a confident beginner familiar with working in the round. Hang it from an accessible rail to keep one replacement roll off the countertop.
The Design: What Makes This Floral Holder Different
The photo shows four colorways—purple, red, pink, and lime green—built from the same structure. Each basket has a flat circular bottom rather than a narrow pouch, which keeps the paper roll upright and prevents its lower edge from folding. White openwork bands interrupt the main-colored fabric, while a scalloped top border keeps the opening visually defined. This is a floral crochet toilet paper holder, not a stuffed animal or an amigurumi character.
The front decoration uses a separate five-petal blossom, a smaller white center, four pointed green leaves, and a pearl-like accent. Keeping those pieces removable during fitting makes placement more accurate. A common mistake in a crochet bathroom organizer is sizing the basket from the yarn label alone. Measure the actual roll and the completed base before building the walls.
Project Info at a Glance
| Skill level | Estimated time | Target finished size | Hook | Best for |
|---|---|---|---|---|
| Confident beginner/intermediate | 4–6 hours per holder; planning estimate | Approx. 13 cm diameter × 10–12 cm tall; strap about 40 cm | 5.0 mm, with optional 4.0 mm for motifs | Storing one conventional spare roll |
Sizing note: These are design targets, not measurements of the photographed sample. Tork lists a conventional roll diameter of 12 cm and width of 9.4 cm (product specification). A 13 cm basket leaves a small allowance for the paper and the fabric. Check your own roll before committing to the sidewall rounds.
Gauge target: About 13 single crochet stitches and 14 rows per 10 cm with a 5 mm hook, based on Lily Sugar’n Cream’s published gauge. Measure your actual crochet; the specified gauge is a yarn reference rather than a tested sample for this original pattern.
Materials and Tools
Yarn
The quantities below are planning estimates per holder, not verified consumption for the object shown. Make one basket before purchasing yarn for all four.
- Main color (purple, scarlet red, hot pink, or lime green) — worsted #4 cotton, approximately 55–70 g. Suggested yarn: Lily Sugar’n Cream The Original.
- White — worsted #4 cotton, approximately 20–30 g, for mesh bands, edge, and small center flower.
- Dark leaf green — worsted #4 cotton, approximately 8–12 g, for four leaves.
- Optional second flower shade — worsted cotton, approximately 5–10 g, to add a contrasting petal layer.
Yarnspirations identifies the suggested yarn as 100% cotton, worsted #4, in 71 g solid-color balls and 57 g ombré balls (manufacturer specifications). Individual yarn usage varies with gauge, strap length, and flower fullness.
Tools
- 5.0 mm crochet hook; optional 4.0 mm hook for tighter flower and leaf stitches.
- Four locking stitch markers and a measuring tape.
- Blunt tapestry needle, scissors, and rust-resistant pins.
- One 8–10 mm pearl-look bead, optional; stitch securely or substitute embroidery.
- One conventional toilet-paper roll for sizing.
- Sturdy towel rail or wall hook appropriate for a hanging textile basket.
No polyfill or safety eyes are required. The holder stays open and receives a removable paper roll.
Abbreviations
MR = magic ring; sc = single crochet; inc = two sc in one stitch; dec = single-crochet decrease; sl st = slip stitch; ch = chain; BLO = back loop only; hdc = half double crochet; dc = double crochet; tr = treble crochet; sk = skip; st = stitch; sp = space; R = round; RS = right side. US crochet terminology is used.
For an invisible decrease, insert the hook through the front loops of the next two stitches before completing one sc; this technique is listed for reference but is not needed in the open basket.
Pattern — Step by Step
Work R1–R9 in a continuous spiral, then join each round from R10 through R24 with a slip stitch into its first worked stitch. Begin each joined sc round with ch 1 and each mesh round with ch 2; neither the starting chain nor the joining slip stitch counts as a stitch. Change color at the join and place a stitch marker in the first worked stitch. Count each ch-1 mesh space as one position for the following round.
Circular Base and Basket Body (Make 1)
Yarn: main color, white stripes. Basis: original stitch calculations using the six-increase circle and manufacturer gauge; compare Tork’s roll dimensions.
Circular base
- R1: 6 sc in MR. (6)
- R2: Inc × 6. (12)
- R3: (1 sc, inc) × 6. (18)
- R4: (2 sc, inc) × 6. (24)
- R5: (3 sc, inc) × 6. (30)
- R6: (4 sc, inc) × 6. (36)
- R7: (5 sc, inc) × 6. (42)
- R8: (6 sc, inc) × 6. (48)
- R9: (7 sc, inc) × 6. (54)
Lay the disk flat without stretching it. Its target diameter is approximately 12.5–13.5 cm; if your roll cannot sit on it without overhanging, change gauge or add another six-stitch increase round and adjust subsequent stitch repeats. At the published yarn gauge, 54 sc around the edge gives an estimated circumference of 41.5 cm, or about 13.2 cm in diameter.
Basket walls
- R10: BLO sc all around in main color. (54)
- R11: Sc all around in main color. (54)
- R12: Change to white; (2 dc in next st, ch 1, sk next 2 sts) × 18. (36 dc + 18 ch-1 spaces = 54 positions)
- R13: Work 1 sc into each dc and each ch-1 space. (54)
- R14: Change to main color; sc all around. (54)
- R15: (2 dc in next st, ch 1, sk next 2 sts) × 18. (36 dc + 18 ch-1 spaces = 54 positions)
- R16: Work 1 sc into each dc and each ch-1 space. (54)
- R17: Change to white; (2 dc in next st, ch 1, sk next 2 sts) × 18. (36 dc + 18 ch-1 spaces = 54 positions)
- R18: Work 1 sc into each dc and each ch-1 space. (54)
- R19: Change to main color; sc all around. (54)
- R20: (2 dc in next st, ch 1, sk next 2 sts) × 18. (36 dc + 18 ch-1 spaces = 54 positions)
- R21: Work 1 sc into each dc and each ch-1 space. (54)
- R22: Change to white; (2 dc in next st, ch 1, sk next 2 sts) × 18. (36 dc + 18 ch-1 spaces = 54 positions)
- R23: Work 1 sc into each dc and each ch-1 space. (54)
The decorative gaps deliberately reveal the roll beneath the cotton bands. Do not insert stuffing or close the opening. For a shorter basket, omit R19–R23 as one complete five-round section, then work the trim into the 54 stitches remaining after R18.
White Scalloped Top Edge (Make 1)
Yarn: white. Basis: original 54-stitch shell repeat.
- R24: (1 sc in next st, sk 2 sts, 5 dc in next st, sk 2 sts) × 9; sl st to first sc. (9 shells; 54 worked stitches)
Fasten off and leave a 15 cm tail for weaving. The border uses exactly six base stitches per scallop, so the nine repeats consume all 54 stitches without a partial shell.
Reinforced Hanging Strap (Make 1)
Yarn: main color. Basis: original rectangular strap construction.
- Foundation: Ch 7. (7 ch)
- Row 1: Sc in second ch from hook and each remaining ch; ch 1, turn. (6 sc)
- Rows 2–60: Sc in each of 6 sts; ch 1 and turn after Rows 2–59 only. (6 sc each row)
Work additional complete six-stitch rows if the rail needs a longer loop. The target strap length is approximately 40 cm, but row gauge and the hanging point control the final drop. Fasten off, leaving a 30 cm sewing tail at each end; attach a separate tail to the starting end if needed. Fold the strap in half temporarily to check that neither side twists.
Large Five-Petal Flower (Make 1)
Yarn: main color; optional contrast for petals. Basis: original enlargement of a six-increase circle; compare the layered-petal concept at Crochet ‘n’ Create.
- R1: 6 sc in MR. (6)
- R2: Inc × 6. (12)
- R3: (1 sc, inc) × 6. (18)
- R4: (2 sc, inc) × 6. (24)
- R5: (3 sc, inc) × 6. (30)
- R6: (Sl st in next st, sk next 2 sts, [1 hdc, 2 dc, 3 tr, 2 dc, 1 hdc] in next st, sk next 2 sts) × 5. (5 petals; 50 worked stitches)
Keep the petal clusters facing outward. Each repeat consumes six stitches from R5, creating five equal lobes around the circular flower base. Fasten off with a 25 cm tail for sewing. If you work a second large bloom as a lower layer, make the same six rounds in a darker shade, then rotate the petals before stitching the centers together; this is optional, not needed for the count.
Small White Center Flower (Make 1)
Yarn: white. Basis: original six-petal center on a six-stitch magic ring.
- R1: 6 sc in MR. (6)
- R2: Inc × 6. (12)
- R3: (Sl st in next st, [1 hdc, 2 dc, 1 hdc] in next st) × 6. (6 petals; 30 worked stitches)
Fasten off with a 20 cm tail. Center this white flower over the large blossom so the white petals remain visible around the bead location. A six-petal center contrasts with the five larger lobes instead of trying to align every edge.
Pointed Leaves (Make 4)
Yarn: dark green. Basis: original two-sided foundation-chain oval.
- Foundation: Ch 10. (10 ch)
- R1: Starting in second ch from hook, work sc, hdc, dc in next 2 ch, tr in next ch, dc in next 2 ch, hdc in next ch, 3 sc in last ch; rotate to work on the unused side of the foundation chain, then hdc, dc in next 2 ch, tr in next ch, dc in next 2 ch, hdc, sc. (19 sts)
- R2: Sc once in each stitch around; join with sl st. (19 sc)
Fasten off, leaving a 20 cm sewing tail per leaf. Gently pinch one end to emphasize the point. Make four identical leaves, then distribute two to the left and two to the right behind the large flower, as in the picture.
Pearl-Look Flower Center (Make 1)
Material: optional 8–10 mm decorative bead; non-crochet accessory.
Sew the bead to the white flower center using doubled strong thread, going through the bead and fabric multiple times. For a textile-only alternative, make three or four tight white or cream French knots and omit the bead. Decorative beads are not suitable on an item accessible to small children or pets if they could detach.
Color Variations: Four Holders from One Pattern
Follow the same body, strap, bloom, white trim, and leaves for each photograph-inspired version. The upper-left basket uses violet and purple with white; upper-right uses red and white; lower-left uses hot pink and white; lower-right uses lime green and white. All four have dark green leaves and a pale central accent. For the purple model, mix two shades in the flower petals to reproduce the color depth. When changing the wall color, attach the new strand at the first stitch of the next round and hide tails on the inside of the basket. No additional anatomical components are involved.
Assembly
- Check the base. Place a real spare roll on the circular disk to verify that the full paper diameter fits inside its edge before treating the wall height as final.
- Shape the body. Stand the basket upright, smooth out the BLO corner at R10, and test that the roll slides in vertically without pushing the white bands outward.
- Mark the front. Lay the basket on a flat surface with the decorative mesh aligned and mark the center of the area facing the room.
- Attach the face decoration. Position the large five-petal blossom at the marked front and pin it without covering the top opening.
- Add the small flower. Sew the white center through the large flower’s central circle, taking several passes through the backing fabric.
- Position the leaves. Tuck two leaves behind the left petals and two behind the right petals, then secure the leaf bases to the body.
- Add the pearl or knots. Sew the pearl-look bead to the white center or embroider the knot cluster after the flower has been anchored.
- Attach the strap. Sew one strap end to the inside upper left rim and the other to the inside upper right rim at opposite points, about 27 stitches apart.
- Test the hanging load. Insert a fresh roll, hang the strap on a secure rail, and check that the basket remains level and the attachment stitches do not spread.
- Finish the seams. Weave every tail back through at least 5 cm of crochet in more than one direction, trim the excess, and shape the petals and scallops.
The finished piece is an open-top, single-roll hanging storage basket with a front floral appliqué.
7 Technical Tips
- Stitch-marker drift: Missing the first stitch in a spiral can turn the 54-stitch wall into 53 or 55. Move a locking marker into the first stitch of every base round and recount after R9.
- Base diameter: A 12 cm roll will distort a base smaller than its outside diameter. Measure the disk after R9 and aim for approximately 12.5–13.5 cm before turning upward.
- Openwork snagging: Loose chain spaces can catch an exposed paper edge during removal. Make each ch-1 space similar in width to one sc and work the next round directly into the space.
- Strap stretching: A loosely crocheted 6-stitch strap can elongate under a damp or heavy load. Test the filled basket on its actual rail and shorten or reinforce the strap if the opening tilts.
- Flower rotation: A five-petal flower can look off-center if one petal points downward behind the leaves. Pin the top petal at the twelve-o’clock position before sewing the center.
- Bead detachment: A single loose thread can release an 8–10 mm bead into the bathroom. Sew through the bead multiple times with doubled thread, or replace it with embroidered knots.
- Tail visibility: Short yarn tails can work through the open white mesh and appear on the front. Weave each end for at least 5 cm along a dense main-color row rather than through the openwork gaps.
Conclusion
Measure the roll you intend to store before repeating this project in another color. A conventional 12 cm roll fits the target basket only when the yarn gauge and finished base agree with the stated dimensions; larger household rolls may require extra increase rounds and revised side repeats. The crochet hanging toilet paper holder can be made in violet, red, pink, or lime green without changing the basic construction. For the next sample, test the strap with a full roll and photograph the basket both hanging and standing. Save the finished project to Pinterest and share an assembly view on Instagram with #FloralRollBasket. Which of the four flower colors gives the clearest contrast against the white scalloped rim?









