Introduction
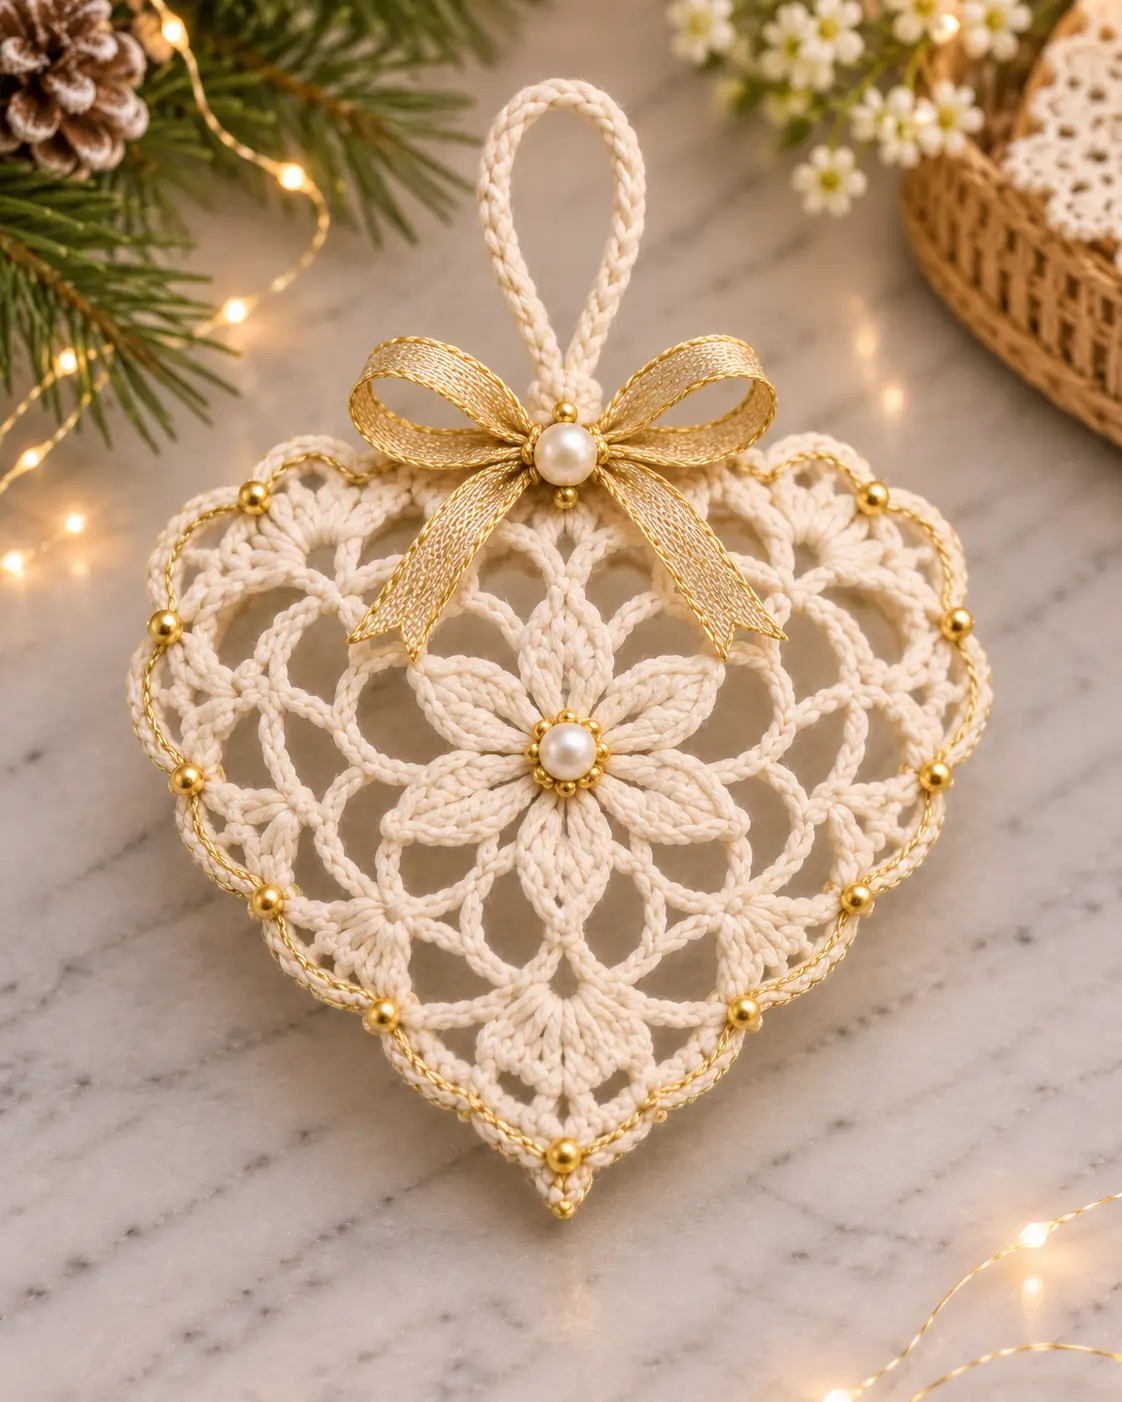
A lace heart only keeps its pointed base when the upper lobes, center flower, and outer arches share the tension correctly. This crochet lace heart ornament pattern uses ivory cotton, open chainwork, a six-petal floral center, gold beads, a pearl accent, and a hanging loop. The project is designed as a lightweight Christmas tree ornament and works best with fine cotton yarn and a small crochet hook.
The Design: What Makes This Crochet Heart Different
The ornament combines three structures instead of relying on one solid heart shape. A central six-petal flower creates the visual anchor. Open chain arches extend outward from that flower, forming a lightweight lace framework, while denser stitch groups define the two rounded upper sections and the pointed lower tip.
The outer edge is deliberately stronger than the interior. That difference matters because beads, metallic thread, and the hanging ribbon add weight around the perimeter. A weak outer round can stretch into an oval after the ornament is suspended.
Gold beads are positioned mainly at structural junctions rather than scattered across the lace. This keeps the decoration balanced and allows the ivory crochet pattern to remain visible.
Project Info at a Glance
| Skill Level | Construction | Suggested Size | Hook | Best For |
|---|---|---|---|---|
| Intermediate | Round center with shaped lace heart | 14–18 cm | 2.0–2.75 mm | Christmas ornament, gift tag, window decoration |
Materials and Tools
Yarn
- Ivory or warm cream — crochet cotton or lightweight cotton yarn — main heart
- Metallic gold thread — optional — outer-edge accent
Decorations
- Small gold beads — approximately 3–5 mm
- 1 pearl bead — approximately 8–12 mm for the flower center
- 1 pearl bead — optional for the ribbon center
- Gold ribbon — approximately 6–10 mm wide
Tools
- 2.0–2.75 mm crochet hook
- Yarn needle
- Fine sewing needle
- Matching sewing thread
- Scissors
- Blocking pins
- Blocking mat
- Fabric stiffener or diluted starch — optional
Abbreviations
- MR — magic ring
- ch — chain
- sc — single crochet
- hdc — half double crochet
- dc — double crochet
- tr — treble crochet
- sl st — slip stitch
- sp — space
- st/sts — stitch/stitches
Construction Overview
The ornament is worked from the center outward. First crochet the central flower. A ring of chain arches is then added behind the petals. Additional arches and elongated stitch groups transform the circular flower into a heart.
The final perimeter establishes the two upper curves and lower point. Gold beads, metallic thread, ribbon, and the hanging loop are added after blocking.
Make one undecorated sample first. Fine cotton can change considerably after wet blocking, so the final dimensions should be measured only after the lace has dried.
Central Six-Petal Flower
Round 1
With ivory yarn, make an MR.
Work 12 sc into the ring.
Pull the ring closed and join with a sl st. (12 sts)
Round 2 — Petal Foundations
Work:
*sc in next st, ch 6, skip 1 st.*
Repeat six times.
You should have six evenly spaced ch-6 loops.
Round 3 — Flower Petals
Into each ch-6 loop work:
sc, hdc, 2 dc, 2 tr, 2 dc, hdc, sc.
Repeat in all six loops.
Join with a sl st.
The result should be a six-petal flower with pointed oval petals.
Flower Center
The center can remain crocheted, but a pearl creates the raised focal point shown in the design.
Position an 8–12 mm pearl bead over the center ring.
Sew through the crochet center several times with matching thread. Keep all securing stitches behind the pearl.
Small gold seed beads can be arranged around the pearl if additional definition is wanted.
First Openwork Ring
Join ivory yarn behind one flower petal.
Work:
*sc between two petals, ch 8.*
Repeat around the flower.
Join to the first sc.
There should be six large arches surrounding the flower.
Second Lace Ring
Move to the center of the first ch-8 arch.
Work:
*sc into the arch, ch 5, sc into the same arch, ch 7.*
Continue around, distributing the arches evenly.
The smaller ch-5 sections create attachment points. The longer ch-7 sections provide the open spaces visible between the flower and outer heart.
Beginning the Heart Shape
Mark three locations before continuing:
- Top center
- Lower center
- Approximate widest point on each side
The top center will divide into two rounded lobes. The lower marker becomes the heart point.
Do not depend only on stitch counting at this stage. Place the lace flat after every section and compare both halves.
Upper Left Heart Lobe
Join yarn near the upper center.
Across the next available arches, gradually increase stitch height:
sc, hdc, dc, 2 tr, 3 tr, 2 tr, dc, hdc, sc.
Between dense groups, use ch-4 to ch-6 arches.
The tallest stitches should sit near the outermost curve of the lobe rather than directly at the top-center indentation.
Upper Right Heart Lobe
Repeat the same construction in reverse.
Count the arches used on the first lobe and use the same number on the second.
Lay the work flat before continuing. Both lobes should have approximately equal height and width.
Creating the Top Indentation
The indentation between the heart lobes should remain narrow.
At the top center, work a short joining section:
sc, ch 2, sc.
A long chain at this position can remove the recognizable heart shape.
Side Lace Sections
Continue downward from each upper lobe using progressively smaller arches.
A useful sequence is:
ch 7, ch 7, ch 6, ch 6, ch 5.
Anchor each arch with sc into the next structural point.
Repeat the sequence symmetrically on the opposite side.
This gradual reduction pulls the lace toward the lower tip without producing an abrupt angle.
Lower Floral Sections
The image-inspired design contains denser decorative sections around the lower sides.
Into a suitable ch-6 space work:
sc, hdc, 3 dc, 2 tr, 3 dc, hdc, sc.
Repeat on the corresponding space on the opposite side.
These shell-like sections visually connect the central flower to the outer perimeter.
Forming the Lower Point
The bottom of the ornament needs a defined point rather than a rounded curve.
At the lowest marked space work:
sc, hdc, dc, tr, ch 3, tr, dc, hdc, sc.
The ch-3 section forms the tip.
On the next edging round, work directly into that ch-3 space to reinforce the point.
Outer Structural Round
Work around the entire heart with ivory.
Across ordinary chain arches, work approximately:
3–5 sc per arch, depending on arch length.
Do not automatically place the same number of stitches into every arch. Longer upper curves need more stitches than short sections near the lower point.
At the bottom point work:
2 sc, ch 2, 2 sc.
At the top indentation, use one tight sc or sl st to preserve the V-shaped dip.
Decorative Outer Arches
The perimeter can now receive the small rounded loops visible around the ornament.
Work:
*sc in next structural point, ch 5, skip the next suitable section.*
Repeat around.
Adjust the spacing around both upper lobes so the arches follow the curve without overlapping.
Use a slightly smaller ch-4 arch immediately beside the upper indentation if necessary.
Gold Metallic Accent
Hold a fine metallic gold thread together with the ivory yarn for the final perimeter, or surface crochet the metallic thread afterward.
Surface slip stitches provide more control because they add gold only where needed.
Work the metallic thread along the outside of the decorative arches without tightening it.
The gold line should follow the ivory edge rather than contract it.
Adding the Gold Beads
Block the heart before adding beads.
Position one small gold bead at selected junctions around the outer edge. Regular spacing creates a cleaner result than placing a bead on every stitch.
For a 14–18 cm heart, approximately 10–16 perimeter beads usually provide enough decoration without making the lace heavy.
Sew each bead independently with matching thread.
Pass through each bead at least twice before knotting securely on the back.
Optional Beaded Flower Center
Surround the central pearl with several small gold beads.
Arrange them evenly around the pearl before sewing.
Keep the bead ring smaller than the base of the six petals. If the bead cluster spreads onto the petals, the flower center loses definition.
Crochet Hanging Loop
The hanging loop should attach to structural stitches rather than directly to the ribbon.
Join ivory yarn at the top center behind the heart.
Ch 30–40, depending on the required loop length.
Sl st back into the same attachment area.
For a thicker cord, work one sl st into every chain before fastening off.
Alternatively, crochet a narrow Romanian cord for a firmer hanging loop.
Gold Ribbon Bow
Cut approximately 25–35 cm of narrow gold ribbon.
Form two loops and two tails.
Secure the center with matching sewing thread.
Position the bow over the base of the hanging loop.
Sew the bow to the crochet structure rather than relying on adhesive.
Add a pearl bead to the bow center and place small gold beads above and below it if desired.
Blocking the Heart
Blocking determines whether the finished ornament looks like a heart or a distorted circle.
Pin the lower point first.
Next pin the top indentation.
Pull both upper lobes outward equally and pin their widest points.
Then pin the lower side curves.
Measure from the center flower to each side. The measurements should be nearly identical.
Arrange the remaining chain arches only after the main heart outline has been established.
Optional Stiffening
A hanging ornament benefits from moderate stiffness.
Use a commercial fabric stiffener or a diluted starch solution suitable for the selected fiber.
Apply only enough product to hold the lace open.
Re-pin the heart immediately after applying the stiffener.
Keep the pearl, metallic ribbon, and beads away from wet stiffening solution when their finishes are not water resistant.
For that reason, stiffening before adding the final embellishments is often the safer construction order.
Size Adjustments
| Finished Size | Suggested Yarn | Suggested Hook | Use |
|---|---|---|---|
| 8–10 cm | Crochet thread | 1.25–1.75 mm | Small tree ornament |
| 12–14 cm | Fine cotton | 1.75–2.25 mm | Gift decoration |
| 14–18 cm | Sport/fine cotton | 2.0–2.75 mm | Large tree ornament |
| 20–25 cm | DK cotton | 3.0–3.5 mm | Window or wall decoration |
Making a Set of Crochet Hearts
For a coordinated Christmas set, keep the ivory crochet structure consistent and change only the embellishment color.
- Ivory and antique gold
- Ivory and burgundy
- Ivory and forest green
- White and silver
- Champagne and pearl
Make one master heart first and record the number of arches used along each section. Use those notes for every additional ornament so the finished set remains consistent.
Using the Heart as a Gift Decoration
Leave the hanging loop slightly longer and attach the ornament to gift ribbon.
After the package is opened, the heart can be removed and used as a Christmas tree decoration.
For this application, avoid very heavy beads. Lightweight decorations place less strain on the open chain sections when the ornament hangs vertically.
Alternative Without Beads
The ornament can be made entirely from crochet.
Replace each gold bead with a small picot:
ch 3, sl st into the first chain.
Replace the pearl center with a small crocheted bobble or popcorn stitch.
A chain bow can also replace the metallic ribbon.
This version is useful when the ornament needs to remain washable.
Assembly
- Crochet the six-petal ivory center flower and check that all petals have equal length.
- Add the first and second openwork rings behind the flower.
- Shape the two upper lobes symmetrically and establish the narrow center indentation.
- Work down both sides with gradually shorter chain arches.
- Create the denser lower decorative sections and form the pointed bottom.
- Add the structural perimeter and decorative outer arches.
- Block the heart to its final measurements and apply optional stiffener before embellishing.
- Sew the center pearl and gold perimeter beads securely to structural stitches.
- Add the crochet hanging loop and sew the gold ribbon bow over its attachment point.
- Weave in every yarn end, inspect the back for loose threads, and reshape the lace before hanging.
The completed ornament should hang vertically with two balanced upper lobes, an open floral center, and a clearly defined lower point.
7 Technical Tips
- Keep the two upper lobes within approximately 5 mm of each other. Unequal lobes become much more obvious after the hanging loop is attached.
- Do not tighten the outer metallic thread. A metallic edging that is shorter than the ivory perimeter will curl the ornament inward even after blocking.
- Keep the bottom ch-2 or ch-3 point centered beneath the flower. A point shifted by one structural arch makes the entire heart appear asymmetrical.
- Attach beads only after blocking. Blocking a heavily beaded ornament can distort the lace and may damage metallic or pearl finishes.
- Use a hanging loop at least 7–10 cm long when folded. A very short loop can force the ribbon against a Christmas-tree branch and tilt the heart forward.
- Secure the large center pearl through dense center stitches. Sewing it only through chain spaces can stretch the flower center and create an oversized hole.
- Check every five or six outer arches on a flat surface. If the edge begins to ripple, reduce either the chain length or the number of perimeter stitches before continuing.
Care and Storage
Store the ornament flat between sheets of acid-free tissue paper or in a rigid ornament box.
Avoid folding the lower point or crushing the central flower.
If the lace loses its shape, lightly dampen the cotton section and block it again. Remove or protect embellishments first if their finish is sensitive to moisture.
Do not hang the ornament from the ribbon bow. Always use the crocheted top loop because it transfers the weight directly into the structural edge.
Conclusion
This crochet lace heart Christmas ornament pattern uses a six-petal floral center, open chainwork, shaped upper lobes, a pointed lower section, gold accents, pearl details, and a structural hanging loop. Make the undecorated heart first, block it carefully, then add beads and ribbon after the final outline is stable. The same construction can be scaled down for tree decorations or enlarged for window ornaments. Save the finished project to Pinterest or share your version on Instagram with #LaceHeartCrochetOrnament. For this heart specifically, would you keep the antique-gold details or replace them with silver and white pearls?









