Introduction
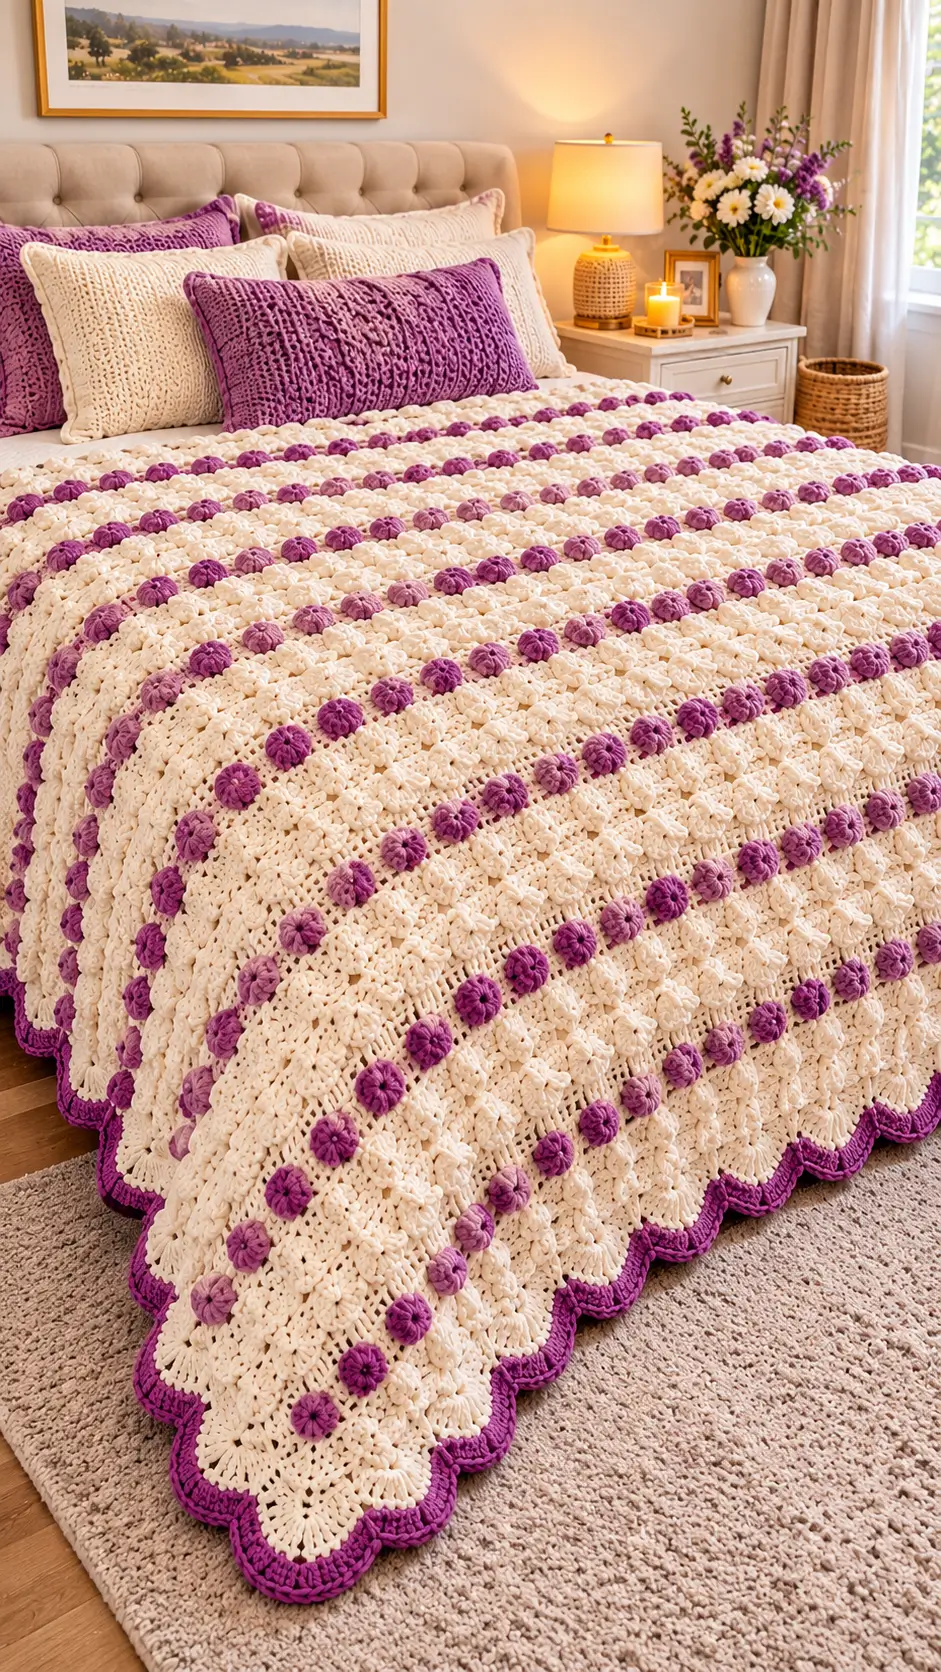
Purple rosettes travel across this ivory bedspread in staggered lines, while a dark scalloped border contains the textured field. This 3D flower crochet blanket pattern uses worsted-weight yarn, a 5.5 mm hook, and separate six-petal appliqués to approximate the photographed design. The planned finished size is about 180 × 220 cm, with intermediate-level skills required. Separate flowers make the arrangement adjustable without changing the main blanket’s stitch count.
The Design: What Makes This Floral Bedspread Different
The cream foundation uses half-double crochet for a stable rectangular shape, with raised bobbles added on wrong-side rows. That construction reproduces the photograph’s densely textured appearance without requiring hundreds of joined squares. The bobbles remain attached to the fabric, so there are fewer structural seams to stretch under the blanket’s weight.
Purple rosettes are made separately, then sewn over a staggered placement grid. You can alter their spacing before committing to the arrangement; the photographed bedspread suggests diagonal floral tracks rather than isolated centered medallions. A deeper plum scalloped crochet blanket border frames the edges and visually links the repeated flowers.
The frequent mistake with a floral crochet bedspread is attaching bulky blossoms before the base has been measured and squared. That makes later adjustments harder and can pull an otherwise flat panel into ridges.
Project Info at a Glance
| Item | Specification |
|---|---|
| Skill level | Intermediate: turning rows, bobbles, joined rounds, appliqué |
| Time | Multi-session project; no measured completion time available |
| Planned finished size | Approximately 180 × 220 cm (71 × 87 in) |
| Main panel | 242 stitches × 212 rows |
| Hook | 5.5 mm (I-9), or size required for gauge |
| Yarn | Medium/worsted #4, smooth washable fiber |
| Target gauge | 14 hdc and 10 rows = 10 × 10 cm, before blocking |
| Best for | Large decorative bed throw or bedspread |
| Construction | One continuous rectangle plus 168 attached flowers |
The target is a proposed project specification, not a measured feature of the supplied photo. Check finished dimensions against your actual mattress and desired overhang before buying all the yarn.
Materials and Tools
Yarn
- Warm ivory or cream — medium/worsted #4 — 3,000–3,500 g estimated for the main field; example yarn: Red Heart Super Saver in an ivory shade.
- Deep magenta or plum — medium/worsted #4 — 350–450 g estimated for flower centers, flowers, and the scalloped edge.
- Dusty lavender or orchid — medium/worsted #4 — 150–250 g estimated for a second flower shade.
These are planning allowances, not tested consumption figures. Use the same yarn family for all three shades to reduce differences in stretch, washing behavior, and stitch height. A yarn label’s meterage matters as much as its ball weight. For example, a 100 g ball containing 180 m is not interchangeable, skein for skein, with a 100 g ball containing 300 m.
Tools
- 5.5 mm crochet hook for the blanket and flowers.
- Locking stitch markers, at least four for corners and additional markers for the placement grid.
- Tapestry needle with an eye large enough for worsted yarn.
- Sharp scissors, measuring tape, digital kitchen scale, and blocking pins.
- Washable contrast thread or removable stitch markers for marking floral centers.
No stuffing or safety eyes are used. The matching pillows in the photograph are styling accessories and are not included in the blanket’s yarn estimates.
Gauge and Yarn Calculation
Make a 20 × 20 cm sample with several plain half-double-crochet rows and at least one bobble row. Measure a 10 × 10 cm area inside the sample; aim for 14 hdc across and 10 rows vertically. If the square is wider than specified, try a smaller hook. For a narrower square, try a larger hook. Record the weight of the full 20 × 20 cm sample, including its bobbles.
For a planned area of 180 × 220 cm, there are 99 sample-sized areas of 20 × 20 cm. If the sample weighs 28 g, the simple estimate is 99 × 28 = 2,772 g. Adding 10% for finishing and variation gives approximately 3,050 g of cream. Weigh a separate completed purple flower, multiply by 168, and add an allowance for the perimeter edging. The border and appliqué consumption should not be guessed from the cream swatch.
Abbreviations and Special Stitches
- MR: magic ring.
- ch: chain.
- sc: single crochet (US terms).
- hdc: half double crochet.
- dc: double crochet.
- sl st: slip stitch.
- inc: two sc in one stitch; used in the flower center.
- sk: skip.
- st/sts: stitch/stitches.
- RS/WS: right side/wrong side.
- FO: fasten off.
- bobble: five unfinished dc in the same stitch, closed together to form one stitch.
- puff: four elongated yarn-over pull-up motions in one stitch, closed together.
- shell: five dc worked into one foundation stitch.
To make a five-dc bobble, work five unfinished dc into one stitch, leaving the final loop of each on the hook. Yarn over and pull through all six loops, then ch 1 loosely to secure it; that locking chain does not count as a stitch. Bobbles rise on the side facing away from the hook, so place them on WS rows.
To make a four-pull-up puff, yarn over, insert the hook, and draw a long loop up to hdc height; repeat four times in the same stitch, yarn over, draw through all nine loops, and ch 1 to secure. The locking chain does not count separately.
An invisible decrease combines two front loops into one stitch, but this rectangular design requires no decreases.
Pattern — Step by Step
US crochet terminology. Work the blanket in turned rows, not a spiral. Flowers are worked in joined rounds; the outer border is crocheted continuously around the finished rectangle. The counts below describe an original construction and should be checked against your gauge swatch.
Cream Textured Blanket Panel (Make 1)
Yarn: warm ivory. Method: original stitch-count design; bobble orientation follows the Sarah Maker bobble-stitch tutorial.
Foundation: Ch 244.
Row 1 (RS): Hdc in the third ch from the hook and in every remaining chain. (242 hdc)
Row 2 (WS): Ch 1, turn; hdc in each stitch across. (242 hdc)
Row 3 (RS): Ch 1, turn; hdc in each stitch across. (242 hdc)
Row 4 (WS, bobble row): Ch 1, turn; hdc in first 6 sts; [bobble in next st, hdc in next 11 sts] × 19; bobble in next st; hdc in last 7 sts. (222 hdc + 20 bobbles = 242 sts)
Rows 5–11: Ch 1, turn; hdc in each stitch across every row. (242 hdc per row)
Row 12 (WS): Repeat the Row 4 bobble sequence. (222 hdc + 20 bobbles = 242 sts)
Rows 13–19: Repeat the plain hdc row. (242 hdc per row)
Row 20 (WS): Repeat the Row 4 bobble sequence. (242 sts)
Rows 21–203: Continue plain hdc on all remaining rows except every eighth row in the bobble sequence: Rows 28, 36, 44, 52, 60, 68, 76, 84, 92, 100, 108, 116, 124, 132, 140, 148, 156, 164, 172, 180, 188, and 196. Each plain row has (242 hdc); each listed bobble row has (222 hdc + 20 bobbles = 242 sts).
Row 204 (WS): Repeat the bobble sequence. (242 sts)
Rows 205–212: Ch 1, turn; hdc in each stitch across. (242 hdc per row)
FO: Cut yarn, pull the tail through, and leave at least 15 cm for weaving.
This arrangement contains 26 bobble rows: Rows 4 through 204, increasing by eight. At 20 bobbles per row, the complete panel contains 520 cream bobbles. A bobble replaces one existing stitch, so the width remains 242 stitches throughout.
Check the panel width at Rows 20, 100, and 212. If it increases or decreases, inspect the turning edge and avoid working into the bobble locking chain as an extra stitch. The panel should lie flat before the flowers are attached.
Raised Purple Rosettes (Make 168)
Yarn: plum or lavender. Method: original six-petal arrangement using standard MR, sc increases, and puff stitches; compare the general flower structure with the Easy Crochet six-petal appliqué tutorial.
R1: Work 6 sc in MR; pull tight and join with sl st to first sc. (6 sc)
R2: Ch 1; 2 sc in each stitch around; join with sl st. (12 sc)
R3: [Sl st into next sc; ch 2; work one four-pull-up puff in next sc; ch 2; sl st into that same sc] × 6. (6 raised petals, using all 12 R2 stitches)
FO: Leave a 20 cm tail for sewing and weave the starting tail into the center.
The first round provides a compact core and the second round supplies exactly two attachment stitches for each petal. Raised puff loops rise above that center, producing a rounded floral profile rather than a flat six-petal disk. Test one flower with the chosen yarn; its diameter will vary with tension. Aim for roughly 4–6 cm, but treat that as a design goal rather than a verified outcome.
Use both plum and lavender to reflect the picture’s variation. For example, make 112 plum rosettes and 56 lavender rosettes; the count still totals 168. If those proportions look too regular on the bed, change the color sequence before sewing.
Marking the Staggered Floral Layout
Materials: removable markers and measuring tape. This is a placement stage, not an added crochet round.
With the blanket RS up and the top edge horizontal, measure positions from the upper-left corner of the main panel, excluding the edging. Mark 14 horizontal placement lines, at 12, 26, 40, 54, 68, 82, 96, 110, 124, 138, 152, 166, 180, and 194 cm from the top. Each line receives 12 flowers.
On the first, third, fifth, and other odd-numbered placement lines, set flower centers 8, 22, 36, 50, 64, 78, 92, 106, 120, 134, 148, and 162 cm from the left edge. For each even-numbered line, shift all centers 6 cm to the right, giving positions 14 through 168 cm. This creates diagonal visual tracks rather than rigid vertical columns.
The grid contains 14 × 12 = 168 rosettes. Position the flowers with their centers over the markers, then photograph the arrangement from above to check spacing. Minor shifts of 1–2 cm are acceptable when the stitch texture changes the apparent alignment. Keep appliqué edges away from the future scalloped border.
Cream Foundation Border (Round 1)
Yarn: ivory. Method: original edge count for the 242-stitch × 212-row panel.
Join ivory at a corner. Work one sc into each of the four corner positions, with 240 sc between corners along each short end. Along each long side, distribute 318 sc between corners: work approximately three sc for every two interior row ends, adding three further sc at evenly separated points if necessary.
Join with a sl st to the first sc. (1,120 sc total: 480 short-edge sc + 636 long-edge sc + 4 corner sc)
Mark the four corner stitches. Confirm that each short side has 240 noncorner stitches and each long side has 318 noncorner stitches before working the shells. If the border cups or ripples, adjust the pickup distribution and repeat this round; the target counts matter for the next round.
Purple Scalloped Border (Round 2)
Yarn: deep plum. Method: standard five-dc scallop adapted to the exact border counts above.
Join plum in a marked corner stitch. Work 7 dc into that corner. Across the next short side, repeat [sc in next sc, sk 2 sc, 5 dc in next sc, sk 2 sc] × 40. (40 five-dc shells)
Work 7 dc in the next corner stitch. Across the next long side, repeat the same six-stitch sequence × 53. (53 shells)
Repeat these corner and edge instructions along the second short side (40 shells), then the second long side (53 shells). Join with sl st to the top of the first dc. (186 five-dc shells and 4 seven-dc corner fans)
FO and leave a 15 cm tail. No additional picot or fringe is required; the shell groups create the purple scalloping visible in the reference. If a corner begins to flare, test a five-dc corner fan in a small border swatch before making a change to all four corners.
Assembly — 10 Steps
- Finish the base panel. Verify 242 stitches across the final row and confirm the planned width and length against your gauge.
- Prepare its shape. Lay the panel flat and align the four corners, checking that neither diagonal is visibly distorted.
- Mark the floral grid. Use the centimeter coordinates above, excluding the border allowance.
- Arrange the rosettes. Distribute 112 plum and 56 lavender flowers over the marked positions, adjusting neighboring colors where necessary.
- Pin every flower. Keep each rosette’s center exactly over its marker and leave the petals free for a raised profile.
- Sew the motifs. Use each 20 cm tail to attach the flower center and one or two hidden points beneath the petal bases; do not flatten the upper puff loops.
- Work the cream foundation border. Establish the 1,120-stitch perimeter with the marked corner stitches.
- Finish the plum scallops. Crochet the 186 shells and four corner fans, then inspect for twists at the corner transitions.
- Weave all yarn ends. Pass tails through several dense stitches on the WS and reverse direction once before trimming.
- Block and measure. Follow the yarn label’s care instructions, shape the rectangle without crushing the flowers, and measure after drying.
The result is one rectangular textured blanket with 168 attached rosettes and a continuous scalloped border.
Seven Technical Tips
- Stitch-marker drift: Place a removable marker every 20 stitches along the 242-stitch rows, then count the last two separately. A missed turning stitch can alter the entire width before the next bobble row.
- Uneven bobbles: Each five-dc bobble must close through six loops and occupy only one stitch. Working into its locking chain on the next row produces an accidental increase.
- Flower-center distortion: Keep the MR closed before adding the second round of 12 stitches. An open center makes all six petals spread unevenly under sewing tension.
- Incorrect face orientation: Work every bobble row with the WS facing you. Otherwise the cream raised dots will project toward the blanket’s reverse side.
- Tension variation: Compare a 10 × 10 cm area against the target of 14 hdc and 10 rows. A difference of one stitch per 10 cm can change a wide panel by more than 10 cm.
- Appliqué puckering: Pin all 168 flowers before stitching the first center. Sewing petals down too tightly can gather the cream foundation into permanent ridges.
- Loose tails and twisted scallops: Leave at least 15–20 cm on finishing ends and reverse the weaving direction once. At corners, check all seven dc of each fan before proceeding to the next edge.
Resizing and Care
For a smaller throw, calculate the width from your personal stitch gauge, then choose a foundation count that fits the bobble repeat. The interior bobble sequence places one bobble every 12 stitches; the panel formula can be adapted as 12n + 2 stitches, with six plain stitches at the starting edge and seven at the finishing edge when n is 20. At a different width, keep the bobble count and end margins symmetrical as closely as possible while preserving the total.
For example, a 182-stitch panel uses a foundation ch 184. Work six hdc, 14 repetitions of [bobble, 11 hdc], one additional bobble, and seven final hdc. The count is 6 + 14 × 12 + 1 + 7 = 182, giving 15 bobbles per patterned row. Adjust the flower grid to the new area rather than trying to compress 168 motifs into a smaller blanket.
A washable worsted acrylic can be practical for a bedspread, but always defer to the care directions of the specific yarn. Lay a heavy wet blanket across a supported surface; hanging it by a short section may stretch the half-double-crochet rows. Reposition the scalloped edge before drying and lift each raised flower slightly if washing has compressed the puff stitches.
Frequently Asked Questions
Can this blanket be made without sewing individual flowers?
Yes, but the resulting surface will differ. You could use an integrated floral granny-square construction, which incorporates the flower into the square before joining. This pattern uses attached appliqués so that their color and placement can be arranged independently of the stable cream panel.
Why are the purple flowers not worked directly into the blanket rows?
Integrated flowers can produce a more rigid texture where the contrasting yarn enters and leaves the base. Separate pieces let you choose diagonal bands, repair an individual motif, and keep the main row count unchanged. The trade-off is additional sewing and end management.
Does this pattern reproduce the photograph stitch for stitch?
No. A photograph does not expose the underside, complete stitch sequence, gauge, yarn label, or original designer’s notes. The instructions provide a workable interpretation of the observable features: an ivory textured ground, raised purple flowers, diagonal placement, and a plum scalloped perimeter.
How do I calculate the exact yarn needed?
Work and weigh the 20 × 20 cm swatch in the real stitch pattern. Scale the sample weight by area, then add a finishing allowance. Weigh one completed rosette in each color and multiply by the intended number; make a small length of scalloped edging and weigh that separately if you need a tighter purchasing estimate.
Conclusion
The 3D flower crochet blanket pattern is built from three controlled elements: a 242-stitch cream foundation, 168 detachable purple rosettes, and a counted shell edging. The main rectangle provides the structure, while the flower grid reproduces the diagonal movement visible in the reference. Before making the full bedspread, crochet a 20 × 20 cm bobble swatch and one six-petal motif, then measure and weigh both. Use those results to revise the yarn allowance and final dimensions. Save the finished project on Pinterest or share a photograph on Instagram using #CreamPurpleFlowerBlanket. Which plum-to-lavender ratio gives the flower rows the clearest diagonal definition on your bed?









