Introduction
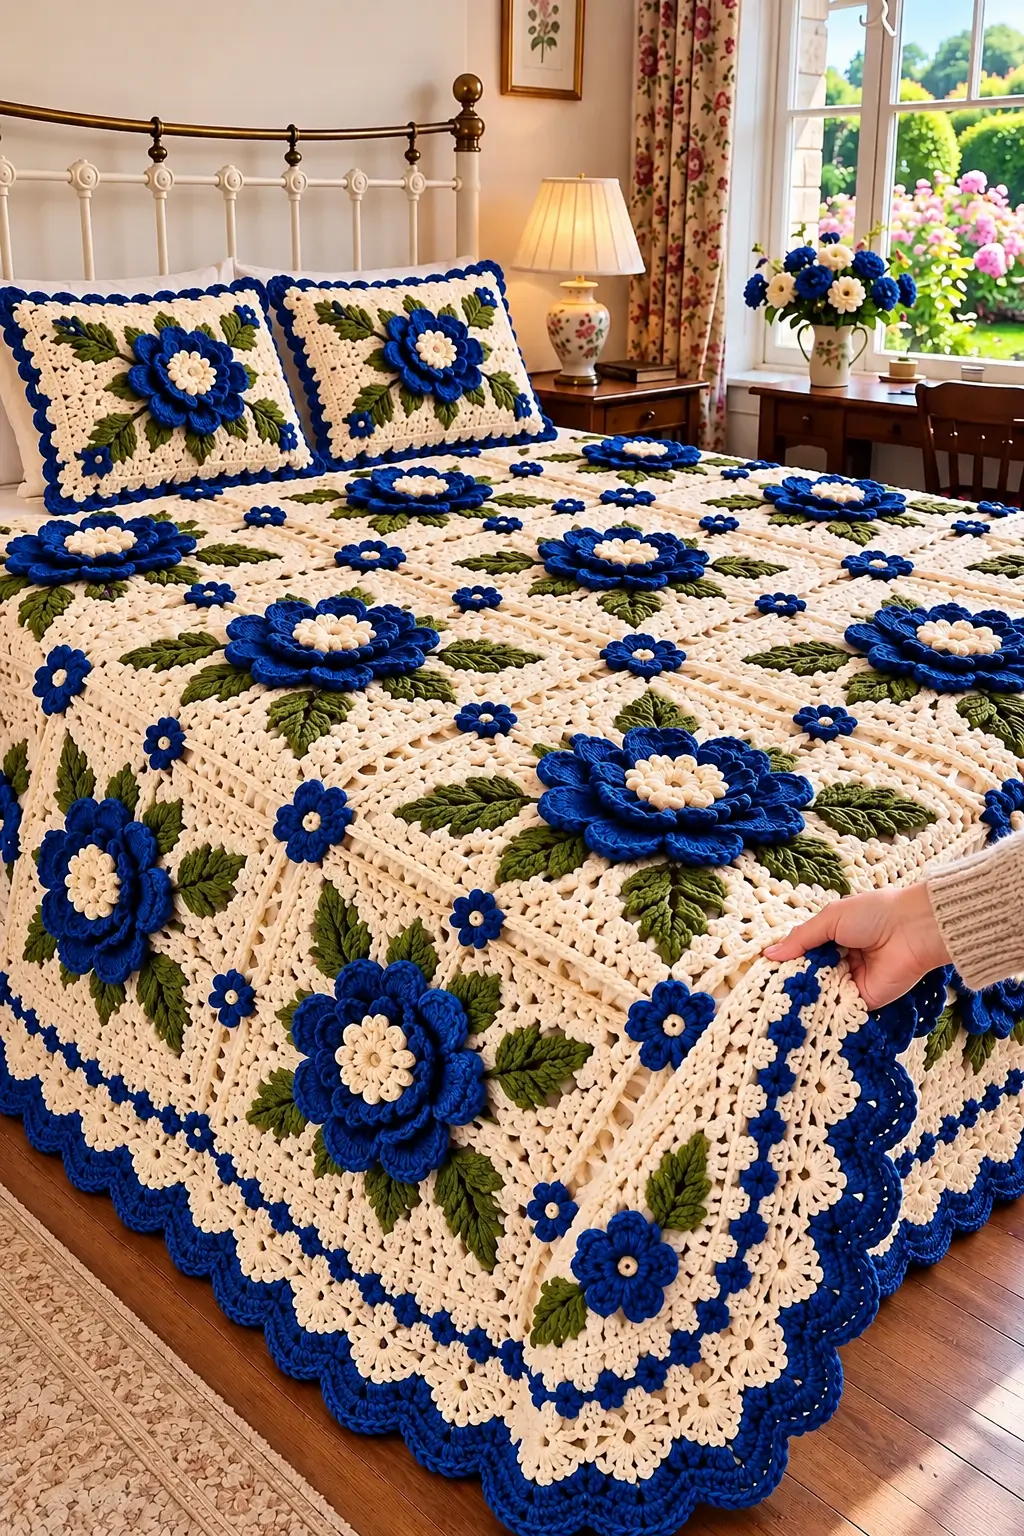
Large royal-blue flowers need a flat structural base or their weight will pull a lace bedspread out of square. This 3D flower crochet bedspread pattern combines cream openwork panels, layered blue flowers, olive-green leaves, small connector blossoms, and a deep scalloped border. The construction is best suited to an intermediate crocheter using medium-weight yarn and separate appliqués.
The Design: What Makes This Floral Bedspread Different
The bedspread is built around contrast between a light structural background and heavily raised decoration. Large royal-blue flowers sit at regular intervals across the cream crochet field, while smaller blue blossoms occupy selected intersections. Olive leaves extend from the major flowers and break up the geometric grid.
The important construction decision is to keep the cream bedspread structure independent from the flowers. Each large bloom is crocheted separately, blocked, and attached after the main panels have been joined. This prevents thick petals from becoming trapped inside seams.
A second structural feature is the border. Cream lace creates the transition from the main body to the edge, while royal-blue scallops provide the final weighted outline. The result is decorative but still modular enough to resize.
Project Info at a Glance
| Skill Level | Construction | Suggested Hook | Yarn Weight | Main Technique |
|---|---|---|---|---|
| Intermediate | Modular panels with appliqués | 4.5–5.0 mm | Worsted / #4 | Openwork crochet and layered flowers |
Materials and Tools
Yarn
- Warm cream — worsted weight #4 — main squares, lace sections and border
- Royal blue — worsted weight #4 — large flowers, small flowers and outer scallops
- Olive green — worsted weight #4 — leaves
- Ivory — worsted weight #4 — flower centers
For a full bedspread, buy yarn by dye lot whenever possible. The exact quantity depends on bed dimensions, yarn density, square size, and the number of dimensional flowers.
Tools
- 4.5–5.0 mm crochet hook
- Yarn needle
- Scissors
- Stitch markers
- Blocking mats
- Rust-resistant blocking pins
- Tape measure
Abbreviations
- MR — magic ring
- ch — chain
- sc — single crochet
- hdc — half double crochet
- dc — double crochet
- tr — treble crochet
- sl st — slip stitch
- sp — space
- st/sts — stitch/stitches
- BLO — back loop only
Construction Overview
The bedspread can be reproduced as a photo-inspired modular project using five components:
- Cream openwork foundation squares or panels
- Large layered royal-blue flowers
- Small blue connector flowers
- Olive-green leaves
- Cream lace and royal-blue scalloped edging
Make one complete sample unit before committing to the full blanket. Block that sample and use its finished measurements to calculate the required number of units.
Cream Openwork Foundation Square
A target blocked size of approximately 20–24 cm works well for a large floral bedspread. Adjust the number of outer rounds rather than forcing your gauge to match a specific measurement.
Round 1
With cream yarn, make an MR.
Ch 3, 2 dc into ring, ch 3.
Repeat [3 dc, ch 3] three more times.
Join with sl st to the top of the beginning chain.
You now have four sides and four corner spaces.
Round 2
Sl st to the first corner.
In each corner work:
3 dc, ch 3, 3 dc.
Ch 2 between corners.
Repeat around and join.
Round 3
Work 3 dc, ch 3, 3 dc in each corner.
Along each side, work ch 2, 3 dc into the next ch-2 space, ch 2.
Repeat around.
Round 4 — Openwork Round
Work the corners as established.
Across each side alternate:
3 dc, ch 2, skip next space, 3 dc.
The objective is an open cream framework rather than a completely solid granny square.
Round 5 — Structural Round
Work hdc around the entire square.
In each corner work:
2 hdc, ch 2, 2 hdc.
This round stabilizes the motif before additional lace is added.
Round 6 — Lace Round
Work:
*sc in next 3 sts, ch 3, skip 2 sts.*
Repeat across each side.
At each corner, work sc, ch 4, sc into the corner space.
Round 7
Work a small fan into each suitable chain space:
sc, hdc, 3 dc, hdc, sc.
At the corners use a slightly larger fan so the square remains flat.
Final Foundation Round
Work one round of sc around the motif.
Use sc, ch 2, sc at every corner.
Block the square before measuring.
Large Royal-Blue Layered Flower
The dominant feature is a substantial layered flower with a pale raised center. Make these flowers separately. A finished diameter around 13–16 cm provides a strong visual scale on a 20–24 cm foundation.
Flower Center
With ivory yarn, make an MR.
Round 1: Work 8 sc into MR. Join. (8 sts)
Round 2: Work 2 sc in every stitch. Join. (16 sts)
Round 3: Work *sc, ch 3, sc* around selected stitches to create a raised clustered center.
Fasten off.
Inner Blue Petal Foundation
Join royal blue behind the ivory center.
Work:
*sc at the base, ch 5* eight times, distributing the loops evenly.
Join.
Inner Petals
Into each ch-5 loop work:
sc, hdc, 3 dc, hdc, sc.
Repeat for all eight petals.
Middle Petal Foundation
Working behind the first petal layer, make eight ch-7 loops.
Anchor each loop between two petals so the second layer is offset from the first.
Middle Petals
Into each ch-7 loop work:
sc, hdc, 2 dc, 3 tr, 2 dc, hdc, sc.
Repeat eight times.
Outer Petal Foundation
Working behind the middle layer, create eight ch-9 loops.
Keep the anchors evenly distributed around the flower base.
Outer Petals
Into each ch-9 loop work:
sc, hdc, 2 dc, 4 tr, 2 dc, hdc, sc.
Repeat around.
Fasten off with a long sewing tail.
Shaping the Flower
Do not press the flower completely flat during blocking. Pin the outer tips into position while allowing the middle and inner petals to retain their height.
The outer layer provides diameter. The middle layer creates most of the visual depth, while the ivory center should remain clearly visible above the blue petals.
If the flower becomes bowl-shaped, the foundation loops are too short or the petals contain too many tall stitches. Increase the loop length slightly before changing the petal stitch count.
Small Royal-Blue Flowers
The smaller flowers appear between major motifs and along selected border areas.
Round 1
With ivory, make an MR and work 6 sc. Join.
Round 2
Change to royal blue.
For each petal work:
sl st, ch 3, 2 dc, hdc, ch 2, sl st.
Repeat six times around the center.
Fasten off, leaving a sewing tail.
A small flower should remain noticeably smaller than the large layered bloom. Aim for approximately 4–6 cm depending on the yarn.
Olive-Green Leaves
The major flowers are framed by elongated leaves. Make approximately 6–8 leaves for each large flower if you want a dense botanical arrangement similar to the photographed design.
Leaf
With olive yarn, ch 11.
Starting in the second chain from the hook, work:
sc, hdc, dc, 2 tr, 2 tr, dc, hdc, sc.
Work 3 sc into the final chain.
Continue along the opposite side of the foundation chain:
sc, hdc, dc, 2 tr, 2 tr, dc, hdc, sc.
Join at the base.
Leaf Vein
Surface crochet slip stitches from the base toward the tip along the foundation chain.
This central line gives the leaf more definition.
Fasten off with a sewing tail.
Arranging the Large Floral Motif
Place the royal-blue flower at the center of the selected cream square.
Arrange the leaves behind the flower in pairs. Four diagonal directions work well: upper left, upper right, lower left, and lower right.
For a fuller arrangement, place two leaves in each direction.
Pin everything before sewing.
Attach the leaves first. Sew through the central vein and lower edges while leaving the outer leaf tips free.
Position the flower over the leaf bases and sew firmly through the flower center and lower 2–3 cm of the outer petals.
Do not stitch every petal edge to the background.
Alternative Panel Construction
The bedspread does not require a large flower on every square. Alternating decorative and openwork units reduces weight.
A practical arrangement is:
- Large flower square
- Open cream lace square
- Large flower square
- Small connector-flower square
Repeat the sequence across the bed while checking the arrangement from a distance before joining.
Calculating the Bedspread Size
Block one completed cream square first.
If the blocked square measures 22 cm, calculate the number of motifs from the desired finished dimensions.
| Squares Across | Squares Long | Approximate Body Size at 22 cm Each |
|---|---|---|
| 6 | 8 | 132 × 176 cm |
| 7 | 9 | 154 × 198 cm |
| 8 | 10 | 176 × 220 cm |
| 9 | 11 | 198 × 242 cm |
| 10 | 12 | 220 × 264 cm |
The outer lace border adds additional width and length. Measure the mattress and desired drop before selecting the final layout.
Estimating Yarn
The most accurate method is to make one complete sample square with its flower and leaves.
Weigh each color separately if possible.
For example, if one finished decorative square uses 70 g of yarn and the blanket contains 60 equivalent units:
70 g × 60 = 4,200 g.
Add the yarn required for joining and the wide border, then purchase extra yarn from the same dye lot.
Because dimensional flowers consume substantially more yarn than flat motifs, do not estimate this bedspread from a standard granny-square blanket.
Joining the Squares
Block all cream squares to the same dimensions before joining.
A cream joining yarn keeps the grid visually quiet behind the blue flowers.
Slip-Stitch Join
Place two squares with the right sides facing upward.
Work through corresponding edge loops with a relaxed slip stitch.
Do not tighten the seam.
Continue across the complete edge.
Join squares into rows first, then connect the rows.
Checking the Grid
After joining three or four rows, lay the work flat.
Measure several seams. A tight seam shortens the joined edge and can make the blanket buckle even when every individual square is correctly blocked.
Adding Flowers After Joining
For a heavy dimensional bedspread, joining the cream foundations before attaching the largest flowers can make construction easier.
Complete the cream grid first.
Block the joined body.
Mark each flower position.
Sew on the leaves and large flowers.
Add the small blue connector flowers last.
This sequence keeps thick petals away from the joining seams and gives better access to the structural stitches.
Cream Lace Border
The photographed design uses a deep decorative edge rather than a narrow finishing round.
Border Round 1
With cream, work sc evenly around the entire blanket.
At each blanket corner work:
sc, ch 2, sc.
Border Round 2
Work hdc around.
In each corner work:
2 hdc, ch 2, 2 hdc.
Border Round 3
Work:
*sc in next 3 sts, ch 3, skip 2 sts.*
Repeat along each side.
Border Round 4
Work:
*sc into next ch-3 space, ch 4.*
Repeat around.
Border Round 5 — Cream Fans
Into each suitable ch-4 space work:
sc, hdc, 4 dc, hdc, sc.
Repeat around.
Use larger corner fans where necessary to prevent the corners from cupping.
Royal-Blue Scalloped Outer Border
Change to royal blue.
Foundation Round
Work sc around the outside edge of the cream lace.
Space stitches evenly rather than forcing one stitch into every visible loop.
Scallop Round
Work:
*sl st in next suitable space, skip approximately 2 sts, 7 dc in next space, skip approximately 2 sts, sl st in next space.*
Repeat along the edge.
Before completing the entire border, work at least 30 cm and inspect it flat.
If the blue shells overlap, increase the spacing. If the cream edge is pulled inward, decrease the spacing.
Corner Treatment
At each corner, use a larger royal-blue shell.
A practical corner shell is:
9–11 dc into the corner space.
Place a slip stitch on either side of the corner shell.
The corner should form a smooth rounded fan without folding over itself.
Matching Crochet Pillow Shams
The same floral construction can be used for matching pillows.
Make one larger cream openwork square sized to the pillow front.
Add one large royal-blue flower in the center.
Arrange 6–8 olive leaves around it.
Add small blue flowers near selected corners.
Finish the front with cream lace followed by a royal-blue scalloped edge.
For the back, use two overlapping cream crochet panels or a fabric envelope closure.
Color Placement
Royal blue is visually dominant, so it does not need to cover a large percentage of the bedspread.
A useful balance is approximately:
- 60–70% cream background and structural lace
- 15–20% royal-blue flowers and edging
- 10–15% olive-green leaves
- Small quantity ivory flower centers
These percentages are visual planning guides rather than yarn-consumption ratios.
Optional Smaller Version
For a lighter throw, reduce the square size to approximately 16–18 cm and use only two petal layers on the large flowers.
Use four leaves around each flower instead of eight.
Finish with two cream lace rounds and one blue scalloped round.
This version requires less yarn and creates less surface weight while retaining the cream, blue, and olive floral composition.
Assembly
- Crochet one complete cream sample square, block it, and record its finished dimensions.
- Calculate the required grid from the mattress width, mattress length, and desired side drop.
- Make all cream foundation squares and block them to matching measurements.
- Join the foundation squares with cream yarn, checking that every seam remains flexible.
- Crochet the olive leaves and pin them at the selected large-flower positions.
- Make the layered royal-blue flowers and sew them over the leaf bases.
- Add the small blue flowers at selected intersections and border positions.
- Work the cream structural and openwork border around the completed bedspread.
- Add the royal-blue scalloped outer edge and correct any rippling before fastening off.
- Weave in all ends, block the final perimeter, reshape the petals and leaves, and allow the bedspread to dry completely.
The completed bedspread should lie flat through the cream grid while the flowers and leaves remain raised above the surface.
7 Technical Tips
- Keep every blocked foundation square within 5 mm of the master square. Small size differences multiply across a grid and can create visibly curved seams.
- Leave at least 2 cm between the outer flower petals and structural joining seams. Petals caught in the seam make repairs difficult and create bulky ridges.
- Attach leaves through the central vein rather than sewing the entire perimeter. Stitching every edge down removes the raised botanical texture.
- Test at least 30 cm of the blue scalloped border before continuing. Too many shells produce waves; insufficient shells pull the cream lace inward.
- Keep large flowers around 13–16 cm when using a 20–24 cm foundation square. A flower that nearly reaches the square edge interferes with joining and makes the grid visually crowded.
- Use the same hook and tension for every structural cream square. Changing hook size by even 0.5 mm during a large project can create a measurable difference across multiple rows of motifs.
- Weave structural yarn tails for at least 5–7 cm through dense stitches. Avoid securing important joining tails only inside open chain spaces, where repeated washing can loosen them.
Blocking the Finished Bedspread
Block the cream foundation before concentrating on the flowers.
Measure the outer perimeter at several points. Opposite sides should match as closely as possible.
Shape the cream lace into regular arches.
Arrange the royal-blue scallops individually.
Lift each flower layer rather than pressing it flat. Separate overlapping petals and position the olive leaves so their pointed ends remain visible.
Allow the entire piece to dry completely before placing it on the bed.
Care
Follow the washing instructions supplied with the chosen yarn. A large dimensional bedspread becomes heavy when wet, so support its full weight when moving it.
For machine-washable yarn, use a gentle cycle only when the yarn label permits it. A large laundry bag can reduce friction on raised flowers.
Dry flat whenever practical. Reshape the border, leaves, and petals before drying.
Store the bedspread folded rather than suspended from a hanger, since the combined weight of the flowers and border can stretch the cream openwork structure.
Conclusion
This royal blue 3D flower crochet bedspread pattern combines a cream modular foundation with layered blue flowers, olive leaves, small connector blossoms, and a wide two-color lace border. Start with one complete sample square and use its blocked measurement to calculate the bedspread grid before producing the remaining motifs. Attach the largest decorations after the structural sections are joined to reduce distortion. Save the finished design to Pinterest or share your color version on Instagram with #RoyalBlueFlowerBedspread. For this specific design, would you keep the olive-green leaves or replace them with a darker forest green?









