Introduction
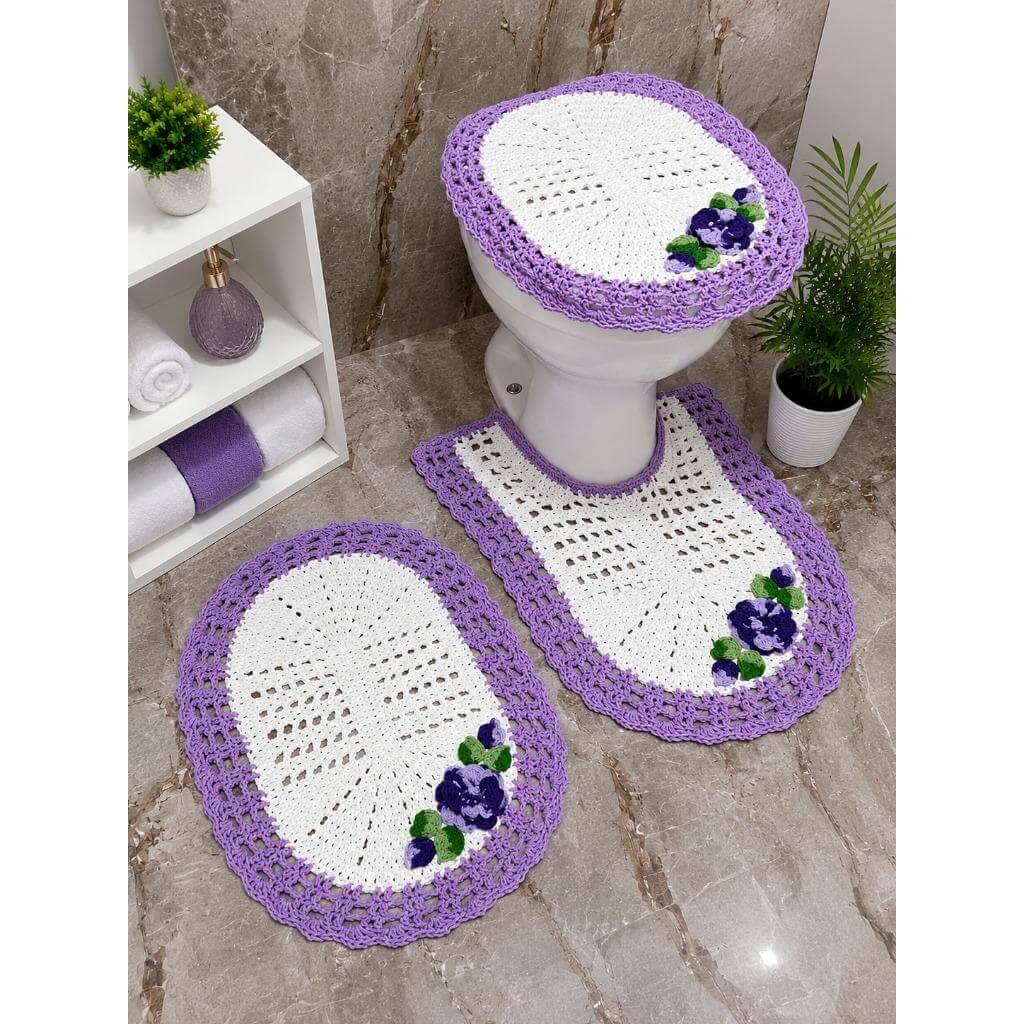
An oval bathroom mat has to widen at both ends without developing pointed corners or a ruffled edge. This crochet bathroom set pattern uses a white oval center, lavender openwork border, and dimensional purple flowers with green leaves. The coordinated set includes a toilet lid cover, contoured toilet mat, and oval floor mat. Cotton or a washable cotton-blend yarn is the practical choice for all three pieces.
The Design: What Makes This Crochet Bathroom Set Different
The design uses the same visual structure across three different shapes. White forms the main surface, lavender creates the open lace border, and dark-purple flowers provide concentrated decoration near one side of each piece. Small green leaves separate the flowers from the lavender edging.
The oval mat and lid cover use rounded increases distributed across both ends. The toilet mat requires a different construction because the opening around the toilet base must remain smooth while the outer edge expands. Trying to use identical stitch counts for all three pieces is a common mistake.
The floral appliqués are made separately and sewn on after blocking. This keeps the dimensional petals away from the structural shaping and makes replacement easier if a flower becomes damaged.
Project Info at a Glance
| Skill Level | Construction | Hook | Recommended Yarn | Pieces |
|---|---|---|---|---|
| Intermediate | Oval and contoured crochet | 3.5–4.5 mm | DK or light worsted cotton | 3 |
The dimensions in this pattern are adjustable project targets. Measure the toilet, lid, and available floor area before choosing the final number of rounds.
Materials and Tools
Yarn
- White — DK or light worsted cotton/cotton blend — main sections
- Lavender — same weight — borders and edging
- Deep purple — same weight — dimensional flowers
- Light purple — small quantity — flower centers or inner petals
- Leaf green — small quantity — leaves
Tools
- 3.5–4.5 mm crochet hook
- Yarn needle
- Scissors
- Stitch markers
- Tape measure
- Blocking mats and pins
- Optional non-slip rug backing
Abbreviations
- MR — magic ring
- ch — chain
- sc — single crochet
- hdc — half double crochet
- dc — double crochet
- tr — treble crochet
- sl st — slip stitch
- st/sts — stitch/stitches
- sp — space
- RS — right side
Before You Begin: Take Three Measurements
Do not size the set from a photograph. Bathroom fixtures vary considerably.
- Measure the maximum length and width of the toilet lid.
- Measure the available floor area in front of the toilet for the contoured mat.
- Measure the desired length and width of the separate oval floor mat.
Make the crochet pieces slightly smaller than the final target during construction if your cotton yarn normally relaxes after washing and blocking.
Oval Floor Mat
The separate floor mat is worked from the center outward. A foundation chain creates the straight central section, while increases around both ends produce the oval.
Foundation
With white yarn, make a foundation chain approximately one-third to one-half of the desired finished mat length.
For a medium mat, begin with approximately ch 36–44. The exact chain count should be adjusted to your gauge.
Round 1
Work 2 hdc in the second chain from the hook.
Work 1 hdc in each chain until the final chain.
Work 5 hdc in the final chain.
Rotate the work and crochet along the unused loops on the opposite side of the foundation chain.
Work 1 hdc in each chain across.
Work 3 hdc in the first foundation position. Join with sl st.
Place markers at the center of both curved ends.
Round 2
Ch 1. Work hdc across the first straight side.
Across the rounded end, distribute increases evenly rather than stacking them directly above the previous increases.
Work hdc across the second straight side.
Repeat the same increase distribution across the opposite curve.
Join.
Following White Rounds
Continue in hdc or dc.
Keep the long sides mostly free from increases. Add the required increases through the curved sections only.
Place the mat on a flat surface after every two rounds.
If the ends curl upward, more increases are required. If the edge begins to ripple, reduce the increase frequency.
Creating the Openwork Detail
Before changing to lavender, add several decorative white rounds similar to the open sections visible in the reference design.
Openwork Round 1
Ch 3.
Work:
*dc in next 2 sts, ch 1, skip 1 st.*
Repeat around, maintaining the required shaping at the curved ends.
Openwork Round 2
Work dc into the dc stitches and ch 1 over each chain space.
At the curves, add extra stitches gradually so the oval remains flat.
Structural Round
Work one complete round of hdc.
This solid round provides a stable foundation for the lavender lace.
Lavender Border
Change to lavender yarn.
Border Round 1
Work sc evenly around.
Distribute increases through the rounded ends as required.
Border Round 2
Work:
*sc in next 2 sts, ch 3, skip 2 sts.*
Repeat around.
Adjust the final repeat at each curve instead of forcing the same spacing into an unsuitable stitch count.
Border Round 3
Into each ch-3 space work:
sc, ch 3, sc.
Border Round 4
Work:
*sc into next chain space, ch 4.*
Repeat around.
Final Scalloped Round
Into each suitable ch-4 space work:
sc, hdc, 3 dc, hdc, sc.
Repeat around the complete mat.
Fasten off.
Toilet Lid Cover
The lid cover uses the same oval principle, but it must match the actual lid closely. Make a paper template from the lid before beginning if the fixture has an unusual shape.
White Center
Begin with a foundation chain sized to approximately one-third to one-half of the lid length.
Work around both sides of the chain exactly as for the oval mat.
Continue adding rounds until the white center reaches approximately 75–85% of the required lid dimensions.
Do not stretch the crochet while measuring.
White Openwork Section
Work one or two rounds alternating dc groups and chain spaces.
A useful repeat is:
*2 dc, ch 1, skip 1 st.*
Keep increases concentrated around the curved ends.
Lavender Lid Border
Change to lavender.
Work one sc foundation round.
Follow with:
*sc, ch 3, skip 2 sts.*
On the next round, work sc, ch 3, sc into each chain space.
Finish with small shells:
sc, hdc, 3 dc, hdc, sc.
Optional Elastic Back for the Lid Cover
A decorative top alone can slide when the lid is raised. For a fitted cover, add a simple holding structure to the underside.
Join white or lavender yarn to the wrong side near the outer edge.
Work one round of sc around the underside, decreasing slightly as required.
For the final round, crochet over a length of washable elastic cord.
Test the cover directly on the lid before securing the elastic permanently. It should hold the crochet in position without pulling the top into a bowl shape.
Contoured Toilet Mat
The center mat needs a U-shaped opening around the toilet base. Measure the fixture before beginning because this opening cannot be standardized accurately.
Foundation
With white yarn, chain to the required width of the rear section.
Work several rows of hdc to establish the area behind and beside the toilet base.
Forming the U-Shaped Opening
Mark the width required for the toilet pedestal.
Work across the first side section, stop at the first marker, and turn.
Continue working this side independently until it reaches the required depth.
Fasten off.
Join yarn at the opposite marker and repeat for the second side.
The two extensions now form the arms of the U.
Front Section
Reconnect the work across the front when the opening is deep enough.
Continue across the full width.
To produce the rounded front visible in the design, increase gradually near both outer corners for several rows.
Lay the piece flat frequently. Both sides of the opening must remain symmetrical.
Openwork Section on the Toilet Mat
After establishing the complete white shape, work an open filet-style section.
A simple repeat is:
*dc, ch 1, skip 1 st.*
On the following row or round, work dc above dc and ch 1 above the spaces.
Around the inner U-shaped opening, use shorter chain spaces if the edge becomes loose.
Lavender Toilet Mat Border
Join lavender yarn.
Work one complete sc round around both the outside edge and the inner U-shaped opening.
Along the outer edge, add the same openwork lace used for the oval mat:
*sc, ch 3, skip 2 sts.*
Follow with another chain-space round and finish with scallops.
Around the inner opening, use a simpler sc or hdc edging. A bulky shell border in this area can prevent the mat from sitting close to the toilet base.
Dimensional Purple Flower
Make one main flower for each piece. Additional buds can be added around it.
Flower Center
With light purple yarn, make an MR.
Round 1: 6 sc in MR. Join. (6 sts)
Round 2: Work 2 sc in each stitch. Join. (12 sts)
Fasten off.
Inner Petals
Join deep purple.
In each suitable attachment position work:
sl st, ch 3, 2 dc, ch 3, sl st.
Make six evenly spaced petals.
Outer Petal Foundation
Working behind the first petal layer:
*sc around the base between petals, ch 5.*
Repeat six times.
Outer Petals
Into each ch-5 loop work:
sc, hdc, 2 dc, tr, 2 dc, hdc, sc.
Repeat around.
For a fuller flower, add a third layer using ch-6 loops and slightly taller petals.
Small Purple Buds
With deep purple yarn, make an MR.
Round 1: 6 sc in MR. (6 sts)
Round 2: Work 2 sc in each stitch. (12 sts)
Round 3: *Sc, hdc, 2 dc, hdc, sc* across selected stitches to form compact overlapping petals.
Fasten off, leaving a sewing tail.
Make two small buds for each floral arrangement if desired.
Green Leaves
Make 3–5 leaves for each main flower arrangement.
With green yarn, ch 8.
Beginning in the second chain from the hook, work:
sc, hdc, dc, tr, dc, hdc, sc.
Work around the end of the chain and repeat the stitch sequence along the opposite side.
Sl st into the base.
Fasten off, leaving a sewing tail.
Textured Leaf Option
After completing the leaf, work a line of surface slip stitches from the base to the tip.
This creates a central vein and gives the small leaf more definition beside the dark-purple petals.
Arranging the Flowers
Block all three main pieces before attaching the appliqués.
Position the floral arrangement near one side of each piece rather than exactly in the center. The asymmetrical placement matches the visual balance of the photographed set.
Place the large flower first.
Add three green leaves behind it.
Position one or two smaller purple buds toward the outer edge.
Pin everything before sewing.
Sew through the flower center and lower petal bases. Avoid stitching the outer edges of every petal flat against the mat.
Suggested Finished Dimensions
| Piece | Example Target Size |
|---|---|
| Oval floor mat | Approximately 50 × 70 cm |
| Contoured toilet mat | Approximately 50–55 × 60–70 cm |
| Toilet lid cover | Approximately 38–45 × 45–50 cm |
These are starting dimensions only. The fixture measurements should determine the actual finished size.
Adjusting the Oval Size
For a wider mat, continue adding rounds while distributing increases through both curved ends.
For a longer mat without excessive width, begin with a longer foundation chain rather than adding many extra rounds.
For a smaller lid cover, shorten the foundation chain and stop the white expansion earlier.
The relationship between the foundation-chain length and the number of expansion rounds determines the final oval proportions.
Color Variations
- White + lavender + dark purple — matches the photographed design.
- Cream + dusty rose + burgundy — produces a warmer floral set.
- White + sage + forest green — removes the flower contrast for a botanical version.
- Ivory + powder blue + navy — creates a cooler two-tone bathroom set.
- White + peach + coral — works with the same floral construction while keeping the center light.
Adding Non-Slip Backing
A crochet floor mat can move on smooth tile. Use a washable non-slip rug underlay or another backing product intended for floor textiles.
Cut the backing slightly smaller than the crochet mat so it does not show beyond the lavender border.
If attaching a backing permanently, follow the backing manufacturer’s washing and installation instructions.
Do not rely on the decorative lace border for grip.
Assembly
- Measure the toilet lid, toilet base opening, and available floor area before selecting final dimensions.
- Crochet the white oval floor mat and stop when its solid section reaches the planned size.
- Make the lid cover separately, testing it against the actual lid before completing the lavender edge.
- Construct the contoured toilet mat around the measured U-shaped pedestal opening.
- Add the white openwork sections to all three pieces while keeping the shapes flat.
- Work the lavender structural and lace borders, using the same border sequence wherever the shape permits.
- Block all three pieces and correct any rippling before adding dimensional decoration.
- Crochet the purple flowers, buds, and green leaves separately.
- Pin and sew the floral arrangements near one side of each piece, attaching mainly through their centers and bases.
- Weave in all tails, add suitable non-slip backing to the floor pieces, and check the lid cover fit before use.
The finished set should contain three coordinated pieces with flat white centers, lavender lace borders, and raised purple floral clusters.
7 Technical Tips
- Check the oval after every two expansion rounds. A ruffled perimeter means the curved ends contain too many increases, while cupping indicates too few.
- Keep the toilet opening at least 1–2 cm clear of the fixture after blocking. A crochet edge pressed tightly against the pedestal can bunch upward instead of lying flat.
- Use stitch markers at the center of both oval curves. Losing the curve positions causes increases to migrate and creates an asymmetrical mat.
- Test the lid cover before adding its final border. An extra 2–3 cm around the perimeter can substantially change the fit once elastic is added underneath.
- Attach dimensional flowers through their lower 1–2 cm only. Sewing every petal edge down removes the layered appearance visible in the floral arrangement.
- Block the lavender lace before judging its width. Chain-space borders can expand noticeably after washing, so adding unnecessary extra rounds may create rippling.
- Secure yarn tails inside dense stitches for at least 4–6 cm. Open chain spaces provide poor anchoring points for pieces that will be washed regularly.
Washing and Care
Bathroom crochet should be made from yarn that tolerates regular washing. Cotton and washable cotton blends are practical choices because they provide stitch definition and can be cleaned frequently.
Remove detachable non-slip backing before washing when required by the backing manufacturer.
Reshape the mats while damp. Arrange the scalloped borders individually and lift the dimensional flower petals with your fingers.
Dry completely before returning the pieces to the bathroom floor or toilet lid.
Conclusion
This purple and white crochet bathroom set pattern uses one coordinated palette across an oval floor mat, contoured toilet mat, and fitted lid cover. Begin by measuring the actual bathroom fixtures, then make the white foundations before adding the lavender openwork borders. Crochet the flowers separately so their size and placement can be adjusted after blocking. For the next step, make a small gauge sample with the intended cotton yarn and wash it before calculating the final foundation chains. Save the finished set to Pinterest or share your version on Instagram with #PurpleFloralBathroomSet. Would you keep the dark-purple flowers or make the appliqués lavender to match the border?









