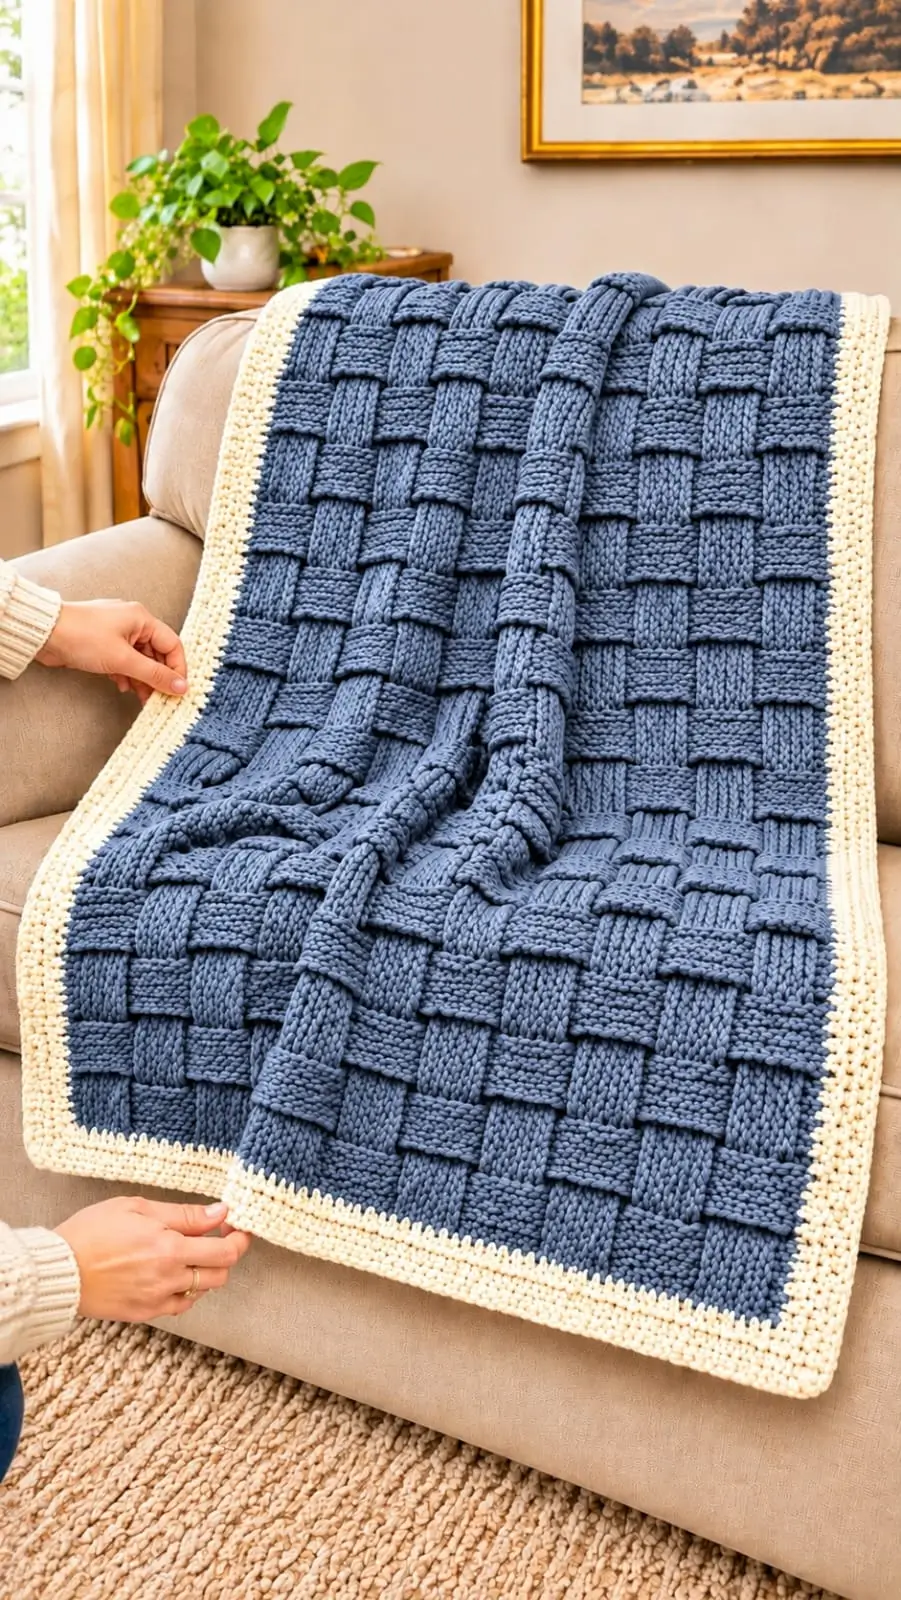
A basketweave blanket gets its distinctive checkerboard relief from alternating raised and recessed crochet posts. This blue basketweave crochet blanket pattern combines super-bulky yarn, a 10 mm hook, and a contrasting cream border to create an approximately 110 × 150 cm throw. Designed for intermediate crocheters, the construction uses repeatable eight-row sections and simple rectangular shaping. Its dense surface makes it suitable for a sofa throw or an additional bed layer.
The Design: What Makes This Basketweave Blanket Different
The blue field is constructed with groups of four front-post and four back-post double crochet stitches. Reversing the raised and recessed sections at regular intervals produces the basketweave effect without attaching individual strips.
The first structural decision is to maintain one ordinary double crochet stitch at each side edge. These edge stitches provide consistent locations for the cream border and reduce the distortion that post stitches can create near the corners.
Second, the cream edging is worked separately after the blue body is complete. This allows the border to frame the textured surface without interrupting the stitch repeat.
Third, super-bulky yarn creates pronounced relief in this chunky crochet blanket. The principal mistake is changing post-stitch direction without accounting for the turned fabric. That error breaks the alignment of the basket weave crochet stitch and creates irregular blocks.
Project Info at a Glance
| Skill Level | Intermediate |
|---|---|
| Time | Approximately 18–30 hours (estimate) |
| Finished Size | Target 110 × 150 cm, gauge-dependent |
| Hook | 10 mm, subject to gauge |
| Yarn | Super bulky #6 |
| Technique | Front-post and back-post double crochet |
| Construction | Flat rows with three border rounds |
| Best For | Sofa throw and bed layering |
The dimensions, hook size, yarn quantities, and working time are proposed specifications for this original pattern, not measurements verified from the photograph.
Materials and Tools
Yarn
- Dusty slate blue — super bulky #6 — approximately 1,500–1,800 g: Main blanket body. Bernat Blanket or a comparable washable bulky yarn is a possible choice.
- Ivory cream — super bulky #6 — approximately 250–350 g: Contrasting border. Select a yarn with similar fiber composition and yardage per gram.
These quantities are purchasing estimates, not measured consumption. Post stitches can require substantially more yarn than plain double crochet. Purchase sufficient yardage from one dye lot and retain unused skeins until the project is complete.
Tools
- 10 mm crochet hook, subject to gauge adjustment
- Locking stitch markers, at least six
- Large-eye tapestry needle
- Scissors
- Flexible measuring tape
- Blocking mats, optional for suitable fibers
Gauge and Sizing
Work a 26-stitch practice panel containing one edge stitch, 24 post stitches, and one edge stitch. Use the same yarn and hook intended for the blanket.
For a target body width of approximately 102 cm before edging, the 130-stitch row should measure about 102 cm, equivalent to approximately 12.7 stitches per 10 cm. Measure a relaxed sample after several complete basketweave repeats.
For a target body length of 142 cm across 112 patterned rows, the required average is approximately 7.9 rows per 10 cm.
These are calculated target gauges, not tested measurements. If your swatch differs, change the hook size or adjust the number of eight-stitch groups.
Crochet Abbreviations
| Abbreviation | Meaning |
|---|---|
| ch | Chain |
| sc | Single crochet |
| dc | Double crochet |
| FPdc | Front-post double crochet |
| BPdc | Back-post double crochet |
| sl st | Slip stitch |
| st / sts | Stitch / stitches |
| RS / WS | Right side / Wrong side |
| rep | Repeat |
| sp | Space |
All instructions use US crochet terminology. Invisible decreases are not required for this rectangular project.
Basketweave Crochet Blanket Pattern – Step by Step
Understanding the Basketweave Technique
Front-post double crochet stitches are worked around the vertical post of the stitch below rather than through the top loops. Insert the hook from front to back and then front again, yarn over, pull up a loop, and complete the double crochet.
For a back-post double crochet, insert the hook from behind around the post and return to the back. Complete the stitch in the same manner.
Because the fabric is turned after every row, the post direction must alternate on consecutive rows to keep a raised section on the same physical face. After four rows, reverse the arrangement to create the adjacent woven block.
Part 1: Foundation Chain
Yarn: Dusty slate blue.
Make 132 chains.
Row 1: Dc in the fourth chain from the hook, then dc in every remaining chain. (130 sts)
The three skipped chains count as the first double crochet for the foundation row only. Turn.
Place markers after every eight-stitch group, excluding the two edge stitches. The interior contains 128 stitches, or sixteen groups of eight.
Part 2: Basketweave Body
Yarn: Dusty slate blue.
From Row 2 onward, ch 2 at the beginning of each row. This turning chain does not count as a stitch. Work one dc into each edge stitch and 128 post stitches between them.
Row 2: Ch 2, dc in first st, *FPdc in next 4 sts, BPdc in next 4 sts*; repeat from * to * sixteen times. Dc in final st. (130)
Row 3: Ch 2, dc in first st, *BPdc in next 4 sts, FPdc in next 4 sts*; repeat sixteen times. Dc in final st. (130)
Row 4: Repeat Row 2. (130)
Row 5: Repeat Row 3. (130)
Row 6: Ch 2, dc in first st, *BPdc in next 4 sts, FPdc in next 4 sts*; repeat sixteen times. Dc in final st. (130)
Row 7: Ch 2, dc in first st, *FPdc in next 4 sts, BPdc in next 4 sts*; repeat sixteen times. Dc in final st. (130)
Row 8: Repeat Row 6. (130)
Row 9: Repeat Row 7. (130)
Rows 2–9 establish one complete eight-row basketweave cycle.
Part 3: Continue the Pattern
Repeat Rows 2–9 until the blue body approaches the desired length. For the proposed 112-row textured body, work thirteen additional complete cycles after Row 9, ending at Row 113.
This gives 112 textured rows after the foundation row, or 113 worked rows in total.
If the body reaches the target length earlier, finish after a complete eight-row repeat rather than halfway through a block.
Check that all sixteen stitch groups remain aligned and that every row contains 130 stitches.
Part 4: Preparing the Cream Border
Fasten off the blue yarn, leaving approximately 15 cm for weaving. Attach cream yarn at a corner with the right side facing.
Work a first round of evenly spaced single crochet stitches around the rectangle. Across the top and bottom, use one sc per available stitch. Along the sides, distribute stitches according to the measured row-edge gauge.
At each corner, work 3 sc into the corner space. Join to the first sc with a slip stitch.
The edging should lie flat without pulling the corners inward or creating waves along the long edges.
Part 5: Cream Border – Round 2
Ch 1. Work one sc into each stitch around. At each corner, work 3 sc into the center stitch of the previous round’s three-stitch corner group.
Join with sl st to the first sc. This adds eight stitches to the full perimeter, provided no additional side adjustments are made.
If the edging ripples, there may be too many side stitches. If it pulls inward, the side stitch spacing may be too sparse.
Part 6: Cream Border – Round 3
Ch 1. Sc in each stitch around, placing 3 sc in each marked corner-center stitch. Join with sl st.
Fasten off, leaving a 15 cm tail. This round adds another eight stitches to the perimeter.
The three-round cream frame contrasts with the raised blue texture. Its exact width depends on yarn thickness, hook size, and stitch height.
Part 7: Optional Wider Border
Add one or two further rounds of single crochet for a wider frame, repeating the same corner treatment.
Measure after every round. A wider border increases the finished width and length, particularly when using thick chenille yarn.
How to Resize the Basketweave Blanket
The foundation uses 128 interior post stitches and two edge stitches. Each additional eight-stitch group expands the blanket by one basketweave unit.
Starting-chain formula: 8 × number of groups + 4.
| Interior Groups | Starting Chains | Row Stitches |
|---|---|---|
| 12 | 100 | 98 |
| 14 | 116 | 114 |
| 16 | 132 | 130 |
| 18 | 148 | 146 |
| 20 | 164 | 162 |
These stitch counts are exact, but finished measurements depend on gauge. For a narrower lap blanket, remove two or four groups. For a wider bed throw, add groups while maintaining the two edge stitches.
Change the length by adding or removing complete eight-row repeats.
Assembly and Finishing
- Lay the completed blue blanket on a clean, flat surface.
- Check that the foundation edge and final row have equal stitch counts.
- Identify the right side and inspect the alternating raised blocks.
- Confirm that the cream border has four distinct corner centers.
- Examine each edge for puckering or excess fullness.
- Thread the blue yarn tails onto a large-eye tapestry needle.
- Weave each tail through several stitches on the reverse side, changing direction at least once.
- Repeat the same process with the cream border tails.
- Measure the blanket across its width and length without stretching the fabric.
- Follow the yarn label’s washing and drying instructions before final measurement.
The finished blanket consists of one continuous textured rectangle surrounded by a cream crochet border.
7 Technical Tips for a Better Basketweave Blanket
- Stitch-marker placement: Mark every eight-stitch interior group during the first patterned row. A missing stitch at a group boundary can shift all subsequent raised blocks.
- Edge-stitch control: Keep one ordinary double crochet at both ends of every row. Accidentally working a post stitch into the turning chain creates an uneven edge.
- Post-stitch direction: Check the relief after every two rows. Repeating FPdc on the working side without accounting for turning can reverse the intended surface texture.
- Foundation tension: If the starting chain measures more than 5% shorter than the finished row width, try a larger hook for the chain. A tight foundation can cause the bottom edge to curve.
- Bulky yarn tension: Keep loop height consistent around the post stitches. Pulling loops too tightly compresses the woven blocks and reduces their height.
- Border corner placement: Put three single crochet stitches into each marked corner-center stitch. Missing a corner increase may pull the border diagonally toward the center.
- Tail weaving: Leave approximately 15 cm at each color change or fastening-off point. Short tails can work loose during washing, especially in slippery polyester chenille.
Common Basketweave Crochet Problems
Why Is My Blanket Curling?
Curling often results from a tight foundation chain, inconsistent tension, or a border with too few stitches. Compare the foundation width with the patterned fabric before adding more rows.
If the foundation is the problem, remaking the chain with a larger hook may be more effective than trying to correct the distortion through blocking.
Why Do My Basketweave Blocks Look Uneven?
The most common causes are misplaced post groups and inconsistent row changes. Count four stitches per raised or recessed section and verify the eight-row sequence.
A block that looks correct on the reverse side but wrong on the front may indicate that FPdc and BPdc were not exchanged correctly after turning.
Can I Use Worsted-Weight Yarn?
Yes, but the blanket will be thinner and the same stitch count will produce a smaller finished width. Make a swatch and calculate the required starting chain using the eight-stitch repeat.
Do not assume that a 10 mm hook will be suitable for worsted yarn. Follow the yarn’s recommended hook range and adjust according to the desired fabric.
Can I Make the Blanket Reversible?
Traditional basketweave fabric shows related but different relief patterns on opposite sides. A carefully maintained post-stitch repeat produces organized texture on both faces, although the appearance may not be identical.
Care and Washing Instructions
The washing method depends on fiber content. Many polyester blanket yarns are machine washable, but temperatures and drying recommendations vary by product.
Check the care label before washing. For a large, heavy throw, use a machine with sufficient capacity to allow the blanket to move without excessive compression.
Dry according to the yarn manufacturer’s directions. Avoid high heat unless the label specifically permits it. Measure the finished blanket after washing and drying, because the fabric may relax or change dimensions.
Store the blanket folded rather than hanging it from one edge for long periods. Heavy post-stitch fabric can stretch under its own weight.
Related Crochet Patterns
- Chunky Waffle Stitch Blanket: A raised grid texture created with post stitches. [INTERNAL LINK NEEDED: chunky waffle stitch blanket]
- Easy Moss Stitch Crochet Throw: A flatter, reversible alternative for a lighter blanket. [INTERNAL LINK NEEDED: moss stitch crochet throw]
- Modern Cable Crochet Blanket: Raised cable columns for a sculpted surface. [INTERNAL LINK NEEDED: crochet cable blanket]
- Simple Crochet Blanket Border: A tutorial on neat edges and rectangular corners. [INTERNAL LINK NEEDED: crochet blanket border]
Conclusion
This basketweave crochet blanket pattern uses a fixed eight-row stitch sequence, a consistent 130-stitch working width, and a separate cream edging. The main technical priorities are post-stitch orientation, even tension, and accurate corner placement. Before making a full-size version, crochet a practice swatch and compare its measurements with the target gauge.
Save the finished project to Pinterest with a close-up photograph of the raised texture. On Instagram, share the completed blue and cream throw using #BlueBasketweaveBlanket and include the yarn brand and hook size for reference.
Would you keep the cream border at three rounds, or increase it to five to make the contrast more prominent?
Pattern References
- Jo to the World — Basketweave Stitch Blanket
- Make & Do Crew — Basketweave Blanket
- Daisy Farm Crafts — Basketweave Blanket
- Ravelry — Terracotta Basketweave Blanket
Pattern note: This is an original, untested basketweave approximation inspired by the reference photograph. The exact construction of the photographed blanket has not been established. Crochet a sample and confirm gauge, yarn requirements, and appearance before publishing it as a tested pattern.









