Introduction
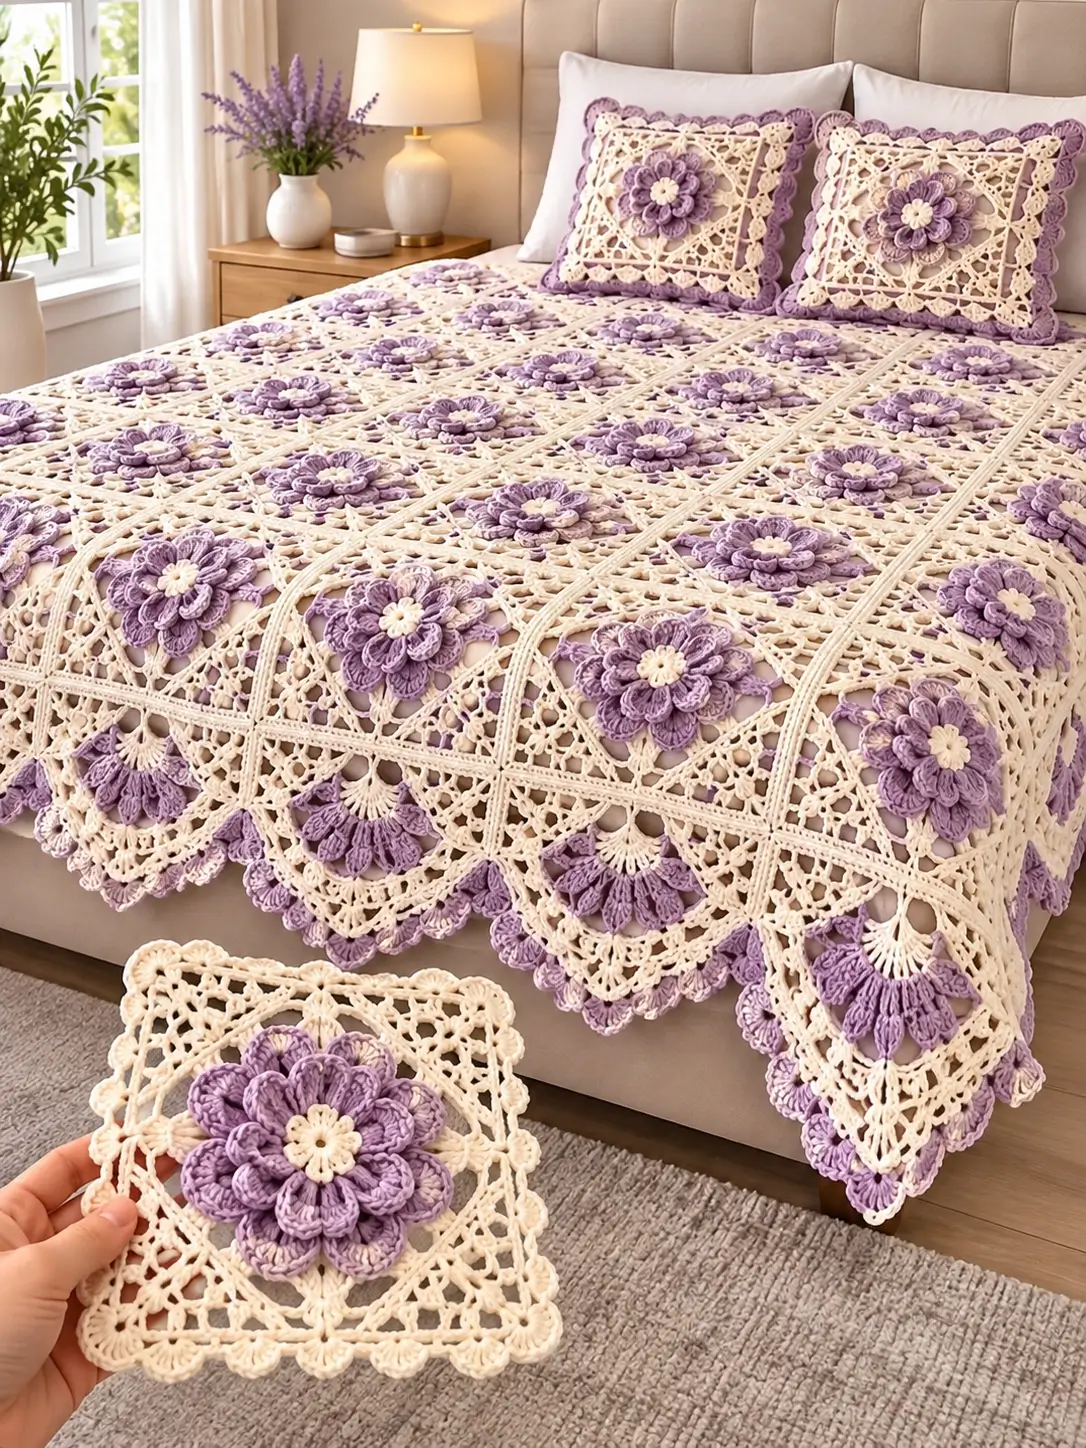
The raised lavender flowers in this bedspread need enough depth to remain dimensional without pulling the cream lace squares inward. This lavender 3D flower crochet bedspread pattern combines layered floral centers, an openwork ivory square foundation, decorative joining lines, and a deep fan-style border. The construction is modular, making the finished dimensions adjustable by changing the number of squares rather than altering the floral motif itself.
The Design: What Makes This Bedspread Different
The design separates decoration from structure. Each motif begins with a dimensional lavender flower, but the flower does not carry the weight of the neighboring squares. A cream openwork framework surrounds it and provides stable joining edges. This keeps the petals raised while allowing the bedspread to lie relatively flat.
The flower uses several graduated petal layers. Smaller petals form the center, medium petals add volume, and larger outer petals create the dominant floral shape. Cream lace then changes the geometry from circular to square. The border repeats the same lavender-and-cream relationship with large fan motifs. A common construction failure is making the flower too tight before adding the square frame; that causes the corners to curl upward and makes joining difficult.
Project Info at a Glance
| Skill Level | Construction | Target Square Size | Hook | Best For |
|---|---|---|---|---|
| Intermediate–Advanced | Joined floral lace squares | Approximately 20–22 cm | 4.0–4.5 mm | Bedspread, throw, pillow cover |
The measurements are project targets rather than dimensions taken directly from the photograph. Block one finished sample square before calculating the final bedspread size.
Materials and Tools
Yarn
- Warm ivory or cream — DK or light worsted cotton/cotton blend — main square framework and border
- Lavender — DK or light worsted — main flower petals
- Light lavender — optional — petal highlights
- Cream — small amount — flower centers
Tools
- 4.0–4.5 mm crochet hook
- Yarn needle
- Stitch markers
- Scissors
- Blocking mats
- Rust-resistant pins
- Tape measure
Abbreviations
- MR — magic ring
- ch — chain
- sl st — slip stitch
- sc — single crochet
- hdc — half double crochet
- dc — double crochet
- tr — treble crochet
- sp — space
- st/sts — stitch/stitches
- FLO — front loop only
- BLO — back loop only
- RS — right side
Pattern Construction
Make one complete test motif before starting production. The target is a square measuring approximately 20–22 cm after blocking. The flower should remain centered with its outer petals clear of the joining edge.
The motif is worked in three stages:
- Layered lavender flower.
- Cream structural lace square.
- Firm outer joining frame.
Layered Lavender Flower
Flower Center
With cream yarn:
Round 1: Make an MR. Ch 1, work 8 sc into the ring. Join with sl st. (8 sts)
Round 2: Ch 1. Work 2 sc in each stitch around. Join. (16 sts)
Round 3: Ch 1. Work 1 sc in each stitch around. Join. (16 sts)
Fasten off cream.
First Lavender Petal Layer
Join lavender yarn to one stitch of Round 3.
Foundation Round: *Sc in next 2 sts, ch 4.* Repeat 8 times. Join to first sc. (8 loops)
Into each ch-4 loop work:
sc, hdc, 3 dc, hdc, sc.
Repeat around to create eight compact petals.
Fasten off or carry the yarn to the rear of the flower.
Second Petal Layer
Join lavender yarn behind the first layer, positioning each new loop between two front petals.
Create eight ch-6 loops evenly around the back of the flower.
Into each ch-6 loop work:
sc, hdc, 2 dc, 2 tr, 2 dc, hdc, sc.
Repeat around.
The second layer should extend beyond the first without completely covering it.
Large Outer Petal Layer
Join yarn behind the second petal layer.
Create eight evenly distributed ch-8 loops.
Into each loop work:
sc, hdc, 2 dc, 3 tr, 2 dc, hdc, sc.
Repeat for all eight loops.
If the petals curl excessively, increase the loop to ch 9. If they spread too loosely, reduce it to ch 7. Make this decision on the master motif and use the same count for every square.
Petal Definition Round
The photograph shows strong definition around the raised petals. A surface edging can reproduce that effect without making another full petal layer.
With light lavender or the main lavender yarn, join at the base of an outer petal.
Work sl st or loose sc around the exposed outer edge of the petal.
At the petal tip work:
(sc, ch 2, sc) into the central stitch.
Continue down the opposite edge.
Repeat around all outer petals.
Preparing the Flower for the Square
The cream lace foundation must attach behind the flower rather than through the visible outer petal tips.
Turn the flower to the wrong side.
Identify eight evenly distributed attachment points behind the final petal layer.
Join cream yarn.
Foundation Round: *Sc into attachment point, ch 6.* Repeat around. Join with sl st.
You now have eight cream chain spaces behind the flower.
Converting the Flower into a Square
Mark every second chain space as a corner. This gives four corner spaces and four side spaces.
Cream Square Round 1
Into each marked corner ch-6 space work:
2 hdc, 2 dc, 2 tr, ch 3, 2 tr, 2 dc, 2 hdc.
Into each side ch-6 space work:
2 hdc, 4 dc, 2 hdc.
Join with sl st.
Lay the motif flat before continuing. Four recognizable corners should now be visible.
Cream Square Round 2
Ch 3.
Dc in each stitch along the first side.
In each ch-3 corner work:
2 dc, ch 3, 2 dc.
Repeat around and join.
Open Lace Round
Ch 1.
Work:
*sc in next st, ch 3, skip 2 sts*
across each side.
At every corner work:
sc, ch 5, sc into the corner space.
Repeat around.
Decorative Lace Round
Into each regular ch-3 space work:
sc, ch 3, sc.
Into each corner ch-5 space work:
sc, ch 3, 2 dc, ch 3, 2 dc, ch 3, sc.
This begins the open geometric framework visible around the flowers.
Outer Structural Frame
The final rounds need to be flatter than the flower section because they form the joining surface.
Frame Round 1
Work hdc evenly around the motif.
In each corner work:
2 hdc, ch 2, 2 hdc.
Frame Round 2
Work one sc in each stitch around.
At each corner work:
sc, ch 2, sc.
Frame Round 3
Work hdc around.
At each corner work:
2 hdc, ch 2, 2 hdc.
Fasten off.
Blocking the Master Square
Block the first completed motif before making the remaining squares.
Pin the four corners first, then position the midpoint of every side.
Target approximately 20–22 cm square, but allow the yarn and gauge to determine the natural final measurement.
Measure both diagonals. Keep their difference within approximately 5 mm when possible.
The outer flower petals should stop at least 1.5–2 cm before the joining edge.
Calculating the Bedspread Size
Use the blocked dimension of the master square rather than the unblocked measurement.
If one motif blocks to 21 cm, the following grid gives useful starting dimensions before the outer border:
| Square Layout | Approximate Motif Area |
|---|---|
| 5 × 6 | 105 × 126 cm |
| 6 × 8 | 126 × 168 cm |
| 8 × 10 | 168 × 210 cm |
| 9 × 11 | 189 × 231 cm |
| 10 × 12 | 210 × 252 cm |
Add the planned border depth to both dimensions before selecting the final layout.
Estimating Yarn
The most accurate method for a dimensional floral bedspread is to weigh one completed blocked square.
For example, if one square weighs 70 g and the bedspread uses 80 squares:
70 × 80 = 5,600 g.
Then add yarn for joining, border work, swatching, and normal variation.
This number is an example only. A flower made from DK cotton can weigh substantially less than one made with thicker yarn.
Color Distribution
The photographed design uses cream as the dominant structural color and lavender only for the dimensional flowers and selected border details.
A practical allocation is:
- Cream: square framework, joins, lace border, flower centers.
- Lavender: all major petal layers.
- Light lavender: optional petal edging or small accent rounds.
Keeping the joining framework cream prevents the large number of flowers from visually merging into one solid lavender surface.
Making the Remaining Squares
Once the master motif is blocked and approved, make the remaining flowers assembly-line style.
Complete all cream centers first.
Next make the first lavender petal layer on every motif.
Continue with the second and third layers.
Finally, add the cream square framework.
This production method makes tension differences easier to detect.
Joining the Squares
Block every square before joining.
Arrange the motifs on a clean surface in the planned bedspread layout.
Rotate any square that has a slightly different petal orientation until the overall arrangement looks balanced.
Flat Slip-Stitch Join
Place two squares with matching edges together.
Using cream yarn, work a relaxed slip stitch through the corresponding outer loops.
Do not pull the joining yarn tightly.
Join complete rows first, then connect those rows into the full bedspread.
Alternative Single Crochet Join
A visible raised seam can be made with sc instead of sl st.
Work one sc through matching stitches of both motifs.
Keep the seam on the right side if a decorative grid is desired.
Decorative Intersection Flowers
Small lavender flowers can be added where four squares meet.
Small Flower
With cream:
Round 1: 6 sc in MR. Join. (6)
Change to lavender.
Work into each stitch:
sl st, ch 3, 2 dc, ch 3, sl st.
Repeat six times.
Fasten off.
Sew the flower over the four-square intersection using only its center. Leave the petals free.
Bedspread Border
The border in the reference is deeper than the individual square frames. Build it in stages rather than attaching large scallops directly to the joined motifs.
Border Round 1
With cream, work sc evenly around the complete bedspread.
At each outer corner work:
sc, ch 2, sc.
Border Round 2
Work hdc around.
At each corner:
2 hdc, ch 2, 2 hdc.
Openwork Border Round
Work:
*sc, ch 4, skip 3 sts*
around each side.
Adjust only near the corners so the repeat remains symmetrical.
Second Openwork Round
Into each ch-4 space work:
sc, ch 5, sc.
Repeat around.
Large Lavender Fan Border
The lower edge of the photographed bedspread contains pronounced lavender fan or petal details.
Change to lavender.
Into selected ch-5 spaces work:
sc, hdc, 2 dc, 5 tr, 2 dc, hdc, sc.
In the next space work a single sc.
Repeat the fan spacing consistently around the bedspread.
Before completing the full round, work at least three fans and lay the border flat. Increase the number of skipped spaces if the fans overlap.
Cream Lace Between the Fans
Join cream at the top of one lavender fan.
Work chains between neighboring fans to create the open net visible in the border.
A useful starting sequence is:
sc at fan tip, ch 5, sc into intermediate cream space, ch 5, sc at next fan tip.
Repeat around.
Final Scalloped Edge
With cream, work into each border arch:
sc, hdc, 3 dc, hdc, sc.
For a larger scallop use:
sc, hdc, 2 dc, 3 tr, 2 dc, hdc, sc.
Use the larger version only if the border lies flat during a test section.
Optional Lavender Picot
A narrow lavender accent can be added to the final cream scallops.
Join lavender at the beginning of a shell.
Work loose sl sts around the shell.
At the center stitch work:
ch 3, sl st into first ch.
Continue around the remaining shell.
Matching Pillow Cover
The matching pillows can use one oversized floral square or a small grid of bedspread motifs.
For a decorative pillow approximately 45 × 45 cm, two blocked 21 cm motifs across plus joining and border rounds create a useful starting width.
Make the front from four floral squares.
For the back, work a solid cream panel in hdc or use additional lace squares over a fabric pillow insert.
Join the front and back with sc around three sides.
Insert the cushion and close the final side with a removable closure or permanent seam.
Optional Pillow Scallops
Repeat a reduced version of the bedspread border around the pillow:
Round 1: Cream sc.
Round 2: Lavender hdc.
Round 3: Cream ch-4 arches.
Round 4: Lavender or cream shells.
This keeps the pillow visually connected to the bedspread without making the edge excessively heavy.
Alternative Colorways
The same construction works with different flower colors while keeping the cream lace framework unchanged.
- Dusty rose + cream — replace lavender with muted pink.
- Sage green + ivory — use green petals for a botanical variation.
- Burgundy + warm cream — increases contrast and makes the dimensional petals more prominent.
- Powder blue + ivory — produces a cooler two-color version.
Assembly
- Make one complete layered flower and check that all petal layers remain centered.
- Add the cream lace framework and block the master square to the selected measurement.
- Make the required number of identical squares using the master motif as the size reference.
- Block all motifs and check that corresponding sides differ by no more than approximately 5 mm.
- Arrange the squares in the complete bedspread layout before beginning any seams.
- Join the squares in rows with cream yarn, keeping the joining tension relaxed.
- Connect the completed rows and add the small decorative intersection flowers where desired.
- Work the cream foundation border around the entire bedspread before adding lavender fans.
- Complete the open lace, fan, and scalloped border sections, checking every 30–40 cm for rippling.
- Weave in all ends, wash according to the yarn instructions, and block the completed bedspread to its final rectangular dimensions.
The finished bedspread should have flat cream joining lines, clearly separated square motifs, raised lavender flowers, and a border that hangs without pulling the corners inward.
7 Technical Tips
- Keep at least 1.5–2 cm between the outer petals and the square edge. Petals extending into the joining area become trapped in the seams and make adjacent squares appear uneven.
- Check both diagonals after blocking every test square. A difference greater than approximately 5 mm indicates that one corner or side is being worked more tightly than the others.
- Do not tighten the rear petal loops. Tight ch-6 or ch-8 foundations pull the flower into a cup instead of allowing the layers to spread across the square.
- Use stitch markers on all four square corners. Losing a corner during the openwork rounds can shift the frame and turn the motif into a diamond.
- Join only through the structural cream frame. Catching a lavender petal in the seam compresses the flower and creates an irregular ridge between motifs.
- Test three border fans before continuing around the bedspread. If three consecutive fans overlap or produce more than approximately 1 cm of rippling, increase the spacing before completing the border.
- Weave each tail through at least 4–6 cm of dense stitches. Avoid hiding structural ends only inside open chain spaces because repeated bedspread movement can loosen short tails.
Washing and Blocking
Large dimensional flowers require gentler blocking than the surrounding lace.
Wash the finished piece according to the yarn label. Remove excess water without twisting.
Lay the bedspread flat and square the outer edges first.
Align the vertical and horizontal joining lines.
Shape the lace border next.
Do not flatten the flowers under heavy objects. Arrange each petal layer by hand and allow the raised sections to dry naturally.
Final Size Check
Measure the bedspread only after it is completely dry.
Check the width at the top, center, and bottom.
Repeat the measurement vertically on the left side, center, and right side.
If the difference is minor, reshape the border rather than stretching individual floral squares.
For a bedspread intended to cover the mattress and drape down the sides, calculate the desired drop before selecting the motif grid. Adding another complete row of squares is structurally better than trying to gain substantial length from an oversized border.
Conclusion
This lavender 3D flower crochet bedspread pattern is built around a structural separation between the raised flower and the cream joining frame. Complete and block one master motif first, record its final measurement, then calculate the required square grid for the bed. Keep the dimensional petals away from joining seams and test the fan border in short sections before continuing around the full perimeter. Matching pillow covers can be constructed from the same floral squares for a coordinated set. Save the design to Pinterest or share the completed project on Instagram with #Lavender3DFlowerBedspread. Would you keep all the flowers lavender, or alternate two shades across the square grid?









