Introduction
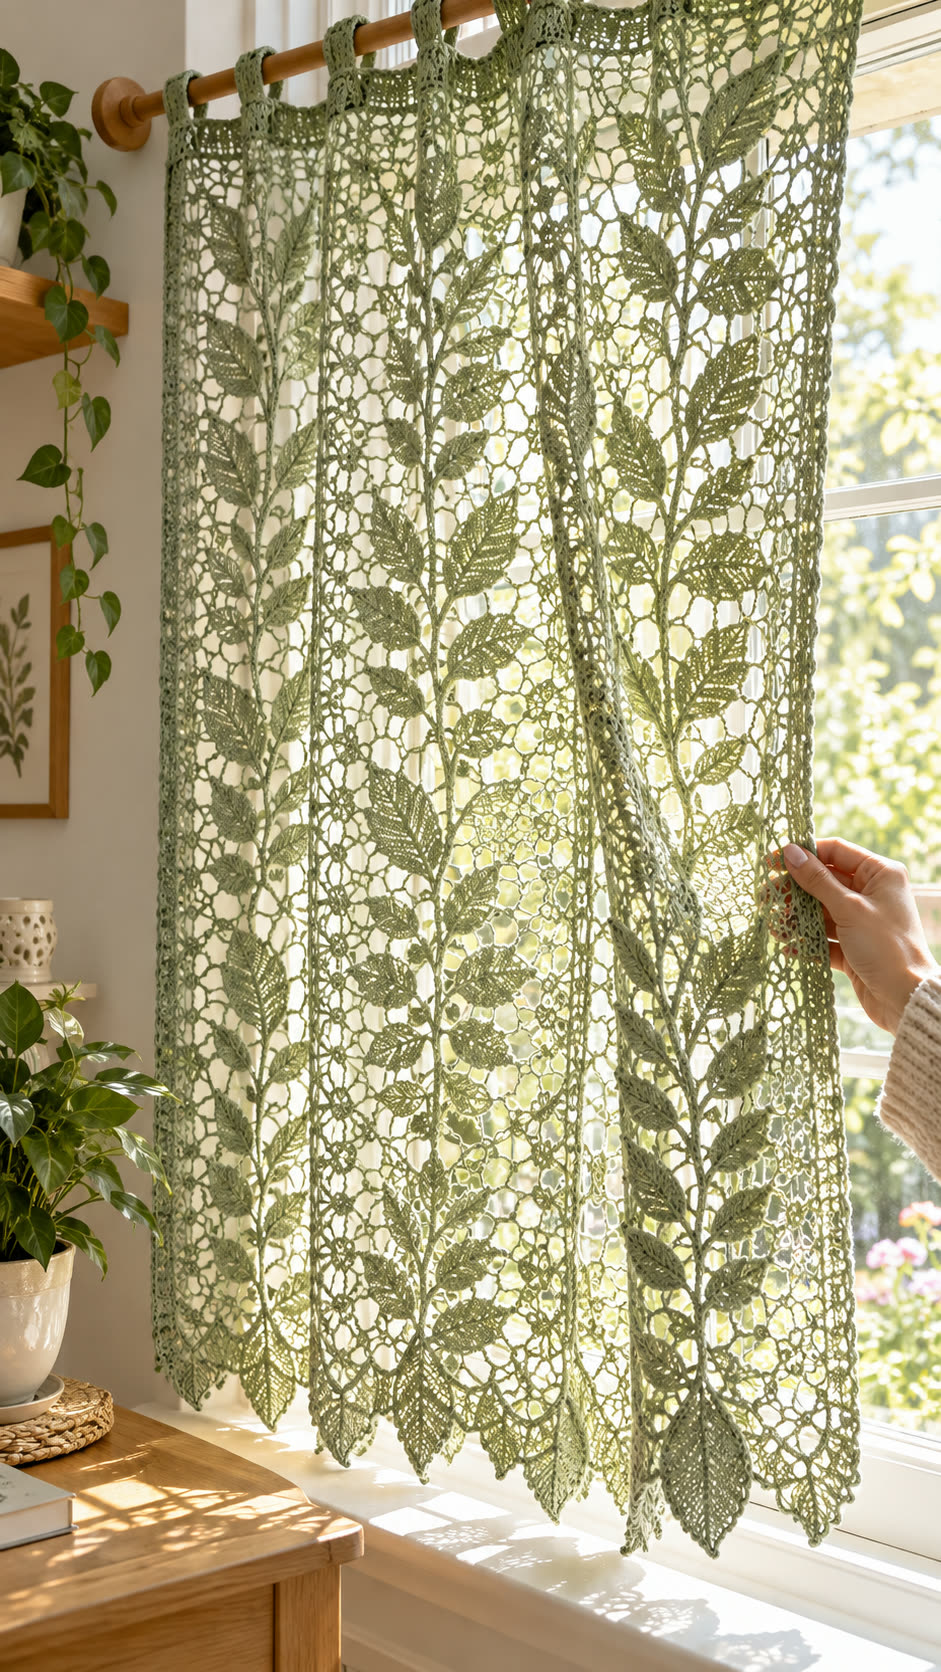
Botanical curtains require two structures to work together: a stable lace grid and flexible leaf-covered stems. This sage green crochet lace curtain pattern combines both in a modular window panel made from cotton thread, chain spaces, and individually crocheted leaves. Designed for intermediate to advanced crocheters, the proposed 90 × 140 cm curtain filters daylight while leaving much of the window visible. Its modular construction also allows repairs without dismantling the entire panel.
The Design: What Makes This Botanical Curtain Different
The curtain uses a vertical vine arrangement rather than a conventional repeating shell pattern. Its leaves are crocheted separately, then attached to an open mesh background. This keeps the leaf outlines visible and allows the foliage to face different directions.
The second structural decision concerns weight. A lightweight crochet curtain needs a firm upper edge to support the hanging loops without pulling the lace out of shape. The lower edge remains open and flexible, reducing bulk.
Finally, the botanical motifs are distributed across several vertical columns instead of covering every mesh opening. This maintains light transmission and prevents the curtain from appearing too dense. One common mistake in a crochet leaf lace curtain is attaching too many motifs before blocking the background. The result can be uneven tension, diagonal pulling, and distorted openwork. Blocking the mesh first provides a more reliable foundation.
Materials and Tools
Yarn
- Main yarn: Sage-green size 3 cotton crochet thread, approximately 400–550 g.
- Accent yarn: A slightly lighter sage or olive-green cotton thread, approximately 50–100 g.
- Suggested alternatives: Mercerized cotton from established crochet-thread ranges such as Aunt Lydia’s or Anchor, provided the thread size and gauge are compatible.
The quantities above are provisional allowances for the proposed curtain, not verified consumption figures. Use matching fiber content for the main panel and motifs. Combining cotton with stretchy acrylic may cause the leaves and mesh to change shape differently after washing.
Published curtain patterns illustrate why thread selection matters. Yarnspirations’ Shell Stitch Curtain Panel uses size 10 cotton crochet thread with a 3.75 mm hook, while a vintage filet curtain by Susan Bates specifies finer size 20 thread and a 1.25 mm hook. These are documented examples, not interchangeable specifications for this design.
Tools
- 2.5 mm crochet hook, subject to swatch results
- Tapestry needle for attaching motifs
- Stitch markers for repeat boundaries
- Blocking pins and a blocking mat
- Measuring tape for panel dimensions
- Sharp scissors
- Wooden or metal curtain rod, sized to the window
- Optional fabric-safe starch for a firmer finished appearance
Gauge and Sizing
The working mesh consists of repeated chain spaces separated by double crochet stitches.
Make a sample using 10 mesh spaces across and 12 rows high. Wash, dry, and block the sample using the method intended for the finished curtain.
Measure its blocked width and height. Calculate the number of repeats required for your window using:
Repeats = Target width ÷ Blocked repeat width
Round to a whole repeat. For height, divide the desired curtain drop by the blocked height per row, then adjust to a whole number of rows.
Do not assume that 2.5 mm hooks produce identical gauge across different cotton threads.
Crochet Abbreviations
All instructions use US crochet terminology.
| Abbreviation | Meaning |
|---|---|
| ch | Chain |
| sc | Single crochet |
| hdc | Half double crochet |
| dc | Double crochet |
| tr | Treble crochet |
| sl st | Slip stitch |
| st / sts | Stitch / stitches |
| sp | Space |
| rep | Repeat |
| RS | Right side |
| WS | Wrong side |
| FO | Fasten off |
The pattern is worked flat in rows, with separate motifs joined afterward. Magic rings and invisible decreases are unnecessary because this project contains no stuffed pieces.
Pattern — Step by Step
Original modular pattern instructions. Stitch counts are derived from the construction below; finished dimensions, drape, and assembly have not been physically sample-tested.
Part 1: Crochet the Openwork Lace Background
The background consists of open chain spaces, forming a flexible grid that supports the decorative foliage.
For a sample panel, work 30 mesh spaces across. Larger curtains can be made by increasing the repeat count.
Foundation row: Ch 93.
Row 1: Dc in the 6th ch from the hook. *Ch 2, skip 2 ch, dc in next ch.* Repeat from * to * across. (30 mesh spaces, 31 dc)
Row 2: Ch 5, turn. Skip the first dc and the first ch-2 space; dc in the next dc. *Ch 2, skip the next ch-2 space, dc in the next dc.* Repeat across. (30 mesh spaces, counting the turning-chain space; 30 worked dc plus the turning chain representing the first dc)
Rows 3–12: Repeat Row 2. (30 mesh spaces per row)
Continue repeating Row 2 until the panel reaches the required length, allowing room for the upper hanging band and lower edging.
For a full curtain, work a width and height determined by your blocked sample rather than treating the 30-space swatch as a guaranteed 90 cm panel.
Technical note: The first and last vertical edges should remain reasonably straight. If the mesh narrows, recount the 30 chain spaces and check that the turning chain is not being treated as an extra space.
Fasten off only after the desired length is reached, leaving a 20 cm tail for weaving.
Part 2: Crochet the Botanical Leaves
The leaf motif is formed around a central foundation chain. Taller stitches widen the middle, while shorter stitches shape the base and tip.
This original leaf variation is designed to be repeated in different orientations across the lace grid.
Make approximately 24 leaves for an initial decorative sample, adding more as needed.
Ch 13.
Round 1 — First side: Sc in the 2nd ch from the hook. Hdc in the next 2 ch. Dc in the next 6 ch. Hdc in the next 2 ch. Work 3 sc in the final ch to turn around the tip.
Round 1 — Opposite side: Working into the unused loops along the other side of the foundation chain: Hdc in the next 2 ch. Dc in the next 6 ch. Hdc in the next 2 ch. Sc in the final available foundation chain. Join with a sl st to the first sc.
Stitch count: 25 stitches, excluding the joining slip stitch.
Round 2 — Decorative edge: Ch 1. Sc in each of the next 11 stitches. Work (sc, ch 2, sc) in the next stitch to form a pointed accent. Sc in each of the remaining 13 stitches. Join with a sl st. (26 sc and one ch-2 point)
Fasten off, leaving a 20 cm sewing tail.
The decorative point may sit slightly off-center depending on how the leaf lies after blocking. Reposition the point over the tip if a more symmetrical silhouette is desired.
For a visible central vein, embroider a loose line of running stitches along the original foundation chain using matching cotton thread.
Leaf appliqué construction using graduated stitch heights is a recognized technique; related examples are documented by Jess Crafting and Jayda InStitches. The counts above belong to this article’s original variation.
Part 3: Crochet the Vertical Vine Stems
The vertical stems connect the separate leaf motifs visually. They should follow the mesh without forcing it into a curved shape.
Make 3–5 stems for a typical decorative panel, depending on its blocked width.
Row 1: Ch to the required stem length.
Row 2: Sc in the second ch from the hook and in every remaining chain. (Foundation chain count minus 1)
Fasten off, leaving a 25 cm sewing tail.
For a finer stem, use surface slip stitches directly over the mesh intersections instead of making a separate cord.
Position the stems vertically. Allow gentle curves between leaves, but avoid pulling the mesh sideways.
Attaching the Leaves
Place each leaf at an angle of approximately 30–60 degrees to its supporting stem.
Alternate leaves from left to right. Maintain a vertical separation of roughly 8–12 cm between major leaves as an initial layout target.
Sew each leaf base to the stem and catch one or two outer stitches against the background mesh. Avoid stitching around the entire leaf perimeter; the free edges create dimensional relief.
Part 4: Crochet the Small Flower Motifs
Small flowers can be positioned between the vines to reproduce the botanical density of the reference image.
Make 12–20 flowers, depending on panel size.
R1: Make a magic ring. Work 6 sc into the ring. Join with a sl st. (6)
R2: *Ch 3, skip 1 sc, sl st into the next sc.* Repeat 3 times. (3 chain-3 loops)
R3: Into each ch-3 loop, work (sc, hdc, 3 dc, hdc, sc). (7 stitches per petal; 21 stitches total)
Join with a sl st and fasten off.
The result is a three-petal accent flower. To create a denser floral display, make additional flowers rather than increasing the stitch count inside each petal.
Attach the flowers at selected mesh intersections, preferably between the larger leaves.
Part 5: Crochet the Hanging Loops
The photograph shows wide crocheted loops wrapped around a wooden curtain rod. These distribute the weight along the top edge and allow the panel to hang without separate metal rings.
First reinforce the upper edge.
Top band — Row 1: Join yarn at the upper corner. Work sc evenly across the top edge, placing approximately 3 sc per mesh space. For 30 mesh spaces, this gives 90 sc.
Rows 2–4: Ch 1, turn. Sc in every stitch. (90)
Fasten off.
Individual hanging loops: Make 7 loops for the 30-space sample.
Row 1: Ch 9.
Row 2: Sc in the 2nd ch from the hook and in every remaining ch. (8)
Rows 3–16: Ch 1, turn. Sc across. (8)
Fasten off, leaving a 30 cm sewing tail.
Each loop forms a narrow rectangular strap. Fold it over the curtain rod and stitch both ends securely to the upper band.
Space the seven loops evenly, with one near each outer edge. Adjust the strap length to the rod diameter and required clearance.
For a heavier curtain, consider a sewn fabric header or an additional reinforced crochet band.
Part 6: Crochet the Lower Scalloped Border
The lower edge should have enough definition to hang neatly without forming a thick, rigid hem.
Border Row 1: Join yarn at the lower corner. Work sc evenly across the edge, placing approximately 3 sc into each mesh space. (90 sc for 30 mesh spaces)
Border Row 2: Ch 1, turn. *Skip 2 sc, work 5 dc into the next sc, skip 2 sc, sl st into the next sc.* Repeat across the row. (15 shell motifs for a 90-stitch edge)
Fasten off and weave in the yarn tail.
Each five-double-crochet shell produces a rounded scallop. For a more pointed lower border, a picot edging can be added after blocking.
Check that the border remains level when suspended. If it flares excessively, use fewer stitches along the first border row rather than pulling the finished edge tighter.
Assembly — 10 Steps
- Block the mesh background to the intended dimensions and allow it to dry completely.
- Lay the panel on a flat surface with the right side facing upward.
- Pin the main vine stems in vertical columns, leaving open mesh between them.
- Sew the stems to selected mesh intersections using small, loose stitches.
- Position the largest leaves first, alternating their direction along each stem.
- Attach smaller leaves and flower motifs to fill selected spaces without covering the entire mesh.
- Attach the reinforced hanging loops to the upper band, checking that the rod passes through freely.
- Complete the scalloped lower border and secure all loose ends.
- Lightly dampen and reblock the assembled curtain, protecting any raised leaf details.
- Hang the curtain and inspect the top edge, stem alignment, and lower border for distortion.
The completed curtain should hang from its reinforced header, with the botanical motifs supported by the openwork background.
7 Technical Tips for Better Crochet Lace Curtains
- Keep mesh repeats consistent. Mark every tenth mesh space and recount at the end of each row; missing one ch-2 space can shift the entire vertical pattern.
- Avoid excessive tension in the foundation chain. If the first row measures more than 5% narrower than the blocked sample width, remake the foundation with a larger hook.
- Control the weight of the leaf motifs. Heavy appliqués can stretch open mesh downward, so attach each leaf at both its stem and one supporting mesh intersection.
- Check the hanging loop length. Measure the rod circumference and test one folded strap before making the remaining loops; an undersized loop can bunch the upper edge.
- Prevent uneven blocking. Pin the panel into a measured rectangle rather than pulling individual corners, which can turn square mesh openings into diamonds.
- Maintain consistent flower placement. Position flowers at least two mesh spaces away from a large leaf when possible; crowded motifs can make the background sag.
- Secure yarn tails without thick knots. Weave each tail through approximately 4–6 cm of neighboring stitches, reversing direction once to reduce the chance of ends working loose.
How to Customize the Curtain for Different Windows
Small Kitchen Window
For a narrow kitchen window, use fewer mesh repeats and shorten the panel to the required drop. Three botanical vines may provide enough visual detail without making the curtain appear crowded.
A short panel also needs fewer leaf motifs, which reduces weight and makes laundering easier.
Bedroom Window
For a bedroom, make two matching panels and divide the total required width between them. Keep the leaf arrangements similar, but reverse the direction of selected branches to create a balanced pair.
The open mesh offers decorative screening rather than full privacy. Add a separate lining or blind if the window requires privacy at night.
Living Room Window
A longer living room curtain benefits from additional vertical vines and a wider spacing between motifs. The leaves can be concentrated near the outer edges while the central mesh remains comparatively open.
Measure the curtain after blocking and hanging. Cotton may settle slightly under its own weight, particularly in a long panel.
Washing and Caring for Handmade Crochet Curtains
Cotton crochet curtains require gentle handling because the open mesh can snag on buttons, zippers, and other laundry items.
Hand wash in cool or lukewarm water using a mild detergent suitable for cotton. Support the fabric when lifting it from the water rather than pulling it by one corner.
Remove excess water by rolling the curtain inside a clean towel. Do not wring the fabric, as twisting may deform the leaf motifs and chain spaces.
Lay the curtain flat to dry. Reshape the scalloped edge, straighten the vines, and align the hanging loops while the cotton remains damp.
If the curtain loses definition, repeat the blocking process using its original finished measurements.
Avoid hanging wet cotton lace directly from the rod because the additional water weight can stretch the upper band.
Frequently Asked Questions
What yarn is best for a crochet lace curtain?
Cotton crochet thread is a practical choice because it produces defined stitches and can be blocked into an even shape. Mercerized cotton also provides a smooth surface that makes leaf outlines easier to distinguish.
Can beginners make this botanical curtain?
A crocheter who can work chains, single crochet, double crochet, and flat motifs can practice the individual components. The full curtain is better classified as intermediate to advanced because it requires consistent gauge, accurate spacing, and careful assembly.
How much yarn does a crochet curtain need?
The amount depends on curtain dimensions, thread thickness, stitch density, and the number of appliqués. For this proposed 90 × 140 cm design, the preliminary allowance is 450–650 g, but a weighed and measured swatch is needed for a reliable estimate.
Can the curtain be made in white or beige?
Yes. The pattern structure works with white, cream, beige, dusty blue, and other colors. Maintain a consistent thread weight when changing colors so that the mesh and leaves remain proportional.
How do I make the curtain wider?
Increase the number of three-chain mesh repeats in the foundation. Each additional repeat adds one mesh opening, so calculate the required number from the blocked sample width before beginning the full panel.
Does a crochet lace curtain provide privacy?
Openwork lace diffuses the view through a window during daylight but does not provide dependable privacy, especially when interior lights are on at night. Pair it with a separate blind or lined curtain when privacy is required.
Conclusion
This sage green crochet lace curtain pattern combines an open mesh foundation, separate botanical leaves, vertical stems, decorative flowers, and crocheted hanging loops. Its modular structure allows the width, length, and foliage density to be adjusted for different windows. Before making a full-size panel, complete a blocked gauge sample and one finished leaf to confirm the proportions and calculate yarn consumption. Save the design to Pinterest for future reference, or share a photograph of your finished curtain on Instagram using #SageGreenCrochetCurtain. For a more natural botanical arrangement, would you position the largest leaves near the lower edge or distribute them evenly along each vine?









