Introduction
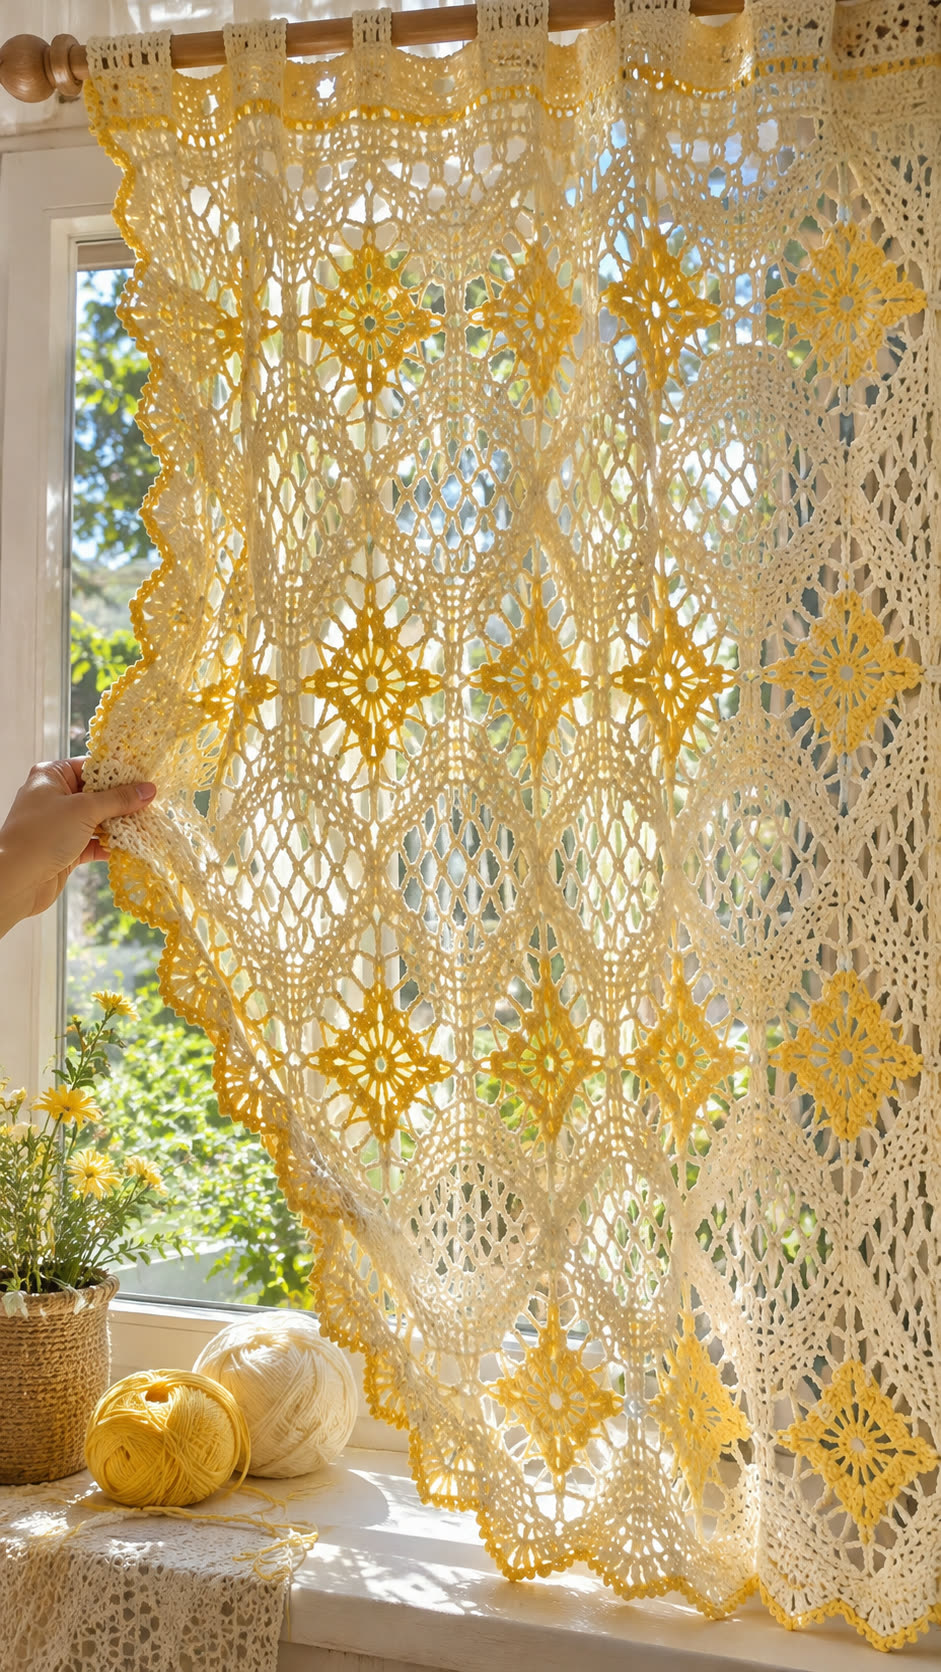
Yellow eight-point flowers interrupt the ivory diamond mesh of this curtain at regular intervals, creating a repeating pattern that remains visible against daylight. This crochet lace curtain pattern uses sport-weight cotton, a 3.5 mm hook, and joined square motifs to produce a panel approximately 60 × 95 cm after blocking. Intended for intermediate crocheters, the modular construction allows you to adjust the curtain for kitchen windows, narrow doors, or decorative window panels.
The Design: What Makes This Floral Curtain Different
The curtain combines three structural elements: an open flower center, a square joining framework, and a continuous outer border. Each flower begins with eight radiating petals. A surrounding ivory round changes the circular shape into a square, allowing individual pieces to connect without large gaps between their corners.
The yellow accents are concentrated in selected motifs rather than distributed throughout the entire panel. This produces a clear repeating arrangement while keeping most of the fabric ivory.
A common problem with a floral crochet curtain is uneven motif sizing. Small differences accumulate across multiple joined squares and can distort the panel. Blocking every motif to the same measurement before assembly reduces this problem.
The resulting floral crochet curtain has the appearance of a vintage crochet window curtain while using a repeatable construction system.
Project Info at a Glance
| Feature | Details |
|---|---|
| Skill level | Intermediate |
| Estimated working time | 18–30 hours |
| Target finished size | 60 × 95 cm |
| Crochet hook | 3.5 mm |
| Yarn | Sport-weight cotton |
| Construction | 24 joined square motifs |
| Best for | Decorative windows, kitchens, cottage-style interiors |
| Terminology | US crochet terms |
Time and finished dimensions are estimates for the proposed design, not measured results from a completed sample.
Materials and Tools
Yarn
Select smooth cotton yarn with consistent thickness. Mercerized cotton gives the flower edges clear stitch definition, while matte cotton produces a less reflective surface.
- Ivory or cream sport-weight cotton — 350–400 g: For the main motif framework, joining, header, and outer border. Suggested type: mercerized cotton comparable to sport-weight Patons Grace.
- Golden-yellow sport-weight cotton — 50–75 g: For the flower centers, selected motif petals, and edging accents.
- Optional extra ivory cotton — 50 g: Useful for extending the panel or testing alternative borders.
The recommended amounts are provisional purchasing allowances. Actual consumption depends on motif gauge, yarn length per gram, and the final number of repeats.
Tools
- 3.5 mm crochet hook
- Tapestry needle with a blunt tip
- Scissors
- Stitch markers for identifying corners and repeat positions
- Measuring tape
- Rust-resistant blocking pins
- Blocking mats or a flat padded surface
- Curtain rod approximately 15–20 mm in diameter for the proposed loops
The 3.5 mm hook and sport cotton combination is documented in a comparable floral curtain pattern. A finer hook and lace thread can also produce traditional curtain lace, but they change the finished gauge substantially.
Abbreviations
| Abbreviation | Meaning |
|---|---|
| MR | Magic ring |
| ch | Chain |
| sc | Single crochet |
| hdc | Half double crochet |
| dc | Double crochet |
| tr | Treble crochet |
| sl st | Slip stitch |
| sp | Space |
| st / sts | Stitch / stitches |
| rep | Repeat |
| RS | Right side |
| WS | Wrong side |
All instructions use US terminology. Beginning chains do not count as stitches unless specifically stated.
This flat lace design does not require decreases; invisible decreases are normally used in three-dimensional crochet to reduce visible gaps.
Pattern — Step by Step
Before You Begin: Gauge and Motif Layout
The curtain is constructed from 24 identical square motifs. Twelve use yellow flower centers, and twelve use ivory centers. Each square is joined to adjacent squares with a whip stitch through the outer loops.
Arrange the squares in a 4-across by 6-down grid, alternating yellow and ivory flower centers in a checkerboard arrangement.
The proposed gauge is one blocked motif measuring approximately 14 × 14 cm. Four motifs across produce a main fabric width of about 56 cm before the outer border. Six motifs down produce approximately 84 cm before the header and edging.
Make one motif first, block it, and measure across opposite sides. If it measures more than 14 cm, try a smaller hook. If it measures less, try a larger hook or revise the number of motifs.
A gauge adjustment affects both width and length. Do not calculate the final curtain size from an unblocked motif.
Flower Center — Round 1
Make 24. Use yellow for 12 centers and ivory for 12 centers.
R1: Work 8 sc into a magic ring. Join with a sl st to the first sc. (8 sc)
Pull the magic ring closed and keep the center flat. A loose ring can enlarge when the finished curtain hangs.
Flower Petals — Round 2
R2: Ch 1. Repeat the following sequence eight times: sl st into the next sc, ch 5, sl st into the same sc. (8 ch-5 petal loops)
Each loop creates one elongated petal. Maintain equal chain tension so that the petals have consistent length.
The chains form the main visual openings around the center.
Flower Framework — Round 3
R3: Sl st into the first ch-5 loop. Ch 1, then work (sc, ch 5, sc) into that loop. Repeat (sc, ch 5, sc) in each of the remaining seven loops. Join with a sl st to the first sc. (16 sc, 8 ch-5 spaces)
The new chain spaces extend the flower into a larger circular framework. Four of these spaces will become the corners of the square in the following round.
Check that all eight spaces are present before continuing.
Square Formation — Round 4
Change to ivory if the flower center is yellow.
R4: Sl st into the first ch-5 space. Ch 1. Work (3 sc, ch 2, 3 sc) into the first space. Work 5 sc into the next ch-5 space. Repeat this two-space sequence three more times, using the next pair of spaces each time. Join with a sl st to the first sc. (44 sc, 4 ch-2 corner spaces)
There should be four clear corners and four straight sides.
Fasten off, leaving a 20 cm yarn tail for joining.
The square may curl slightly before blocking. Place it flat, position each corner at a right angle, and pin it to the chosen gauge measurement.
Joining the Floral Squares
Arrange the blocked motifs in six rows of four. Alternate yellow and ivory flower centers as shown in the proposed layout.
Place two squares with right sides together. Using an ivory yarn tail and tapestry needle, whip stitch through corresponding outer loops along one edge. Match each corner space and each group of edge stitches.
Each side contains 11 sc between the corner spaces. Pair those stitches consistently and work a joining stitch through each corresponding pair. Join corner to corner without pulling the seam tight.
Continue until each horizontal row contains four motifs. Then join the six rows together along their horizontal edges.
Lay the assembled fabric flat after every completed row. If one seam becomes shorter than the adjacent motifs, remove and rework it rather than stretching the lace.
A joined-motif curtain uses the same broad modular principle found in published doily and flower curtain patterns, although the stitch instructions here are newly developed.
Outer Border — Round 1
Yarn: ivory.
Attach ivory yarn at any corner of the assembled panel.
R1: Ch 1 and work sc evenly around the entire rectangle, placing 3 sc into each outer corner. Along the motif edges, work approximately one sc into each available sc and one sc into each ch-2 corner space.
Join with a sl st to the first sc.
The total stitch count depends on how the motif seams are treated. Record your actual border count and adjust by one or two stitches near a seam if necessary to keep the border flat.
This is an edging round, not an amigurumi-style fixed-count round.
Decorative Mesh Border — Round 2
Yarn: ivory.
R2: Ch 1. Work sc in the first stitch, then repeat ch 3, skip 2 sc, sc in next sc along each straight edge.
At each corner, work (sc, ch 3, sc) into the center corner stitch.
Continue around the panel, distributing any remaining stitches evenly before the next corner. Join with a sl st.
The mesh round creates an open transition between the square motifs and the final scalloped edge.
Scalloped Side and Bottom Edging
Yarn: ivory, with optional yellow accents.
Attach yarn to the upper corner of one side edge. Work the following sequence into successive ch-3 spaces:
R1: (Sc in next ch-3 space, 5 dc in following ch-3 space), repeating along the side and bottom edges.
At each bottom corner, add a second group of 5 dc if needed to prevent the edging from pulling inward.
Continue up the opposite side and fasten off at the top corner.
For a yellow accent, join yellow yarn to the outer edge of selected scallops and work one sl st into each stitch across those scallops. Do not tighten the slip stitches, since a tight decorative round can shorten the border.
This edging is worked along three sides only. Leave the top edge available for the curtain header.
Curtain Header — Row 1
Yarn: ivory.
With the right side facing, attach ivory yarn at the upper-left corner.
Row 1: Ch 1, work 1 sc into each available stitch or space along the top edge, then turn.
Count the stitches in this row. The header must remain the same width as the joined motifs.
Curtain Header — Rows 2–5
Row 2: Ch 3 (counts as first dc), work 1 dc in each remaining sc, turn.
Row 3: Ch 1, sc in each dc across, turn.
Row 4: Repeat Row 2.
Row 5: Repeat Row 3.
Fasten off and weave in the ends.
This creates a compact band that supports the hanging loops and distributes the weight of the curtain across the rod.
Hanging Loops — Make 8
Yarn: ivory.
R1: Ch 25. Sc in the second chain from the hook and in each remaining chain. (24 sc)
R2: Ch 1, turn, sc in each sc across. (24 sc)
R3: Ch 1, turn, sc in each sc across. (24 sc)
Fasten off, leaving a 25 cm tail for attachment.
Fold each strip into a loop and place both ends against the top of the curtain header.
Position the first and last loops near the upper corners. Space the remaining six loops evenly between them.
Sew both ends of each loop securely to the header, passing the needle through several stitches. Test one loop on the intended rod before attaching all eight.
For a larger rod, increase the starting chain count and test the folded length before completing the set.
Optional Yellow Flower Appliqués
The reference image includes several prominent yellow floral shapes. To emphasize this feature, make additional small flowers and attach them over selected motif centers.
Yarn: golden yellow. Make 4–8 as desired.
R1: Work 8 sc into a magic ring. Join with a sl st. (8 sc)
R2: Repeat sl st in next sc, ch 4, sl st in same sc eight times. (8 ch-4 loops)
R3: Work (sc, hdc, dc, hdc, sc) into each ch-4 loop. (40 stitches across 8 petals)
Fasten off, leaving a 20 cm sewing tail.
Pin each appliqué in place and sew through its center and petal bases. Keep the outer petal tips free to preserve the layered appearance.
These appliqués are optional. The main curtain already contains flower centers within its square motifs.
Assembly — 10 Steps
- Block the motifs. Pin all 24 squares to a consistent measurement and allow them to dry completely.
- Arrange the color sequence. Place four motifs across and six down, alternating yellow and ivory centers.
- Join the first horizontal row. Whip stitch four squares together, matching the corners and outer edge stitches.
- Complete the remaining rows. Make five additional rows using the same joining method.
- Join the rows vertically. Sew the six rows together, checking that each seam aligns with the adjacent motif corners.
- Work the perimeter. Add the ivory foundation edging and decorative mesh round.
- Finish the sides and bottom. Crochet the scalloped border, then add selected yellow accents if desired.
- Make the header. Work the five header rows across the upper edge without narrowing the panel.
- Attach the hanging loops. Sew eight loops evenly along the header and test their fit on the curtain rod.
- Complete the final blocking. Weave in every yarn tail, dampen the panel, and pin the border and corners into their final positions.
The finished panel consists of 24 joined motifs, one perimeter border, one header, and eight hanging loops.
7 Technical Tips for a Better Crochet Curtain
- Mark every corner. Place a stitch marker in each ch-2 corner space of the square motif. Missing one corner space can turn the intended square into an uneven polygon.
- Measure after blocking. Aim for a consistent 14 cm motif width before joining. A difference of 5 mm per motif can create approximately 2 cm of width variation across four motifs.
- Keep joining seams flexible. Tight whip stitches pull adjacent squares inward and create visible ridges. Lay each completed seam flat before proceeding to the next motif.
- Check flower symmetry. Every central flower should contain eight petal loops. A missing loop changes the spacing of the square framework and can distort the corners.
- Test rod clearance. Fold one completed hanging strip around the intended curtain rod before making the remaining seven. A loop that fits tightly around a 20 mm rod may be difficult to slide.
- Control border tension. If the scalloped edge begins to ripple, too many stitches may be concentrated in one area. If it curls inward, the border may need additional space or looser tension.
- Secure yarn tails. Weave each tail through at least 5 cm of nearby stitches, changing direction once. Short unsecured tails can work loose when the curtain is washed or adjusted on the rod.
Adjusting the Curtain to Fit Your Window
The modular construction makes it possible to change the dimensions without redesigning the flower motif.
First, measure the desired finished width and length. Decide whether the curtain should hang flat or have some fullness. A highly open lace design is often easier to read visually when it hangs relatively flat.
Next, measure one blocked motif. Use that measurement to estimate how many squares are needed across and down.
For a narrower curtain, remove one column of motifs. For a longer panel, add one or more horizontal rows. Keep the border and header measurements in the calculation rather than using the motif grid dimensions alone.
If the curtain needs gathering, allow additional fabric width. However, heavy gathering can obscure the yellow flower motifs and reduce the visual clarity of the geometric arrangement.
Choosing the Right Yarn for Crochet Window Curtains
Cotton is a practical material for this design because it produces defined stitch openings and can be blocked into a regular shape. Mercerized cotton is especially useful for the small decorative spaces around the flower petals.
Sport-weight cotton is a reasonable choice for the proposed version. A finer crochet thread can create a lighter, more intricate curtain, but it requires more stitches and considerably more working time.
A published vintage curtain uses fine cotton lace yarn, while other floral curtain designs use sport or DK cotton. The variation confirms that curtain construction can accommodate several yarn weights when the gauge and final dimensions are adjusted.
Avoid combining different yarn weights within the same motif unless the design has been tested. A thicker yellow center surrounded by finer ivory yarn may cause the square to buckle.
For consistent color placement, purchase all the ivory yarn from the same dye lot where possible. Slight color differences are particularly noticeable in a large uninterrupted background.
Washing, Blocking, and Hanging
Handwashing is a controlled option for a lace curtain with many joined motifs. Follow the yarn manufacturer’s care label, particularly when using dyed cotton.
Wash gently in cool or lukewarm water with a mild detergent suitable for the yarn. Avoid twisting the wet curtain, since the weight of absorbed water can stretch the openwork.
Press excess water out using a clean towel. Spread the panel flat on blocking mats and arrange the sides so that they remain parallel.
Pin the flower points, corners, and scalloped edging into shape. Allow the fabric to dry fully before removing the pins.
When hanging the curtain, distribute its weight across all eight loops. If the center begins to sag, additional loops can be attached to the header.
For a wide curtain, consider dividing the design into two separate panels. This reduces the weight carried by each header and allows the curtains to be opened independently.
Common Crochet Curtain Problems
Why does the lace curtain look uneven?
The most common causes are inconsistent motif gauge, tight joining seams, or uneven blocking. Compare the width and height of individual motifs before attaching them.
Why is the curtain shorter after hanging?
Cotton can change shape under its own weight. Depending on stitch structure and blocking, some sections may lengthen while others pull inward. Measure the hanging panel before making a final adjustment to the lower border.
Can acrylic yarn replace cotton?
Acrylic can be used, but it may behave differently during blocking and hanging. Test a full motif before substituting the yarn, and follow the manufacturer’s heat-care instructions.
Can this design be used as a kitchen curtain?
Yes, provided the panel is kept clear of cooking flames, hot surfaces, and other heat sources. A shorter version can be made by reducing the number of motif rows.
How can the curtain be made more private?
The open mesh provides decorative coverage rather than full privacy. Install a separate sheer or opaque lining behind the crocheted panel if privacy is required.
Conclusion
This crochet lace curtain pattern uses repeated square motifs, alternating flower colors, and a continuous openwork border to create a decorative window panel. The construction can be adjusted by changing the number of motifs, but every size change should begin with a blocked gauge sample.
Before making the full curtain, complete one yellow flower motif and one ivory motif, measure both, and test the joining seam. Record the results for consistent assembly.
Save the finished project to Pinterest or share your completed curtain on Instagram using #YellowFlowerLaceCurtain.
For your own window, would you arrange the yellow flowers in alternating rows or concentrate them along the lower edge?









