Introduction
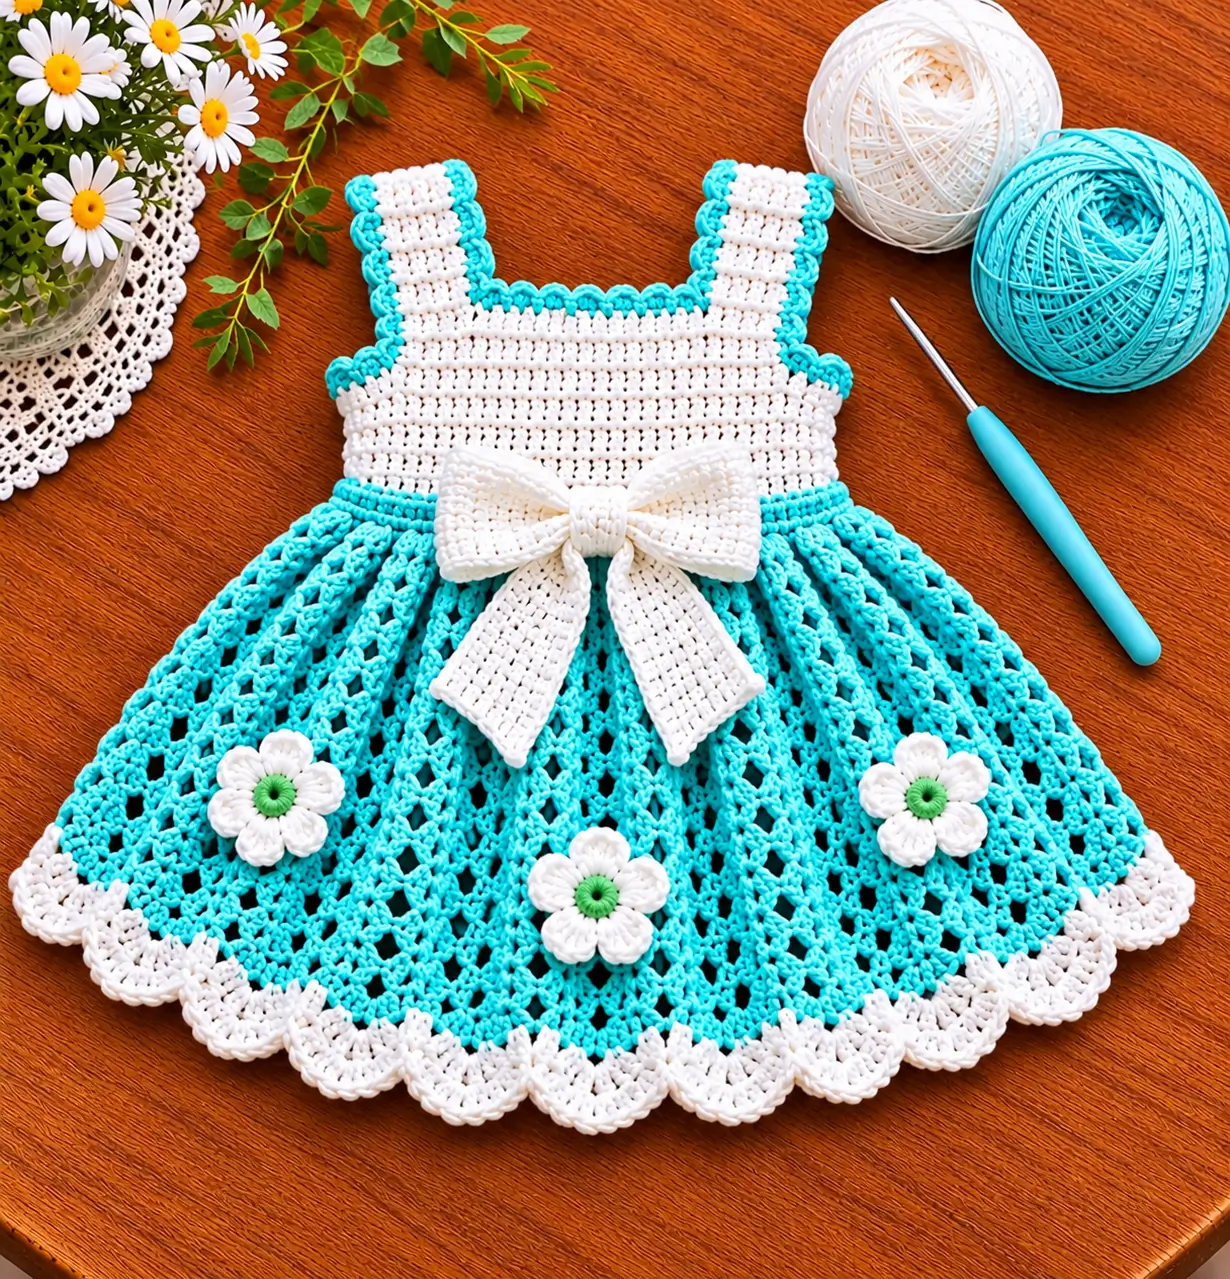
The wide turquoise lace skirt needs enough expansion to form its fan shape without forcing the white bodice to stretch at the waist. This turquoise and white crochet daisy dress pattern uses a fitted sleeveless bodice, an openwork skirt, a contrasting scalloped hem, three-dimensional flower appliqués, and a large removable bow. The construction can be adjusted to a child’s actual chest, waist, and dress-length measurements rather than relying on one fixed age size.
The Design: What Makes This Crochet Dress Different
The dress combines a relatively dense white bodice with a much lighter turquoise skirt. That contrast is structural as well as decorative. The bodice needs close stitches so it holds its shape around the chest, while the skirt uses chain spaces and taller stitches to create width without excessive weight.
A turquoise edging traces the straps, neckline, and armholes, visually connecting the upper section with the skirt. The large white bow sits directly over the waist seam. Three white flowers with green centers are distributed across the lower skirt, while a broad white shell border finishes the hem.
The main construction risk is adding too much skirt width in the first round. Expansion should be distributed gradually so the waist seam stays flat.
Project Info at a Glance
| Skill Level | Construction | Yarn | Hook | Fit Method |
|---|---|---|---|---|
| Intermediate | Bodice + attached lace skirt | DK #3 cotton or cotton blend | 3.0–3.5 mm | Made to measurements |
The measurements and stitch quantities below are construction targets for a photo-inspired dress. Check the garment against the intended wearer before completing the bodice, straps, and final skirt length.
Materials and Tools
Yarn
- Bright turquoise — DK #3 cotton or cotton blend — main skirt and upper edging
- White — DK #3 cotton or cotton blend — bodice, bow, flowers and hem
- Green — small quantity — flower centers
Tools
- 3.0–3.5 mm crochet hook
- Yarn needle
- Stitch markers
- Scissors
- Flexible tape measure
- Blocking pins
Abbreviations
- MR — magic ring
- ch — chain
- sl st — slip stitch
- sc — single crochet
- hdc — half double crochet
- dc — double crochet
- tr — treble crochet
- sp — space
- st/sts — stitch/stitches
- RS — right side
- WS — wrong side
Measurements Before You Crochet
Take four measurements before calculating the foundation chain:
- Chest circumference
- Waist circumference
- Shoulder-to-waist length
- Waist-to-finished-hem length
Also measure the desired strap length from the upper front bodice, over the shoulder, to the upper back.
For a comfortable child’s dress, the bodice should not be constructed from the photograph alone. Use the actual chest measurement and add a small amount of wearing ease appropriate to the yarn and stitch fabric.
Gauge Swatch
Using white yarn and the selected hook, crochet a swatch at least 12 × 12 cm in the stitch intended for the bodice.
Wash or damp-block it as the finished dress will be treated.
Measure the number of stitches across 10 cm and the number of rows vertically over 10 cm.
Use those numbers to calculate the bodice rather than copying a fixed foundation-chain count.
White Bodice
The bodice can be worked as one rectangular tube if sufficient stretch is available, or as front and back panels that are joined at the sides.
For easier size adjustment, the panel method is used here.
Front Foundation
Calculate the required front width from half the finished chest circumference.
Chain until the foundation measures that width without stretching.
Row 1
Hdc in the second chain from the hook and in every chain across.
Turn.
Row 2
Ch 1.
Hdc in each stitch across.
Turn.
Rows 3 onward
Repeat Row 2 until the panel reaches from the upper waist to the required underarm height.
Check the width after several rows. Dense cotton crochet can become wider after blocking, so compare the blocked gauge rather than stretching the panel while measuring.
Back Bodice
Make the back panel using the same stitch count and number of rows as the front.
Place the two panels together and verify that their combined circumference matches the required finished chest measurement.
Join the side seams with slip stitches or mattress stitch.
Leave sufficient space at the top for the armholes.
Creating the Upper Neckline
The photograph shows a broad, nearly square neckline rather than a narrow neck opening.
Mark the left and right strap positions on the front panel.
Do the same on the back, checking that the markers align vertically.
The space between the front straps forms the neckline.
Shoulder Straps — Make 2
With white yarn, chain enough stitches to reach from the front bodice to the corresponding point on the back.
Row 1
Hdc in the second chain from the hook and across.
Rows 2–4
Ch 1, turn.
Hdc across.
Add or remove rows to obtain the required strap width.
Fasten off, leaving a long sewing tail.
Attach each strap securely to both the front and back bodice.
Turquoise Upper Edging
Join turquoise yarn at one upper edge.
Work sc evenly around the neckline.
Continue around the strap edges and armholes if a continuous decorative outline is desired.
For the small scalloped appearance visible in the reference, work the following repeat over selected edge stitches:
sl st in next st, 3 hdc in next st, sl st in next st.
Do not force a scallop into every available stitch. Space the repeats according to the gauge so the neckline remains flat.
Preparing the Waist
Turn the bodice so the lower edge is accessible.
Join turquoise yarn at a side seam.
Waist Round 1
Work one sc evenly around the lower bodice.
Count the stitches and place a marker at the beginning of the round.
Waist Round 2
Work hdc around, adding increases at regular intervals.
A practical starting point is approximately one increase after every 4–6 stitches.
The exact frequency depends on the desired skirt fullness. The new round should spread outward slightly without producing heavy ripples.
Turquoise Lace Skirt
The skirt uses repeating openwork sections rather than a dense fabric. Expansion is added gradually through the chain spaces.
Skirt Round 1
Repeat around:
dc in next st, ch 1, skip 1 st.
Join with sl st.
Skirt Round 2
Sl st into the first ch-1 space.
Repeat:
2 dc in next ch-1 sp, ch 2.
Join.
Skirt Round 3
Into each ch-2 space work:
2 dc, ch 2, 2 dc.
Join.
This round begins forming the vertical lace sections visible in the skirt.
Open Diamond Lace Section
For the following rounds, work the stitch groups into the chain spaces rather than directly into every stitch.
Round 4
Repeat:
2 dc in next sp, ch 3, 2 dc in next sp, ch 3.
Round 5
Work:
2 dc in next sp, ch 4, sc in next sp, ch 4.
Repeat around.
Round 6
Work:
2 dc in next ch-sp, ch 3, 2 dc in next ch-sp, ch 3.
Repeat around.
The chain spaces should create vertical openings while the dc groups provide enough structure to prevent the skirt from collapsing.
Increasing the Skirt Width
After several lace rounds, lay the dress flat.
The skirt should form a gentle semicircular spread rather than a narrow tube.
If additional width is required, add an extra dc group into selected repeats.
Distribute these increases evenly around the entire skirt. Avoid placing several increases beside one another because that creates isolated ruffles.
Check the skirt every 3–4 rounds.
Continuing the Lace Skirt
Repeat the established openwork sequence until the skirt is approximately 5–7 cm shorter than the required finished length.
Stop at the same point in the lace repeat all the way around.
The remaining depth will be created by the white lower border.
White Hem Foundation
Change to white.
Hem Round 1
Work sc evenly around the lower turquoise edge.
Place approximately 2 sc into larger chain spaces and 1 sc into smaller spaces as needed.
The edge must remain flat.
Hem Round 2
Work hdc around.
Add occasional increases only if the skirt begins pulling inward.
White Scalloped Hem
The photograph uses a broad repeating white shell rather than a narrow picot.
Mark the hem into equal sections before starting the scallops.
A practical shell repeat is:
sl st in next st, skip 1 st, 7 dc in next st, skip 1 st, sl st in next st.
Repeat around.
If the shells are too crowded, increase the number of stitches between them. If large gaps appear, reduce the spacing.
Optional Final Turquoise Outline
A thin turquoise line can be added around the outside of the white shells for additional definition.
Join turquoise and work one relaxed sl st into each available stitch along the scalloped edge.
Do not tighten these slip stitches. Tight surface edging can pull a wide skirt inward.
White Daisy Appliqué — Make 3
The reference uses three prominent white flowers across the turquoise skirt.
Green Center — Round 1
With green yarn, make a MR.
Work 8 sc into the ring.
Join. (8)
Center Round 2
Work 2 sc in each stitch around.
Join. (16)
Fasten off green.
White Daisy Petals
Join white yarn to the green center.
To form eight petals, work each petal over two center stitches.
Repeat around:
sl st in first st, ch 3, 3 dc in next st, ch 3, sl st in same st.
Continue until eight petals are formed.
Fasten off with a long tail for sewing.
Flower Placement
Lay the finished dress flat before attaching the flowers.
Place one flower slightly left of center, one near the lower center, and one slightly right of center.
Avoid placing the flowers on exactly the same horizontal line. The staggered arrangement works better with the expanding lace structure.
Keep every flower several centimeters above the white hem so the petals do not overlap the scallops.
Attaching the Flowers
Sew each flower through its green center first.
Add one hidden stitch near the base of every white petal.
Do not stitch the entire outer edge of each petal to the skirt. Leaving the upper petal area free preserves the dimensional effect.
Check the wrong side and secure all yarn tails away from large lace openings.
Large White Waist Bow
The bow is made separately and attached over the center front waist seam.
Main Bow Rectangle
With white yarn, ch 31.
Row 1
Hdc in the second chain from the hook and across.
Turn. (30)
Rows 2–10
Ch 1.
Hdc across.
Turn.
Continue until the rectangle reaches the desired bow depth.
Fasten off.
Shaping the Bow
Fold the rectangle slightly toward its center from both sides.
Pinch the middle firmly.
Wrap a separate narrow crocheted band around the pinched section.
Sew the band closed at the back.
The finished bow should remain wider than it is tall.
Bow Center Band
With white yarn, ch 7.
Sc in the second chain from the hook and across.
Work approximately 8–12 rows, depending on the thickness of the gathered bow center.
Wrap the strip around the center and sew securely on the back.
Bow Tails — Make 2
With white yarn, ch 11.
Row 1
Hdc in the second chain from the hook and across. (10)
Rows 2–20
Ch 1, turn.
Hdc across.
Adjust the number of rows to produce tails proportional to the dress size.
For a slightly tapered end, decrease one stitch at each side during the final two rows.
Fasten off.
Attaching the Bow
Sew the two tails behind the center bow.
Position the complete bow at the front waist.
Attach the center band securely to the bodice and upper skirt seam.
Add several hidden stitches behind the main bow loops so they do not rotate.
Keep the lower portions of the tails free.
Adjusting the Dress for Different Sizes
The safest way to resize this dress is by measurement rather than age labels.
| Area | How to Adjust |
|---|---|
| Bodice Width | Use chest measurement and gauge |
| Bodice Height | Add or remove hdc rows |
| Straps | Measure shoulder length directly |
| Skirt Fullness | Change increase frequency |
| Skirt Length | Add or remove lace repeats |
| Hem | Adjust shell spacing |
Making the Skirt Fuller
For a wider party-dress silhouette, increase more frequently during the first third of the skirt.
Do not add all the extra stitches directly at the waist.
Instead, distribute increases across several rounds. This produces a smoother transition from the fitted bodice into the open lace.
Making a Lighter Summer Version
Use mercerized cotton or another smooth lightweight cotton in DK #3 or a suitable sport-weight yarn.
A thinner yarn produces smaller flowers and a more flexible skirt.
Recalculate all foundation measurements from a new gauge swatch when changing yarn weight.
Optional Lining
The turquoise skirt is intentionally open, so a fabric lining may be added for practical wear.
Cut a lightweight cotton lining slightly narrower than the full crocheted skirt.
Attach it at the inside waist seam rather than sewing it through the open lace farther down.
The lining should finish above the white scalloped hem so it remains hidden from the front.
Color Variations
| Bodice | Skirt | Flowers | Centers |
|---|---|---|---|
| White | Turquoise | White | Green |
| Ivory | Dusty Pink | Ivory | Mustard |
| White | Lavender | White | Yellow |
| Cream | Sage Green | Cream | Gold |
| White | Sky Blue | White | Yellow |
Assembly
- Crochet and block a bodice gauge swatch, then calculate the front and back widths from the required chest measurement.
- Make the white front and back bodice panels and join the side seams, checking the finished circumference before proceeding.
- Make and attach both shoulder straps, then test the strap length against the required shoulder-to-bodice measurement.
- Work the turquoise edging around the neckline, straps, and armhole areas without allowing the edging to pull the white bodice inward.
- Join turquoise yarn at the waist and establish the skirt foundation, distributing the first increases evenly around the lower bodice.
- Continue the openwork turquoise skirt, adding gradual increases until the required fullness and length are reached.
- Change to white for the lower border and complete the structural rounds followed by the evenly spaced scalloped shells.
- Crochet three white flowers with green centers and sew them to the skirt through their centers and lower petal sections.
- Make the white bow, center band, and two tails, then attach the complete bow securely at the center front waist.
- Weave in every yarn tail, check the bodice and strap measurements, lightly block the skirt and scallops, and reshape the flowers and bow after drying.
The finished dress should have a stable white upper section, an evenly expanding turquoise lace skirt, a level scalloped hem, and decorative elements that do not distort the underlying fabric.
7 Technical Tips
- Check the chest circumference before starting the skirt. A bodice that is even 3–4 cm too narrow becomes difficult to correct once the waist and skirt have been attached.
- Mark the beginning of every skirt round. Missing one lace repeat can shift the vertical openings and become increasingly visible as the skirt expands.
- Distribute skirt increases around the complete circumference. Concentrating several increases within 10 cm creates a local ruffle rather than controlled flare.
- Measure both straps before sewing the second ends. A difference of 1 cm can make the neckline sit noticeably higher on one side.
- Test three white hem shells before completing the border. If the shells overlap, increase the spacing; if the turquoise edge pulls inward, reduce the spacing between shell anchors.
- Attach each flower through the center and petal bases. Sewing only the green center allows the white petals to fold or rotate during washing.
- Secure bow tails through at least 4–5 cm of the upper tail. A single stitch at the top acts as a pivot and lets the long tail twist away from the center front.
Care and Finishing
Follow the washing instructions supplied with the selected yarn. Cotton dresses can gain length after washing, which is why the gauge swatch should be treated before the garment measurements are calculated.
After washing, arrange the dress flat. Straighten the bodice first, then distribute the turquoise skirt evenly around the waist.
Shape each white scallop separately. Arrange the three flowers so the petals remain distinct, then reshape the bow and tails.
Allow the dress to dry completely while flat. Avoid hanging a wet crocheted dress from its shoulder straps because the weight of the skirt can lengthen both straps.
Conclusion
The main construction point in this turquoise and white crochet daisy dress pattern is the transition from the dense white bodice to the expanding lace skirt. Complete the bodice from actual measurements, establish the turquoise waist without excessive increases, and add skirt width gradually through the openwork rounds. Finish the lower edge with white scallops, then attach the flowers and bow only after the main garment dimensions have been checked. A lightweight lining can be added beneath the open skirt when needed. Share your finished version on Pinterest or Instagram with #TurquoiseDaisyCrochetDress. Would you keep the white bow oversized like the reference or make a smaller bow for everyday wear?









