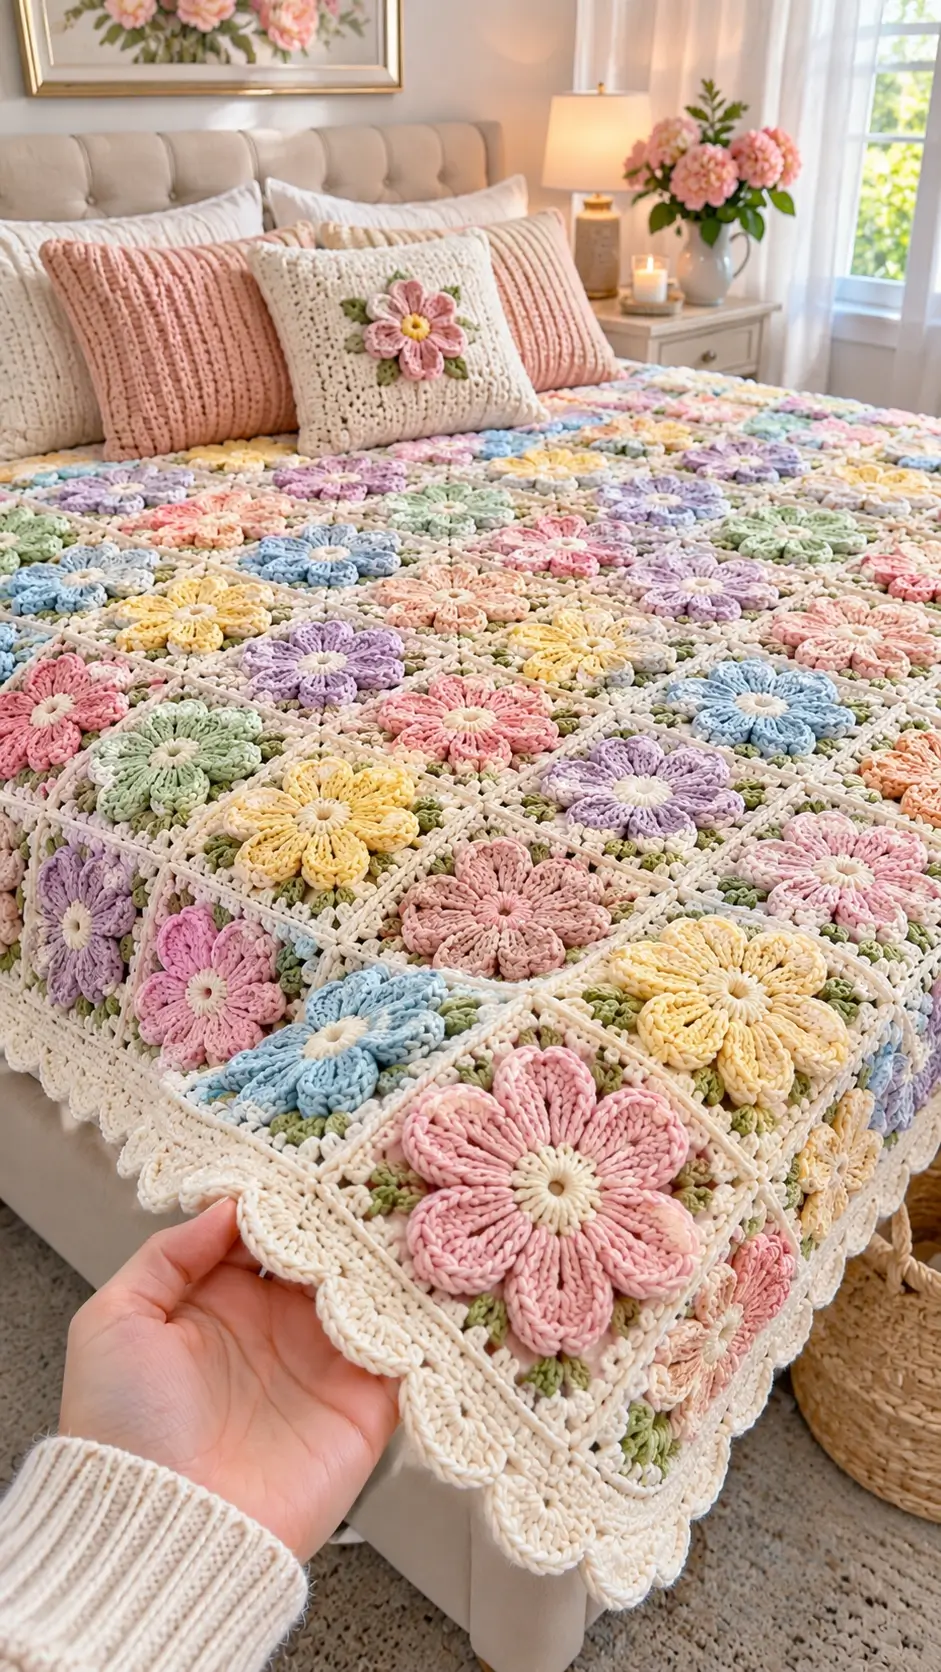
A pink flower overlaps the lower corner of this bedspread, but an ivory lattice—not the petals—forms the structural edge. This pastel 3D flower granny square blanket uses medium-weight yarn, a 5.5 mm hook, eight-petal appliqués, and a scalloped border. The photo-inspired version below is an intermediate project designed as a modular throw or bed topper. Separate motifs make damaged squares easier to replace.
The Design: What Makes This Floral Blanket Different
Three decisions control the photographed look. First, the raised flower is made separately from the background square; the cream grid therefore remains flat while the petals project above it. Second, olive-green leaves sit behind each bloom rather than replacing structural corner stitches. That placement preserves the square’s geometry and imitates the small green accents seen between pastel flowers. Third, the border is worked after joining, so oversized cream scallops read as one continuous perimeter rather than 120 individual edges. A common mistake with a 3D flower granny square is to join motifs before measuring their blocked widths. That two-millimeter difference per block becomes noticeable across ten columns. The floral crochet blanket also needs deliberate color placement: distribute pink, lavender, blue, mint, peach, and yellow across the grid instead of arranging identical shades in stripes.
Project Info at a Glance
| Skill level | Time | Finished size | Hook | Best for |
|---|---|---|---|---|
| Intermediate | Not timed; depends on square count | Planned 10 × 12 squares; about 150–170 × 180–204 cm before edging if each square blocks to 15–17 cm | 5.5 mm, subject to gauge | Large throw or bed topper |
Measurement status: The 15–17 cm target is a planning assumption for this original motif, not a measurement extracted from the photo. For comparison, a published 3D daisy blanket uses 11.5 cm blocks with medium-weight yarn and a 5.5 mm hook source. Crochet and block one sample before deciding the grid.
Materials and Tools
Yarn
Use smooth #4 medium/worsted-weight yarn throughout; Loops & Threads Soft Classic is one published example for a raised-flower blanket. The following color allocation is a design plan, not a verified shopping quantity.
- Warm ivory — medium/worsted — grams: measure a complete base square and border sample — Loops & Threads Soft Classic suggestion.
- Blush pink, dusty rose, pale lavender, powder blue, soft peach, butter yellow, and mint — same weight — grams: weigh one flower of each color, then multiply by planned motifs — matching range suggestion.
- Sage or olive green — same weight — grams: weigh four leaves, then multiply by 120 — matching range suggestion.
- Cream or pale yellow — same weight — grams: weigh one center, then multiply by 120 — matching range suggestion.
A published 99-square throw lists 1,188 g of white and 198–396 g per contrasting shade, but those amounts belong to that designer’s smaller-block construction, not this untested reconstruction published yardage. Weigh the completed prototype: (base + flower + four leaves) × 120, then add the joining and outer-border yarn, plus an allowance for swatches and trimming. Buying from a single dye lot avoids inconsistent cream seams.
Tools
- 5.5 mm crochet hook, or the size that produces an even blocked sample.
- Yarn needle for hidden seams and attaching appliqués.
- Locking stitch markers, at least eight; measuring tape; scissors.
- Blocking mats and rust-resistant pins; a gram scale with 0.1 g resolution.
- No stuffing, safety eyes, or toy hardware is used.
Abbreviations and Stitch Rules
MR magic ring; sc single crochet; inc two sc in one stitch; hdc half double crochet; dc double crochet; tr treble crochet; sl st slip stitch; ch chain; sk skip; sp space; BLO back loop only; RS right side. All instructions use US crochet terms. Beginning ch-3 counts as one dc only where specifically stated; joining sl sts do not count as stitches. Invisible decrease is not needed because these motifs are flat, and the flower is shaped by chain loops rather than decreases.
Construction note: This is an original, photograph-inspired pattern draft, not an identification of the image creator’s instructions. The stitch arithmetic below has been checked, but the pattern has not been physically test-crocheted. Flower pieces are worked in joined rounds; do not work them as a continuous amigurumi spiral.
Pattern — Step by Step
Ivory Granny-Square Base (Make 120)
Yarn: warm ivory. Join every round with a sl st; move to a corner using sl sts. Standard granny-cluster arithmetic.
R1: Ch 4 and sl st to form a ring. Ch 3 (counts as dc), 2 dc, ch 2; repeat [3 dc, ch 2] three more times into the ring. Join. (12 dc; four ch-2 corners)
R2: Work [3 dc, ch 2, 3 dc] in each corner space, with ch 1 between corners; close with a sl st. (24 dc; four ch-2 corners; four ch-1 spaces)
R3: Work [3 dc, ch 2, 3 dc] in each corner; work 3 dc in each side ch-1 space, placing ch 1 between consecutive clusters; sl st to close. (36 dc; four ch-2 corners; eight ch-1 spaces)
R4: Repeat the corner rule, working 3 dc into each of the two side spaces per side, with ch 1 between clusters; close the round. (48 dc; four ch-2 corners; twelve ch-1 spaces)
R5: Repeat with three side spaces per side; sl st to close. (60 dc; four ch-2 corners; sixteen ch-1 spaces)
R6: Repeat with four side spaces per side; close with sl st. (72 dc; four ch-2 corners; twenty ch-1 spaces)
R7: Ch 1; work one sc into each dc and each ch-1 space, and 3 sc into each corner ch-2 space. Close with a sl st. (104 sc: 72 + 20 + 12)
Fasten off with a 20 cm tail for seaming. Place a marker in the middle stitch of each three-sc corner. Block the base without stretching its open spaces into elongated rectangles.
Cream Flower Center (Make 120)
Yarn: cream or pale yellow. Use joined rounds. Counts follow standard six-increase circle math.
R1: 6 sc in MR; join. (6)
R2: Inc × 6; join. (12)
R3: [Sc, inc] × 6; join. (18)
R4: [2 sc, inc] × 6; join. (24)
Do not fasten off if the next round uses the same color. For a contrasting petal color, cut the center yarn leaving a 15 cm tail, and attach the new shade at any stitch of R4.
Eight Raised Petals (Make One Set Per Center)
Yarn: choose one pastel. Each petal is built over a chain loop, not stuffed.
R5: [Sl st in next sc, ch 11, sk next 2 sc] × 8; join to the first anchor. (8 sl-st anchors; eight ch-11 loops; 88 chains)
R6: In each ch-11 loop work [sc, hdc, 4 dc, 3 tr, 4 dc, hdc, sc], then sl st into the anchor before the next loop. Repeat around. (120 petal stitches: eight × 15; eight sl-st joins)
Fasten off, leaving a 25 cm sewing tail. The treble stitches create the outer tip of each raised lobe; keep the shorter sc and hdc stitches at its two ends. Do not iron the petal relief flat. Repeat in assorted colors, distributing approximately 20 motifs in each of six main pastel families for the 120-square grid.
Sage-Green Leaves (Make Four Per Square; 480 Total)
Yarn: sage or olive green. Worked as a small oval around a foundation chain.
R1: Ch 8. (8 chains; seven working positions)
R2: Starting in the second chain from the hook, work sc, hdc, dc, tr, dc, hdc, sc. Ch 1 to pivot and work along the opposite side of the foundation: sc, hdc, dc, tr, dc, hdc, sc; join. (14 worked stitches; one pivot chain)
Fasten off with a 20 cm tail. Fold the leaf lightly along its chain spine, rather than pressing it completely flat. Make four per motif so green points remain visible at the northeast, southeast, southwest, and northwest diagonals.
Optional Matching Pillow Flower (Make One)
Yarn: pink petals, cream center, and sage leaves.
Repeat flower-center R1–R4 (6, 12, 18, 24 stitches) and petal R5–R6 (eight loops, 120 petal stitches). Add four leaves using the leaf instructions above, then sew the arrangement onto an existing crochet pillow front. This is a separate accessory inspired by the pillow in the photograph, not a required part of the blanket. Leave the back of the pillow unobstructed so the cushion cover can be washed.
Join the Squares and Crochet the Scalloped Edge
Arrange the 120 blocks in 10 columns × 12 rows. Pin neighboring corners first, then each side midpoint; sew corresponding R7 stitches together with ivory yarn using a mattress stitch, keeping petals out of the seam. Joining along the framed squares, rather than through raised flowers, stops petals from being trapped between blocks.
Border R1: Attach ivory at any outer corner. Work sc along the exposed outer edges, with 3 sc in each of the four blanket corners; place an additional sc over any visible join gap. Join with sl st. (Perimeter count depends on the actual joins; record it before starting shells.)
Border R2: Ch 1 and sc in the first stitch. Repeat [sk 2, 7 dc in next st, sk 2, sc in next st] around the blanket. (One scallop consumes six perimeter stitch positions.) At each corner, space the shells so one crest faces outward; if necessary, distribute one extra or one fewer skipped stitch on a side rather than forcing a ripple.
Fasten off with a 25 cm tail. Weave the border end back through at least 5 cm of cream stitches, reverse direction for another 5 cm, and trim only after the fabric has rested.
Assembly
- Crochet one base, one flower, and four leaves; wash or damp-block the sample using the planned care method.
- Measure the blocked square across both diagonals and both straight sides; record its actual dimensions and dry weight.
- Confirm that ten squares across and twelve down will fit the intended throw or bed topper before buying the full quantity.
- Crochet the remaining 119 bases, checking that their outside R7 counts remain 104 sc each.
- Make all 120 flower centers, then finish eight petals on each; count the loops before working the tall stitches.
- Work 480 green leaves, grouping them into labeled sets of four to avoid missing accents.
- Tack each bloom at its center and at four gaps between petals, allowing the petal edges to lift.
- Slip the green leaves behind the diagonally facing petals and sew their bases to the cream ground.
- Lay out a 10 × 12 color grid; pin and mattress-stitch the squares into rows, then join the rows.
- Work the outer sc round and scallops, weave away the remaining ends, and give the background seams a final light block.
The completed piece has raised floral motifs, a continuous ivory grid, and one scalloped perimeter.
7 Technical Tips
- Lost-round marker: Place a contrasting marker in the first stitch after every join on the center circle. Missing the start of R4 produces 23 or 25 stitches instead of the required 24.
- Petal-height mismatch: Compare the eight ch-11 loops before R6. One loop made with ten chains shortens a petal and can pull the flower off-center.
- Loose magic ring: Pull the six-stitch center closed before adding R2. Any gap over roughly 3 mm stays visible beneath pale yarn.
- Blocked-size drift: Measure each base after R7, not before the cream edging. Across ten blocks, a 2 mm variation can shift a full row by 2 cm.
- Velvet substitution: Avoid switching only the petals to velvet yarn, which obscures stitch tops and changes loop height. If velvet is essential, remake the complete sample at a suitable hook size rather than keeping the original counts without testing.
- Pinning skew: Pin all four corners and each side midpoint before joining. An unsecured diagonal flower can catch in the seam and twist an otherwise square block.
- Tail escape: Weave each joining tail for 5 cm, reverse direction, and travel another 5 cm. A single short pass can loosen under repeated blanket handling.
Conclusion
The main structural requirement is a square that holds its width after the raised flower and leaves are attached. Complete one blocked prototype, record the weight of each color component, and use that result to calculate yarn purchases for the entire grid. If the first sample differs from the planned 15–17 cm, adjust the column and row count rather than stretching every seam. Photograph the finished pastel 3D flower granny square blanket from directly above for Pinterest, then share a close view of the leaf placement on Instagram using #PastelFlowerGrannyBlanket. Which arrangement creates a more even distribution on your bed: alternating lavender and blue diagonally, or separating them with yellow squares?









