Introduction
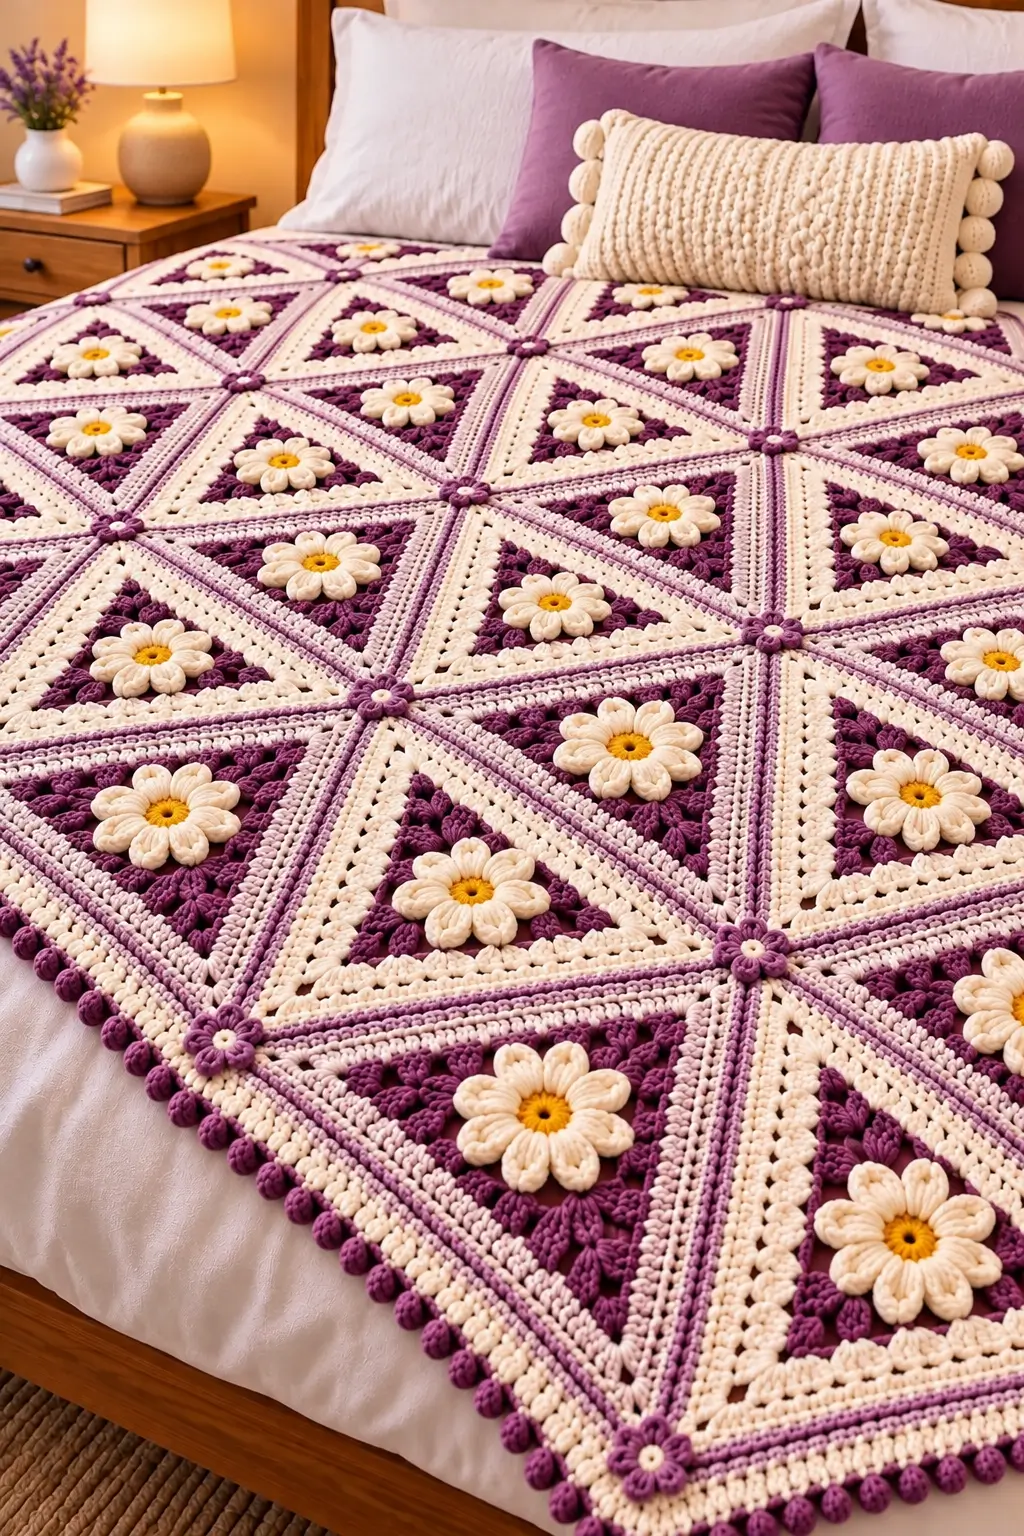
The diagonal seams are the structural feature here: every triangle must meet at the same angle or the flower grid shifts across the bed. This triangle daisy crochet bedspread pattern combines plum and cream triangular motifs, raised white daisies, golden centers, lavender joining lines, and small floral connectors. The photo-inspired construction uses worsted-weight yarn and a 4.5–5.0 mm hook for an intermediate-level decorative bedspread.
The Design: What Makes This Bedspread Different
Instead of conventional square motifs, the blanket is organized around large triangular units. Each triangle carries a dimensional daisy and uses alternating plum and cream sections to create a repeating diamond effect after assembly. Narrow lavender seams emphasize the geometry rather than hiding it.
The flowers are made separately. A compact golden center supports eight rounded cream petals, while plum leaf-like clusters form a textured ring behind selected daisies. Small lavender flowers cover the points where several triangle corners meet.
This separation between structure and decoration matters. The triangles can be blocked, measured, and joined before the raised elements are attached. That keeps the seams flat and reduces distortion around the flowers. The main failure mode is unequal triangle sides; even a small difference becomes obvious where six or more diagonal lines converge.
Project Info at a Glance
| Skill Level | Construction | Triangle Size | Hook | Best For |
|---|---|---|---|---|
| Intermediate | Joined triangular motifs with appliqué flowers | Approx. 24–28 cm per side | 4.5–5.0 mm | Throws and decorative bedspreads |
Materials and Tools
Yarn
- Deep plum — worsted #4 — triangle sections, textured leaves and outer accents
- Warm cream — worsted #4 — contrasting triangles, daisy petals and border
- Dusty lavender — worsted #4 — joining lines and connector flowers
- Golden yellow — worsted #4 — daisy centers
Choose yarns from the same range when possible. Equal yarn diameter is important because cream and plum triangles must block to identical measurements.
Tools
- 4.5–5.0 mm crochet hook
- Yarn needle
- Scissors
- Locking stitch markers
- Tape measure
- Blocking mats
- Rust-resistant pins
Abbreviations
- MR — magic ring
- ch — chain
- sl st — slip stitch
- sc — single crochet
- hdc — half double crochet
- dc — double crochet
- tr — treble crochet
- sp — space
- st/sts — stitch/stitches
- RS — right side
- WS — wrong side
- FO — fasten off
Construction Overview
This is an original photo-inspired construction. The blanket is built from repeated triangular units rather than attempting to crochet the complete geometric surface in one piece.
Make one master triangle first. Block it and record the length of all three sides. Every additional triangle should match those measurements before assembly.
Master Triangle
The triangle is worked from the center outward with three clearly marked corners.
Round 1
Make a MR.
Ch 3, counting as the first dc.
Work:
2 dc, ch 3, 3 dc, ch 3, 3 dc, ch 3.
Join to the top of the beginning ch-3.
You now have three sides and three corner spaces.
Round 2
Sl st to the first corner space.
In the corner work:
(3 dc, ch 3, 3 dc).
Ch 1.
Repeat the same corner group in the next two corner spaces, placing ch 1 between sections.
Join.
Round 3
Sl st to the first corner.
Work:
(3 dc, ch 3, 3 dc) in the corner.
Ch 1.
Work 3 dc into the next side space.
Ch 1.
Repeat around, maintaining the same number of groups on all three sides.
Round 4
Continue the established pattern.
At every corner work:
(3 dc, ch 3, 3 dc).
Across each side, work 3 dc into each ch-1 space with ch 1 between groups.
Round 5 — Openwork Round
At each corner work:
(2 dc, ch 3, 2 dc).
Across each side repeat:
ch 2, skip one corresponding section, sc in next space.
Keep the same number of repeats on all three sides.
Round 6 — Structural Round
At each corner work:
(3 dc, ch 3, 3 dc).
Across each side, work groups of 3 dc into the open spaces.
Ch 1 between groups.
Round 7 — Final Triangle Frame
Ch 1.
Sc evenly across each side.
At each corner work:
(2 sc, ch 2, 2 sc).
Join and FO.
Triangle Measurement
Block the master triangle before making the complete set.
Target approximately 24–28 cm per side, depending on yarn and hook.
Measure all three sides individually. Keep the difference between the longest and shortest side below approximately 5 mm.
Plum Triangle
Work the complete master triangle in deep plum.
This version provides the darker background visible behind many of the cream daisies.
Keep the final structural round firm but not tight because it becomes part of the joining edge.
Cream Triangle
Repeat the identical triangle construction in warm cream.
Do not change hook size to compensate for a difference in color tension. Adjust hand tension and compare the triangle to the blocked master measurement.
Optional Two-Color Triangle
For additional variation, work Rounds 1–4 in plum and Rounds 5–7 in cream.
Another option is to reverse the colors.
Keep the final joining round consistent across the complete set.
3D Daisy Center
With golden yellow, make a MR.
Round 1
Ch 1.
Work 8 sc into MR.
Join. (8)
Round 2
Work 2 sc in each stitch.
Join. (16)
FO yellow.
Daisy Petal Foundation
Join warm cream.
Repeat around:
sc in next st, ch 6, skip 1 st.
Continue until eight petal loops have been formed.
Join.
3D Daisy Petals
Into each ch-6 loop work:
sc, hdc, 2 dc, 3 tr, 2 dc, hdc, sc.
Repeat for all eight petals.
Join.
FO, leaving approximately 20 cm for attachment.
Adding Petal Definition
For a more pronounced raised petal, join cream yarn at the base of a petal.
Work relaxed surface slip stitches along the center line toward the tip.
Stop approximately 5–8 mm before the outer edge.
Repeat on each petal.
Target Daisy Size
Target approximately 9–11 cm from one petal tip to the opposite tip.
Make one master flower and compare the remaining daisies with it.
Keep flower diameter differences below approximately 5 mm.
Plum Textured Leaf Clusters
The dark sections surrounding some flowers can be represented with small leaf-shaped appliqués.
With plum yarn, ch 7.
Starting in the second chain from the hook work:
sl st, sc, hdc, dc, hdc, sc.
Ch 2.
Continue down the opposite side:
sc, hdc, dc, hdc, sc, sl st.
FO.
Textured Leaf Variation
Work surface slip stitches along the center of the leaf.
Pinch the base together and secure it with two small stitches.
This creates the compact raised shape visible around the floral centers.
Arranging Leaves Behind the Daisy
Place approximately 6–8 plum leaves around the center point of the triangle.
Angle their tips outward.
Overlap the bases slightly.
Place the cream daisy over the inner ends so the attachment stitches remain hidden.
Attaching the Daisy
Center the flower on the triangle.
Sew around the yellow disk first.
Add one small anchoring stitch through the inner 1–1.5 cm of each petal.
Leave the outer section of every petal free to preserve the dimensional effect.
Making the Small Connector Flowers
Use dusty lavender for the flowers positioned where triangle corners meet.
Round 1
Make a MR.
Work 6 sc into the ring.
Join.
Petals
Repeat six times:
sl st in next st, ch 3, 2 dc in same st, ch 3, sl st in same st.
FO, leaving a sewing tail.
Connector Flower Center
Using cream or pale yellow, make a small French-knot-style yarn detail or work several compact surface stitches in the center.
Keep the center below approximately 1 cm across.
Planning the Blanket Layout
Block every triangle before arranging the bedspread.
Place neighboring triangles with points facing in alternating directions.
Two triangles form a diamond-like unit.
Repeating those units creates the strong diagonal network visible across the blanket.
Alternating the Colors
A useful arrangement is:
Plum triangle — Cream triangle — Plum triangle — Cream triangle.
On the next row, reverse the starting color.
Do not place every flower in the same background color. Mixing flower placement prevents the blanket from forming heavy color stripes.
Lavender Joining Edge
Before assembly, add a narrow dusty-lavender line to selected triangle edges.
Join lavender at one corner.
Sc evenly across the side.
At the next corner work:
(sc, ch 1, sc).
Continue around if all three edges require the accent.
Cream Joining Edge
Add one cream sc round outside the lavender accent when a wider light seam is desired.
This produces the layered cream-and-lavender diagonal lines seen between the darker triangle sections.
Joining Two Triangles
Place two blocked triangles with right sides upward.
Align corresponding corners and side stitches.
Using lavender or cream, insert the hook through matching inner loops.
Work relaxed sl sts across the complete side.
Checking Seam Tension
After joining approximately 8–10 cm, stop and place the work flat.
The seam should not create a ridge or pull either triangle inward.
If the joined edge is shorter than the unjoined edge, remake the seam with looser slip stitches.
Creating the Diamond Units
Join two triangles along one full side.
Open the piece flat.
The outer perimeter should form a diamond or quadrilateral unit with the diagonal seam running through the center.
Make identical units before assembling full rows.
Joining Diamond Units
Arrange the units so the diagonal lines continue across the blanket.
Join corresponding outer edges using the same seam method.
Check the intersection before completing the next seam.
Intersection Measurement
Where several triangle corners meet, the center should remain compact.
Target an intersection opening below approximately 1–1.5 cm.
Larger openings can weaken the visual connection between the geometric sections.
Adding Connector Flowers
Sew one small lavender flower over selected multi-triangle intersections.
Stitch only through the center and inner petal bases.
The flower hides the seam junction while adding a repeated decorative detail.
Suggested Blanket Sizes
Calculate final dimensions from the blocked triangle rather than relying on a fixed motif count.
| Project | Approximate Finished Size |
|---|---|
| Baby Blanket | 75 × 95 cm |
| Lap Throw | 90 × 120 cm |
| Sofa Throw | 120 × 160 cm |
| Large Throw | 140 × 180 cm |
| Bed Throw | 160 × 200 cm |
| Large Bedspread | 180 × 220 cm or larger |
Estimating the Number of Triangles
Make and block two triangles, join them into one test unit, and measure the complete unit.
Divide the desired blanket width and length by the measured unit dimensions.
Round upward to a complete repeat.
This method accounts for the diagonal geometry more accurately than calculating from one triangle side alone.
Estimating Yarn
Weigh one finished and blocked triangle before attaching the flower.
Then weigh one completed daisy and its leaf cluster.
For example, if a triangle weighs 45 g and a complete floral decoration weighs 15 g, one decorated unit requires approximately:
45 + 15 = 60 g.
If the blanket contains 40 decorated triangles:
60 × 40 = 2,400 g.
Add yarn for seams, connector flowers, border, and approximately 10% reserve.
These weights are calculation examples. Replace them with the actual measurements from your yarn.
First Border Round
After all triangles are joined, use cream yarn.
Ch 1.
Sc evenly around the complete perimeter.
At each outer corner work:
(2 sc, ch 2, 2 sc).
Join.
Lavender Accent Round
Join dusty lavender.
Ch 1.
Sc in every stitch.
At each corner work:
(2 sc, ch 2, 2 sc).
Join.
Cream Structural Border
Join cream.
Ch 2.
Hdc in every stitch around.
At each corner work:
(2 hdc, ch 2, 2 hdc).
Join.
Openwork Border
Ch 1.
Sc in the first stitch.
Repeat:
ch 3, skip 2 sts, sc in next st.
Use a ch-5 space at each corner.
Continue around.
Plum Decorative Edge
Join plum in the first ch-3 space.
Into each regular space work:
(sc, hdc, 3 dc, hdc, sc).
Into each corner ch-5 space work:
(sc, hdc, 5 dc, hdc, sc).
Join.
Optional Plum Bobble Edging
For the rounded details visible along the outer edge, replace the shell border with small bobbles.
Work a bobble by beginning 5 dc in the same stitch but leaving the final loop of each dc on the hook.
Yarn over and pull through all loops.
Ch 1 to close.
Space the bobbles evenly along the border.
Bobble Spacing
Target approximately 2–3 cm between neighboring bobbles.
Test the spacing along one 20 cm section before working around the complete blanket.
Too many bobbles cause the edge to ripple.
Matching Cushion Idea
Use the same triangle construction for a coordinating cushion front.
Join enough triangles to create a rectangular panel approximately 45 × 45 cm or to match the chosen cushion form.
Add one or two cream daisies rather than covering every triangle.
Simple Cushion Back
Use cream yarn.
Chain to the blocked width of the cushion front.
Work hdc rows until the panel reaches the required height.
Join the front and back with sc around the perimeter.
Plum-Dominant Version
Use plum for approximately two-thirds of the triangles and cream for the remainder.
Keep the flowers cream with yellow centers.
Use lavender only for the joining lines and small connector flowers.
Cream-Dominant Version
Reverse the color ratio.
Use cream for most triangles and plum for selected diagonal sections.
This produces a lighter bedspread while retaining the geometric pattern.
Sage Variation
Replace plum with muted sage green.
Use cream daisies, golden centers, and a pale olive joining accent.
Dusty Blue Variation
Replace plum with dusty blue and lavender with a deeper blue-gray.
Keep the warm cream flower petals and golden centers.
Terracotta Variation
Use terracotta for the main dark sections and oatmeal for the light sections.
Muted olive can replace lavender along the joining lines.
Assembly
- Make one complete triangle, block it, and record all three side measurements before crocheting the remaining motifs.
- Produce the required plum and cream triangles, keeping every side within approximately 5 mm of the master triangle.
- Make the cream daisies, plum leaf clusters, and lavender connector flowers, but do not permanently attach them yet.
- Block all structural triangles and arrange them on a flat surface with alternating points and a balanced plum-and-cream distribution.
- Join triangle pairs into larger geometric units, checking the first 8–10 cm of every seam for contraction.
- Connect the larger units into rows and check each multi-triangle intersection before adding the next section.
- Pin the plum leaves and cream daisies in position, then attach the leaves first and flowers second.
- Sew lavender connector flowers over selected seam intersections after confirming that the complete blanket lies flat.
- Work the cream, lavender, and plum border rounds, checking the perimeter every 30–40 cm for waves or inward pulling.
- Weave structural tails through at least 6–8 cm of dense crochet, complete a light final blocking, and reshape every raised flower after drying.
The finished bedspread should show a regular network of diagonal cream and lavender lines, alternating plum and cream fields, raised daisies, and compact floral connectors at the major intersections.
7 Technical Tips
- Keep all three sides of each blocked triangle within approximately 5 mm of one another. Unequal sides shift the diagonal seams and prevent neighboring motifs from meeting cleanly.
- Check every seam after the first 8–10 cm. Tight slip stitches shorten the joined edge and create a ridge through the geometric pattern.
- Keep daisy diameter within approximately 5 mm of the master flower. Different flower sizes become obvious when several motifs meet in the same row.
- Attach only the inner 1–1.5 cm of each daisy petal. Sewing farther toward the tip removes the dimensional effect, while leaving the entire petal loose increases snagging.
- Keep major seam intersections below approximately 1–1.5 cm across. A wider opening remains visible even after a connector flower is added.
- Check the outer border every 30–40 cm. Excess stitches produce waves, while insufficient stitches pull the triangular motifs toward the center.
- Weave joining tails through at least 6–8 cm of dense stitches. Avoid securing structural ends only beneath an appliqué because repeated movement can loosen the seam.
Care and Final Blocking
Follow the care instructions for the selected yarn. A large motif bedspread can become heavy when wet, so support the complete fabric instead of lifting it from one corner.
Lay the bedspread flat. Align the diagonal seams first, then check the outer corners and border. Reshape the daisies only after the structural geometry is correct.
Allow the project to dry completely. Lift the cream petals and arrange the small connector flowers by hand after blocking so the raised details remain visible.
Conclusion
The diagonal construction gives this triangle daisy crochet bedspread pattern a different structure from a conventional granny-square blanket. Begin with one accurately blocked triangle, record all three side measurements, and use it as the reference for every additional motif. Assemble the geometric surface before permanently attaching the raised daisies so the seams can be checked without floral bulk in the way. The next practical step is to crochet one plum and one cream triangle, join them, and measure the resulting unit before calculating the full bedspread. Share the finished version on Pinterest or Instagram with #TriangleDaisyCrochetBedspread. Would you keep the plum-and-cream palette or replace the plum sections with sage green?









