Introduction
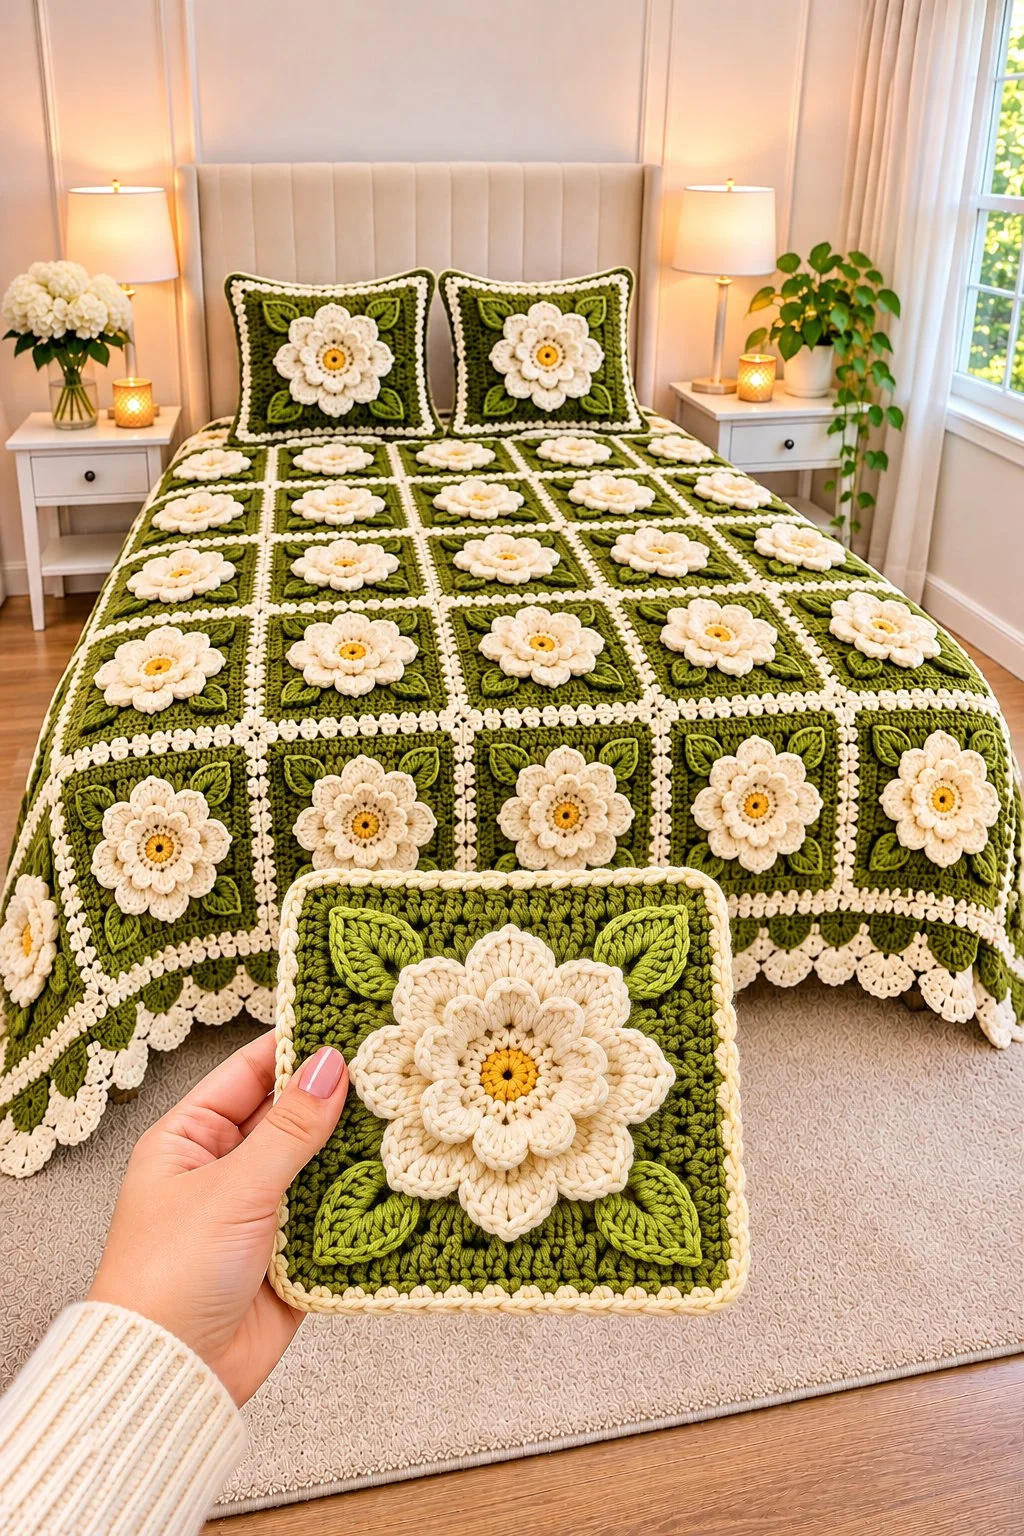
The golden-yellow center of a daisy must remain visible beneath its overlapping ivory petals. This 3D daisy granny square crochet blanket pattern combines raised cream flowers, olive-green square foundations, four pointed leaves, and contrasting ivory joins. Made with medium-weight yarn and a 5 mm hook, the design suits intermediate crocheters. Individual motifs allow you to adjust the finished dimensions for a throw, bedspread, or matching pillow covers.
The Design: What Makes This Daisy Blanket Different
The photographed blanket uses a layered floral construction rather than a flat daisy worked directly into a granny square. Each flower has a compact golden-yellow center surrounded by two overlapping ivory petal layers. Four green leaves extend diagonally toward the square’s corners.
The olive-green background provides contrast without interrupting the botanical appearance. Ivory edging outlines each square and forms a visible grid across the finished blanket. The decorative border combines green scallops with cream lace-inspired edging.
Separating the flower from its square foundation is an important structural decision. You can adjust the height and placement of the petals without changing the joining stitches. This also makes it easier to replace a damaged flower.
One frequent problem with raised flower granny squares is overcrowding. When the flower covers the corner spaces, adjoining motifs become difficult to join evenly. Keep the decorative petals clear of the outer two rounds of the square.
Project Info at a Glance
| Detail | Specification |
|---|---|
| Skill level | Intermediate |
| Construction | Individual squares with sewn floral appliqués |
| Suggested hook | 5.0 mm (US H/8) |
| Yarn | Medium / worsted weight (#4) |
| Target square size | 20 × 20 cm after blocking |
| Proposed blanket panel | 180 × 220 cm |
| Proposed layout | 9 columns × 11 rows (99 squares) |
| Estimated time | 90–140+ hours, depending on gauge and experience |
| Terminology | US crochet terms |
These dimensions and times are planning estimates, not measurements taken from the photograph. The pattern has not been physically sample-tested. A completed sample square determines the actual size.
Materials and Tools
Yarn
Choose a medium-weight acrylic, cotton, or cotton-blend yarn. Use the same yarn line for all four colors where possible, so the squares maintain consistent tension after washing.
- Olive green — worsted weight — estimated 2,000–2,600 g: square backgrounds, leaves, and green scalloped edging.
- Ivory or warm cream — worsted weight — estimated 1,500–2,100 g: daisy petals, square joins, and lace border.
- Golden yellow — worsted weight — estimated 150–250 g: flower centers.
- Light leaf green — worsted weight — estimated 150–300 g: optional leaf highlights.
These are provisional allowances for a large blanket, not verified yarn consumption. Weigh one finished square and calculate the amount needed before buying the complete supply. Matching pillows require additional yarn.
Tools
- 5.0 mm crochet hook for the main squares and flowers
- 4.5 mm crochet hook if the flower centers require firmer tension
- Tapestry needle for appliqués and joining
- Locking stitch markers for corners and round beginnings
- Measuring tape for gauge checks
- Scissors and blocking pins
- Blocking mats for square shaping
- Two pillow inserts for optional matching cushions
Abbreviations
| Abbreviation | Meaning |
|---|---|
| MR | Magic ring |
| ch | Chain |
| sc | Single crochet |
| hdc | Half double crochet |
| dc | Double crochet |
| tr | Treble crochet |
| sl st | Slip stitch |
| inc | Two single crochets in one stitch |
| dec | Single crochet decrease |
| BLO | Back loop only |
| FLO | Front loop only |
| sp | Space |
| st / sts | Stitch / stitches |
| FO | Fasten off |
An invisible decrease is worked through the front loops of two adjacent stitches before completing a single crochet; it is not required for the main granny-square foundation.
Pattern – Step by Step
Make one complete sample motif before producing the blanket. The foundation, flower, and leaves are separate components, allowing the raised decorations to be sewn in place after the square is blocked.
Work the circular components in joined rounds unless otherwise indicated. A beginning ch-3 counts as one double crochet in the granny-square foundation.
Part 1: Olive-Green Granny Square Foundation (Make 99)
Yarn: Olive green.
R1: Make MR. Ch 3, 2 dc, ch 2, then (3 dc, ch 2) ×3. Join with sl st. (12 dc, 4 corner spaces)
R2: Sl st to the first corner. Work (3 dc, ch 2, 3 dc) in each of the four corner spaces. Join. (24 dc, 4 corners)
R3: Work (3 dc, ch 2, 3 dc) in each corner and 3 dc in each side space. Join. (36 dc, 4 corners)
R4: Repeat the corner groups and work 3 dc in each of the two side spaces per side. (48 dc, 4 corners)
R5: Repeat with three side groups per side. (60 dc, 4 corners)
R6: Repeat with four side groups per side. (72 dc, 4 corners)
R7: Repeat with five side groups per side. (84 dc, 4 corners)
R8: Repeat with six side groups per side. (96 dc, 4 corners)
FO, leaving a 20 cm tail.
Measure the square. Add further granny rounds if needed, increasing by twelve double crochets per round. The finished size depends on the yarn, hook, and individual tension.
Block the foundation flat before attaching the raised flower. Check that all four corners form right angles.
Part 2: Golden-Yellow Daisy Center (Make 99)
Yarn: Golden yellow.
R1: 6 sc in MR. (6)
R2: inc ×6. (12)
R3: (1 sc, inc) ×6. (18)
R4: (2 sc, inc) ×6. (24)
R5: Sc in every stitch. (24)
Join with sl st. FO, leaving a 30 cm tail.
The center should remain a flat circular disk. Do not stuff it. Keep the final yarn tail available for sewing the completed flower onto the ivory petal layer.
Part 3: Inner Ivory Daisy Petals (Make 99)
Yarn: Ivory.
Work a flat circular foundation first.
R1: 6 sc in MR. (6)
R2: inc ×6. (12)
R3: (1 sc, inc) ×6. (18)
R4: (2 sc, inc) ×6. (24)
R5: (3 sc, inc) ×6. (30)
R6: (4 sc, inc) ×6. (36)
Join with sl st.
R7: Repeat (sl st in next stitch, 5 dc in next stitch, sl st in next stitch) ×12. (12 petals, 84 worked stitches)
FO, leaving a 35 cm sewing tail.
Each petal uses three foundation stitches. The five double crochets form a rounded outer edge, while the slip stitches separate neighboring petals.
Place the yellow center over the middle of the ivory disk. Sew through the yellow center’s outer stitches and the flat portion of the ivory foundation.
Part 4: Outer Ivory Daisy Petals (Make 99)
Yarn: Ivory.
The outer layer creates the fuller, raised flower shape visible in the photograph.
R1: 6 sc in MR. (6)
R2: inc ×6. (12)
R3: (1 sc, inc) ×6. (18)
R4: (2 sc, inc) ×6. (24)
R5: (3 sc, inc) ×6. (30)
R6: (4 sc, inc) ×6. (36)
R7: (5 sc, inc) ×6. (42)
R8: (6 sc, inc) ×6. (48)
Join with sl st.
R9: Repeat (sl st in next stitch, hdc in next stitch, 5 dc in next stitch, sl st in next stitch) ×12. (12 petals, 96 worked stitches)
FO, leaving a 40 cm tail.
Position the inner flower on top of the outer disk. Rotate the inner layer slightly so its petals sit between the outer petals. Sew only through the flat centers of the two disks.
The completed flower should have a visible yellow center and two distinct ivory petal rings. Do not stitch the raised petal edges together.
Part 5: Pointed Olive-Green Leaves (Make 396)
Yarn: Olive green or light leaf green.
Each flower square uses four pointed leaves, positioned diagonally toward the corners.
Row 1: Ch 10.
Row 2: Starting in the second chain from the hook, work sl st, sc, hdc, dc, tr, dc, hdc, sc, sl st. (9 stitches)
Row 3: Ch 1. Rotate the work to crochet along the opposite side of the foundation chain. Work sl st, sc, hdc, dc, tr, dc, hdc, sc, sl st. (9 stitches)
FO, leaving a 25 cm tail.
Gently shape the leaf into a pointed oval. The treble crochet near the center gives it additional width, while the slip stitches taper both ends.
For a raised center vein, thread a tapestry needle with light green yarn and sew one long stitch from the base toward the tip. Add two short diagonal stitches on each side if desired.
Repeat for four leaves per square.
Part 6: Attaching the Daisy and Leaves
Yarn: Matching ivory and olive-green sewing yarn.
Place the completed ivory daisy at the center of the green foundation. Check the distance from the flower to each outer edge before sewing.
Attach the flower by stitching around the underside of the outer ivory disk. Leave the raised petals unattached so they retain their dimensional shape.
Position four leaves diagonally around the flower. The pointed ends should face the square’s corners, while the bases disappear slightly beneath the outer petals.
Stitch along the center of each leaf and secure its base beneath the flower. Avoid sewing down the full leaf edge if you want the leaves to remain slightly raised.
Check that no leaves extend into the corner spaces needed for joining.
Part 7: Ivory Granny Square Edging (Make 99)
Yarn: Ivory.
Join ivory yarn in one corner space of the green square.
R1: Ch 1. Work (sc, ch 2, sc) in each corner space and 1 sc in every double crochet along each side. Join with sl st.
For an eight-round foundation, this produces 26 sc per side when both corner stitches are included, plus four ch-2 corner spaces.
FO, leaving a 30 cm tail for joining.
The cream edging should form a narrow frame around the olive-green background. If the edging pulls the square inward, use a larger hook or relax the tension.
Part 8: Joining the Daisy Granny Squares
Yarn: Ivory.
Arrange the completed squares in nine columns and eleven rows. Orient the leaves consistently, with one pointing toward each corner.
- Lay two squares side by side with their right sides facing upward.
- Align the corresponding corner spaces and edge stitches.
- Join ivory yarn at the first corner.
- Insert the hook through the matching back loops of both squares.
- Work a slip stitch through the two loops.
- Repeat along the entire shared edge.
- Continue joining squares to form complete horizontal rows.
- Connect the rows using the same slip-stitch technique.
Keep the seams flat. If the ivory joining line becomes too prominent, use a tapestry needle and mattress stitch instead.
After joining, inspect the reverse side of the blanket for loose yarn tails or uneven seams.
Part 9: Olive-Green Scalloped Border
Yarn: Olive green.
Work the first border round around the entire assembled blanket.
R1: Join green yarn at an outer corner. Work sc evenly around the blanket, placing 3 sc at each corner. Join with sl st.
R2: Ch 1. Work sc around, adding stitches at the corners as needed to keep the border flat. Join.
R3: Repeat (skip 2 stitches, 5 dc in next stitch, skip 2 stitches, sl st in next stitch) along the sides. Adjust the spacing at each corner so the scallops do not overlap.
FO and weave in the tail.
The green scallops create a rounded foundation for the contrasting cream border. Check the perimeter after every round, because too many stitches will cause rippling and too few will pull the corners inward.
Part 10: Ivory Lace-Style Outer Border
Yarn: Ivory.
Join ivory yarn at the base of a green scallop.
R1: Work (sc, ch 3, sc) into the top-center stitch of each green scallop, then ch 2 to reach the next scallop. Repeat around the perimeter.
R2: In each ch-3 loop, work (sc, hdc, 3 dc, hdc, sc). Work sl st in the intervening ch-2 space. Repeat around the blanket.
FO and weave in the tail.
This creates a small cream fan above each green scallop. The original photograph shows a more elaborate lace appearance, so additional decorative rounds may be added after the first sample border has been checked.
At corners, space the fan groups evenly rather than forcing an extra group into a narrow gap.
Part 11: Matching Daisy Pillow Covers (Make 2)
Yarn: Olive green, ivory, and golden yellow.
Make one enlarged floral granny square for each pillow front. Continue adding green granny-square rounds until the foundation reaches the desired pillow size, approximately 40 × 40 cm for a standard decorative cushion.
Attach a complete ivory daisy with a golden center to the front. Position four green leaves diagonally around the flower.
For the back, crochet a plain green square to the same dimensions. Place the front and back wrong sides together.
Join three edges using single crochet in ivory yarn. Insert the pillow form and close the remaining edge.
Finish with one additional round of ivory single crochet if desired. For a washable removable cover, use a buttoned opening rather than permanently closing the fourth side.
Assembly – 10 Steps
- Make one complete sample granny square and measure it after blocking.
- Crochet the required olive-green square foundations.
- Make all golden-yellow flower centers.
- Complete the inner and outer ivory petal layers.
- Sew the yellow centers and petal layers together.
- Crochet four green leaves for every square.
- Attach each flower and its leaves to the center of a green foundation.
- Add ivory edging, block the squares, and join them into the blanket panel.
- Work the green scalloped border and ivory outer lace edging.
- Weave in the remaining yarn tails, inspect the seams, and assemble the optional pillows.
The finished project consists of a joined floral bedspread with raised ivory daisies, golden centers, green leaves, and a contrasting decorative border.
7 Technical Tips for Better Results
- Use stitch markers at every corner. Missing a corner space during the green foundation rounds can turn a square into an uneven four-sided shape. Mark all four ch-2 spaces before starting the next round.
- Keep the flower centers flat. Stuffing the yellow disks can cause the ivory petals to tilt away from the foundation. Use firm, even crochet tension instead of fiberfill.
- Check stitch increases. Each standard six-point increase round adds exactly six stitches. A missing increase can distort the circular disk and shift the petal placement.
- Center the daisy before sewing. Keep the flower’s center within approximately 5 mm of the foundation’s center point. An off-center flower becomes more noticeable when many squares are joined.
- Test alternative yarn textures. Velvet or chenille yarn can obscure the gaps between individual petals and produce a much larger flower. Make a new gauge sample before substituting these fibers.
- Block the square foundations consistently. Even a 5 mm difference between adjoining motifs can accumulate across nine columns. Use the same blocking measurements for every square.
- Secure the sewing tails beneath the flowers. Pass each tail through several stitches and reverse direction at least once. Loose appliqué tails can work free when the blanket is folded or washed.
Blanket Sizing Guide
The finished size depends on the number of squares and their blocked measurements. The following examples assume each square measures 20 cm across, excluding the outer border.
| Blanket Size | Square Layout | Approximate Panel |
|---|---|---|
| Baby or small lap blanket | 4 × 5 = 20 squares | 80 × 100 cm |
| Small throw | 5 × 7 = 35 squares | 100 × 140 cm |
| Large throw | 7 × 9 = 63 squares | 140 × 180 cm |
| Bedspread | 9 × 11 = 99 squares | 180 × 220 cm |
| Extra-large bedspread | 10 × 12 = 120 squares | 200 × 240 cm |
These figures are approximate and exclude the border. A larger or smaller sample square will change the finished dimensions.
How to Calculate Yarn Requirements
Because the blanket contains multiple raised layers, yarn consumption is higher than for a simple flat granny-square blanket.
Make one complete motif with the flower, leaves, and ivory edging. Weigh it on a digital scale, preferably recording the weight of each color separately.
Total motif yarn (g) = Weight of one completed motif (g) × Number of motifs
Add the yarn required for joining, the outer border, and optional pillow covers. A purchasing allowance of approximately 10–15% can help account for variations in tension and dye-lot availability.
For example, if one finished square weighs 65 g, ninety-nine squares would require approximately 6,435 g before joining and border yarn. This is a calculation example, not a measured weight for the pictured blanket.
Use actual sample weights rather than relying on this example for purchasing.
Washing, Blocking, and Care
Follow the care instructions supplied with the chosen yarn. Acrylic, cotton, and wool blends can require different washing and drying methods.
Test-wash one finished sample square before assembling the complete blanket. Check whether the olive-green yarn transfers dye onto the ivory petals and whether the flower retains its shape after drying.
When blocking, pin the green foundation into a square without stretching the raised petals. Allow the sample to dry completely before measuring it.
After washing the finished blanket, reshape the petals and leaves by hand. Dry the blanket flat if recommended by the yarn manufacturer.
Do not iron directly over the raised flower layers. High heat can flatten the textured stitches or damage synthetic fibers.
Conclusion
The 3D daisy granny square crochet blanket uses separate floral layers to create ivory daisies with golden-yellow centers against an olive-green background. Four pointed leaves, cream joining seams, and a two-color scalloped border complete the botanical design. Its modular construction makes it possible to adjust the blanket dimensions or reuse the same motifs for matching pillow covers.
Begin with one complete square, including the flower and leaves, then measure and weigh it before purchasing yarn for the full project. Save this pattern to Pinterest or share your finished work on Instagram using #OliveGreenDaisyBlanket.
Would you keep the golden-yellow daisy centers or change them to soft cream for a monochromatic flower design?









