Introduction
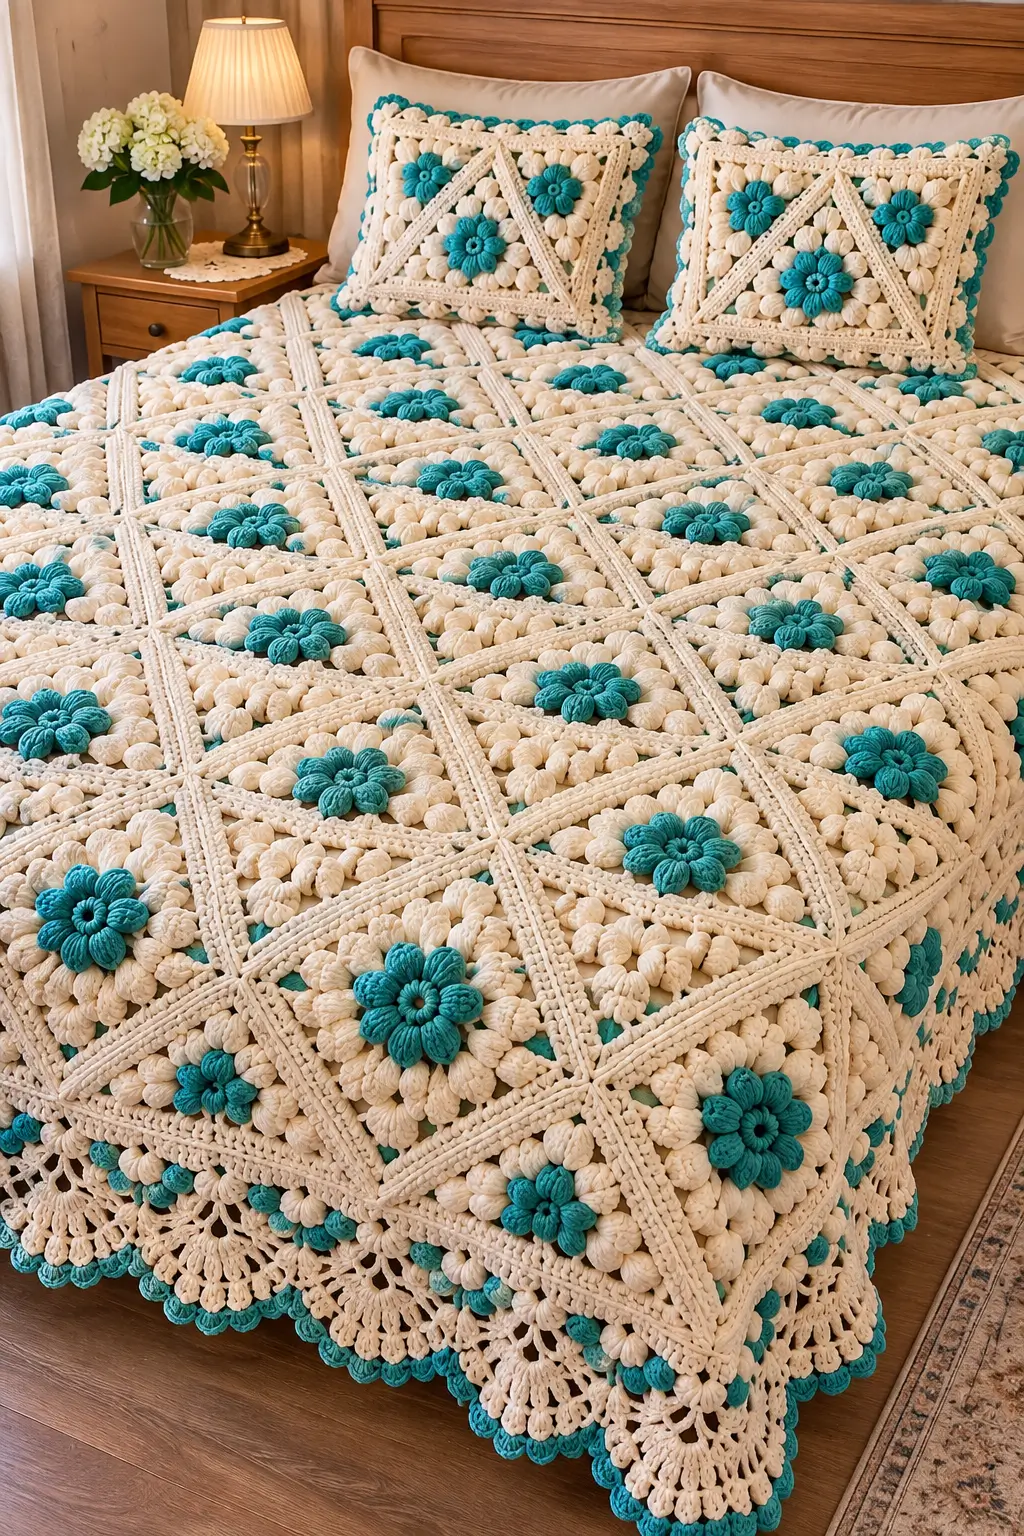
The teal flower has to rise above a dense ring of ivory puffs without forcing the square corners upward. This teal and ivory 3D puff flower granny square crochet bedspread pattern separates the dimensional center from the structural frame, then joins the finished blocks with firm ivory seams. Use medium-weight yarn with a 4.5–5.0 mm hook and target approximately 18–20 cm for each blocked motif.
The Design: What Makes This Flower Bedspread Different
The visual weight comes from three distinct layers. A compact teal flower forms the center, a broad ring of ivory puff stitches surrounds it, and an open ivory square frame carries the joining seams. This prevents the thick decorative stitches from controlling the final dimensions.
The raised center is smaller than the ivory flower field. That proportion matters. If the teal flower becomes too wide, the surrounding ivory puffs disappear and the motif loses the strong two-color contrast visible in the design.
The final bedspread also uses a deeper lace border than the individual squares. Large fan-shaped openings reduce the weight of the perimeter, while a narrow teal accent along the final edge repeats the center color. A common failure is joining through puff stitches; all seams should remain on the flat structural frame.
Project Info at a Glance
| Skill Level | Construction | Target Square | Hook | Best For |
|---|---|---|---|---|
| Intermediate | 3D flower, puff ring and structural square | 18–20 cm | 4.5–5.0 mm | Bedspreads, throws and pillow covers |
Materials and Tools
Yarn
- Warm ivory — DK/light worsted or worsted #4 — puff petals, structural squares, joining and lace border
- Teal — matching yarn weight — central flowers and final border accent
A smooth yarn gives the puff stitches a clearly defined shape. Use the same yarn line for both colors when possible so the teal centers and ivory backgrounds respond similarly during washing and blocking.
Tools
- 4.5–5.0 mm crochet hook
- Yarn needle
- Scissors
- Locking stitch markers
- Tape measure
- Blocking mats
- Rust-resistant pins
- Digital scale for yarn calculations
Abbreviations
- MR — magic ring
- ch — chain
- sl st — slip stitch
- sc — single crochet
- hdc — half double crochet
- dc — double crochet
- tr — treble crochet
- puff — puff stitch
- BLO — back loop only
- FLO — front loop only
- sp — space
- st/sts — stitch/stitches
- FO — fasten off
Special Stitch — Puff Stitch
Yarn over, insert the hook into the indicated space, yarn over and pull up a long loop. Repeat this action until there are approximately nine loops on the hook. Yarn over and pull through all loops, then ch 1 to close the puff.
Keep every pulled-up loop approximately the same height. Unequal loop height produces noticeably different puff sizes across a large bedspread.
Pattern — Step by Step
This is an original photo-inspired construction using standard puff-flower and square-shaping techniques. Complete and block one master motif before producing the remaining squares.
Teal Flower Center
With teal, make a MR.
Round 1
Ch 1.
Work 8 sc into the MR.
Join with a sl st. (8)
Round 2 — Petal Foundation
Ch 1.
In each stitch work:
(sc, ch 3).
Repeat around to create 8 ch-3 loops.
Join.
Teal Puff Petals
Sl st into the first ch-3 loop.
In each loop work:
(puff, ch 1, puff).
Repeat in all eight loops.
Join.
This creates a dense dimensional flower with eight paired puff sections.
Alternative Eight-Petal Teal Flower
For a cleaner flower with eight individual petals, work one larger puff into each ch-3 loop instead of two smaller puffs.
After each puff, ch 2 before moving to the next loop.
This variation produces stronger separation between petals and uses less teal yarn.
Teal Flower Definition Round
Join teal behind the puff petals.
Work one sl st between neighboring petals.
Ch 1 after each sl st.
Continue around.
FO.
The flower should remain compact and raised rather than spreading completely flat.
Ivory Puff Foundation
Turn the teal flower to the wrong side.
Join ivory behind the petals.
Create 16 evenly spaced ch-3 loops around the flower.
Join.
These loops form the attachment points for the large ivory puff ring.
Ivory Puff Ring
Turn to the right side.
Sl st into the first ch-3 loop.
Work one large puff into the loop.
Ch 2.
Work one puff into the next loop.
Continue around.
You should have approximately 16 ivory puffs.
Second Ivory Puff Layer
For the dense flower effect shown in the reference, work another layer behind the first.
Join ivory to the structural foundation behind the existing puffs.
Create ch-4 spaces positioned between the first puff stitches.
Into each ch-4 space work:
(puff, ch 1, puff).
Continue around.
FO.
The second layer should fill visible gaps without covering the teal flower.
Controlling Puff Height
Pull every puff loop to approximately 15–18 mm.
Measure several early puffs before continuing.
If later puffs become taller, the finished flower will lean outward rather than forming an even circular field.
Structural Foundation Behind the Flower
Turn the motif to the wrong side.
Join ivory into the back structure behind the puff ring.
Create 8 evenly distributed ch-5 spaces.
Mark every second space.
The four marked spaces become the structural corners.
First Squaring Round
Turn to the right side.
In each marked corner space work:
(2 hdc, 2 dc, 2 tr, ch 3, 2 tr, 2 dc, 2 hdc).
In each unmarked side space work:
(2 hdc, 4 dc, 2 hdc).
Join.
Lay the motif flat before continuing.
Second Squaring Round
Ch 3.
Dc in every stitch along the first side.
At each corner ch-3 space work:
(2 dc, ch 2, 2 dc).
Continue around.
Join.
Openwork Frame Round
Ch 1.
Sc in the first stitch.
Repeat across each side:
ch 2, skip 1 st, sc in next st.
At each corner work:
(sc, ch 3, sc).
Continue around.
Join.
Raised Ivory Frame
Sl st into the first ch-2 space.
Work 2 hdc into each ch-2 space.
At each corner work:
(2 hdc, ch 2, 2 hdc).
Join.
Structural Round
Ch 1.
Sc in every stitch.
At each corner work:
(2 sc, ch 2, 2 sc).
Join.
Raised Ridge Round
Ch 2.
Working BLO, hdc in every stitch.
At each corner work:
(2 hdc, ch 2, 2 hdc).
Join.
The unused front loops create a narrow line around the dimensional flower.
Final Joining Round
Ch 1.
Sc in every stitch.
At each corner work:
(sc, ch 2, sc).
Join and FO.
Target Motif Size
Block only the structural square to approximately 18–20 cm.
Do not flatten the teal or ivory puff stitches.
Measure both diagonals and keep their difference within approximately 5 mm.
Target Flower Diameter
The complete teal-and-ivory flower should occupy approximately 70–80% of the square width.
On a 20 cm square, a flower around 14–16 cm across creates a visible ivory structural margin for joining.
Flower Relief
Target approximately 2–3 cm of maximum relief.
For a bedspread used directly for sleeping, make the puffs slightly shorter.
For a decorative top cover, taller puffs can be retained.
Master Motif Check
Complete one square and record:
- Blocked width
- Blocked height
- Diagonal A
- Diagonal B
- Teal flower diameter
- Complete puff-flower diameter
- Relief height
- Finished motif weight
Batch Production
Make all teal centers first.
Compare the diameter of every fifth flower.
Work the ivory puff rings as a second batch.
Add the structural square rounds last.
This method makes changes in puff tension easier to detect than completing one entire square at a time.
Bedspread Layout
If the blocked square measures 19 cm, approximate dimensions before the outer border are:
| Grid | Total Motifs | Approximate Size |
|---|---|---|
| 5 × 6 | 30 | 95 × 114 cm |
| 6 × 8 | 48 | 114 × 152 cm |
| 8 × 10 | 80 | 152 × 190 cm |
| 9 × 11 | 99 | 171 × 209 cm |
| 10 × 12 | 120 | 190 × 228 cm |
| 11 × 13 | 143 | 209 × 247 cm |
| 12 × 14 | 168 | 228 × 266 cm |
Calculating Bed Coverage
Measure the mattress width.
Add the required drop on both sides.
For a 160 cm mattress with a 30 cm drop:
160 + 30 + 30 = 220 cm.
If each blocked motif measures 19 cm:
220 ÷ 19 = approximately 11.6.
Twelve motifs across produce approximately 228 cm before the lace border.
Estimating Yarn
Dimensional puff stitches consume substantially more yarn than flat double crochet, so calculate requirements from a physical master square.
Weigh the finished motif after all ends are woven.
For example, if one motif weighs 85 g and the project uses 80 motifs:
85 × 80 = 6,800 g.
Add the joining yarn and deep lace border separately, then add approximately 10% for tension differences and future repairs.
The 85 g figure is an example only. Replace it with the measured weight of your own motif.
Estimating Yarn by Color
Weigh the teal and ivory yarn separately before and after completing one motif.
If a test motif uses, for example:
- Teal — 18 g
- Ivory — 67 g
multiply each figure by the number of motifs.
Purchase additional ivory for seams and the lace border, plus additional teal for the final accent edging.
Blocking Before Joining
Block every square before assembly.
Pin the four corners first.
Align the flat structural frame.
Do not place pins through the puff petals unless one specific petal needs minor correction.
The decorative center should retain its natural height.
Arranging the Squares
Place all blocked motifs on a large flat surface.
Check that the teal flowers have similar diameter and orientation.
Move any noticeably larger flower toward the outer edge rather than placing it in the center of the bedspread.
Joining the Squares
Use warm ivory.
Place two motifs right sides upward.
Match the corner spaces.
Insert the hook through corresponding inner loops of the final structural round.
Work relaxed sl sts from corner to corner.
Seam Tension Test
Stop after approximately 5 cm.
Lay both squares flat.
The seam must remain the same length as the blocked edge.
If the squares pull toward each other, work more loosely or use a hook approximately 0.5 mm larger for joining.
Keeping Puff Stitches Out of the Seams
Push all ivory puffs toward the center before joining.
The hook should pass only through the flat outer frame.
A puff caught in a seam creates a thick lump and pulls the flower off-center.
Joining Horizontal Rows
Join complete horizontal rows first.
Measure each row after assembly.
Rows with the same motif count should remain within approximately 1 cm of one another.
Joining Vertical Rows
Place completed rows side by side.
Match every square intersection.
Join continuously from one outer edge to the other.
Keep the four-square intersections compact.
Outer Border Foundation
Join ivory at one corner of the assembled bedspread.
Ch 1.
Sc evenly around the complete perimeter.
At each corner work:
(2 sc, ch 2, 2 sc).
Join.
Border Round 2
Ch 2.
Hdc in every stitch.
At each corner work:
(2 hdc, ch 2, 2 hdc).
Join.
Border Round 3 — Openwork Foundation
Ch 1.
Sc in the first stitch.
Repeat:
ch 3, skip 2 sts, sc in next st.
At each corner create a slightly larger ch-5 space.
Join.
Border Round 4 — Large Fans
Sl st into the first ch-3 space.
Work:
(2 dc, ch 1, 2 dc)
in each ch-3 space.
At each corner ch-5 space work:
(3 dc, ch 2, 3 dc).
Join.
Border Round 5 — Lace Arches
Sl st to the center of the first fan.
Repeat:
ch 5, sc into the center of the next fan.
Continue around.
At each corner work a ch-7 arch.
Border Round 6 — Deep Ivory Fans
Into each ch-5 arch work:
(sc, hdc, 3 dc, hdc, sc).
Into each corner ch-7 arch work:
(sc, hdc, 5 dc, hdc, sc).
Continue around.
Join.
Border Round 7 — Picot Detail
Work sc across each fan.
At the center dc of each fan work:
ch 3, sl st into the first ch.
Continue around.
This produces a small picot at the center of every ivory fan.
Final Teal Accent
Join teal at any outer fan.
Work a relaxed sl st or sc along the outermost edge.
At each picot, work:
(sc, ch 2, sc).
Continue around.
FO.
The teal line should remain narrow so it repeats the flower centers without overpowering the ivory lace.
Checking Border Tension
Lay the border flat after every complete round.
If the outer edge begins to ripple, reduce the number of stitches or chain spaces in the next round.
If the corners curl inward, add slightly more corner spacing.
Do not wait until the final round to correct perimeter distortion.
Matching Pillow Cover
The matching pillow uses the same teal-and-ivory flower language but can be constructed with larger individual floral panels.
For a 45–50 cm cushion, make one central flower motif and expand the ivory frame until the required measurement is reached.
Pillow Teal Flower
Begin with the same 8-stitch teal center.
Use ch-4 loops instead of ch-3 loops for the petals.
Work larger puffs by pulling the loops approximately 18–20 mm high.
Target a flower approximately 10–12 cm across.
Ivory Pillow Flower Ring
Work 16–20 ivory puff stitches around the teal flower.
Keep the ivory ring approximately 16–18 cm across.
Add structural cream rounds behind the flower until the pillow front reaches the required size.
Decorative Diagonal Pillow Frame
The pillow design can include raised diagonal bands across the ivory background.
After completing the square panel, mark the four corners and the midpoint of each side.
Using ivory, surface crochet from one corner toward the opposite side to create diagonal lines.
Repeat symmetrically.
Keep these lines flat so they do not distort the cushion front.
Scalloped Pillow Edge
Join ivory around the completed pillow front.
Repeat:
skip 1 st, 5 dc in next st, skip 1 st, sl st in next st.
Finish with a narrow teal accent along the outer shell tips if desired.
Plain Pillow Back
With ivory, chain to the width of the finished pillow front.
Row 1: Hdc in the third chain from the hook and across.
Row 2: Ch 2, turn, hdc across.
Repeat until the panel matches the front.
FO.
Assembling the Pillow
Place the front and back together.
Sc around three sides.
Insert the cushion form.
Close the remaining side, or use an envelope back for a removable cover.
Throw Size Version
A 6 × 8 arrangement of 19 cm motifs uses 48 squares.
The motif field measures approximately 114 × 152 cm before the lace border.
Large Bedspread Version
A 10 × 12 arrangement requires 120 motifs.
At 19 cm per motif, the square field measures approximately 190 × 228 cm.
A deep lace border can add several additional centimeters on every side.
Extra-Large Bedspread
A 12 × 14 arrangement uses 168 motifs.
The 19 cm motif field measures approximately 228 × 266 cm before edging.
Calculate yarn from the actual master-square weight before beginning a project of this scale.
Flatter Everyday Version
Use one teal puff per petal instead of paired puffs.
Make only one ivory puff layer.
Pull puff loops approximately 12–15 mm high.
This reduces yarn consumption and produces a flatter sleeping surface.
Extra-Dimensional Decorative Version
Keep both ivory puff layers.
Work paired teal puffs.
Allow approximately 2.5–3 cm of relief.
This version is better suited to a decorative top cover than a blanket placed directly beneath the sleeper.
Alternative Colorway — Navy and Cream
Replace teal with deep navy.
Keep the puff field and lace border warm ivory.
The darker center produces a strong nautical contrast.
Alternative Colorway — Sage and Ivory
Use muted sage green for the flower centers and outer accent.
Keep all dimensional puff sections ivory.
Alternative Colorway — Dusty Rose
Replace teal with dusty rose.
Use cream or oatmeal for the puff background and structural frame.
Alternative Colorway — Burgundy
Use burgundy for the flower centers and final border detail.
Pair it with warm cream for a stronger high-contrast version.
Assembly
- Make one teal flower center, keeping all eight petal sections equal in height and checking the finished diameter before adding ivory.
- Add the ivory puff layers behind the teal center, maintaining consistent 15–18 mm loop height across the complete flower.
- Build the structural ivory foundation behind the decorative stitches, mark four independent corners and complete the square frame.
- Block the master square to approximately 18–20 cm, keep both diagonals within 5 mm and leave the dimensional flower unflattened.
- Produce the remaining motifs in batches and compare every fifth square with the master for size, flower diameter and puff height.
- Arrange the complete bedspread on a flat surface and join motifs only through the structural ivory edges, keeping all puff stitches outside the seams.
- Join horizontal rows first, measure them, then connect the rows vertically while matching every four-square intersection.
- Work the ivory structural border around the complete motif field and correct any perimeter distortion before beginning the deeper lace rounds.
- Add the open arches, ivory fan edging and narrow teal outer accent, checking the border every 30–40 cm for waves or contraction.
- Weave structural tails through dense stitches, lightly block the finished bedspread and reshape every teal and ivory puff flower after drying.
The finished bedspread should form a regular ivory grid with compact teal centers, dense raised puff flowers and a deep open lace perimeter finished with a restrained teal accent.
7 Technical Tips
- Keep puff loops within approximately 15–18 mm. A 5 mm increase in loop height across later motifs creates visibly larger flowers and increases yarn consumption.
- Keep both square diagonals within approximately 5 mm. Puff weight can pull the center off-axis even when all four structural sides have the same measurement.
- Leave at least 1.5–2 cm between the outer puff ring and the joining edge. Decorative stitches touching the seam are easily trapped during assembly.
- Test every seam after approximately 5 cm. Tight slip stitches shorten the ivory frame and make adjacent dimensional flowers tilt toward each other.
- Check the lace border every 30–40 cm. Too many arches create ruffles, while too few arches make the outer edge curl toward the bedspread.
- Use stitch markers at all four structural corners before squaring the flower. Determining corners from puff positions alone can rotate the square relative to the central flower.
- Weave structural tails through at least 6–8 cm of dense ivory crochet. Do not hide important seam ends inside puff stitches because repeated movement can loosen them.
Care and Final Blocking
Follow the care instructions for the selected yarn. A large puff-stitch bedspread absorbs substantial water, so support the complete fabric when transferring it after washing.
Lay the bedspread flat. Align the ivory square grid before shaping the lace perimeter.
Measure the top, center and bottom widths and compare both long edges. Correct the structural frame while damp, but do not press the puff flowers flat.
Allow the bedspread to dry completely. Lift the teal petals and separate the ivory puff sections by hand after drying to restore their dimensional shape.
Conclusion
The contrast between the compact teal centers and dense ivory puff fields defines this teal and ivory 3D puff flower granny square crochet bedspread pattern. Begin with one 18–20 cm master motif and measure its structural square, flower diameter, relief and weight before producing the remaining blocks. Keep the dimensional stitches away from the joining edge, connect only through the flat ivory frames and build the deep lace border after the complete motif field lies evenly. The next step is to make one eight-petal teal center and test its proportion against the first ivory puff ring. Save the finished project to Pinterest or share it on Instagram with #TealIvoryPuffFlowerBedspread. Would you keep the teal centers or replace them with dusty blue?









