Introduction
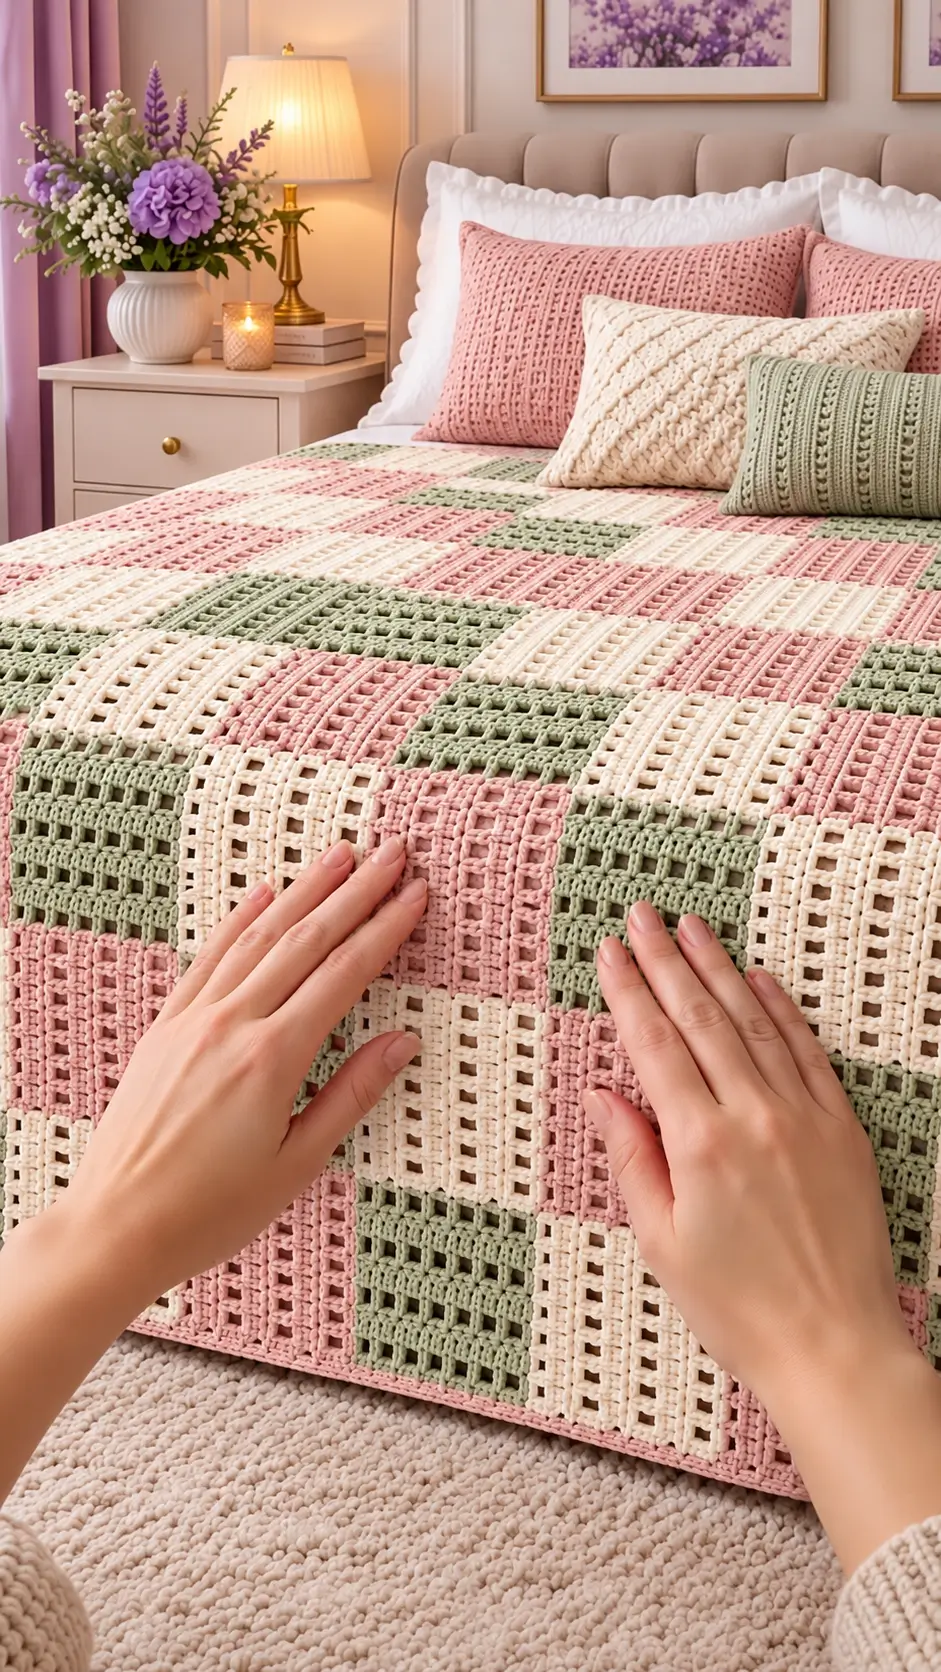
The square openings in this bedspread have one job: stay square after dozens of blocks are joined. This pink sage and cream crochet bedspread pattern combines dusty-pink, soft-sage and warm-cream filet blocks into a geometric patchwork with alternating visual direction. The construction uses medium-weight yarn, a 4.5–5.0 mm hook and individually blocked squares, making the finished dimensions easy to adjust for a throw or full bed cover.
The Design: What Makes This Patchwork Different
The pattern depends on geometry rather than raised flowers or appliqués. Each block uses an open crochet grid bordered by denser stitches, then the squares are rotated during assembly so the vertical and horizontal lines appear to change direction across the bedspread.
Three colors divide the grid visually. Dusty pink provides the strongest contrast, sage softens the arrangement, and warm cream separates the two colors while connecting the patchwork to the narrow outer border.
The structural decision that matters most is consistent blocking. Filet squares can stretch more in one direction than the other, especially when chain spaces are loose. Every finished block should therefore be measured in both directions before joining. A difference of only 5 mm becomes significant when eight or ten motifs are placed across a bed.
Project Info at a Glance
| Skill Level | Construction | Target Square | Hook | Best For |
|---|---|---|---|---|
| Intermediate | Modular filet-grid squares | Approx. 16–18 cm | 4.5–5.0 mm | Throws, bedspreads and lightweight blankets |
Materials and Tools
Yarn
- Dusty pink — DK/light worsted or worsted #4 — approximately 35–40% of total yarn
- Soft sage green — matching yarn weight — approximately 25–30% of total yarn
- Warm cream — matching yarn weight — approximately 30–35% of total yarn
Choose three yarns with similar fiber content and elasticity. Mixing a firm cotton with a highly elastic acrylic can make the squares behave differently during blocking and joining.
Tools
- 4.5–5.0 mm crochet hook
- Yarn needle
- Scissors
- Locking stitch markers
- Tape measure
- Blocking mats
- Rust-resistant pins
- Digital scale for yarn calculations
Abbreviations
- ch — chain
- sl st — slip stitch
- sc — single crochet
- hdc — half double crochet
- dc — double crochet
- BLO — back loop only
- sp — space
- st/sts — stitch/stitches
- RS — right side
- WS — wrong side
- FO — fasten off
Pattern — Step by Step
This is an original photo-inspired modular construction. The exact number of squares is determined from the finished measurement of one blocked master motif rather than from a fixed blanket size.
Filet Grid Square
Make the same basic square in dusty pink, sage green and warm cream.
The square consists of a rectangular filet grid surrounded by compact structural rounds. The visual direction changes when the completed block is rotated during assembly.
Foundation
Ch 35.
Keep the foundation chain relaxed. If your chain is noticeably tighter than your normal double crochet, make the foundation with a hook approximately 0.5 mm larger.
Row 1
Dc in the fifth chain from the hook.
Ch 1, skip 1 chain, dc in the next chain.
Repeat:
ch 1, skip 1, dc in next ch
across.
Turn.
Row 2
Ch 4, counting as dc plus ch 1.
Skip the first ch-1 space.
Dc into the next dc.
Repeat:
ch 1, dc in next dc
across.
Turn.
Rows 3–15
Repeat Row 2.
The grid should contain evenly stacked rectangular openings.
Do not pull the ch-1 stitches tightly. The chains determine the width of each opening.
Checking the Grid Before Edging
Lay the piece flat without stretching it.
Measure the center width and center height.
If the grid is substantially wider than it is tall, add additional rows.
If it is already taller than its width, remove rows or adjust the stitch gauge before continuing.
The central grid should be close to square before the border is added.
Structural Border — Round 1
Do not fasten off.
Ch 1.
Sc evenly across the top edge.
At the first corner work:
(sc, ch 2, sc).
Work sc evenly down the row-end edge.
Use a consistent distribution rather than forcing one stitch into every visible strand.
At the next corner work:
(sc, ch 2, sc).
Continue around the foundation edge and opposite side.
Join with a sl st.
Structural Border — Round 2
Ch 2.
Hdc in every stitch.
At each corner ch-2 space work:
(2 hdc, ch 2, 2 hdc).
Join.
Raised Detail Round
Ch 1.
Working BLO, sc in every stitch.
At each corner work:
(2 sc, ch 2, 2 sc).
Join.
The unused front loops create a narrow ridge around the filet center.
Final Square Round
Ch 2.
Hdc in every stitch.
At each corner work:
(2 hdc, ch 2, 2 hdc).
Join and FO.
Target Square Size
Block the completed square to approximately 16–18 cm.
Choose one exact measurement after testing your yarn and use that dimension for every remaining motif.
Measure:
- Top edge
- Bottom edge
- Left edge
- Right edge
- Both diagonals
Keep the two diagonal measurements within approximately 5 mm.
Alternative Denser Filet Square
If the basic ch-1 grid is more open than desired, use a denser version.
Work:
dc in next 2 sts, ch 1, skip 1 st
across the row.
On subsequent rows, place the solid dc stitches directly above the previous dc stitches.
This creates smaller openings and additional vertical texture.
Alternating Stripe Square
Some sections of the reference appear denser because the open spaces are separated by stronger vertical columns.
For this variation, begin with the same foundation.
Row 1
Dc in the fifth chain from the hook.
Work:
dc in next st, ch 1, skip 1 st
across.
Row 2
Ch 3.
Dc into each dc.
Ch 1 above every previous ch-1 space.
Continue across.
Repeat until the center reaches the required height.
Add the same structural border used for the standard square.
Why the Squares Appear to Change Direction
The underlying filet pattern can remain identical.
Rotate alternate blocks by 90 degrees during layout.
The vertical columns of one square then meet the horizontal visual lines of the neighboring square.
This simple rotation creates the woven patchwork effect without requiring several unrelated stitch patterns.
Color A — Dusty Pink Squares
Work approximately 35–40% of the required motifs in dusty pink.
Keep the complete square in one color, including its structural border, for the clearest block effect.
Color B — Sage Green Squares
Work approximately 25–30% of the motifs in soft sage.
Distribute these blocks across the blanket rather than grouping them in one section.
Color C — Warm Cream Squares
Make approximately 30–35% of the blocks in warm cream.
Cream works as the visual separator between pink and sage.
Master Square Test
Finish and block one complete square before batch production.
Record:
- Blocked width
- Blocked height
- Diagonal A
- Diagonal B
- Number of filet rows
- Square weight
Keep this square beside you while producing the remaining blocks.
Batch Production
Make squares in groups of five or ten.
Check the dimensions after every batch.
If the later squares become larger, tension is probably relaxing. Compare them with the master before making the next group.
Sample Color Layout
A balanced repeating arrangement can begin:
Row 1: Pink — Cream — Sage — Pink — Cream — Sage
Row 2: Cream — Sage — Pink — Cream — Sage — Pink
Row 3: Sage — Pink — Cream — Sage — Pink — Cream
Repeat the sequence while rotating selected motifs 90 degrees.
More Random Patchwork Layout
For a less repetitive arrangement, place all blocked motifs on a floor or large table.
Start with the pink squares.
Add sage blocks while avoiding long uninterrupted rows of green.
Fill the remaining spaces with cream.
Rotate approximately half of the blocks by 90 degrees.
Photograph the final layout before stacking the motifs for joining.
Bedspread Size Planning
If each blocked motif measures 17 cm, approximate dimensions before the outer border are:
| Grid | Total Squares | Approximate Size |
|---|---|---|
| 5 × 7 | 35 | 85 × 119 cm |
| 6 × 8 | 48 | 102 × 136 cm |
| 8 × 10 | 80 | 136 × 170 cm |
| 9 × 11 | 99 | 153 × 187 cm |
| 10 × 12 | 120 | 170 × 204 cm |
| 12 × 14 | 168 | 204 × 238 cm |
| 13 × 15 | 195 | 221 × 255 cm |
Add the width of the final perimeter separately.
Calculating the Required Width
Measure the mattress.
Add the desired side drop twice.
For example, a 160 cm mattress with a 25 cm drop on each side requires:
160 + 25 + 25 = 210 cm.
If one blocked square measures 17 cm:
210 ÷ 17 = approximately 12.35.
Thirteen squares across would produce approximately 221 cm before the border.
Calculating the Required Length
Measure from the desired upper starting point to the lower edge of the mattress.
Add the required foot drop.
Divide that measurement by the blocked square dimension.
Round to the nearest practical whole number of motifs.
Estimating Yarn
Use the completed master square rather than a generic yarn estimate.
Weigh the blocked motif after all ends have been trimmed.
For example, if one square weighs 35 g and the project needs 120 squares:
35 × 120 = 4,200 g.
Add yarn for joining and the perimeter, then add approximately 10% for swatching, tension variation and future repairs.
The 35 g figure is only an example calculation. Replace it with the measured weight of your own master square.
Calculating Yarn by Color
If a 120-square bedspread uses approximately:
- 45 pink squares
- 35 sage squares
- 40 cream squares
multiply the weight of one square by the required number for each color.
If the sample square weighs 35 g:
Pink: 45 × 35 = 1,575 g
Sage: 35 × 35 = 1,225 g
Cream: 40 × 35 = 1,400 g
Additional yarn will be needed for seams and the final border.
Blocking the Squares
Block every motif before joining.
Pin all four corners first.
Measure the width and height.
Adjust the sides until the openings form regular rectangles or squares.
Do not stretch individual filet spaces with pins; shape the complete structural edge instead.
Checking the Filet Openings
Select a central group of five openings.
Measure their combined width.
Compare the same section on several other motifs.
A visible difference indicates that chain tension changed even if the outer square measurements are similar.
Joining the Squares
A flat joining method keeps the geometric patchwork clean.
Use the dominant color of one square, cream, or a dedicated joining color.
For the closest photo-inspired effect, join adjacent blocks with matching yarn where practical.
Slip-Stitch Join
Place two blocked squares right sides upward.
Match the corner spaces.
Insert the hook through the corresponding inner loops of both edges.
Work relaxed sl sts from one corner to the next.
Do not pull the working yarn tightly after each stitch.
Seam Tension Test
Stop after approximately 5 cm.
Lay both squares flat.
The seam should not shorten the joined edges.
If the fabric pulls inward, use looser tension or a hook approximately 0.5 mm larger for joining.
Horizontal Assembly
Join the motifs into complete horizontal rows first.
Measure each row before adding the next one.
Rows containing the same number of squares should remain within approximately 1 cm of each other.
Vertical Assembly
Place two completed rows together.
Match all square intersections.
Join from one outside edge to the other.
At each four-square intersection, avoid adding unnecessary chains.
A compact intersection produces the cleanest patchwork grid.
Alternative Invisible Sewing Join
Thread a yarn needle with matching yarn.
Place the squares side by side.
Whip through corresponding inner loops.
Pull the yarn only until the edges meet.
Do not cinch the seam.
This method creates a softer join than surface slip stitches.
Outer Border — Foundation Round
Use dusty pink for a narrow edge similar to the reference, or use cream for a quieter finish.
Join at one outer corner.
Ch 1.
Sc evenly around the complete bedspread.
At each corner work:
(2 sc, ch 2, 2 sc).
Join.
Border Round 2
Ch 2.
Hdc in every stitch.
At each corner work:
(2 hdc, ch 2, 2 hdc).
Join.
Border Round 3
Ch 1.
Working BLO, sc in every stitch.
At each corner work:
(2 sc, ch 2, 2 sc).
Join.
FO.
Minimal Border Version
The patchwork already contains strong geometric lines, so a deep decorative border is not required.
For a minimal finish, work only one sc round followed by one hdc round.
This keeps attention on the pink, cream and sage blocks.
Wide Border Version
For a larger bedspread, add additional rounds in the three project colors.
Work:
Round 1 — Cream sc
Round 2 — Sage hdc
Round 3 — Pink sc BLO
Round 4 — Cream hdc
Round 5 — Pink sc
Maintain a ch-2 corner space in every round.
Matching Pink Pillow
The pink pillow visible with the bedspread can be worked as a simple rectangular textured panel.
Chain to the required pillow width.
Row 1
Hdc in the third chain from the hook and across.
Row 2
Ch 2, turn.
Working BLO, hdc across.
Row 3
Ch 2, turn.
Hdc in every stitch.
Repeat Rows 2–3 until the panel reaches the required height.
Matching Sage Pillow
Use the same basic construction in sage.
For additional vertical texture, alternate one row of BLO hdc with one row of regular hdc.
Make two panels or combine the textured front with a plain hdc back.
Cream Textured Cushion
A cream accent pillow can use a denser stitch than the bedspread.
Work crossed dc pairs or front-post texture over a solid background.
Keeping the cushion cream allows the three-color patchwork to remain the main visual feature.
Throw Size Version
A grid of 6 × 8 squares using 17 cm motifs produces approximately 102 × 136 cm before the border.
This version requires 48 motifs.
Lap Blanket Version
Use a 5 × 7 grid.
At 17 cm per motif, the patchwork field measures approximately 85 × 119 cm.
Add a 3–5 cm border for additional width and length.
Large Bedspread Version
A 13 × 15 layout contains 195 squares.
At 17 cm per block, the motif field measures approximately 221 × 255 cm before the border.
Measure the actual bed before committing to this number of motifs.
Changing the Color Palette
The same geometric construction can be adapted without changing the stitch pattern.
Blue Version
Use dusty blue, warm cream and muted navy.
Autumn Version
Use terracotta, oatmeal and olive green.
Neutral Version
Use ivory, beige and taupe.
Lavender Version
Use muted lavender, cream and soft sage.
Using Cotton Yarn
Cotton creates a crisp filet grid and clearly defined square openings.
It can also produce a heavier finished bedspread.
Make a complete blocked test square and weigh it before purchasing yarn for a large bed-size project.
Using Acrylic Yarn
Acrylic generally creates a lighter modular blanket for the same apparent yarn thickness.
Because some acrylic yarns stretch during use, avoid aggressive blocking.
Shape the squares to their natural dimensions rather than forcing them significantly larger.
Using DK Yarn
For a lighter bedspread, use DK #3 yarn with approximately a 4.0 mm hook.
The finished square will probably be smaller than the worsted-weight version.
Make a new master block and recalculate the required motif count from its actual measurement.
Preventing Wavy Squares
Waves usually indicate excessive stitches around the structural border.
If the center lies flat but the edging ripples, remove the border and reduce the number of stitches along the row-end edges.
Do not attempt to remove severe waves by blocking alone.
Preventing Tight Squares
If the filet center cups upward after the border is added, the structural edging may contain too few stitches.
Add stitches evenly along the affected edges.
The square should lie flat without requiring strong pin tension.
Keeping the Filet Grid Square
Compare the height and width after every five rows.
If the openings become tall rectangles, shorten the chain tension slightly or adjust hook size.
If they become wide rectangles, the chains may be too loose relative to the double crochet height.
Assembly
- Make one complete filet square, block it to approximately 16–18 cm and record its width, height, diagonals and finished weight.
- Test the dusty-pink, sage and cream yarns with the same stitch count and confirm that all three colors block to the same master measurement.
- Produce the required motifs in batches, comparing every fifth square with the master before beginning another group.
- Block all squares individually and rotate selected motifs by 90 degrees to create the alternating vertical-and-horizontal grid effect.
- Arrange the complete color layout on a flat surface and photograph it before moving any squares for joining.
- Join the motifs into horizontal rows with relaxed seams, checking each seam after approximately 5 cm for contraction.
- Measure all completed rows and correct any row differing by more than approximately 1 cm before vertical assembly.
- Join the horizontal rows together, matching every four-square intersection and keeping the seam structure compact.
- Work the outer foundation border around the completed patchwork, correcting any waves before adding the remaining edging rounds.
- Weave all structural tails through dense border stitches, block the complete bedspread lightly and align the outer corners while drying.
The finished bedspread should form a flat geometric field of pink, sage and cream filet blocks with regular openings, clearly defined square boundaries and a restrained perimeter.
7 Technical Tips
- Keep blocked squares within approximately 5 mm of the master size. A 5 mm difference repeated across 10 motifs changes the finished row by 5 cm.
- Measure both diagonals before joining. A square with equal side lengths can still be skewed, causing the filet lines to lean after assembly.
- Test seam tension after the first 5 cm. Tight slip stitches shorten the square edge and create raised ridges through the finished bedspread.
- Rotate selected motifs exactly 90 degrees. Partial rotation destroys the clean vertical-and-horizontal patchwork effect and makes intersections appear misaligned.
- Check the outer border every 30–40 cm. Too many perimeter stitches produce waves; too few stitches pull the edge inward.
- Measure five central filet openings as one group. A changing group measurement identifies chain-tension problems earlier than checking only the outer square size.
- Weave structural tails through at least 6–8 cm of dense crochet. Avoid carrying ends through open filet spaces where they remain visible from the front.
Care and Final Blocking
Follow the care instructions for the selected yarn. A large modular bedspread becomes substantially heavier when wet, so support the fabric fully during washing and transfer.
Lay the bedspread flat. Align the square intersections first, then straighten the outside perimeter.
Measure the top, center and bottom widths. Compare both long edges. Correct minor differences while the fabric is damp without stretching individual filet openings.
Allow the project to dry completely in a flat position before folding or placing it on the bed.
Conclusion
The alternating orientation of the open squares gives this pink sage and cream crochet bedspread pattern its geometric character without requiring complicated motifs. Begin with one 16–18 cm master block, test all three yarn colors against that measurement and calculate the final grid from the actual bed dimensions. Rotate selected squares by 90 degrees before joining, keep the seams relaxed and use a narrow border so the patchwork remains dominant. The next practical step is to crochet one pink and one sage test square and compare them after blocking. Save the finished project to Pinterest or share it on Instagram with #PinkSageFiletBedspread. Which arrangement would you choose: evenly repeated colors or a more random patchwork?









