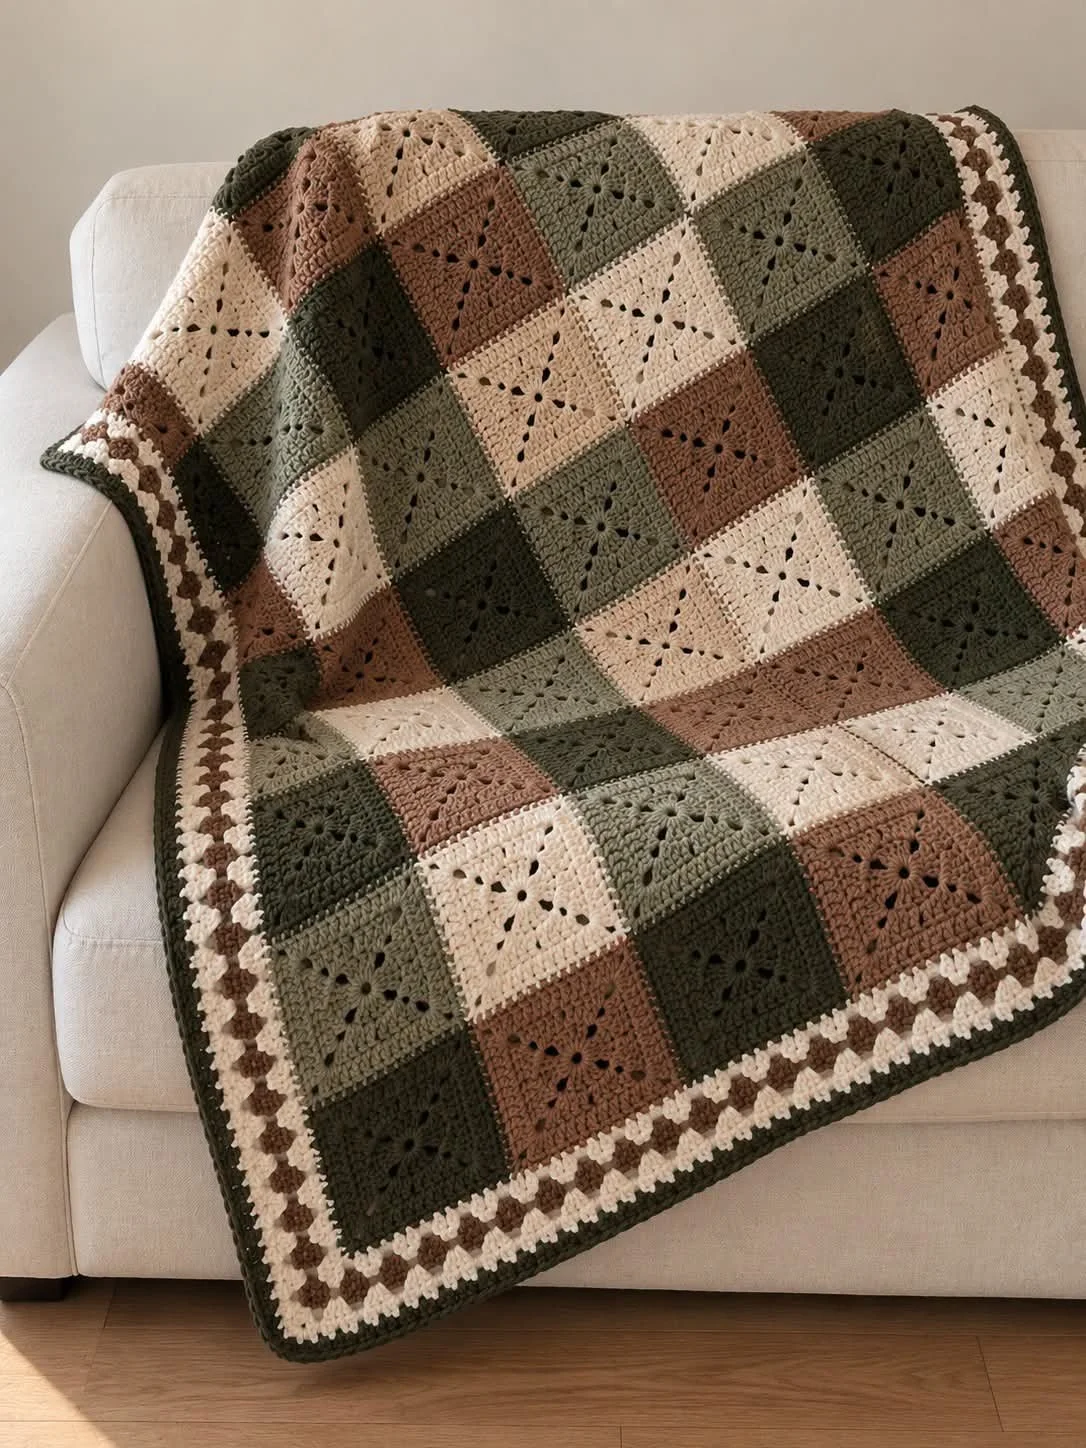
This patchwork throw is made from 80 matching granny squares in deep forest green, sage or olive, cream, and warm brown. The traditional clusters create an open, textured fabric, while the earthy palette and alternating layout give the finished blanket a calm woodland check.
Each square is worked in joined rounds from the center outward, then the motifs are arranged in an 8-by-10 layout and joined into one rectangle. A simple three-round border frames the patchwork. The construction is straightforward to work in batches, and making a test square first helps you keep the motifs consistent and plan for the desired finished size.
Pattern at a Glance
- Skill level: Confident beginner; requires basic crochet stitches, joined rounds, and motif assembly.
- Terminology: US crochet terms.
- Construction: 80 granny squares, joined into rows and then joined together.
- Finished size: About 48 × 60 in (122 × 152 cm) before edging, based on squares measuring 6 in (15 cm).
- Yarn weight: Worsted (#4).
- Hook: 5.0–5.5 mm.
- Main stitch: Double crochet (dc) granny clusters.
- Gauge: No stitch gauge is specified. Adjust your test square to about 6 in (15 cm).
- Motifs: 80 equal squares; aim for 20 in each of the four colors.
- Layout: 8 squares across by 10 squares down.
- Joining: Cream or forest-green slip-stitch join, or sewn edge to edge with a yarn needle.
- Border: One round of forest-green single crochet, one decorative cream-and-brown granny-cluster round, and one final round of dark-green single crochet.
Materials
- Worsted (#4) yarn: Approximately 2,000–2,600 yd (1,830–2,380 m) total, depending on gauge, in:
- Deep forest green
- Sage or olive
- Cream
- Warm brown
- 5.0–5.5 mm crochet hook
- Yarn needle for weaving in ends and, if preferred, sewing the squares together
- Scissors
- Stitch markers
- Tape measure
The total yarn quantity is an estimate for the complete blanket, including its motifs and edging. The amount needed in each shade will depend on how you distribute the colors and which color you choose for joining. If possible, have a little extra yarn available in the joining and border colors, since those details run continuously across the assembled blanket.
Yarn and Color Notes
A smooth, medium-weight yarn makes the granny clusters easy to see and helps the squares keep a clear shape. Choose yarns with similar thickness and texture across all four colors. If one shade is noticeably thinner or bulkier, its squares may finish at a different size even when worked with the same hook and number of rounds.
The woodland palette is built around contrast: forest green gives the design depth, sage or olive adds a softer green, cream brightens the layout, and warm brown brings in a natural accent. Aim for an even distribution of colors and avoid placing too many of the same shade together. A checkerboard effect does not require a rigid, repeated sequence; the important thing is to alternate the colors so the arrangement feels balanced rather than clumped.
Solid yarns or gently heathered shades show the square construction clearly. Highly variegated yarn can add interest, but it may obscure the checkerboard effect and make individual motifs look less distinct.
Finished Measurements
At the stated target size of 6 in (15 cm) per square, the 8-square width measures approximately 48 in (122 cm) and the 10-square length measures approximately 60 in (152 cm), before edging.
These dimensions are based on the joined square field. The completed blanket will be slightly larger after the border is added. The exact final size depends on your yarn, hook, tension, joining method, and border tension.
Gauge and Test Square
A conventional stitch gauge is not supplied for this pattern. Instead, the working target is a square that measures about 6 in (15 cm) across. Make one test square before producing the other 79 motifs.
Measure the square after completing enough rounds to reach the target size. Lay it flat without stretching, and measure from edge to edge. Use the same yarn, hook, and general tension for the rest of the squares.
- If your test square is larger than 6 in, try a smaller hook or work fewer rounds, as appropriate for the fabric and the intended motif size.
- If it is smaller than 6 in, try a larger hook or continue the established round repeat until the square reaches the target.
The pattern does not specify a fixed number of rounds: the number needed depends on your yarn and tension. Once the test square is the size you want, use it as your reference for every remaining motif. Consistency matters more than matching a particular round count.
Abbreviations
The pattern uses these US crochet abbreviations:
- ch: chain
- dc: double crochet
- sc: single crochet
- sl st: slip stitch
A space (often abbreviated sp) is the opening formed by a chain or between stitch groups. A corner space is the chain-2 space at each corner of a square.
Important Pattern Notes
- The beginning ch 3 counts as a dc in Round 1.
- The squares are worked in joined rounds, not as a continuous spiral.
- In Round 1, each group of 3 dc, ch 2 forms one side and one corner of the center square.
- In Round 2 and later, each corner is increased with (3 dc, ch 2, 3 dc) in the corner space.
- Along each side, granny clusters are worked in the ch-1 spaces.
- Keep one ch between adjacent groups as specified, including between side clusters and corners.
- The source instructions say to join each round but do not specify a particular joining stitch. Use a consistent join for the rounds and make sure the round closes without adding or skipping a cluster.
- Work all 80 squares to the same measured size, even if the exact number of rounds varies from the number you expected.
- The suggested color count is 20 squares per shade. This is a balanced target, not a requirement to follow one exact row-by-row color sequence.
Special Techniques
Magic ring
The magic ring creates an adjustable center. After working the first round into the ring, pull the yarn tail to close the center opening. If you prefer a different starting loop technique, make sure the center is secure and does not leave a visible hole.
Granny cluster
A granny cluster in this pattern is a group of 3 dc worked into the designated chain space. The chain spaces between clusters keep the fabric open and define the sides and corners.
Joined-round construction
At the end of each round, join as directed, then use slip stitches to reach the next corner space when needed. Keep the joining and travel stitches consistent. They are not a substitute for the granny clusters that form the square.
Understanding the Construction
Each square begins with four 3-dc groups separated by chain-2 spaces. Those four chain-2 spaces become the square’s corners. In the next round, work a larger cluster on both sides of each corner chain space; the extra group at each corner lets the motif grow outward into a square.
In subsequent rounds, work one 3-dc cluster in each chain-1 space along a side and the corner increase in every chain-2 corner space. Repeat this structure until the square measures about 6 in. Make the motifs individually, arrange them in eight columns and ten rows, join the rows, and then join the rows together. Finish by working the specified border around the outside edge.
Full Pattern Instructions
Test Square
Choose one of the four colors and make a single square to check your yarn, hook, tension, and finished motif size.
Follow the motif instructions below, adding rounds until the square measures about 6 in (15 cm). Record the number of rounds you worked and use the square as a size reference. The pattern does not prescribe a set number of rounds; the measurement determines when to stop.
Motif: Round 1
- With your chosen color, make a magic ring.
- Ch 3; this counts as the first dc.
- Work 2 dc into the ring.
- Ch 2.
- Repeat [3 dc, ch 2] three more times.
- Join to the top of the beginning ch 3.
- Pull the magic ring closed.
You should have four 3-dc groups with a ch-2 space between each group. The four chain spaces establish the corners of the square.
Motif: Round 2
- Sl st to a corner ch-2 space.
- In that corner space, work (3 dc, ch 2, 3 dc).
- Ch 1.
- In the next corner ch-2 space, work (3 dc, ch 2, 3 dc).
- Continue around, working (3 dc, ch 2, 3 dc) in each of the four corner spaces and ch 1 between adjacent corners.
- Join the round.
Each corner now has a pair of 3-dc clusters separated by a ch-2 space. The ch-1 spaces between corners form the side spaces for the next round.
Motif: Round 3 and Later Rounds
- Sl st to the next corner ch-2 space if needed.
- In the corner ch-2 space, work (3 dc, ch 2, 3 dc).
- Ch 1.
- In each ch-1 space along the side, work 3 dc.
- Continue around the square. In every corner ch-2 space, work (3 dc, ch 2, 3 dc), keeping ch 1 between groups.
- Join the round.
- Repeat this round structure until the square reaches the size of your test square—about 6 in (15 cm).
As the square grows, each side gains another ch-1 space to receive a 3-dc cluster. Continue to place the corner increase only in the ch-2 corner space.
Checkpoint: Motif Size and Shape
After completing a round, lay the square flat and check that it has four recognizable corners and reasonably straight sides. Measure across the center in both directions. Stop when the square is approximately 6 in and compare it with your test square.
If the sides bow or ripple, check that you have placed the corner increase in each corner space and one 3-dc cluster in each side ch-1 space—without accidentally adding clusters elsewhere.
Make the Remaining Squares
Make 80 squares in total, using all four woodland colors. For a balanced distribution, aim for 20 squares in each color.
Use the test square as a guide throughout. Measure the motifs periodically rather than relying only on memory or counting rounds. If the squares are different sizes, the joins may pull or buckle, so correct any tension change before making many more motifs.
Arrange the Blanket
Lay the squares out in 8 across by 10 down. Alternate the colors to create a woodland checkerboard and avoid grouping too many matching shades together.
Before joining, step back and review the full arrangement. Check that the colors are distributed evenly, the squares are all oriented consistently, and the 8-square direction will be the blanket’s width while the 10-square direction will be its length. You can use stitch markers to label the row order or mark the first square in each row while you prepare to join.
Joining the Squares
The pattern offers two joining options:
- Slip-stitch join: Join with cream or forest green, keeping the squares right side up.
- Sewn join: Sew the squares edge to edge with a yarn needle.
For either method, join the squares in rows first, then join the completed rows together as columns. This order helps keep the layout organized and makes it easier to match the square corners.
Slip-Stitch Join
Place two squares right sides up with their edges aligned. Using cream or forest-green yarn, work slip stitches along the touching edges to join them. Keep the joining tension even: pulling too tightly can draw the edges inward, while very loose stitches can leave a bulky or uneven seam.
Continue joining neighboring squares until you have complete rows. Then align the rows and join them together, matching the corners and the intersections between squares.
Sewn Edge-to-Edge Join
Place the squares right sides up and align their edges and corners. Use a yarn needle and a length of yarn to sew the edges together. Take even, consistent passes so the seam does not gather the fabric. Join all squares into rows first, then sew the rows together.
Checkpoint: Joined Blanket
After completing the rows, lay them flat before joining them to one another. Check that no row has been turned or reversed and that the color placement matches your layout. As you join the rows, keep the seam intersections aligned and avoid drawing the fabric in at the corners.
Border
The border is worked around the outside edge of the assembled blanket in three rounds.
Border Round 1: Forest-Green Single Crochet
With forest-green yarn, work 1 round of sc around the blanket’s outer edge. Add 3 sc to each outer corner.
Work evenly along the sides and through the edges of the squares. Since the pattern does not specify a precise sc count for the sides, distribute stitches evenly rather than forcing a fixed number into every edge. Check the fabric as you go: the edge should lie flat without puckering or flaring.
Border Round 2: Cream-and-Brown Granny Clusters
Work 1 decorative granny-cluster round in cream and brown. The source specifies the colors and cluster style but does not give a fixed color-change sequence or a complete stitch-by-stitch repeat for this round. Use the granny-cluster look to complement the squares, and adjust the corner spaces as needed to keep the border flat.
Avoid adding so many clusters that the border ripples. If the edge begins to draw inward, it may need more room; if it flares, it may have too many stitches or clusters. Keep your treatment consistent around the blanket.
Border Round 3: Dark-Green Single Crochet
With dark green, work 1 final round of sc around the outside edge. Continue to adjust at the corners as needed so the border follows the shape without pulling or flaring.
Border Checkpoint
Lay the blanket flat after each border round. The corners should remain defined, and the sides should not ripple or cup. Small adjustments in spacing at the border corners are appropriate because the decorative granny-cluster round must lie flat around a large rectangle.
Finishing
Weave in all yarn tails with a yarn needle. Secure each end neatly without pulling the fabric out of shape, and distribute the tails so that no one area of the joined blanket becomes thick or stiff.
Block the blanket lightly to even the joined squares. Arrange it flat, smooth the motifs and seams into alignment, and allow the fabric to settle without stretching the squares beyond their intended size. Blocking is especially useful for easing small differences between motifs and helping the joined edges look more uniform.
How to Resize the Blanket
The blanket’s size is controlled by two things: the size of each square and the number of squares in the layout.
- To change the overall dimensions while keeping this layout: Work the squares to a different consistent size. The stated 8-by-10 arrangement remains the same, but the finished blanket becomes larger or smaller in both directions.
- To make a wider or longer blanket: Add columns, rows, or both. Each additional column adds one square to the width; each additional row adds one square to the length.
- To estimate dimensions: Multiply the measured square width by the number of squares across or down. For example, the supplied 6-in square size gives approximately 48 in across for 8 squares and 60 in long for 10 squares, before the border.
- To make a smaller version: Use fewer rows or columns while keeping the squares the same size, or make smaller squares by stopping the rounds sooner. The finished dimensions will depend on the measurements you actually achieve.
The yarn estimate of 2,000–2,600 yd applies to the stated project approximately and may not scale evenly if you change the square size or layout. A larger layout uses more motifs, joining yarn, and border yarn.
Variations
Shift the Color Balance
Keep the four woodland shades but use different proportions. For example, place more cream squares across the blanket for a brighter field, or use additional forest-green squares for a darker, more grounded look. Preserve the alternating, non-clumping principle so one color does not dominate a single area.
Use a Two-Color Palette
The same 80-square construction can be made in two colors. Alternate them throughout the layout for a strong checkerboard, or use one shade for most motifs and the second as an accent. The square construction remains unchanged.
Make a One-Color Throw
A single-color version emphasizes the granny texture and joins rather than the patchwork effect. Choose one yarn shade for the squares and use a contrasting border color if desired; keep the three-round border structure.
Make a Smaller Motif Project
The squares can also be arranged in a smaller rectangle for a lap blanket or other compact project. Keep the square size consistent and calculate the approximate dimensions from the number of squares across and down. The source does not provide a separate motif count or finished size for these alternatives.
Troubleshooting
Why Are My Squares Different Sizes?
Tension can shift over a long batch of motifs, and different yarn shades may vary slightly in thickness. Compare squares to the test square as you work. Use the same hook and yarn type for every shade, and measure the motifs rather than relying only on round counts.
Why Is a Square Bowing or Becoming Wavy?
Check that every corner contains (3 dc, ch 2, 3 dc) and that each side ch-1 space receives one 3-dc cluster. Extra clusters or extra stitches can make the sides flare. If the square cups inward, check that you have not missed a side cluster or corner increase.
Why Is My Square Not Lying Flat?
Uneven tension, inconsistent corner spaces, or a different number of clusters on one side can distort the motif. Lay it flat after each round and inspect all four sides. Make sure the corner ch-2 spaces remain clearly identifiable and the clusters are distributed evenly.
Why Does the Center Have a Hole?
The magic ring may not have been pulled fully closed, or the yarn tail may have loosened. After completing Round 1, pull the tail firmly enough to close the center, then secure the tail when weaving it in.
Why Do the Joined Edges Pucker?
The squares may be different sizes, or the slip-stitch or sewing join may be too tight. Compare the motif edges before joining, align the corners, and maintain an even, relaxed joining tension. Avoid tugging the yarn to make the seam “disappear”; that can pull the blanket out of shape.
Why Does the Border Ripple?
A border can ripple if too many stitches or clusters are worked along an edge. On the next round, distribute the stitches more evenly and avoid adding excess clusters. The pattern specifically allows corner spaces to be adjusted so the decorative round lies flat.
Why Is the Border Pulling In?
The border may be too tight or may have too few stitches along the sides. Keep a relaxed working tension and distribute the sc evenly. Check the blanket flat after each round; the outside edge should not cup or draw inward.
Why Does the Blanket Look Clumped Rather Than Checkered?
The layout may have too many same-color squares touching. Rearrange the motifs before joining, spreading each shade across the blanket. A balanced target of 20 squares per color helps distribute the four shades evenly.
Frequently Asked Questions
Can I use a different yarn weight?
The pattern is written for worsted (#4) yarn. A different weight changes the square size, fabric feel, and yarn requirements. If you substitute, make a test square and use its measured size to decide whether the resulting blanket dimensions suit your plan.
Can I use a different hook?
The suggested hook range is 5.0–5.5 mm. You can test within that range to reach the square size and fabric you prefer. Use one hook consistently for all the motifs so they remain as uniform as possible.
Do I need to make exactly 20 squares in each color?
No. Twenty of each shade is the suggested balanced distribution for 80 squares. You can alter the proportions, but use all four colors and arrange them thoughtfully to avoid color clumps.
How many rounds should each square have?
The pattern does not specify an exact round count. Make a test square and continue the established round repeat until it measures about 6 in (15 cm). Use the same measured size for the remaining squares.
Is the finished blanket exactly 48 × 60 in?
The stated measurement is approximate and applies before edging, assuming each square measures 6 in. Differences in gauge, joins, and border tension affect the final dimensions.
Can I make the blanket larger?
Yes. Add rows or columns of squares, or make the squares larger while keeping them all the same size. Estimate the new dimensions from your actual square measurement and layout.
Can a beginner make this blanket?
A crocheter familiar with chains, double crochet, single crochet, slip stitches, and joining motifs can work the pattern. Beginners may find it helpful to make and measure the test square carefully before producing the full set.
Does the border have an exact stitch count?
No exact border stitch counts are supplied. Work the first and final single-crochet rounds evenly along the edges, add 3 sc at each outer corner in the first round, and adjust the decorative round’s corner spaces to keep it flat.
How should I block the finished blanket?
Block it lightly after weaving in the tails. Smooth the blanket flat and even the squares and joins without stretching the fabric. The aim is to settle minor irregularities, not to force the motifs larger.
Final Thoughts
This blanket is built in three practical stages: crochet 80 equal granny squares, arrange and join them in an 8-by-10 woodland checkerboard, then add the three-round border. Make one test square first, use its 6-in measurement to keep the motifs consistent, and check the layout before joining. Light blocking and careful end-weaving finish the patchwork neatly.









