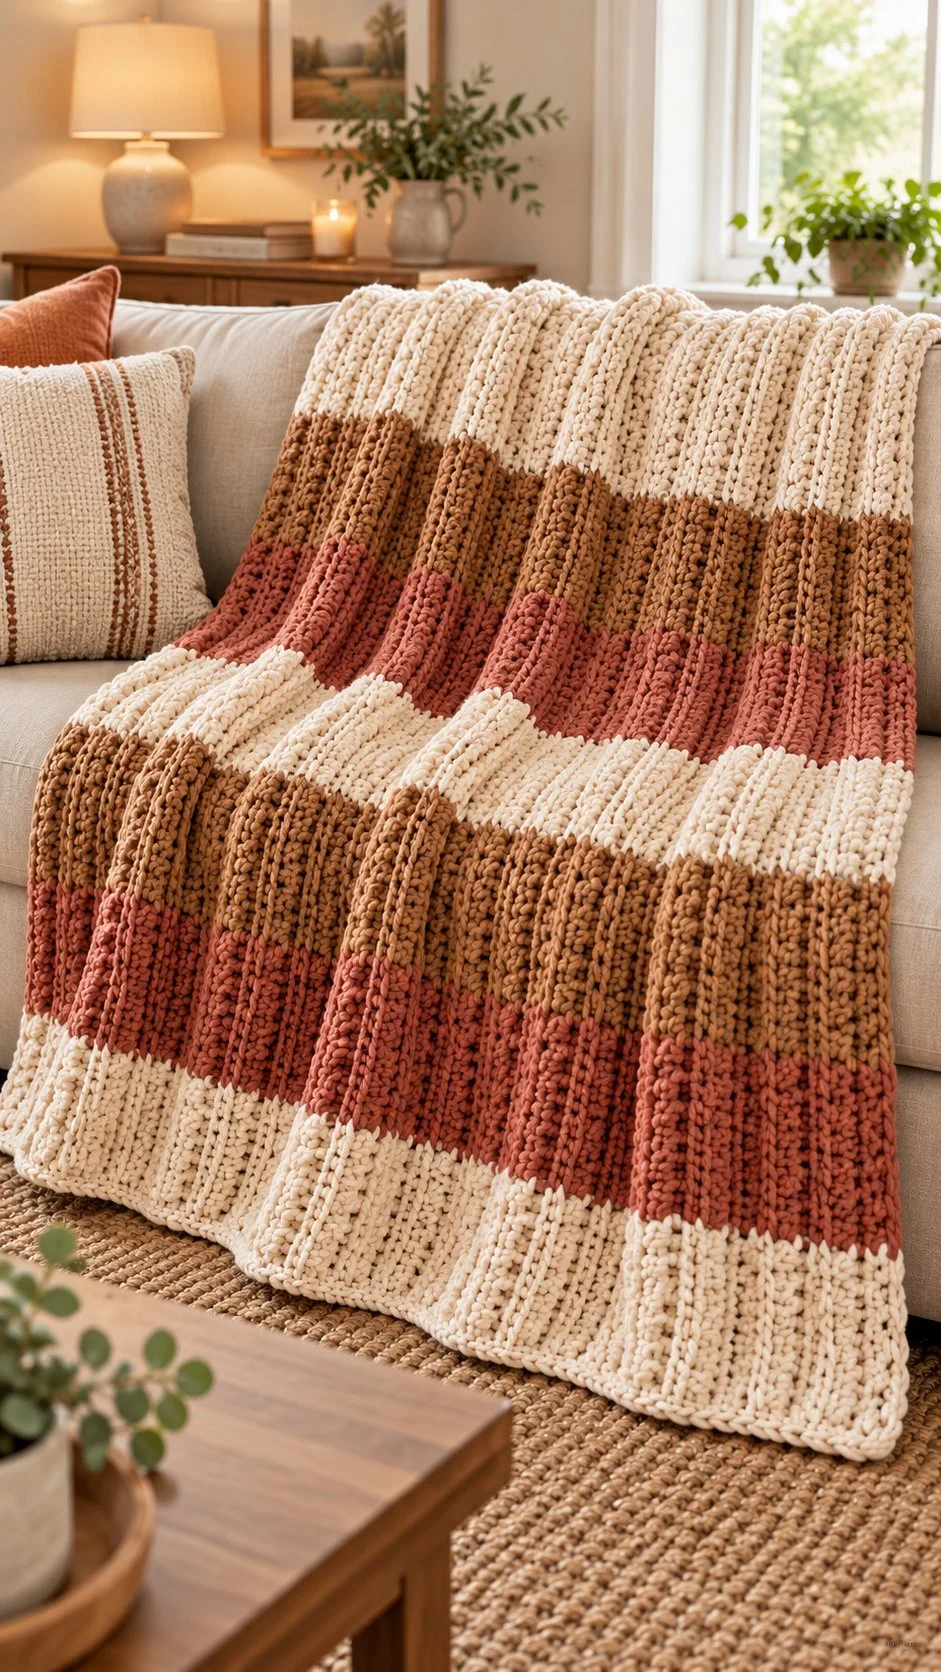
This extra-chunky throw combines broad bands of cream, caramel, and muted rose with a deeply ridged surface. It is crocheted in one piece using half-double crochet through the back loop only, so the ribbing develops as you work rather than being added afterward. The long foundation edge sets the blanket’s length; rows build its width.
The stitch is straightforward, but bulky chenille can make it harder to see individual loops. A small swatch is especially useful: it lets you check that you can identify the back loop, see the ridges clearly, and get a fabric that feels soft and drapes comfortably. The result is a cozy throw with a simple, graphic stripe layout and substantial texture.
Pattern at a Glance
- Skill level: Confident beginner; the stitch is simple, but working consistently with bulky chenille takes attention.
- Terminology: US crochet terms.
- Construction: One rectangular piece worked in rows.
- Finished size: Approximately 48 × 60 in (122 × 152 cm).
- Yarn weight: Super-bulky (#6) chenille-style or soft chunky yarn.
- Hook: 10–12 mm crochet hook.
- Main stitch: Half double crochet through the back loop only (hdc BLO).
- Gauge: Not specified; make and measure a swatch to determine your own gauge.
- Color layout: Seven broad sections in the sequence cream, caramel, rose, cream, caramel, rose, cream. Equal-width sections create a balanced arrangement.
- Border: Optional one-round single crochet border, with 3 sc in each corner.
Materials
- Super-bulky (#6) chenille-style or soft chunky yarn in:
- Ivory or cream
- Caramel brown
- Muted terracotta rose
- Approximately 1,150–1,650 yd (1,050–1,510 m) total. Consumption varies with yarn, hook, gauge, and border; test your yarn before committing to the full blanket.
- 10–12 mm crochet hook
- Yarn needle for weaving in ends
- Scissors
- Measuring tape
- Stitch markers, useful for marking edges or measuring sections
The total yardage is an estimate for the project, not a specified amount for each shade. If you want the bands to be equal in height, plan the color changes by measuring the blanket as you go and keep enough yarn available for each section. Chenille skeins can vary in yardage, so compare the labels and check your supply before starting.
Yarn and Color Notes
Choose a soft, thick yarn that makes a comfortable fabric when worked in hdc BLO. Chenille gives the blanket a plush look and feel, while another soft chunky yarn can produce a more defined ridge. The exact texture depends on the yarn’s pile and construction.
Because chenille can obscure stitch tops, select a yarn that allows you to feel the loops as well as see them. A smooth or lightly textured chunky yarn may make stitch placement easier. Avoid tightening your stitches to compensate for hard-to-see loops; overly firm tension can make the blanket stiff and difficult to drape.
The specified palette uses warm cream, caramel brown, and muted terracotta rose. The alternating warm neutrals and rose create contrast while keeping the overall look soft. You can use the same construction with other colors, but high-contrast shades make the stripes and color transitions more noticeable.
Finished Measurements
The target finished size is approximately 48 in wide × 60 in long (122 × 152 cm).
The foundation chain runs along the approximately 60-inch length. The rows build the approximately 48-inch width. This orientation matters when checking your work: measure the foundation edge to check the length, and measure from the foundation edge toward the current row to track the blanket’s width.
These are approximate dimensions. Your final measurements depend on your yarn, hook, tension, and the amount of relaxation or stretching that occurs during finishing. Use the swatch to choose a foundation length, then measure the blanket as it grows rather than relying on a fixed row count.
Gauge and Swatching
No exact gauge is supplied for this pattern. Make a swatch in hdc BLO with the yarn and hook you intend to use.
Work enough stitches and rows to see whether the fabric forms clear raised ridges and hangs with a comfortable drape. Measure the swatch after it has rested flat. The important checks for this project are the stitch width, the fabric’s feel, and the appearance of the ribbing.
- If your swatch feels stiff or the stitches are difficult to work into, try the larger hook in the stated 10–12 mm range or relax your tension.
- If the fabric feels too loose or the ridges are indistinct, try the smaller hook in that range, while making sure the fabric still drapes.
- If your yarn is especially plush, use touch to locate the back loop and count stitches regularly.
For a blanket, matching a published stitch gauge is not possible here because no gauge is provided. Your own swatch is the practical guide for estimating the starting chain and monitoring the finished dimensions.
Abbreviations
- BLO: Back loop only
- ch: Chain
- hdc: Half double crochet
- sc: Single crochet
- st(s): Stitch(es)
Important Pattern Notes
- The turning chain is ch 1 and does not count as a stitch.
- Work the first row in the second chain from the hook.
- After the first row, work each hdc through the back loop only.
- Keep the stitch count consistent from row to row. The turning chain does not replace or add a stitch.
- Check both edges regularly. Thick yarn can hide an accidental increase or skipped stitch.
- The starting point of ch 161 is only an example. Adjust the foundation to your own yarn and gauge so the worked foundation measures approximately 60 inches.
- The pattern provides the color order but does not prescribe a row count for each band. For a balanced look, make the sections approximately equal in height and use measurements to guide the color changes.
- Change color in the final pull-through of the last stitch before the next band. Leave a tail on the old yarn for weaving in.
Special Stitch and Technique
Half double crochet through the back loop only (hdc BLO)
Make a half double crochet as usual, but insert the hook under the back loop only rather than under both loops at the top of the stitch. Working this way leaves the front loop unworked. Repeating the stitch across the row forms the raised horizontal ridges associated with the blanket’s ribbed texture.
To identify the back loop, look at the top of a stitch: the two loops form a small V. The loop farther from you is the back loop when the stitches are facing you. The exact appearance can be less obvious in chenille, so feel the V with your fingertips if necessary.
Understanding the Construction
The blanket is a single rectangle, not a collection of joined panels or motifs. Its foundation chain establishes the long dimension. The first row is worked into the chain, and the remaining rows are worked back and forth in hdc BLO. Each new row adds to the blanket’s width while the back-loop ridges run along the length.
The color bands are made by changing yarn at the ends of rows. There are no separate stripe pieces to join. The sequence is cream, caramel, rose, cream, caramel, rose, and cream. Once the piece reaches approximately 48 inches wide, finish with an optional loose single crochet border and weave in the ends.
Full Pattern Instructions
Swatch
With the yarn and hook you plan to use, crochet a swatch in hdc BLO.
Check that:
- The raised ridges are visible.
- You can identify the back loop consistently.
- The fabric drapes rather than feeling stiff.
- Your stitches are even enough to make a stable rectangle.
If the sample is too firm, adjust your hook or tension before starting the full blanket.
Foundation
With cream, make a chain long enough that the first worked row measures approximately 60 inches.
A chain of 161 ch may be a useful starting point, but it is not a fixed requirement. Work a sample row and adjust the chain to suit your gauge and yarn. The foundation chain can behave differently from the completed fabric, so use the worked row to judge the length whenever possible.
Row 1
Starting in the second chain from the hook, work 1 hdc in each chain across.
At the end of the row, ch 1 and turn. The turning chain does not count as a stitch.
Checkpoint: Measure the row. It should be close to the intended 60-inch length. If it is not, adjust the foundation before continuing. Count your stitches so you know how many hdc to work on subsequent rows.
Row 2
Ch 1 and turn. Work 1 hdc in the back loop only of each stitch across.
At the end of the row, ch 1 and turn. Continue to treat the turning chain as a turning chain, not as a stitch.
Checkpoint: The first ridge should be visible. Check that the row has the same number of stitches as Row 1 and that neither edge has gained or lost stitches.
Continue Working Rows
Repeat the Row 2 instruction—1 hdc BLO in every stitch across, then ch 1 and turn—for each following row. Maintain the same stitch count throughout.
Keep checking the fabric as it grows. Measure from the foundation edge toward the current row to track the width. Continue until the blanket is approximately 48 inches wide.
Color Bands
Work the broad horizontal bands in this order:
- Cream
- Caramel
- Muted terracotta rose
- Cream
- Caramel
- Muted terracotta rose
- Cream
The source pattern does not specify a set number of rows per color. To make the sections balanced, aim for approximately equal band heights, measuring the blanket as you go. Begin and end with cream as shown in the sequence.
Changing Color
Change yarn at the end of a row, in the final pull-through of the last stitch before the next color band:
- Work the final hdc of the current color until two loops remain on the hook.
- Use the new color for the final yarn-over and pull through both loops.
- Ch 1 and turn as usual.
- Continue the next row in the new color.
Cut the old yarn, leaving a weaving tail. Avoid tightening the join so much that the edge draws in. With chenille, handle the tail carefully and weave it in securely without pulling the fabric out of shape.
Checkpoint: After each color change, confirm that the new band begins at the edge and that the blanket remains rectangular. If you are aiming for equal bands, measure each section rather than estimating by row count alone.
Continue to the Finished Width
Continue working hdc BLO rows and follow the color sequence until the blanket measures approximately 48 inches wide. Keep the long foundation edge close to 60 inches and check both dimensions before finishing.
Checkpoint: The fabric should be approximately 48 × 60 inches, with consistent back-loop ridges running along its length. If your measurements differ slightly, remember that the stated size is approximate and that yarn and tension affect the finished dimensions.
Border
The border is optional. If you want one, work one loose round of sc around the blanket.
Work 3 sc in each corner to help the border turn neatly. Along the sides, distribute stitches evenly enough to keep the edge flat. Avoid packing in too many stitches, which can make the border ripple, or working too few, which can pull the edge inward.
Keep the border relaxed. Since the blanket is thick, a tight border can stiffen the edges and distort the rectangle. After completing the round, lay the blanket flat and check that the edges are not puckering or flaring.
Finishing
Fasten off and weave in all yarn tails with a yarn needle. Chenille can be more delicate than a smooth yarn, so avoid tugging hard or repeatedly pulling the yarn through the same small area. Secure the ends carefully while keeping the fabric relaxed.
Lay the blanket flat and check its shape. If you have added the optional border, make sure the corners lie smoothly and the sides remain straight. Follow the yarn’s care instructions; fiber content and chenille construction affect the safest way to wash, dry, or otherwise care for the finished throw.
How to Resize
The pattern supports resizing through the foundation length and the number of rows:
- To change the length: Adjust the starting chain. The example of 161 chains is only a starting point; work a sample row and make the foundation long enough for your desired length.
- To change the width: Work more or fewer hdc BLO rows before finishing. Each row adds width.
- To change both dimensions: Adjust the foundation for the long edge, then stop adding rows when the other dimension reaches your target.
No exact stitch or row calculations can be given without a measured gauge. Swatch first, then use a measuring tape as the project grows. If you want the seven color sections to remain balanced on a different size, divide the planned width visually among the seven bands and measure each section as you work; the pattern does not require a particular row count for any band.
Variations
- One-color throw: Work the entire blanket in cream, caramel, rose, or another single color. Keep the same foundation and hdc BLO construction.
- Two-color stripes: Use two colors while retaining the same row-based construction. The original seven-section palette can be simplified, but keep transitions at row ends.
- A different warm palette: Replace the shades with colors that suit your room while preserving the broad horizontal bands.
- A longer or shorter throw: Change the foundation length while keeping the same stitch and color sequence.
- A narrower or wider throw: Work fewer or more rows, stopping when the desired width is reached.
These changes affect the appearance or dimensions, not the underlying stitch construction.
Troubleshooting
Why is my blanket getting wider at the edges?
An extra stitch may be worked into the turning chain or into the first or last stitch of a row. Since the turning chain does not count as a stitch, do not work into it as though it were part of the row. Count the hdc regularly and check both edges before turning.
Why is my blanket getting narrower?
You may be skipping the first or last hdc, especially if the chenille hides the stitch top. Find the first and last actual stitch of each row and work into both. Stitch markers can help identify the edge stitches.
Why are the edges wavy?
Uneven stitch counts are a common cause. Check that each row has the same number of stitches. If the stitch count is consistent, look at your tension: very loose or uneven edge stitches can make the sides look irregular.
Why does the fabric feel stiff?
Your tension may be too tight, or the hook may be too small for your yarn. Return to the swatch and adjust within the stated 10–12 mm hook range. The fabric should show ridges but still drape.
Why can’t I see the back loops?
Chenille’s pile may obscure the stitch structure. Feel for the V at the top of each stitch and identify the loop farther from you. A stitch marker at the beginning or end of the row can also help you keep track. A clearer swatch can help you confirm that you are inserting into the correct loop.
Why do the ridges look inconsistent?
Check that you are working through the back loop only on every row after the foundation row. Accidentally using both loops in a stitch interrupts the ribbed texture. Take time to locate the back loop rather than inserting where the stitch is easiest to see.
Why are my color changes bulky or messy?
Change colors in the final pull-through of the last stitch before the next band, and leave a weaving tail when cutting the old yarn. Do not tie a bulky knot at the edge. Keep the new strand and the edge stitches at a relaxed tension so the join does not pull the blanket out of shape.
Why is my border ruffling?
Too many stitches around the sides can add excess fabric. Space the single crochets evenly and keep the round loose. If the edge starts to flare, check the spacing before finishing the round.
Why is my border pulling inward?
The border may be too tight or may have too few stitches along the sides. Work the optional round loosely and distribute the sc evenly. The finished edge should lie flat without drawing in the body of the blanket.
Frequently Asked Questions
Can I use a different yarn weight?
The pattern calls for super-bulky (#6) yarn. A different weight will change the fabric, dimensions, and amount of yarn needed. If you substitute, make a new swatch and use it to determine the foundation length and the finished width; the original yardage estimate may no longer apply.
Can I use acrylic yarn?
A soft chunky acrylic can be used if it gives you a comfortable fabric in hdc BLO. Check the yarn’s care instructions and make a swatch, since different fibers and constructions can produce different drape and ridge definition.
Can I make the blanket in one color?
Yes. Work the same rectangular construction in one color instead of changing yarn for the seven bands. Continue hdc BLO rows until the blanket reaches approximately your desired width.
Is the starting chain of 161 required?
No. Ch 161 is an example, and the pattern says to adjust it to your gauge. The worked first row should measure about 60 inches for the stated finished length.
How many rows should each color band have?
No row count is specified. The number of rows depends on your yarn, hook, tension, and desired band height. Measure the sections as you work if you want the seven bands to be approximately equal.
Do I need to add the single crochet border?
No. The border is optional. If you include it, work one loose round of sc and place 3 sc in each corner.
Is this a good first blanket?
It can suit a confident beginner who knows how to make hdc and is ready to learn or practice working into the back loop. The main challenge is maintaining the same stitch count when the bulky yarn makes the stitch tops harder to see.
How should I care for the finished throw?
Follow the care instructions for your specific yarn. Chenille-style yarns vary, so do not assume that all are handled the same way. Weave in ends securely and avoid tugging on them during finishing or care.
Final Thoughts
This throw is built from a long foundation chain, repeated rows of hdc BLO, and seven broad color sections. Swatch first, measure the foundation row to set the approximately 60-inch length, and keep the stitch count steady as you work toward the approximately 48-inch width. Finish with an optional loose sc border, then weave in the tails carefully so the soft, ridged fabric stays relaxed.









