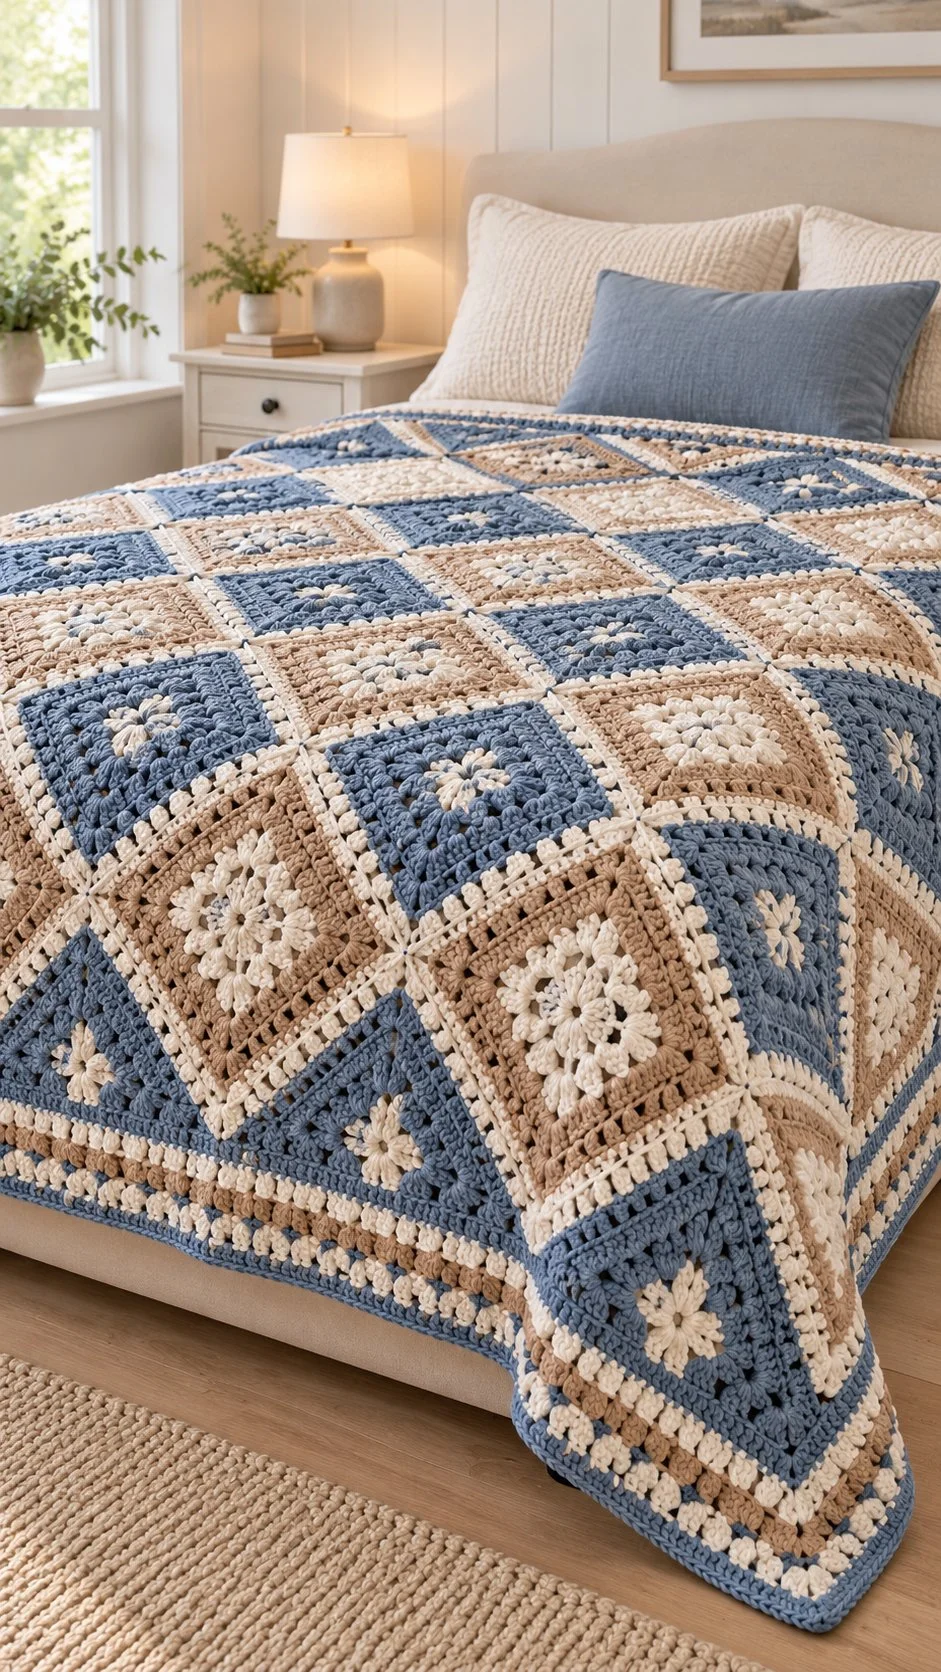
This floral granny-square bedspread is built from individual motifs, each with a raised ivory puff-stitch daisy surrounded by a granny-square frame in dusty denim blue or warm sand. The flowers add a soft, dimensional center, while the alternating blue and sand squares create a calm, balanced pattern across the bed.
Make and measure one practice square before producing the full set. The sample layout uses approximately 99 squares arranged in 9 columns and 11 rows. Each square measures about 9 inches, giving a bed cover approximately 81 × 99 inches before the border. Join the squares in rows, connect the rows with ivory, and finish with three coordinated border rounds.
Pattern at a Glance
- Skill level: Adventurous beginner to intermediate; familiarity with granny squares, joined rounds, and puff stitches is helpful.
- Terminology: US crochet terms.
- Construction: Individual flower-centered squares, joined into a rectangular bedspread.
- Finished size: Approximately 81 × 99 in before the outer border, based on approximately 99 squares measuring about 9 in each.
- Yarn weight: Worsted weight (#4), cotton blend or acrylic.
- Hook: 5.0 mm.
- Main stitches: Single crochet, double crochet, chain, and puff stitch.
- Motifs: Approximately 99.
- Layout: 9 columns × 11 rows, with denim-blue and sand backgrounds in a balanced alternating arrangement.
- Joining: Join squares across each row, then join the rows together with an ivory slip-stitch join or whipstitch.
- Border: Ivory single crochet, a blue-and-sand granny-cluster round, and a final dusty-blue single-crochet round.
- Gauge: No formal gauge is supplied. Use the practice square to establish the size needed: about 9 in per square.
Materials
- Worsted (#4) cotton blend or acrylic yarn in:
- Dusty denim blue
- Warm sand or taupe
- Ivory
- Approximately 3,000–4,400 yd (2,740–4,020 m) total, depending on bed size.
- 5.0 mm crochet hook
- Stitch markers
- Tapestry or yarn needle
- Scissors
- Tape measure
The total yarn amount is an estimate for the project, and the exact amount depends on the finished dimensions and individual tension. The source does not specify how much of the total to allocate to each color, so weigh or measure yarn as you work if you want to monitor use.
Yarn and Color Notes
Choose a smooth, consistent worsted-weight yarn so the puff petals and granny-cluster edges remain easy to see. Cotton blends and acrylic are both suitable options. A cotton blend can give the cover a substantial, defined fabric; acrylic is often lighter and easy to care for. The finished drape will vary with the yarn’s fiber and your tension, so make the practice square in the yarn you intend to use for the full bedspread.
The raised ivory flower is the focal point of every square. The denim-blue and sand backgrounds provide contrast while keeping the overall palette understated. A balanced distribution of the two background colors creates the alternating effect. Before joining, arrange all squares on a flat surface and view the whole layout from a distance; this makes uneven color clusters easier to spot.
Finished Measurements and Sizing
The suggested layout contains approximately 99 squares, arranged in 9 columns and 11 rows. At about 9 in per square, the joined squares measure approximately 81 × 99 in before the border. The border adds to the final dimensions.
These are approximate measurements, not guaranteed finished dimensions. Tension, yarn, and joining can all affect the final size. Measure your practice square after completing enough rounds to reach the intended 9-in size, and measure the bedspread again after joining. For a bed cover intended to drape over the sides, compare the finished dimensions with the mattress and the amount of drop you want before making all the motifs.
Gauge
A stitch-and-row gauge is not supplied for this pattern. The practical target is a square measuring approximately 9 in across after the granny-square rounds are complete.
Make one complete practice motif first. Lay it flat without stretching and measure across the center in more than one direction. If it is smaller than 9 in, your tension may be tighter than the sample target; if it is larger, your tension may be looser. You can adjust your tension or hook choice and make another sample, but the specified hook is 5.0 mm. Once you settle on a size, use the same yarn and working style for every square.
Even square size is especially important here because a small difference repeated across nine columns or eleven rows can make the joined bedspread skew or ripple.
Abbreviations
- ch: chain
- dc: double crochet
- sc: single crochet
- sl st: slip stitch
The pattern also uses a puff stitch, described below.
Important Pattern Notes
- The flower is worked in ivory, and the square frame is worked in either dusty denim blue or warm sand.
- The flower is made in joined rounds. Round 1 has 8 sc; Round 2 has 8 puff petals separated by 8 ch-1 spaces.
- In the square-up round, the ch-2 spaces form the four corners.
- Continue the frame as a traditional granny square, placing 3-dc clusters in side spaces and corner clusters in every corner.
- Make one practice square before committing to the full motif count.
- Keep all motifs the same size. Check them against the same measuring surface rather than comparing only by eye.
- Join the squares into rows first, then join the completed rows together.
- The border is worked around the entire joined piece. Make sure each corner has enough room to turn smoothly.
Special Stitch: Puff Stitch
A puff stitch creates one raised flower petal. It is made by working several elongated, partially completed half-double crochets into the same stitch, then closing them together.
To work a puff, yarn over, insert the hook into the indicated stitch, yarn over and draw up an elongated loop. Repeat the partial half-double-crochet action in the same stitch several times, leaving the partial stitches on the hook. Yarn over and draw through the accumulated loops to close the puff. The pattern does not specify a particular number of partial half-double crochets per puff, so use a consistent puff size throughout the flower round.
After each puff, make ch 1. The eight puff stitches and eight chain spaces make the petals and the spaces used to square up the flower.
Understanding the Construction
Each motif begins as a small, round ivory flower. The next round places one puff stitch in each of the eight foundation single crochets. The blue or sand yarn is then joined to the flower’s chain spaces, and the square-up round creates four corners around the circular center.
From there, the motif grows with traditional granny-square rounds until it measures about 9 in. Once all squares are complete, arrange them in alternating colors, join them across each row, and connect the rows. The final border is worked around the outside edge of the joined bedspread.
Full Pattern Instructions
Make a Practice Square
Use the same yarn and hook planned for the bedspread. Work one complete square through the granny-square rounds until it measures about 9 in. Note how your yarn behaves and whether the motif lies flat.
Use the practice square to confirm that the flowers and frames are consistent, and to decide how many rounds are needed to reach the target size. The pattern does not specify an exact number of later granny rounds; stop when the square measures about 9 in.
Checkpoint: The sample should lie flat and measure approximately 9 in across. Use this square as the size reference for all remaining motifs.
Round 1: Flower Center
With ivory, make a magic ring. Ch 1, then work 8 sc into the ring. Join with a sl st to the first sc.
Pull the magic ring closed securely, taking care not to distort the stitches.
Stitch count: 8 sc.
Round 2: Puff-Stitch Petals
Work one puff stitch in each of the 8 sc around. After every puff, make ch 1. Join with a sl st as appropriate to complete the round.
You should have 8 puff petals separated by 8 ch-1 spaces. Keep the puffs consistent in height and fullness. If the first and last petals appear noticeably different, adjust your loop height or tension before moving on.
Checkpoint: The flower center should have eight distinct raised petals and eight chain spaces around them.
Round 3: Square-Up Round
Join dusty denim blue or warm sand in a ch-1 space from Round 2.
Repeat the following sequence four times:
- Work 3 dc in the next ch-1 space.
- Ch 1.
- In the following ch-1 space, work (3 dc, ch 2, 3 dc).
- Ch 1.
Join to complete the round. The four ch-2 spaces are the corners of the square. Keep the chains between the clusters relaxed enough that the fabric does not pull inward.
Checkpoint: The flower should now sit within a four-cornered frame. Confirm that the ch-2 spaces are spaced evenly and that the square lies flat.
Continue the Granny-Square Frame
Continue in the selected background color using traditional granny-square construction:
- Work 3 dc in each side ch-1 space.
- Ch 1 between side clusters.
- In every corner space, work (3 dc, ch 2, 3 dc).
Repeat rounds until the square measures approximately 9 in. The exact number of rounds is not specified; use the measured practice square as your guide. Join each round consistently and avoid tightening the join.
Checkpoint: Before setting a motif aside, measure it flat. It should match the practice square as closely as possible.
Make the Full Set
Make approximately 99 squares for the suggested layout. Use ivory for every flower, alternating the denim-blue and sand backgrounds in balanced numbers. Because 99 is an odd total, an exactly equal split is not possible; arrange the colors so they remain visually balanced across the full rectangle.
Layout and Assembly
Arrange the Squares
Lay out the squares in 9 columns and 11 rows. Alternate denim and sand backgrounds so that neighboring squares create an even distribution of color. Keep all flowers facing the same way, and check that each square’s corners line up with its neighbors.
Photograph or sketch the arrangement before moving the squares. This gives you a reference while joining and helps prevent accidental color changes in the sequence.
Join Squares into Rows
Join the squares across each row first. Use an even ivory slip-stitch join or whipstitch, as specified. Align the edges and corner points before stitching, and keep the joining tension steady. Avoid pulling the yarn tight: a tight seam can shorten the row and make the fabric pucker.
With a slip-stitch join, work through corresponding edge loops in a consistent manner and make each slip stitch loose enough for the seam to flex. With a whipstitch, use the tapestry needle to sew the corresponding edges together with evenly spaced passes. These are the two joining options supplied for this pattern; choose one and use it consistently.
Connect the Rows
After joining each row, connect the rows together with the same ivory slip-stitch join or whipstitch. Match the square corners and seam intersections carefully. At each crossing, check that the joins do not bunch up or leave a visible gap.
Checkpoint: Spread the joined bedspread flat before beginning the border. The rows should be straight, square corners should meet, and the fabric should not pull into folds along the seams.
Border
The border has three rounds:
Round 1: Ivory Single Crochet
Join ivory at the edge and work a round of sc around the bedspread. Space stitches evenly along the sides, working into the available edges without crowding or stretching the fabric. At each outer corner, work 3 sc or an equivalent ch-2 corner treatment so the border can turn and lie flat.
Round 2: Blue-and-Sand Granny Clusters
Work a granny-cluster round using blue and sand. The source does not specify an exact color sequence or a separate stitch placement for this border round, so arrange the two colors to complement the alternating squares while maintaining the granny-cluster appearance. Keep the clusters and spacing even around the perimeter.
At each corner, preserve a clear turn using the corner treatment established for the border. If the edge begins to cup or ruffle, check whether the corner has too few or too many stitches and whether the side spacing is consistent.
Round 3: Dusty-Blue Single Crochet
Finish with a dusty-blue sc round. Work 3 sc at each corner, or use an equivalent ch-2 corner treatment, so the border lies flat. Check the edge regularly as you work rather than waiting until the end to assess it.
Checkpoint: Lay the bedspread flat after the final round. The border should follow the edge smoothly, without flaring or drawing inward.
Finishing
Weave in all yarn tails with a tapestry needle, securing the ends on the wrong side and taking care not to pull the fabric out of shape. Trim excess yarn only after each end is secure.
Block the bedspread to even the seams and help the motifs settle into a consistent rectangle. Use a method appropriate to your yarn fiber, and avoid stretching the squares beyond their natural shape. Let the fabric dry completely if it has been dampened before moving or folding it.
Measure the finished piece and compare it with the intended bed dimensions. The suggested 81 × 99 in measurement is before the border, so expect the border to increase the overall size.
How to Resize
The motif construction makes resizing straightforward: add or remove squares rather than changing the flower or granny-square stitch pattern.
- To make a narrower cover: Use fewer columns.
- To make a wider cover: Add columns.
- To make a shorter cover: Use fewer rows.
- To make a longer cover: Add rows.
A square is approximately 9 in, so each added column or row changes the approximate pre-border dimension by about 9 in. This is a planning estimate; the actual result depends on your square size and joining width. Make a practice square and measure it before calculating a different layout. The border also adds to the final size.
For a bed cover, measure the mattress and decide how much drop you want on each side and at the foot before choosing the number of squares. The source’s 9-column-by-11-row layout is a starting point, not a substitute for checking your own bed dimensions.
Variations
- Reverse the background balance: Keep the ivory flowers but make sand the more prominent frame color, using denim as the accent.
- Use a seasonal palette: Replace the blue and sand backgrounds with two coordinated shades while retaining ivory flowers.
- Make a smaller cover: Use the same motifs in a smaller rectangular arrangement, keeping the alternating-color layout.
- Create a pillow or table cover: Use a small group of squares and preserve the same flower, granny-square frame, and joining approach. Adjust the border around the smaller joined piece.
- Change the flower texture subtly: Keep the puff construction but maintain the same number of petals and chain spaces so the square-up round still has the spaces it requires.
Troubleshooting
Why Do My Squares Come Out Different Sizes?
Differences in tension, puff height, or the number of granny rounds can change motif dimensions. Measure each square against the practice motif, and use the same yarn, hook, and working tension throughout. Complete the same number of granny rounds whenever possible, but let the 9-in measurement remain the deciding checkpoint.
Why Does the Square-Up Round Look Uneven?
Check that the sequence is repeated four times and that the corner clusters are placed in the intended chain spaces. Each repeat has a 3-dc side cluster followed by a corner group of (3 dc, ch 2, 3 dc), with a ch 1 between the groups. If the corners do not appear evenly distributed, verify that you are moving from one ch-1 space to the following one each time.
Why Is the Flower Center Puckering?
The magic ring may be too tight, or the stitches in the center may be crowded. Close the ring securely but do not cinch it so hard that the eight sc buckle. Keep the puff stitches similar in size and avoid pulling the ch-1 spaces tight.
Why Are the Petals Uneven?
Puffs can vary when the elongated loops are drawn up to different heights. Use the same motion and loop height for every partial half-double crochet. Check the flower after several petals and adjust your tension before finishing the round.
Why Is the Bedspread Wavy Along the Seams?
The joining yarn may be pulled too tightly, or the edges may not be aligned evenly. Join with consistent, relaxed tension and match the corresponding edges and corners before sewing. If a joined row is shorter than the squares suggest, inspect the seam tension before continuing.
Why Is the Border Ruffling or Pulling In?
A ruffled edge usually indicates too much fabric has been added along the sides or at the corners. A border that draws inward may have too few stitches or overly tight tension. Work the sides evenly and use the specified corner treatment—3 sc or an equivalent ch-2 corner—then reassess the fabric flat after each round.
Why Does the Bedspread Not Measure the Planned Size?
The motif dimensions or joining width may differ from the approximate target. Measure the squares before completing the set, then check the joined dimensions before adding the border. If the squares are consistently smaller or larger than 9 in, revise the planned number of columns or rows before making all the motifs.
Frequently Asked Questions
Can I use a different yarn weight?
The pattern specifies worsted-weight (#4) cotton blend or acrylic and a 5.0 mm hook. A different weight will change the size and drape of the squares. If you substitute, make a complete practice motif and measure it before estimating the layout or yarn needs.
Can I use cotton or acrylic?
Yes. Both cotton blend and acrylic are listed options. Their finished drape and weight may differ, so use the practice square to assess how the fabric feels and whether it lies flat.
How many squares should I make?
The suggested bedspread uses approximately 99 squares arranged in 9 columns and 11 rows. Make more or fewer motifs if your intended bed dimensions call for a different layout.
Is the finished size exactly 81 × 99 in?
No. That is the approximate size before the border, based on squares measuring about 9 in. Actual dimensions depend on your tension, joining, and border, so measure your own work as it progresses.
Do all the squares have to be the same color?
No. The pattern calls for balanced numbers of denim-blue and sand backgrounds arranged in an alternating pattern. Keep the ivory flower consistent to tie the layout together.
Can I make the bedspread larger?
Yes. Add columns, rows, or both using the same square pattern. Measure a practice square first, then use its actual size to estimate the added width or length.
Do I need a special hook for the puff stitches?
No special hook is specified. Use the 5.0 mm crochet hook for the project and form the puffs with elongated partial half-double crochets.
How should I block the finished bedspread?
Block gently to even the seams and help the joined squares lie smoothly. Choose a method suitable for the yarn fiber and avoid forcing the bedspread to dimensions beyond its natural shape.
Final Thoughts
This bedspread is made in three main stages: crochet ivory puff-stitch flowers, frame each flower with blue or sand granny-square rounds, then join the squares in an alternating rectangle. Finish with the ivory, blue-and-sand, and dusty-blue border rounds. A measured practice square and consistent joining help keep the large project even from the first motif to the last.









