SEO Title: 3D Puff Flower Granny Square Blanket Crochet Pattern
Meta Description: Crochet a 3D puff flower granny square blanket with pink and yellow raised petals, green centers, matching pillows, and joining instructions.
Introduction
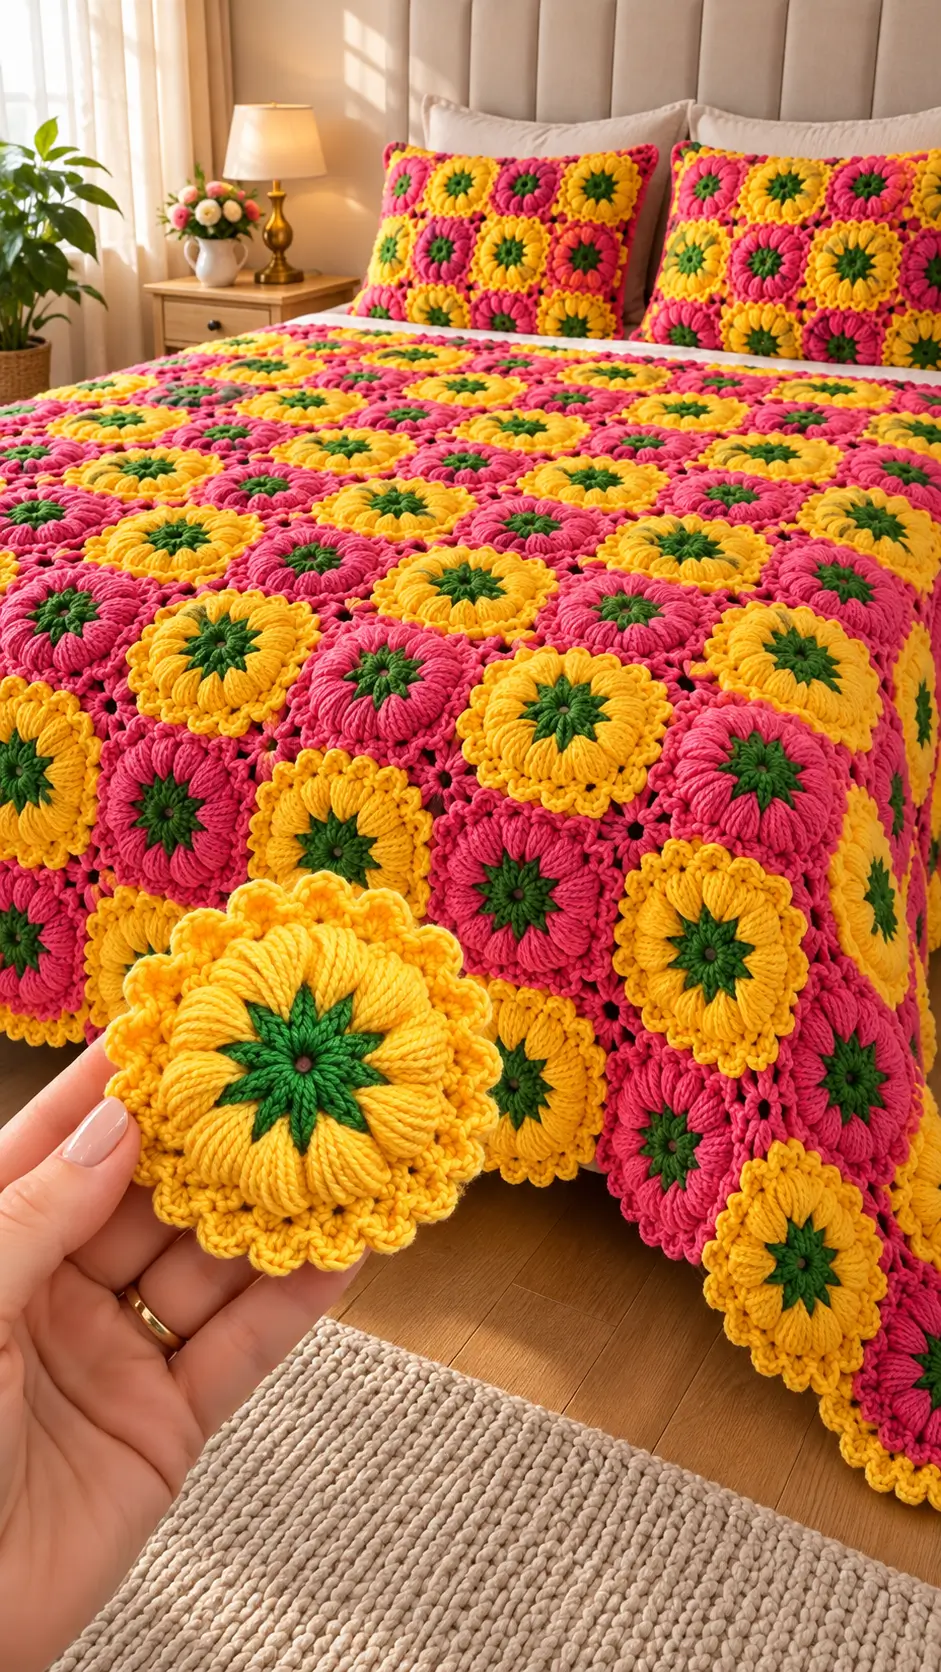
A green eight-pointed center anchors every raised yellow and pink flower in this bedspread. This 3D puff flower granny square blanket uses worsted-weight yarn, a 5 mm crochet hook, and repeated floral motifs designed to finish near 15 cm square. The intermediate-level project combines puff stitches, square shaping, and joined motifs. Its modular construction allows individual damaged squares to be repaired without dismantling the entire blanket.
The Design: What Makes This Flower Blanket Different
The defining feature is the raised flower surface. Instead of relying on flat double-crochet petals, each motif uses thick puff stitches positioned around a green circular foundation. This gives the flower height while retaining a relatively flat back.
The second decision concerns square geometry. Four corner spaces divide the circular flower into a regular grid, allowing motifs to join without distorting the petals. The proposed 3D floral granny square also uses a final edging round to provide a consistent seam allowance.
Color placement is equally important. Alternating hot pink and golden yellow creates a repeating floral grid, while green centers separate the petal colors visually.
A common mistake in a sunflower granny square blanket is making the puff stitches so tight that the center curls. The flower needs enough slack to sit above the square without pulling its corners inward.
Project Info at a Glance
| Skill Level | Intermediate |
|---|---|
| Time | Approximately 45–75 minutes per motif (estimate) |
| Target Motif Size | 15 × 15 cm (untested) |
| Hook | 5 mm |
| Yarn | Worsted weight, category 4 |
| Best For | Bedspreads, throws, pillow covers |
| Terminology | US crochet terms |
Materials and Tools
Yarn
- Golden-yellow worsted yarn — estimated 12–18 g per yellow-petal square.
- Hot-pink worsted yarn — estimated 12–18 g per pink-petal square.
- Leaf-green worsted yarn — estimated 3–6 g per flower center.
- Matching border yarn — estimated 5–10 g per square.
These are provisional yarn quantities. For a 10 × 12 layout, 120 squares at 15 cm each would create an approximately 150 × 180 cm blanket before the outer border. Assuming 25–35 g per completed square, plan for 3–4.2 kg of yarn for the motifs, plus 10–15% for joining, edging, and waste. Weigh a finished sample to establish the actual requirement.
Tools
- 5 mm crochet hook
- Locking stitch markers
- Tapestry needle
- Scissors
- Measuring tape
- Blocking mat and pins
- Digital kitchen scale
- Two pillow inserts, sized after measuring the covers
Abbreviations
| MR | Magic ring |
|---|---|
| ch | Chain |
| sc | Single crochet |
| hdc | Half double crochet |
| dc | Double crochet |
| sl st | Slip stitch |
| st / sts | Stitch / stitches |
| sp | Space |
| inc | Two sc in one stitch |
| dec | Single crochet decrease |
| BLO | Back loop only |
| YO | Yarn over |
| FO | Fasten off |
An invisible decrease is made through the front loops of two consecutive stitches before completing one single crochet.
Puff stitch: YO, insert the hook into the indicated space, and pull up a long loop. Repeat four times until nine loops are on the hook. YO and pull through all loops, then ch 1 to secure. The securing chain is not counted separately.
Pattern — Step by Step
Work the flower in joined rounds rather than a continuous spiral. This is an original, image-based reconstruction and has not been physically tested.
Part 1: Green Flower Center (Make One Per Square)
Yarn: leaf green.
R1: 6 sc in MR, join. (6)
R2: Inc ×6, join. (12)
R3: [1 sc, inc] ×6, join. (18)
R4: [2 sc, inc] ×6, join. (24)
R5: [3 sc, inc] ×6, join. (30)
Fasten off, leaving a 15 cm tail.
Part 2: Green Star Points (Make Eight Per Square)
Yarn: leaf green.
R1: Ch 5. (5 ch)
R2: Starting in the second chain from the hook, work 1 sl st, 1 sc, 1 hdc, and 1 dc. (4 sts)
Fasten off, leaving a 10 cm tail. Repeat eight times and arrange evenly around the center, overlapping the wider ends.
Part 3: Raised Flower Petals
Yarn: golden yellow or hot pink.
Mark eight attachment positions around the 30-stitch green center, with gaps of 4, 4, 4, 3, 4, 4, 4, and 3 stitches.
R1: Work [puff, ch 2] at each marked position. Join. (8 puffs, 8 ch-2 spaces)
R2: Work [2 puffs, ch 2] in each ch-2 space. Join. (16 puffs, 8 ch-2 spaces)
Fasten off, leaving a 20 cm tail. Keep the pulled-up loops approximately 15–18 mm high.
Part 4: Square Foundation
Yarn: matching petal color.
R1: In alternating ch-2 spaces, work [3 dc, ch 2, 3 dc] for a corner and 3 dc for a side. Repeat four times. Join. (36 dc, 4 corner spaces)
R2: Work [3 dc, ch 2, 3 dc] in each corner and 3 dc in each side gap. Join. (60 dc, 4 corner spaces)
R3: Repeat the corner treatment, adding 3 dc in each side gap. Join. (84 dc, 4 corner spaces)
R4: Repeat once more. Join. (108 dc, 4 corner spaces)
Fasten off, leaving a 20 cm tail. Check that the foundation remains flat before making additional squares.
Part 5: Scalloped Edge
Yarn: matching flower color.
R1: Work 1 sc in each dc and 3 sc in each corner ch-2 space. Join. (120 sc)
R2: Repeat [sl st, skip 1 st, 5 dc in next st, skip 1 st] around, adjusting near the corners to maintain an even scallop. The shell count must be fitted to the corners.
Fasten off, leaving a 20 cm tail. For interior motifs, omit the scallop round if a flatter joining seam is preferred.
Part 6: Joining the Blanket Squares
Arrange the finished squares in alternating yellow and pink. For a 120-square layout, position ten squares across and twelve down.
Place adjacent squares right sides together and slip stitch through corresponding foundation stitches. Join individual rows first, then connect the rows. Avoid joining through the raised scallops.
Part 7: Outer Blanket Border
R1: Work sc around the perimeter, placing 3 sc at each external corner.
R2: Work sc around, increasing at corners as needed to keep the border flat.
R3: Repeat [skip 1 st, 5 dc in next st, skip 1 st, sl st in next st], adjusting the final repeats at corners.
Fasten off and weave in the remaining yarn tails. Final round counts depend on the actual joined perimeter.
Part 8: Matching Floral Pillow Covers (Make Two)
Make nine floral squares for each pillow front. Arrange them in a 3 × 3 grid and join them. Crochet a matching back panel or two overlapping envelope panels.
Join front and back, leaving an opening for the insert. Nine 15 cm squares would form a panel approximately 45 cm wide before seam adjustments. Measure the finished panel before selecting the pillow insert.
Assembly — 10 Steps
- Complete one green center and check its shape.
- Attach eight green star points.
- Work the raised yellow or pink petals.
- Build the four-corner square foundation.
- Block and measure the first complete sample square.
- Adjust the hook or foundation if needed.
- Make the remaining motifs using the confirmed gauge.
- Arrange alternating colors and join the squares.
- Add the blanket border and assemble the pillow covers.
- Weave in yarn tails, wash according to the yarn label, and dry flat.
The finished project consists of a joined floral blanket and two coordinating pillow covers.
7 Technical Tips
- Mark every corner. Place markers in all four corner chain spaces. A missed corner can distort the square and disrupt joining.
- Control puff height. Pull loops to approximately 15–18 mm. Uneven heights produce inconsistent petals.
- Check the center. The 30-stitch green circle should lie flat. A cupped center may indicate missed increases or tight tension.
- Practice invisible decreases separately. This pattern does not require them, but they may be useful in shaped adaptations. Working through incorrect loops creates visible bars.
- Pin before joining. Align corners and side midpoints. Unaligned edges can shift by several stitches.
- Avoid bulky seams. Join through the flat foundation rather than overlapping raised scallops. Thick seams can interfere with the blanket’s drape.
- Secure yarn tails. Weave each tail at least 7–10 cm through the reverse side and change direction once. Short tails can loosen during washing.
Related Crochet Patterns
- Puff Flower Granny Square — A raised flower-square tutorial. [INTERNAL LINK NEEDED]
- Puffed Petal Granny Square — Dimensional flower petals. [INTERNAL LINK NEEDED]
- Daisy Patch Granny Square — Multiple puff flowers in one square. [INTERNAL LINK NEEDED]
- Puff Flower Crochet Tutorial — Worsted-weight flower motif. [INTERNAL LINK NEEDED]
Conclusion
The 3D puff flower granny square blanket combines repeated raised floral motifs, square shaping, and a coordinated color arrangement. Its construction can be adapted for throws, bedspreads, cushion covers, and smaller decorative panels. Before making the full blanket, crochet one complete sample square, wash and block it, then record its dimensions and yarn consumption. That measurement determines the final motif count and a more reliable yarn budget.
Save the project to Pinterest as a reference for the pink-and-yellow layout, or share a finished sample on Instagram using #3DPuffFlowerGrannySquareBlanket.
For the next variation, would you keep the green eight-pointed flower centers or replace them with smaller circular centers to increase the visible petal area?
Pattern note: This is an untested original reconstruction inspired by the supplied photograph. Verify stitch placement, gauge, yarn quantities, and finished dimensions with a physical sample before publishing as a tested pattern.









