Introduction
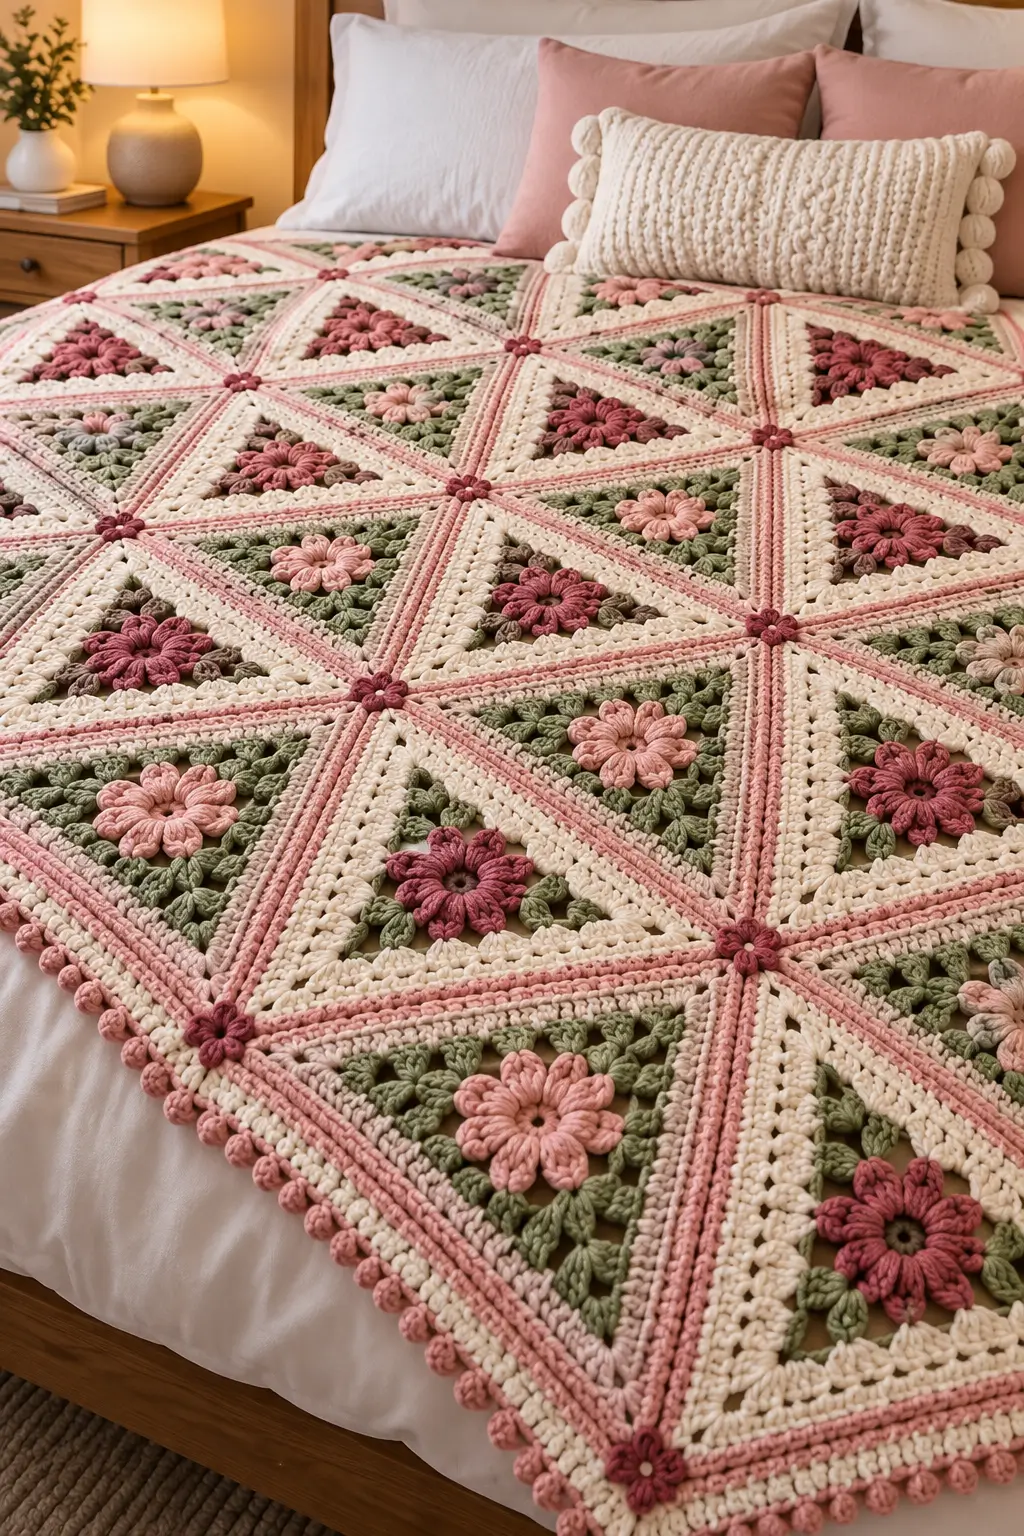
Six cream triangles have to meet around one tiny burgundy flower without turning the intersection into a raised knot. This triangle flower crochet blanket pattern combines dimensional pink and burgundy flowers, sage leaves, cream triangular fields and dusty-pink joining lines. Worked with DK-to-light-worsted yarn and a 4.0 mm hook, the modular construction suits an intermediate crocheter and scales from a lap blanket to a full bedspread.
The Design: What Makes This Triangle Flower Blanket Different
The geometry is built from triangles rather than ordinary granny squares. Each triangular unit carries a raised flower near its center, a sage botanical section around it, and a broad cream frame that isolates the floral color from the joining seams. When the triangles meet, dusty-pink seams form large diamonds and radiating lines across the bed.
Triangle motifs are a proven blanket construction: published examples range from small 7 cm granny triangles to roughly 15–18 cm motifs, depending on yarn and stitch pattern. Worsted flower appliqués commonly use hooks around 4–5 mm, with individual flowers ranging from about 5 cm to 9 cm or more. For this photo-inspired floral triangle crochet blanket, target 22–25 cm per triangle. The critical failure mode is uneven triangle sides; even a 1 cm difference becomes obvious where six units converge.
Project Info at a Glance
| Skill Level | Construction | Triangle Target | Hook | Best For |
|---|---|---|---|---|
| Intermediate | Joined floral triangle motifs | 22–25 cm per side | 4.0 mm | Throws, bedspreads and floral blankets |
The motif measurement is a project target derived from the proportions in the reference. Make one complete blocked triangle before calculating the blanket grid.
Materials and Tools
Yarn
- Warm cream — DK or light worsted #3–4 — main triangular frames
- Dusty rose — DK or light worsted #3–4 — flowers, seams and border
- Deep burgundy — DK or light worsted #3–4 — alternate flowers and intersection flowers
- Sage green — DK or light worsted #3–4 — leaves and botanical sections
- Taupe brown — small quantity — optional leaf accents
- Blush pink — small quantity — alternate flower centers and petals
Use yarns with similar fiber content and meterage. The triangle geometry depends more on equal yarn thickness than on exact brand.
Published floral blanket patterns in comparable palettes commonly specify DK or light-worsted yarn with hooks around 3.5–4.0 mm. A 4.0 mm hook is therefore a practical starting point for the detailed flowers and firm triangular seams shown here.
Tools
- 4.0 mm crochet hook
- DK or light-worsted yarn
- Yarn needle
- Scissors
- Locking stitch markers
- Tape measure
- Blocking mats
- Rust-resistant pins
Abbreviations
- MR — magic ring
- ch — chain
- sl st — slip stitch
- sc — single crochet
- hdc — half double crochet
- dc — double crochet
- tr — treble crochet
- CL — cluster
- sp — space
- st/sts — stitch/stitches
- FO — fasten off
Pattern — Raised Eight-Petal Flower
This is an original photo-inspired construction rather than a transcription of a published blanket. Make the dimensional flower first, then build the sage and cream triangle around it.
Flower Center
With burgundy or dusty rose, make a MR.
Round 1: Work 8 sc into MR. Join with sl st. (8)
Round 2: Work 2 sc in each stitch around. Join. (16)
The center opening may remain slightly visible, matching the ring-like centers seen in several flowers in the reference.
Petal Foundations
Work:
*Sl st in next st, ch 5, skip next st.*
Repeat around.
You should have 8 ch-5 loops.
Raised Petals
Into each ch-5 loop work:
sc, hdc, 3 dc, hdc, sc.
Repeat around all eight loops.
Join with sl st.
FO.
Do not block the petals flat. Their raised shape provides the dimensional flower effect.
Optional Fuller Petal Version
For the larger burgundy flowers, use:
sc, hdc, dc, 3 tr, dc, hdc, sc
inside each petal loop.
This increases the diameter and makes the darker flowers visually heavier than the blush flowers.
Sage Leaf Cluster
The green area around each flower should read as foliage rather than a flat color band.
Join sage yarn behind a petal.
Ch 6.
Beginning in second chain from hook work:
sl st, sc, hdc, dc, hdc.
Sl st back near the flower base.
This forms one compact pointed leaf.
Repeat around the flower to make 8 leaves, positioning one between each pair of petals.
Alternative Textured Leaf
For more relief, ch 7.
Work down one side:
sl st, sc, hdc, dc, hdc, sc.
Ch 1 at the tip.
Turn and work along the opposite side of the foundation chain:
sc, hdc, dc, hdc, sc, sl st.
Attach at the flower base.
Use this fuller leaf selectively so the green layer does not become too thick.
Preparing the Flower for the Triangle
With sage, work one stabilizing round behind the petals and leaves.
Locate eight evenly spaced attachment points.
Work:
*sc at attachment point, ch 3.*
Repeat around.
Join.
This hidden round provides a level foundation from which the triangular field can grow.
Converting the Flower into a Triangle
Switch to cream.
Three corner positions must be established at approximately equal intervals around the flower.
Place markers at the three intended corners before crocheting.
Triangle Round 1
Join cream at the first marked position.
Ch 3.
Work dc stitches and ch-1 spaces across the first side until reaching the next marker.
At the corner work:
(2 dc, ch 3, 2 dc)
Continue to the next marker.
Repeat the corner sequence.
Complete the third side and work the same corner sequence at the starting corner.
Join.
Triangle Round 2
Ch 3.
Dc in each dc and work one dc into each ch-1 space.
At every corner ch-3 space work:
(2 dc, ch 3, 2 dc)
Join.
The motif should now show three distinct straight sides.
Building the Cream Triangle
Round 3
Ch 3.
Dc in every stitch along the first side.
At the corner:
(2 dc, ch 3, 2 dc)
Repeat on the remaining two sides.
Join.
Round 4
Repeat Round 3.
Count the stitches along all three sides.
The counts must match.
Round 5
Ch 1.
Sc in every stitch.
At each corner work:
(sc, ch 2, sc)
Join.
FO cream.
Dusty Pink Accent Round
Join dusty pink in any corner.
Ch 1.
Work sc in each stitch across the side.
At the corner work:
(sc, ch 2, sc)
Repeat around.
Join.
This narrow pink line becomes part of the geometric framework after the motifs are assembled.
Second Cream Structural Round
Switch back to cream.
Ch 2.
Hdc in each stitch around.
At every corner:
(2 hdc, ch 2, 2 hdc)
Join.
FO.
Block the triangle before making additional units.
Blocking the Master Triangle
Pin the three corners first.
Measure all three sides.
Target approximately 22–25 cm per side.
All three measurements should be within approximately 5 mm of one another.
Measure from each corner to the center flower as a secondary check.
The flower should remain centered rather than drifting toward one side.
Flower Color Variations
The reference alternates flower colors while keeping the cream and sage framework consistent.
Use three main flower treatments:
- Deep burgundy flower + sage leaves
- Blush pink flower + sage leaves
- Dusty rose flower + taupe and sage leaves
Do not arrange all burgundy flowers in one section. The darker motifs should be distributed across the blanket to balance the visual weight.
Creating the Large Diamond Layout
Two triangles joined along one side create a diamond-like unit.
Place the first triangle with its point upward.
Place the second with its point downward.
Align one complete side.
The flower centers should mirror one another across the seam.
Repeat these paired units across the blanket.
Additional triangles fill the spaces between rows and continue the geometric network.
Joining Two Triangles
Place two blocked triangles side by side with right sides facing upward.
Using dusty pink, insert the hook through corresponding edge stitches.
Work a loose slip stitch through both motifs.
Continue along the full side.
Do not tighten the seam.
The pink joining line should remain visible but flat.
Raised Pink Joining Line
For a more pronounced seam similar to the reference, join with sc rather than slip stitch.
Hold the triangles with wrong sides together.
Work one sc through corresponding stitches along both edges.
Open the joined motifs flat.
The seam forms a narrow raised pink ridge on the right side.
Adding a Second Pink Ridge
If a wider joining band is desired, surface crochet a second line beside the first.
Use loose slip stitches.
Keep approximately 3–5 mm between the two lines.
Do not add extra surface ridges until several joined triangles have been tested flat.
Small Intersection Flower
The reference places tiny burgundy flowers where several pink seams meet.
With burgundy, make a MR.
Round 1: 6 sc in MR. Join. (6)
Round 2: Work the following in each stitch:
(sl st, ch 2, 2 hdc, ch 2, sl st)
Repeat six times.
FO leaving a 20 cm sewing tail.
The finished flower should remain small enough to cover the intersection without hiding the triangular geometry.
Attaching the Intersection Flowers
Join several triangles first.
Place one small burgundy flower over the central meeting point.
Sew only through its center.
Leave the six tiny petals free.
The flower hides minor seam irregularities and reinforces the point where multiple motifs converge.
Planning the Blanket Grid
The exact number of triangles depends on the blocked side length and desired bed coverage.
For planning, if one triangle has a 24 cm side, two paired triangles form a repeating diamond approximately 24 cm wide, with height determined by the triangular geometry and joining method.
Lay out physical motifs before relying on arithmetic alone because alternating triangle orientation affects the outer edges.
| Project | Starting Triangle Count | Use |
|---|---|---|
| Small lap blanket | Approx. 36–48 | Chair or sofa |
| Large throw | Approx. 60–80 | Sofa or foot of bed |
| Bed blanket | Approx. 90–120 | Full floral coverage |
| Large bedspread | 120+ | Extended side drop |
These are planning ranges, not fixed pattern counts. Build one horizontal sample row before determining the final quantity.
Creating Straight Side Edges
A blanket made entirely from full triangles naturally develops pointed edges.
For a straight side, position triangles so alternating points face inward and outward.
Remaining gaps can be filled with half-triangle units or incorporated into the decorative border.
The photographed blanket uses the geometry as part of the design, so a slightly pointed edge works well with the final bobble trim.
Estimating Yarn
Complete one entire triangle including its flower, leaves and cream frame.
Weigh it.
For example, if one finished triangle weighs 42 g and the blanket requires 90 motifs:
42 g × 90 = 3,780 g
Add yarn for joining, intersection flowers and the outside border.
For better accuracy, weigh each color before and after one sample triangle. That provides separate consumption figures for cream, sage and flower colors.
Suggested Color Balance
Cream should account for the largest share because it forms every triangular frame.
Sage is the second structural color.
For the flowers, a useful starting distribution is:
- 40% deep dusty rose or burgundy
- 35% blush pink
- 25% mixed pink/taupe accents
Use dusty pink consistently for the joining seams so the geometric grid remains continuous across the blanket.
Outer Border — Foundation Round
After all triangles are joined, attach cream yarn at an outer corner.
Work sc evenly around the complete perimeter.
At inward valleys, use sc2tog if extra fullness develops.
At outward corners, work:
(2 sc, ch 2, 2 sc)
Join.
Dusty Pink Border Round
Switch to dusty pink.
Ch 2.
Hdc in each stitch around.
At outward corners work:
(2 hdc, ch 2, 2 hdc)
At inward corners, reduce only if necessary to keep the edge flat.
Cream Border Round
Switch to cream.
Ch 1.
Sc around.
Maintain the established corner shaping.
This cream line separates the pink structural band from the final decorative edging.
Bobble Edge
The reference finishes with small pink rounded details along the outer edge.
Switch to dusty pink.
Work:
sc in next 3 sts, bobble in next st.
Repeat around.
For a compact bobble:
Work 5 unfinished dc into the same stitch.
Yarn over and pull through all loops.
Ch 1 to close.
Continue the established spacing.
Spacing the Border Bobbles
Before completing the entire edge, count the stitches on one long side.
Adjust the number of sc stitches between bobbles so the final bobble lands symmetrically near the corner.
A spacing of approximately 2–4 cm works well visually.
Do not force the same stitch repeat if it creates an extra bobble immediately beside a corner flower.
Matching Lumbar Pillow
The photograph pairs the blanket with a cream textured lumbar cushion rather than repeating the full floral triangles.
For a coordinating crochet front, work a cream rectangle in hdc or a simple raised-rib stitch.
Use dusty pink bobbles along the short sides if a stronger connection to the blanket is wanted.
A simpler pillow keeps attention on the detailed blanket surface.
Optional Floral Pillow Front
For a fully coordinated set, join four or six triangular motifs into a rectangular panel.
Add half motifs where required to straighten the sides.
Work a cream border around the panel.
Attach it to a dense crochet or fabric back.
Use the same small burgundy intersection flowers as the blanket.
Controlling Triangle Distortion
Measure all three sides after every structural round.
If one side is longer, inspect its corner increases and stitch count.
Do not attempt to correct a difference of more than approximately 1 cm through aggressive blocking.
Repair the motif before joining.
Keeping the Flowers Dimensional
Pin only the triangle during blocking.
Do not pin each flower petal flat.
After the motif dries, lift the petals with your fingers.
Likewise, keep the sage leaf tips slightly raised.
The contrast between the flat cream geometry and raised botanical center is central to the design.
Assembly
- Crochet one raised pink or burgundy flower and surround it with the sage leaf cluster.
- Convert the floral center into a cream triangle, add the dusty-pink accent round and block it to establish the master dimensions.
- Make the remaining triangles in the planned flower-color sequence, checking all three sides against the master every few motifs.
- Arrange the blocked triangles with alternating points so pairs create the large diamond geometry visible across the blanket.
- Join corresponding sides with dusty-pink slip stitch or single crochet, keeping every seam relaxed and equal in length to the blocked edge.
- Connect the completed motif rows and check that the flower centers remain aligned before adding any intersection decorations.
- Crochet the small burgundy six-petal flowers and sew one over selected multi-triangle intersections using only the flower center.
- Work the cream perimeter foundation, correcting minor edge irregularities without contracting the triangular points.
- Add the dusty-pink and cream border rounds followed by the evenly spaced pink bobble edging.
- Block the complete blanket flat, align the pink joining lines and reshape every raised flower and sage leaf after drying.
The finished blanket should show a regular triangular grid, continuous dusty-pink seam lines and dimensional flowers centered within alternating cream and sage fields.
7 Technical Tips
- Keep all three sides of each blocked triangle within 5 mm of one another. Unequal sides cause visible twisting when six motif corners meet around one intersection.
- Keep the raised joining seam exactly as long as the blocked motif edge. A seam shortened by 1 cm pulls the neighboring triangles upward and creates a ridge.
- Do not flatten the flower petals during blocking. Pin the cream triangle instead; compressed petals remove the 3D contrast visible in the finished blanket.
- Keep each small intersection flower under about 4–5 cm across. A larger flower hides too much of the dusty-pink geometry at the meeting point.
- Compare every fifth motif with the master triangle. A repeated 5 mm gauge increase can add several centimeters across a long bedspread row.
- Space outer bobbles approximately 2–4 cm apart. Crowded bobbles make the edge flare, while excessive spacing makes the trim appear disconnected.
- Weave seam tails through at least 5 cm of dense cream or pink stitches. Avoid hiding tails in the open botanical sections because those stitches flex more during washing.
Care and Final Blocking
Wash according to the yarn manufacturer’s instructions.
Support the blanket fully when wet.
Lay it on a flat surface and align the dusty-pink seam network first.
Measure several repeated diamonds to confirm the joined geometry has not shifted.
Shape the outer border next.
Once the main fabric is positioned, lift each flower petal and separate the sage leaves.
Allow the blanket to dry completely before folding or placing it on the bed.
Conclusion
The triangle is the measurement that controls this triangle flower crochet blanket pattern. Begin with one floral unit, block it to a 22–25 cm side length and confirm that all three edges match before producing the full set. Keep cream as the dominant structural color, repeat sage around every flower and use dusty pink consistently along the joins so the separate motifs read as one geometric bedspread. Your next step is to make one burgundy-flower triangle and one blush-flower triangle, then place them side by side to test the seam. Share the finished blanket on Pinterest or Instagram with #PinkSageTriangleFlowerBlanket. Would you place the darker burgundy flowers in a repeating diagonal or scatter them evenly across the bed?
knt