Introduction
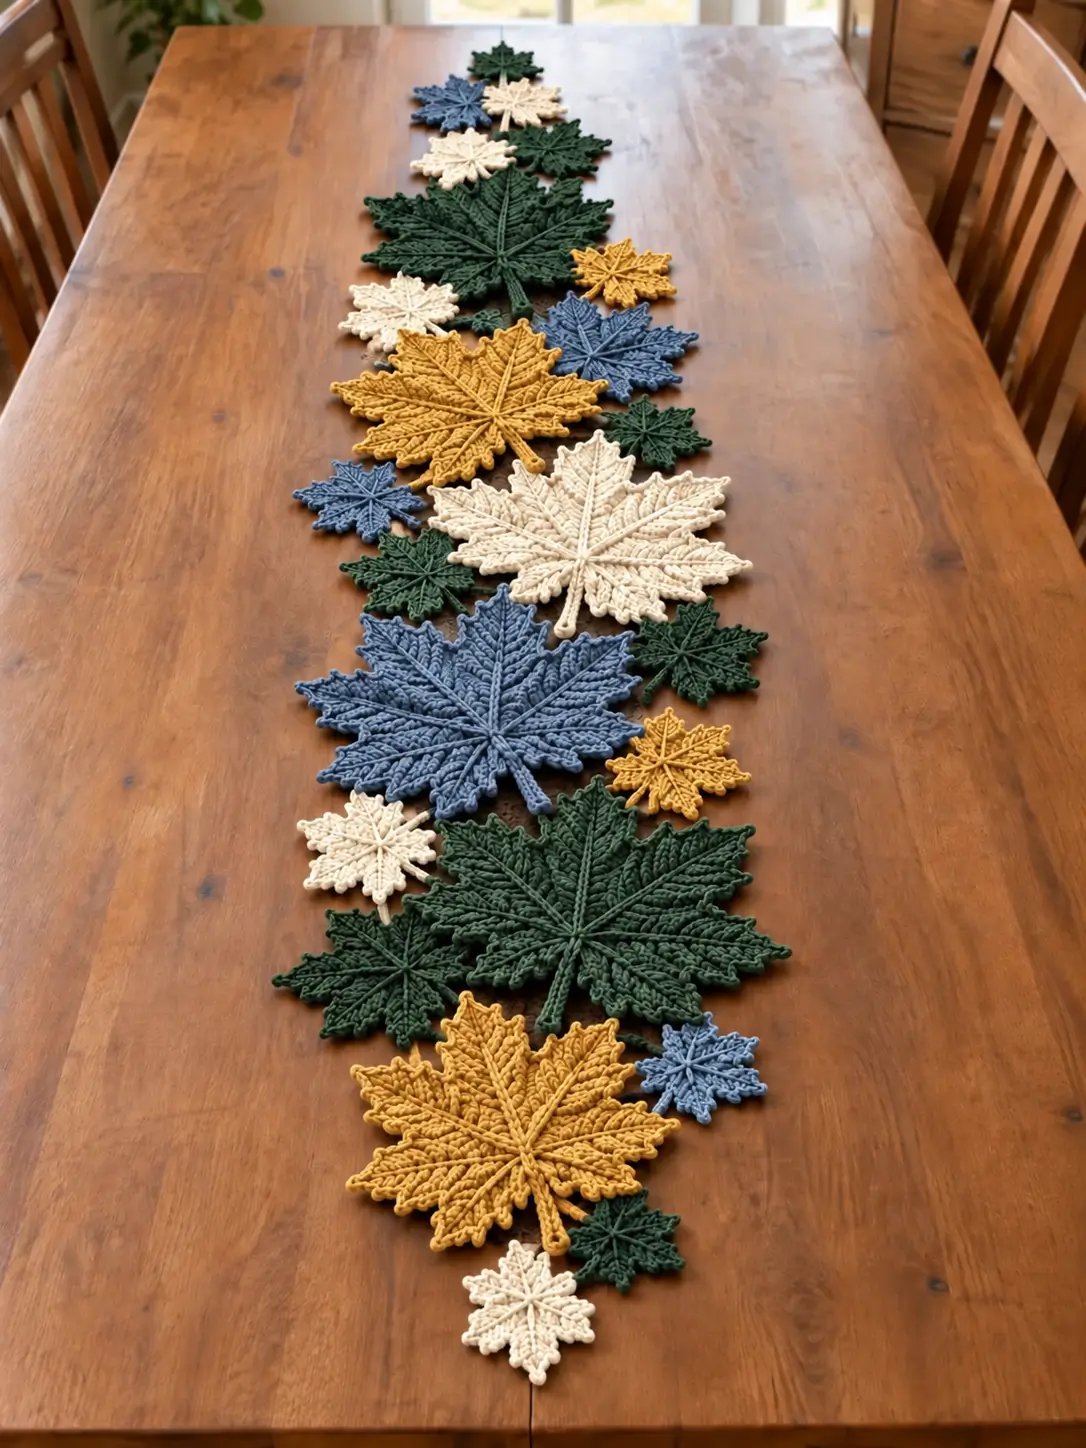
The largest maple leaves in this runner use their veins as structural lines, not just decoration. This crochet maple leaf table runner pattern combines oversized and small leaves in forest green, mustard gold, dusty blue and cream. Worked as separate flat motifs with medium-weight cotton and a 4.0 mm hook, the design suits an intermediate crocheter who wants a runner that can be lengthened without adding a conventional fabric or crochet base.
The Design: What Makes This Maple Leaf Runner Different
The runner is constructed entirely from leaves. Large maple motifs establish the central rhythm, while smaller leaves occupy the spaces between them and narrow the arrangement toward both ends. This produces an irregular botanical edge rather than the straight sides of a conventional rectangular runner.
The second structural feature is the raised vein system. Each large leaf has one strong central rib and four diagonal primary veins, with shorter branches extending toward the serrated edge. Those lines help the broad lobes hold their shape after blocking. Published maple-leaf patterns demonstrate substantial size variation: worsted constructions can finish around 10–14 cm, while larger decorative versions reach roughly 15–17 cm or more depending on yarn and hook. For this photo-inspired runner, the large leaves target 20–24 cm and the small leaves 8–11 cm.
Project Info at a Glance
| Skill Level | Construction | Finished Size | Hook | Best For |
|---|---|---|---|---|
| Intermediate | Separate joined maple-leaf motifs | Approx. 120–160 cm long | 4.0 mm | Dining tables, consoles and seasonal displays |
The runner dimensions are project targets based on the photographed proportions rather than measurements taken from the pictured item. Published maple-leaf appliqués made with worsted yarn and hooks around 3.5–4.0 mm range from small 7–10 cm motifs to considerably larger decorative leaves. Make one large and one small sample before calculating the final arrangement.
Materials and Tools
Yarn
- Forest green — worsted weight #4 cotton or cotton blend — large and small leaves
- Mustard gold — worsted weight #4 — large and small leaves
- Dusty slate blue — worsted weight #4 — large and small leaves
- Warm cream — worsted weight #4 — medium and small leaves
Use the same yarn family for all four colors. Equal yarn thickness matters because every leaf is part of the runner’s final geometry.
A published 3-inch worsted maple-leaf appliqué can use approximately 4 g of yarn, while larger decorative leaves require considerably more. For this runner, weigh one completed large motif and one small motif before buying yarn for a long table.
Tools
- 4.0 mm crochet hook
- Worsted weight #4 cotton or cotton-blend yarn
- Yarn needle
- Scissors
- Locking stitch markers
- Tape measure
- Blocking mat
- Rust-resistant pins
Abbreviations
- MR — magic ring
- ch — chain
- sl st — slip stitch
- sc — single crochet
- hdc — half double crochet
- dc — double crochet
- tr — treble crochet
- dtr — double treble crochet
- sp — space
- st/sts — stitch/stitches
- FO — fasten off
Pattern — Large Textured Maple Leaf
This is an original photo-inspired construction. The goal is to reproduce the arrangement, scale hierarchy and raised-vein character of the reference without copying a published leaf pattern.
The large motif uses five major lobes: one long center lobe, two upper side lobes and two shorter lower lobes. Smaller edge points are added during the perimeter round.
Central Foundation
With the selected color, make a MR.
Round 1: 6 sc in MR. Join. (6)
Round 2: 2 sc in each stitch around. Join. (12)
Round 3: (Sc in next st, 2 sc in next st) ×6. Join. (18)
Round 4: (Sc in next 2 sts, 2 sc in next st) ×6. Join. (24)
The compact center anchors all five lobes and later supports the raised surface veins.
Center Lobe
Mark a six-stitch section at the top of the foundation.
Row 1: Ch 1, sc across 6 sts. (6)
Row 2: Ch 1, increase in first st, sc in next 4, increase in last st. (8)
Row 3: Ch 2, hdc across. (8)
Row 4: Increase at both ends. (10)
Rows 5–8: Hdc across. (10)
Row 9: Hdc2tog, hdc in next 6, hdc2tog. (8)
Row 10: Hdc2tog, hdc in next 4, hdc2tog. (6)
Row 11: Hdc2tog, hdc in next 2, hdc2tog. (4)
Row 12: Hdc2tog twice. (2)
Row 13: Sc2tog. (1)
Ch 3. Sl st into second chain and third chain from hook, then sl st into the final stitch to create a narrow point.
FO.
Upper Left Lobe
Join yarn beside the center lobe.
Row 1: Sc across 5 foundation stitches. (5)
Row 2: Increase at both ends. (7)
Row 3: Hdc across. (7)
Row 4: Increase at both ends. (9)
Rows 5–7: Hdc across. (9)
Row 8: Hdc2tog, hdc in next 5, hdc2tog. (7)
Row 9: Hdc2tog, hdc in next 3, hdc2tog. (5)
Row 10: Hdc2tog, hdc, hdc2tog. (3)
Row 11: Work the remaining stitches together to create the point.
FO.
Upper Right Lobe
Repeat the upper-left lobe on the opposite side.
Lay the motif flat before moving on. The upper lobes should spread outward while remaining visibly shorter than the center point.
Lower Left Lobe
Join yarn below the upper-left lobe.
Row 1: Sc across 4 sts. (4)
Row 2: Increase at both ends. (6)
Row 3: Hdc across. (6)
Row 4: Increase at both ends. (8)
Rows 5–6: Hdc across. (8)
Row 7: Hdc2tog, hdc in next 4, hdc2tog. (6)
Row 8: Hdc2tog, hdc in next 2, hdc2tog. (4)
Row 9: Hdc2tog twice. (2)
Row 10: Sc2tog. (1)
FO.
Lower Right Lobe
Repeat the lower-left lobe on the opposite side.
The large leaf now has its five principal maple points.
Building the Serrated Maple Edge
Join matching yarn at the lower-left edge.
Work sc around the leaf perimeter.
At regular intervals along each lobe work:
sc, ch 2, sl st into second ch from hook, sc.
These small picots create secondary points.
At each major lobe tip work:
hdc, ch 3, sl st into second ch from hook, sl st into next ch, hdc.
In every deep valley between major lobes, work a tight sl st.
Keep the valleys low. Filling them with tall stitches turns the leaf into a rounded star.
Large Leaf Stem
Join yarn at the lower center.
Ch 14.
Beginning in second chain from hook, sl st in first 3 chains.
Sc in each remaining chain.
Sl st securely into the leaf base.
FO.
The return stitches must remain relaxed. Tight slip stitches cause a narrow crochet stem to twist into a spiral.
Raised Central Vein
Lay the leaf right side up.
Join yarn at the stem base.
Work surface slip stitches from the stem through the center of the foundation and toward the tallest point.
Follow a visually straight path.
Stop approximately 5 mm before the center-lobe tip.
FO on the reverse.
Do not pull the surface stitches tight. The leaf should remain flat on the table.
Four Primary Side Veins
Join yarn to the central vein.
Surface sl st diagonally toward the upper-left lobe.
Stop approximately 8–10 mm before its point.
Repeat toward the upper-right lobe.
Work two shorter veins from the lower section of the center rib toward the lower-left and lower-right lobes.
The result should resemble five structural ribs radiating from the stem area.
Secondary Vein Branches
Add short surface-crochet branches from the five main ribs.
Each branch can contain approximately 3–6 slip stitches.
Angle them toward the nearest serrated edge.
Alternate their positions instead of placing matching branches directly opposite one another.
This produces a more botanical structure while preserving enough plain fabric between the veins.
Small Maple Leaf
The smaller leaves fill gaps between the oversized motifs and taper both ends of the runner.
Make a MR.
Round 1: 6 sc in MR. (6)
Round 2: 2 sc in each stitch. (12)
Round 3: (Sc, inc) ×6. (18)
Small Center Point
Work into the next three stitches:
sc, hdc, dc.
In the next stitch work:
(tr, dtr, ch 3, sl st into second ch, sl st into next ch, dtr, tr).
Work:
dc, hdc, sc.
This creates the tall center lobe.
First Side Point
Sl st into the next stitch.
In the following stitches work:
sc, hdc, dc, (tr, ch 2, sl st into second ch, tr), dc, hdc, sc.
Sl st into the next available foundation stitch.
Second Side Point
Repeat on the opposite side.
Lower Points
Create one shorter point on each lower side using:
sc, hdc, (dc, ch 2, sl st into second ch, dc), hdc, sc.
Use sl sts in the valleys.
The small leaf should show one dominant center point, two medium side points and two short lower points.
Small Leaf Stem
Ch 7.
Sl st back along the chain.
Anchor at the leaf base.
FO.
Veins for the Small Leaf
Work one surface-slip-stitch line from the stem toward the center point.
Add four short diagonal veins.
Skip secondary branching on very small motifs. Too much surface crochet makes an 8–11 cm leaf stiff and visually crowded.
Blocking the Leaves
Block every motif before arranging the runner.
For a large leaf, pin the center point first.
Pin the two upper lobes next.
Position the lower lobes last.
Pull each valley slightly toward the center.
Straighten the stem.
Target approximately 20–24 cm across for the large photo-inspired leaves.
Target approximately 8–11 cm for the small leaves.
Those measurements are project targets. Changing the yarn and hook together is safer than randomly adding rows to individual lobes when a different scale is required.
Color Plan
The photographed runner uses four distinct colors with forest green carrying the greatest visual weight.
For a runner approximately 130–150 cm long, begin with:
- Forest green: 3 large leaves + 5–6 small leaves
- Mustard gold: 2 large leaves + 4–5 small leaves
- Dusty blue: 1–2 large leaves + 4–5 small leaves
- Warm cream: 1 large leaf + 4–5 small leaves
This is a layout budget rather than a mandatory count. Add or remove small leaves after placing the large motifs on the actual table.
Planning the Runner Layout
Place the largest leaves first.
Do not arrange them in a perfectly straight line.
Rotate successive leaves slightly left and right.
Overlap selected lobe tips by approximately 1–2 cm.
Leave other large leaves separated by a small gap.
Next, position small motifs between the large leaves.
Use them to bridge empty spaces and disguise joins.
The finished arrangement should remain narrow enough for plates and serving dishes to sit on the uncovered wood beside it.
Recommended Runner Width
For a dining table, target approximately 25–35 cm at the widest section.
Individual leaf points may extend slightly farther.
A narrow center arrangement works better than placing large leaves across most of the tabletop because the dimensional veins can make glasses or plates unstable.
Recommended Runner Length
For a 120 cm runner, arrange approximately 5–6 large leaves with small filler leaves.
For 150 cm, use approximately 7–8 large leaves.
For 180 cm, begin with 9 large leaves and add smaller motifs until the spacing appears continuous.
Actual requirements depend on blocked leaf size and the amount of overlap.
Joining the Runner
The leaves should appear casually layered while remaining connected enough to lift as one piece.
Thread a yarn needle with matching yarn.
At each overlap, sew through approximately 2–3 cm of the two motifs.
Place stitches through dense lobe sections rather than through pointed picots.
Make two separate attachment zones whenever a large leaf overlaps another large leaf.
This prevents individual motifs from rotating during use.
Joining Different Colors
Use the darker of the two overlapping colors when the join is hidden on the reverse.
When a join crosses a visible area, use the yarn color of the upper leaf.
Keep all sewing inside the existing stitches.
A contrasting joining line would interrupt the raised-vein structure.
Using Small Leaves as Connectors
Small leaves are useful structural components rather than simple decoration.
Place one small leaf across a gap between two large motifs.
Sew one lower lobe to the first large leaf.
Attach an opposite lobe to the second.
Leave the center point and remaining lobes free.
This hidden two-point connection keeps the arrangement flexible while preserving the layered appearance.
Tapering the Runner Ends
Do not finish each end with a large leaf.
Move from one medium or large leaf into two or three smaller motifs.
Rotate the smallest final leaf so its center point follows the runner’s length.
This creates the narrow tapered ends visible in the reference.
Estimating Yarn
Complete one large leaf and one small leaf.
Weigh them separately.
Suppose a large motif uses 24 g and a small motif uses 7 g.
If the runner contains 7 large leaves and 18 small leaves:
7 × 24 g = 168 g
18 × 7 g = 126 g
Total sample-based estimate = 294 g
Add approximately 10% for swatching, joins and variation between motifs.
The figures above demonstrate the calculation method. Weigh your own samples before purchasing yarn because leaf density varies considerably between constructions.
Making a Longer Runner
Extend the arrangement through the center rather than adding motifs only to one end.
Separate two existing large leaves.
Insert another large motif between them.
Add two or three small leaves around the new junction.
This preserves the tapered ends and balanced color distribution.
Making a Shorter Centerpiece
Use three large leaves: forest green, mustard and blue.
Add approximately six to eight small leaves in cream, green and mustard.
Target a finished length of approximately 70–90 cm.
This size works well on a coffee table or compact dining table.
Making Matching Coasters
Use only the small-leaf pattern.
Work the motif in worsted cotton with the 4.0 mm hook.
Block to approximately 9–11 cm.
Keep the surface veins relatively flat.
For a coaster set, make one each in forest green, mustard, blue and cream.
Test the finished surface with the intended cup before regular use because highly raised veins can reduce stability.
Making Matching Placemats
Use one large leaf as the visual center.
Add three or four small leaves along one side.
Join them using the same hidden sewing method as the runner.
Keep the center of the placemat comparatively flat if plates will sit directly on the crochet.
An alternative is to place the leaf cluster above the plate position as a decorative table setting rather than beneath dinnerware.
Controlling the Raised Veins
Surface crochet should sit above the leaf without contracting it.
After every five or six slip stitches, place the leaf flat.
If the edge lifts from the table, pull the last stitches out and remake them more loosely.
Using a hook 0.5 mm larger for the surface veins can help crocheters who naturally make tight slip stitches.
Creating Sharper Leaf Points
The final shape comes from both crochet and blocking.
During blocking, place a pin immediately beyond every major point.
Pull only until the stitch structure opens evenly.
Pin the valleys inward.
Overstretching the point while leaving the valley loose produces a star shape rather than a maple silhouette.
Assembly
- Crochet one large maple leaf, add the serrated edge, stem and raised vein system, then block it to establish the master size.
- Make one small leaf and block it separately, recording the finished width and length of both motif sizes.
- Crochet the remaining large leaves in forest green, mustard, dusty blue and cream while comparing each with the master.
- Make the required small leaves and keep their center points and stems oriented consistently during blocking.
- Arrange the large leaves down the center of the table, rotating consecutive motifs slightly and overlapping selected lobes by 1–2 cm.
- Insert small leaves between the large motifs to bridge gaps, introduce color changes and narrow the arrangement between focal leaves.
- Attach overlapping large motifs through two 2–3 cm sewing zones placed in dense sections of the lobes.
- Sew each connector leaf at two discreet points while leaving most of its perimeter free and dimensional.
- Taper both runner ends with progressively smaller leaves and verify the complete arrangement remains centered on the table.
- Weave all tails into dense stitches on the reverse, then perform a final light blocking without flattening the raised veins.
The completed runner should lift as one flexible piece while retaining the appearance of individually scattered maple leaves.
7 Technical Tips
- Keep the largest leaves within about 5 mm of the master width. A 2 cm difference becomes obvious when several focal leaves appear along the same narrow runner.
- Stop every main surface vein 5–10 mm before its lobe point. Continuing into the final picot pulls the point inward and can cup the leaf.
- Overlap large leaves by only 1–2 cm. Deep overlaps hide the five-lobe silhouettes and create thick areas that do not sit level on the table.
- Use two joining zones between large motifs. A single attachment point allows the leaves to rotate and changes the runner width whenever it is moved.
- Keep the runner’s central width near 25–35 cm for dining-table use. A much wider arrangement can interfere with plates and serving pieces.
- Use a hook 0.5 mm larger if surface slip stitches tighten the fabric. Contracted veins are the main cause of curled lobe edges in a flat textured leaf.
- Weave every joining tail through at least 5 cm of dense stitches. Do not hide tails along picot points because those stitches flex whenever the runner is handled.
Color Placement
Forest green is the anchor color in this runner. Use it for several of the largest leaves and repeat it among the smaller connectors.
Mustard provides the warmest contrast and works well on large focal leaves. Dusty blue introduces a cooler note, so separate major blue motifs with green, cream or mustard rather than placing them consecutively.
Cream is the lightest value. Use it around darker leaves to create visual separation.
Before sewing, photograph the entire arrangement from above. A photograph makes accidental color clusters easier to spot than viewing the runner at table height.
Care and Final Blocking
Follow the washing instructions for the selected yarn.
For cotton motifs, support the runner fully when wet.
Lay it flat and arrange the largest leaves first.
Check the overall center line.
Position the small connectors next.
Pin the five main points of each large leaf only where necessary.
Do not press the raised veins flat.
Allow the runner to dry completely before moving it from the blocking surface.
Conclusion
The size contrast between the focal leaves and small connectors gives this crochet maple leaf table runner pattern its long, natural outline. Start with one 20–24 cm large leaf and one 8–11 cm small motif, block both, then use those samples to establish the runner’s scale. Keep the raised veins loose, overlap major leaves by only 1–2 cm and use smaller motifs as discreet structural bridges. The next step is to place the blocked samples on your actual table and measure the remaining length before making the full color set. Share the finished runner on Pinterest or Instagram with #WoodlandMapleLeafRunner. Which focal color would you place at the center of the table: forest green, mustard, dusty blue or cream?