Introduction
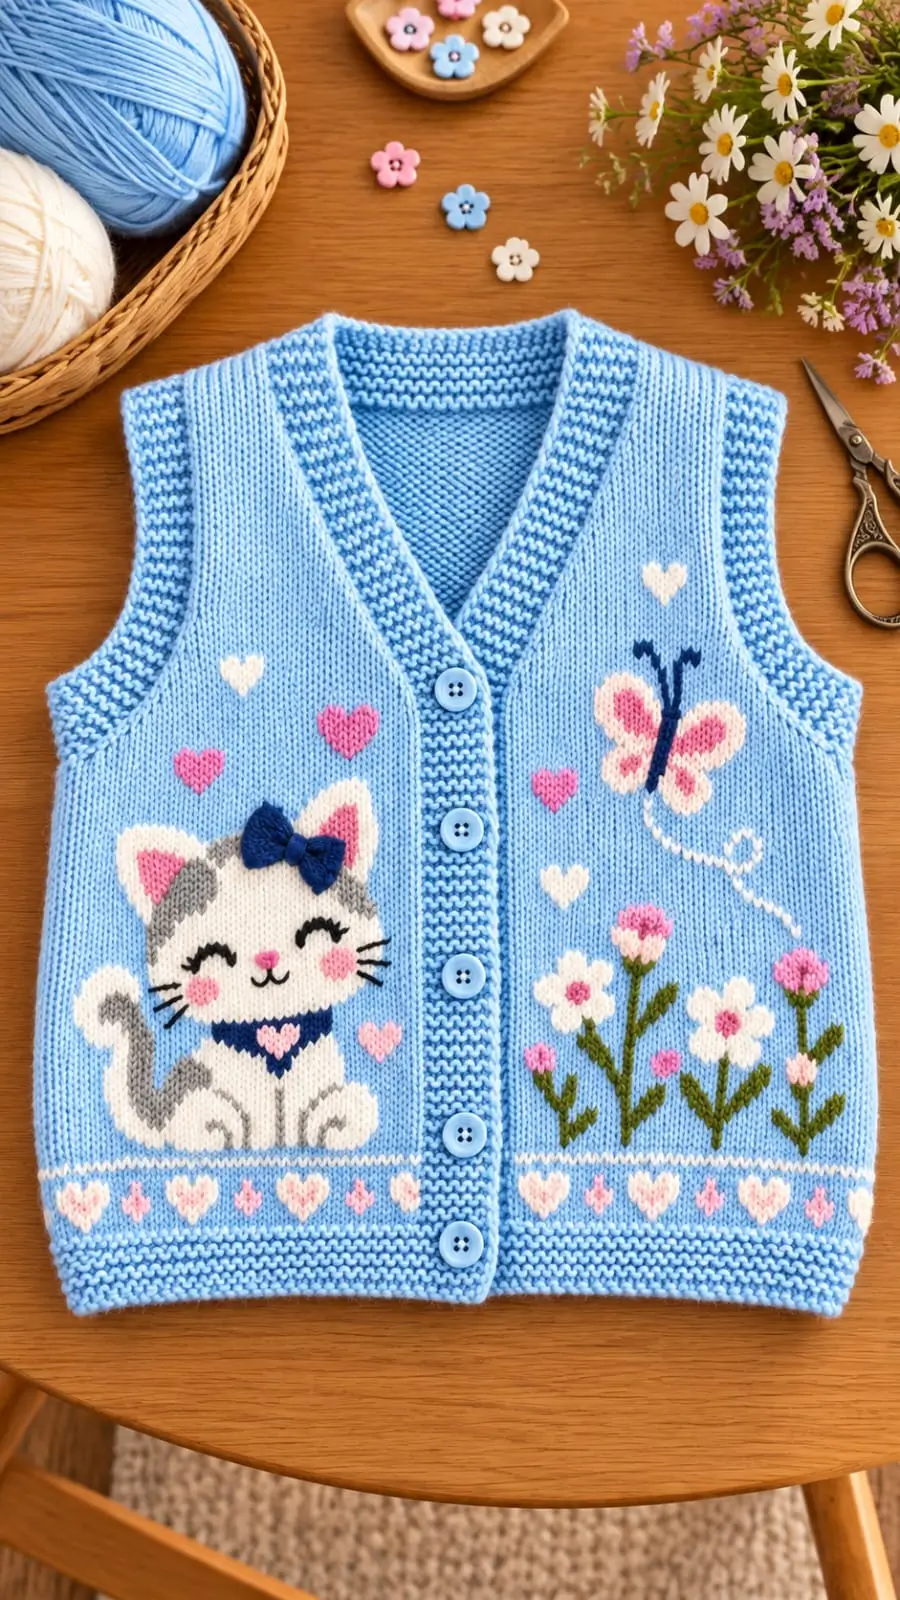
The kitten’s curled tail must clear the five-button placket while its ears stay below the V-neck seam. This knitted cat vest pattern uses DK yarn, 4 mm needles, and duplicate-stitch decoration to make a proposed size-2 vest measuring about 62 cm around the chest and 35 cm long. The construction suits an intermediate knitter who can shape armholes and necklines. Separate motifs allow the base garment to be washed and inspected before decoration.
The Design: What Makes This Kitten Vest Different
The sky-blue fabric is worked flat rather than in a continuous tube. This gives the right and left fronts distinct center edges, a reliable way to place five buttonholes without splitting a panel. A six-stitch garter band follows the V-neck into the back collar, so the neckline does not depend on a tight picked-up edge.
The kitten is positioned on the wearer’s right front, inside a stockinette field that accommodates duplicate stitch. A separate gray tail and narrow navy bow avoid long carried strands; those strands would catch on clothing behind the fabric. The opposite front holds a high butterfly and low flowers, balancing the image without making the placket stiff. A common failure in a cat motif knitting project is to embroider the ears too close to the neckline decrease line. Leave at least four plain stitches there.
Project Info at a Glance
| Detail | Specification |
|---|---|
| Skill level | Intermediate |
| Estimated time | Not verified; depends on embroidery |
| Approximate age | 2 years |
| Finished chest | 62 cm |
| Finished length | Approximately 35 cm |
| Main needles | 4 mm |
| Edging needles | 3.5 mm |
| Yarn | DK weight |
| Gauge | 22 stitches × 28 rows / 10 cm |
| Construction | Three knitted panels |
| Closure | Five buttons |
| Decoration | Duplicate stitch and embroidery |
The sizing is based on stitch calculations rather than an exact measurement of the pictured vest. The Craft Yarn Council child sizing chart lists 53 cm as a typical size-2 chest measurement, while the proposed garment adds approximately 9 cm of positive ease.
Important: Knit and wash a gauge swatch before casting on. This pattern is an untested design draft, so check the child’s actual chest and preferred garment length.
Materials and Tools
Yarn
Choose smooth DK yarn that provides clear stitch definition. Smooth cotton blends, acrylic blends, and machine-washable merino blends are suitable starting points. Quantities are design allowances, not verified consumption figures from the photographed garment.
- Sky blue — DK yarn — approximately 150 g — Stylecraft Special DK or comparable yarn.
- Cream white — DK yarn — approximately 15 g — kitten, flowers, and hearts.
- Light gray — DK yarn — approximately 10 g — kitten stripes, paws, ears, and tail.
- Medium pink — DK yarn — approximately 10 g — cheeks, hearts, flowers, and butterfly wings.
- Soft rose pink — DK yarn — approximately 5 g — smaller floral details.
- Navy blue — DK yarn — approximately 5 g — bow and butterfly body.
- Olive green — DK yarn — approximately 5 g — stems and leaves.
- Black — embroidery thread or fine yarn — kitten face.
Use yarns with compatible washing requirements. A cotton accent stitched onto a wool base may behave differently after laundering.
Tools
- 4 mm knitting needles for stockinette panels.
- 3.5 mm knitting needles for the lower borders and edging.
- Five approximately 12 mm buttons in light blue.
- Blunt tapestry needle for duplicate stitch and seaming.
- Stitch markers for shaping positions.
- Stitch holders or waste yarn for shoulders.
- Measuring tape, scissors, and blocking supplies.
- Fine sewing needle and strong thread for buttons.
Stuffing, safety eyes, and crochet hooks are not required.
Knitting Abbreviations
| Abbreviation | Meaning |
|---|---|
| CO | Cast on |
| BO | Bind off |
| K | Knit |
| P | Purl |
| St / sts | Stitch / stitches |
| RS | Right side |
| WS | Wrong side |
| St st | Stockinette stitch |
| G st | Garter stitch |
| K2tog | Knit two stitches together |
| SSK | Slip, slip, knit |
| YO | Yarn over |
| Rep | Repeat |
| PM | Place marker |
Stockinette stitch: Knit on the right side and purl on the wrong side.
Garter stitch: Knit every row when working flat.
Decrease placement: Work SSK for a left-leaning decrease and K2tog for a right-leaning decrease.
Pattern — Step by Step
The pattern is worked flat from the lower edge upward. Right and left fronts are named from the wearer’s perspective. The row numbers assume the stated gauge and include the initial garter border. Work unlisted rows in the established fabric pattern.
Back Panel — Make 1
Yarn: Sky blue DK.
With 3.5 mm needles:
Row 1: CO 68 stitches and knit across. (68)
Rows 2–8: Knit every row. (68)
Change to 4 mm needles.
Rows 9–62: Work in stockinette stitch, beginning with a knit row. (68)
The piece should be approximately 21–22 cm long near the start of armhole shaping. Measure the fabric.
Shape the Armholes
Row 63 (RS): BO 4 stitches, knit to end. (64)
Row 64 (WS): BO 4 stitches, purl to end. (60)
Row 65: K1, SSK, knit to last 3 stitches, K2tog, K1. (58)
Row 66: Purl. (58)
Row 67: Repeat the decrease row. (56)
Rows 68–98: Continue stockinette without further shaping. (56)
Place 13 stitches for each shoulder on separate holders and the remaining center 30 stitches on another holder.
Stitch verification: 68 − 8 armhole bind-off stitches − 4 decreases = 56 stitches. Shoulder and neckline division: 13 + 30 + 13.
Right Front — Make 1
Yarn: Sky blue DK. This is the kitten side and includes buttonholes.
Row 1: CO 37 stitches and knit. (37)
Rows 2–8: Knit every row. (37)
Change to 4 mm needles. Maintain six garter stitches at the center-front edge: first six stitches on RS rows and final six stitches on WS rows.
Rows 9–58: Continue stockinette and garter combination. (37)
Five Buttonholes
On right-side Rows 13, 25, 37, 49, and 61, replace the first six garter stitches with K2, YO, K2tog, K2. Continue the remainder of the row in pattern.
Each buttonhole maintains the stitch count. Test the opening with a 12 mm button before knitting the final garment.
Shape the V-Neck
On neckline-decrease rows, work K6, SSK, then knit to the opposite edge, unless armhole shaping is also directed.
Row 59: Decrease at neckline. (36)
Row 61: Work fifth buttonhole. (36)
Row 63: Decrease at neckline. (35)
Row 64 (WS): BO 4 stitches at the armhole edge, then work to the front band. (31)
Row 65: Decrease one stitch at the armhole edge with K2tog before the final edge stitch. (30)
Row 67: Decrease at neckline. (29)
Row 69: Repeat the armhole decrease. (28)
- Row 71: Neckline decrease. (27)
- Row 75: Neckline decrease. (26)
- Row 79: Neckline decrease. (25)
- Row 83: Neckline decrease. (24)
- Row 87: Neckline decrease. (23)
- Row 91: Neckline decrease. (22)
- Row 93: Neckline decrease. (21)
- Row 95: Neckline decrease. (20)
- Row 97: Neckline decrease. (19)
Row 98: Work in pattern. (19)
Place 13 outer shoulder stitches on a holder. Continue the six center-front garter stitches to form the back-neck extension. Knit approximately 6.8 cm, or half the measured width of the back neckline, then hold the stitches.
Stitch verification: 37 − 12 neckline decreases − 4 bound-off armhole stitches − 2 armhole decreases = 19 stitches.
Left Front — Make 1
Yarn: Sky blue DK. This is the butterfly and flower side.
Rows 1–8: CO 37 stitches and work garter stitch. (37)
Switch to 4 mm needles.
Rows 9–58: Work stockinette, placing the six-stitch garter band at the opposite center-front edge. There are no buttonholes. (37)
Neckline and Armhole Shaping
For each neckline decrease, knit to the final eight stitches, K2tog, K6.
Row 59: Neckline decrease. (36)
Row 63: BO 4 stitches at the armhole edge, then decrease at neckline. (31)
Row 65: K1, SSK, knit to end. (30)
Row 67: Neckline decrease. (29)
Row 69: Repeat armhole decrease. (28)
- Row 71: (27)
- Row 75: (26)
- Row 79: (25)
- Row 83: (24)
- Row 87: (23)
- Row 91: (22)
- Row 93: (21)
- Row 95: (20)
- Row 97: (19)
Row 98: Work in pattern. (19)
Place 13 outer shoulder stitches on a holder. Extend the remaining six garter-band stitches to approximately 6.8 cm and place them on a holder.
Both fronts finish with 13 shoulder stitches and six band stitches.
Armhole Garter Edging — Make 2
Yarn: Sky blue DK.
After joining the shoulders and side seams, use 3.5 mm circular needles to pick up approximately 60 stitches around each armhole.
Round 1: Purl all stitches.
Round 2: Knit all stitches.
Round 3: Purl all stitches.
Round 4: Knit all stitches.
Round 5: Purl all stitches.
Bind off knitwise with flexible tension. Adjust the pickup count slightly if the edge puckers.
Kitten Face and Ears
Yarn: Cream, gray, pink, and black.
Place the kitten on the wearer’s right front, above the lower heart border and outside the six-stitch front band.
Use duplicate stitch across a stockinette area approximately 19 stitches wide. Center the face around Rows 34–45.
Create a cream oval using these stitch widths from bottom to top:
13, 15, 17, 19, 19, 19, 19, 19, 19, 17, 15, 13 stitches.
Add two triangular ears above the face, each approximately five stitches wide and five rows high. Work the outer shapes in cream and gray and smaller pink triangles inside.
Leave at least four plain stitches between the ears and neckline decrease line.
Facial Details
Use dark embroidery thread for two upward-curving closed eyes, about six stitches apart. Add a small pink triangular nose, a short mouth, and three whiskers on each side.
Cheek patches — Make 2: Work pink duplicate-stitch circles approximately three stitches wide and three rows tall beneath the eyes. They are flat embroidered patches, not separate crochet parts.
Kitten Body, Paws, and Curled Tail
Yarn: Cream and light gray.
Embroider a rounded body approximately 18 stitches wide and 11 rows high. Begin near Row 20, leaving a clear space above the decorative lower border.
Use cream for the body and gray for side stripes. Add two rounded front paws, approximately four stitches across and four rows high, with gray toe markings.
For the curled tail, embroider a three-stitch-wide gray shape extending from the lower outer side of the body. Curve it outward, upward, and inward to create a loose curl.
Backstitch or stem stitch can be used to smooth the curved outline. Avoid pulling the yarn so tightly that the surrounding stockinette gathers.
Navy Bow and Heart Collar
Yarn: Navy blue and pink.
Place a small navy bow near one kitten ear. Create two triangular loops approximately five stitches wide and four rows high, joining them with a darker center knot.
Add a short narrow strip beneath the knot. Embroider a shallow navy V across the kitten’s upper chest and a tiny pink heart at its center.
Keep the bow and heart separate so neither covers the kitten’s face.
Butterfly Motif
Yarn: Cream, rose pink, medium pink, and navy.
Position the butterfly high on the wearer’s left front, away from the center button band.
Reserve an area approximately 16 stitches wide and 15 rows high. Form two upper wings with cream outlines and pink centers, each roughly seven stitches wide.
Add two smaller tapered lower wings. Embroider a narrow navy body approximately two stitches wide and eight rows high.
Use navy backstitch for two short curved antennae. Make the lower wings approximately two rows shorter than the upper wings.
Floral Garden Motifs
Yarn: Olive green, cream, medium pink, and rose pink.
Create three upright stems on the lower left front, beginning near Rows 13–16 and extending to different heights around Rows 27, 31, and 34.
Use olive-green stem stitch or duplicate stitch for stems and add two or three small leaves on each.
White Flowers
For each white flower, create five small cream petals surrounding a pink center. Petals should occupy approximately two to three stitches, giving each flower a diameter of seven to nine stitches.
Make two larger white blossoms, leaving a small gap between neighboring petals.
Pink Flowers
Make three or four smaller pink blossoms, each with five compact petals and a lighter center. Stagger their heights rather than aligning all flower heads on one row.
Scattered Hearts and Lower Border
Yarn: Cream, medium pink, and rose pink.
Add small hearts around the kitten and butterfly, keeping the main motifs visible.
For a seven-stitch-wide heart, follow this grid from top to bottom. X represents a duplicate stitch and a dot represents an empty stitch:
.XX.XX.
XXXXXXX
.XXXXX.
..XXX..
...X...
Repeat larger pink-and-cream hearts above the garter hem, leaving at least two sky-blue stitches between neighboring shapes.
Add a thin cream horizontal line with duplicate stitch just above the hem. Keep the front button band clear so the closure remains functional.
Assembly — 10 Steps
- Block the panels. Lay the back and fronts flat to their planned dimensions without stretching the button bands.
- Join the shoulders. Match each front’s 13 shoulder stitches with the corresponding back stitches and join using a three-needle bind-off or grafted seam.
- Complete the neckline. Join the two six-stitch collar extensions at the center back and sew their lower edges to the back neckline.
- Join the side seams. Align the lower hems and underarm positions before sewing.
- Finish the armholes. Pick up edging stitches, work garter-style rounds, and bind off flexibly.
- Position the kitten. Mark the body, head, ears, and tail on the right front before duplicate stitching.
- Embroider facial details. Add the eyes, nose, whiskers, cheek patches, collar heart, and navy bow.
- Decorate the opposite front. Complete the butterfly, stems, flowers, leaves, and scattered hearts.
- Sew on the buttons. Align all five 12 mm buttons with their buttonholes and attach them securely.
- Inspect the finish. Weave in ends, check embroidery floats, test buttonholes, and wash and dry according to yarn care labels.
The completed garment consists of three knitted panels, five buttons, and embroidered kitten-and-garden decoration.
7 Technical Tips for a Cleaner Finish
- Stitch marker displacement: Mark both armhole-start positions before Row 63. A misplaced marker can create unequal armhole heights.
- Gauge-related size changes: Measure 22 stitches over the central 10 cm of a washed swatch. A difference of two stitches can significantly change the finished chest.
- Buttonhole stretching: Test a yarn-over buttonhole with an actual 12 mm button. An oversized hole may release its button during wear.
- V-neck band distortion: Keep six garter stitches along each front-opening edge. Working them accidentally in stockinette can cause curling.
- Duplicate-stitch puckering: Match embroidery tension to the existing knitted V stitches. Tight yarn can compress the kitten’s cheeks and butterfly wings.
- Uneven seam alignment: Pin side seams at the hem and underarm before sewing. A one- or two-row mismatch may misalign the decorative border.
- Loose ends and buttons: Weave embroidery tails through several wrong-side stitches without long floats. Inspect all five buttons regularly because this is a child’s garment.
Adjusting the Vest Size
The pattern is drafted for an approximate finished circumference of 62 cm at 22 stitches per 10 cm.
For another target circumference, multiply the desired centimeters by 2.2 stitches per centimeter.
A finished circumference of 66 cm needs approximately 145 effective stitches. The original pattern uses 136 effective stitches after accounting for the overlapping front bands.
Distribute any added stitches across the back and two fronts, then recalculate shoulder, armhole, and neckline divisions.
Length changes can be made by adding or removing plain stockinette rows below the armholes, keeping both fronts and the back equal in length.
When adding rows, shift the kitten and floral embroidery upward by the same amount to preserve their proportions relative to the hem.
Do not shorten armhole shaping without checking the intended shoulder and underarm fit.
Care and Washing
Embroidery introduces extra yarn ends and floats on the wrong side of the garment. Secure these before washing.
Follow the care requirements of the least washable fiber used. A machine-washable acrylic base does not make a wool embroidery thread machine-washable.
Dry the garment flat when recommended by the yarn label. Reshape the V-neck and button bands while damp and avoid pulling the embroidered motifs.
After drying, compare the chest measurement with the original blocked size. Keep a record of the yarn, gauge, needle size, and final measurements for future versions.
Related Knitting Patterns
- Children’s V-Neck Knitted Vest: Basic vest shaping without decorative motifs. View reference pattern. [INTERNAL LINK NEEDED]
- Knitted Cat Cardigan: Related kitten garment with picture knitting. View reference pattern. [INTERNAL LINK NEEDED]
- Duplicate Stitch Tutorial: Techniques for small embroidered motifs on stockinette. Read tutorial. [INTERNAL LINK NEEDED]
- Knitted Baby Heart Vest: Children’s garment with heart decoration. View reference pattern. [INTERNAL LINK NEEDED]
Conclusion
After blocking, measure the vest across the closed button bands and compare it with the child’s chest rather than choosing by age alone. The proposed 62 cm circumference allows layering over a thin top, but individual gauge and yarn behavior can change the result. Inspect all five buttons and any embroidery floats from the wrong side before the garment is worn. For the next version, work a swatch in the exact blue yarn and record how much the finished piece grows after washing. Share a flat-lay image of the knitted cat vest pattern on Pinterest or an embroidery close-up on Instagram with #BlueKittenVest. Would you keep the kitten’s navy ear bow or replace it with a smaller pink bow?