Introduction
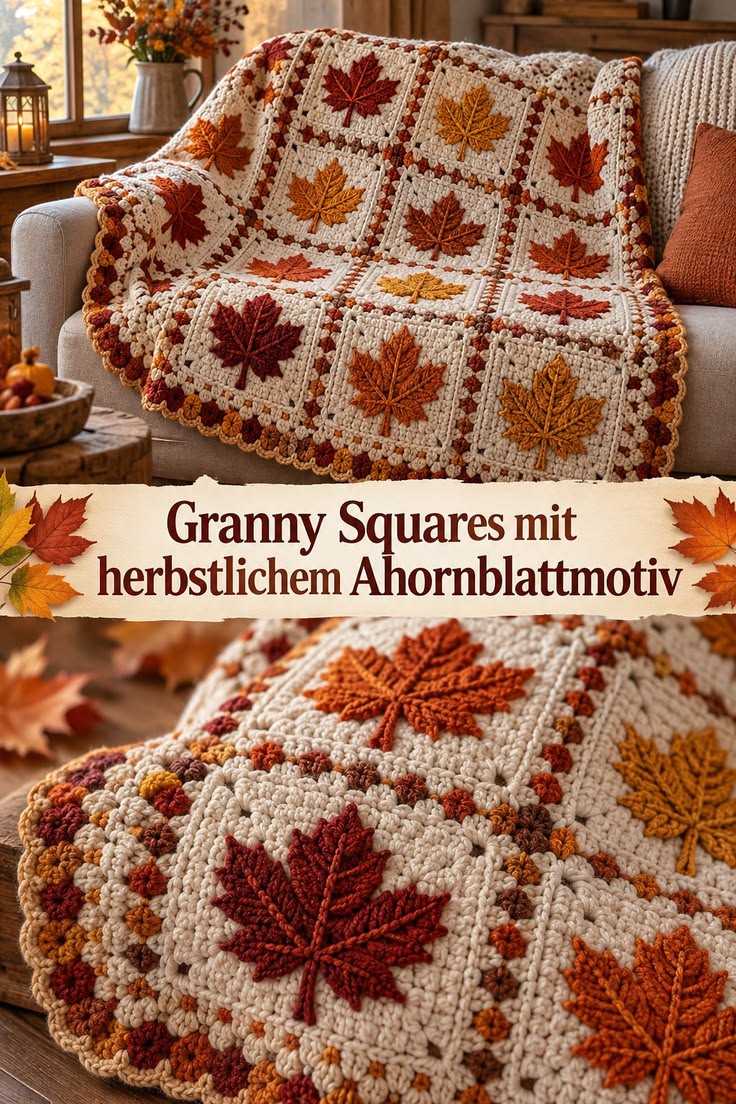
The maple leaf has to keep five recognizable points after it is sewn to the square; otherwise the central feature disappears into the cream background. This maple leaf granny square crochet blanket uses cream textured blocks, separate raised leaf appliqués in burgundy, rust and mustard, and a multicolor dotted border. Work it with worsted-weight yarn and a 4.0 mm hook for an intermediate autumn throw that can be resized by changing the square grid.
The Design: What Makes This Maple Leaf Blanket Different
The reference separates the leaf from the square instead of building the entire image through flat colorwork. That choice creates the strong raised veins, pointed lobes and dimensional edges visible across the blanket. A dense cream square provides enough structure for sewing, while a narrow decorative round introduces rust, burgundy, mustard and brown without competing with the central motif.
Comparable maple-leaf appliqués are commonly made in worsted or Aran yarn with hooks around 3.5–4.0 mm; published examples include approximately 10 cm leaves worked with a 4.0 mm hook. Maple-leaf granny-square patterns also commonly sit in the intermediate range. For this photo-inspired autumn granny square blanket, the leaf is deliberately enlarged to fill most of a 20–22 cm block. The common mistake is oversizing the leaf until its points cover the joining border.
Project Info at a Glance
| Skill Level | Construction | Square Target | Hook | Best For |
|---|---|---|---|---|
| Intermediate | Solid squares + separate maple-leaf appliqués | 20–22 cm | 4.0 mm | Throws, afghans and autumn décor |
The finished dimensions below are project targets for this original photo-inspired construction. Make and block one complete square before calculating the final blanket size.
Materials and Tools
Yarn
- Warm cream — worsted weight #4 — main square background
- Deep burgundy — worsted weight #4 — maple leaves and border accents
- Burnt rust — worsted weight #4 — maple leaves and border accents
- Mustard gold — worsted weight #4 — maple leaves and border accents
- Chestnut brown — worsted weight #4 — optional border accents
For the cleanest result, use yarns from the same product family. Equal thickness and fiber content keep burgundy, mustard and rust leaves close to the same blocked dimensions.
A published worsted maple-leaf appliqué can use only about 5 g for a small 8 cm leaf. The larger leaves in this project will require more, so weighing the first completed leaf is the reliable way to calculate color quantities for a full blanket.
Tools
- 4.0 mm crochet hook
- Worsted weight #4 yarn
- Yarn needle
- Scissors
- Locking stitch markers
- Tape measure
- Blocking mats and pins
Abbreviations
- MR — magic ring
- ch — chain
- sl st — slip stitch
- sc — single crochet
- hdc — half double crochet
- dc — double crochet
- tr — treble crochet
- sp — space
- st/sts — stitch/stitches
- FO — fasten off
Pattern — Cream Background Square
This is an original construction inspired by the visual arrangement in the reference image. The square is made separately from the maple leaf so each component can be blocked before assembly.
Foundation
With cream, ch 35.
Row 1: Sc in second ch from hook and in every chain across. (34)
Row 2: Ch 1, turn, sc across. (34)
Rows 3–34: Repeat Row 2. (34)
Do not fasten off.
The goal is a dense square approximately 17–19 cm before the border. Actual dimensions depend on yarn and tension.
First Square Border
Ch 1.
Work sc evenly around all four sides.
At each corner work:
(sc, ch 2, sc)
Join with sl st.
Check the square immediately. The edges should remain flat and the corners should form clear 90-degree turns.
Raised Cream Frame
Round 2: Ch 2.
Hdc in each stitch around.
At each corner ch-2 space work:
(2 hdc, ch 2, 2 hdc)
Join.
Round 3: Ch 1, sc around.
At each corner work:
(sc, ch 2, sc)
Join and FO.
Block the square before attaching the leaf.
Maple Leaf Appliqué
The photographed blanket uses broad maple leaves with a long center lobe, two prominent upper side lobes, two lower lobes, raised veins and a narrow stem. This version constructs the five lobes around a compact center.
Leaf Center
Use burgundy, rust or mustard.
Round 1: Make a MR and work 6 sc into the ring. Join. (6)
Round 2: Work 2 sc in each stitch. Join. (12)
Round 3: (Sc in next st, 2 sc in next st) ×6. Join. (18)
Do not cut the yarn.
Center Maple Lobe
Work across a six-stitch section of the center.
Row 1: Ch 1, 6 sc. (6)
Row 2: Ch 1, 2 sc in first st, sc in next 4, 2 sc in final st. (8)
Row 3: Ch 2, hdc across. (8)
Row 4: Increase at both ends. (10)
Rows 5–7: Hdc across. (10)
Row 8: Hdc2tog, hdc in next 6, hdc2tog. (8)
Row 9: Hdc2tog, hdc in next 4, hdc2tog. (6)
Row 10: Hdc2tog, hdc in next 2, hdc2tog. (4)
Row 11: Hdc2tog twice. (2)
Row 12: Sc2tog. (1)
Ch 2 and sl st into the second chain from hook to sharpen the point.
FO.
Upper Left Lobe
Join matching yarn beside the center lobe.
Row 1: Work 5 sc across the selected center stitches. (5)
Row 2: Increase at both ends. (7)
Row 3: Hdc across. (7)
Row 4: Increase at both ends. (9)
Rows 5–6: Hdc across. (9)
Row 7: Hdc2tog, hdc in next 5, hdc2tog. (7)
Row 8: Hdc2tog, hdc in next 3, hdc2tog. (5)
Row 9: Hdc2tog, hdc, hdc2tog. (3)
Row 10: Reduce to one point.
FO.
Upper Right Lobe
Repeat the upper-left lobe on the opposite side.
Before continuing, place the leaf flat. The two upper lobes should extend outward at approximately equal angles from the center vein.
Lower Left Lobe
Join yarn to the lower-left section.
Row 1: Work 4 sc. (4)
Row 2: Increase at both ends. (6)
Row 3: Hdc across. (6)
Row 4: Increase at both ends. (8)
Row 5: Hdc across. (8)
Row 6: Hdc2tog, hdc in next 4, hdc2tog. (6)
Row 7: Hdc2tog, hdc in next 2, hdc2tog. (4)
Row 8: Hdc2tog twice. (2)
Row 9: Sc2tog. (1)
FO.
Lower Right Lobe
Repeat the lower-left lobe on the opposite side.
The five major points should now be visible: one long center point, two medium upper points and two shorter lower points.
Maple Leaf Serrated Edge
Join matching yarn at the lower leaf edge.
Work sc around the complete perimeter.
Along each lobe, insert small pointed serrations using:
sc, ch 2, sl st into second ch from hook, sc.
At each major lobe point use:
hdc, ch 3, sl st into second ch, sl st into next ch, hdc.
At the valleys between lobes, use a tight sl st.
This contrast between pointed outer edges and deep valleys makes the maple silhouette readable against the cream square.
Maple Leaf Stem
Join matching yarn at the lower center.
Ch 10.
Beginning in second chain from hook, sl st in first 2 chains.
Sc in each remaining chain.
Sl st into the leaf base.
FO leaving a 20 cm sewing tail.
Raised Center Vein
Place the leaf right side up.
Join matching yarn at the stem base.
Work loose surface slip stitches up the middle of the leaf.
Follow the center line toward the tip of the tallest lobe.
Stop approximately 5 mm before the point.
FO on the reverse.
The vein should sit on the surface without pulling the leaf into a cup.
Upper Side Veins
Join yarn near the lower half of the central vein.
Work surface slip stitches diagonally toward the upper-left lobe.
Stop approximately 8–10 mm before the edge.
FO.
Repeat toward the upper-right lobe.
Lower Side Veins
Join yarn closer to the base.
Surface sl st toward the lower-left lobe.
Repeat for the lower-right lobe.
The completed leaf now has five primary raised ribs corresponding to its five lobes.
Secondary Veins
Add short branches from the major ribs.
Each secondary branch can contain approximately 3–5 surface slip stitches.
Angle the branches toward the nearest serrated edge.
Do not carry them all the way to the perimeter.
The raised stitching should define the leaf rather than cover its surface.
Blocking the Maple Leaf
Dampen the leaf.
Pin the center lobe first.
Position the two upper lobes next.
Pull the two lower lobes outward.
Pin each valley toward the center.
Straighten the stem last.
For a 20–22 cm square, target a leaf approximately 13–15 cm wide.
The leaf should leave at least 2–3 cm of cream background visible around its widest points.
Attaching the Maple Leaf
Center the blocked leaf on the cream square.
Pin the center first.
Pin all five major points.
Check that the stem points toward the bottom edge of the square.
Using matching leaf yarn, sew around the center and along selected sections of the lobes.
Do not stitch every serrated point flat.
Leaving the smallest points slightly free creates the dimensional effect visible in the reference blanket.
Autumn Accent Round
After the leaf is attached, add a decorative outer round to the square.
Join cream at a corner.
Work one round of sc around the complete square.
At each corner work:
(sc, ch 2, sc)
Join.
FO cream.
Colored Dot Round
The reference contains small autumn-colored accents around each cream square.
Join burgundy, rust, mustard or brown at any side.
Work one compact bobble or popcorn at regular intervals.
For a small popcorn:
Work 4 dc into the same stitch.
Remove hook from the working loop.
Insert hook into the first dc.
Pick up the dropped loop and pull it through.
Ch 1 to close.
Work cream sc between colored popcorns if a continuous joining round is required.
Alternate colors irregularly rather than repeating the same sequence on every square.
Suggested Leaf Color Distribution
The photograph balances dark burgundy leaves against medium rust and brighter mustard leaves.
For a 30-square blanket, a practical starting distribution is:
- 10 burgundy leaves
- 11 rust leaves
- 9 mustard leaves
Do not place all mustard squares in one row. Spread the lighter color across the blanket so the eye moves through the entire grid.
Planning the Blanket Grid
Measure one fully blocked square including its joining border.
If each finished square measures 21 cm, example layouts are:
| Grid | Squares | Approx. Size Before Outer Border |
|---|---|---|
| 4 × 5 | 20 | 84 × 105 cm |
| 5 × 6 | 30 | 105 × 126 cm |
| 6 × 8 | 48 | 126 × 168 cm |
| 8 × 10 | 80 | 168 × 210 cm |
The outside border adds several centimeters to both dimensions. Calculate the final grid from your own blocked square rather than the unblocked crochet.
Arranging the Autumn Colors
Lay every square on the floor before joining.
Place the burgundy squares first because they carry the darkest visual weight.
Separate neighboring burgundy leaves with rust or mustard whenever possible.
Add the mustard squares next.
Use rust to fill the remaining positions.
Stand several meters away and check the arrangement.
No single color should form an accidental diagonal stripe unless that effect was planned.
Joining the Granny Squares
Place two squares side by side with right sides facing upward.
Join cream yarn through corresponding border stitches.
Work a flat sc join or a loose slip-stitch join.
Continue across the full edge.
Repeat until one horizontal row is complete.
Make the remaining rows.
Join the rows using the same method.
Keep the cream joining yarn consistent so the autumn colors remain isolated around the individual leaves.
Flat Slip-Stitch Join
For a less prominent seam, use slip stitch.
Insert the hook through the corresponding loops of both squares.
Pull the yarn through both layers and the loop on the hook.
Repeat across.
Do not tighten each stitch.
A seam that is shorter than the square edge will cause the blanket to fold along the joins.
Estimating Yarn for the Blanket
Complete one full square with its leaf and decorative border.
Weigh it on a digital scale.
If one completed square weighs 65 g and the blanket requires 48 squares:
65 g × 48 = 3,120 g
Add yarn for joining and the outer border.
For better color estimates, weigh the cream ball and the leaf-color ball separately before and after making one sample.
This sample-weight method accounts for your actual yarn, hook, gauge and leaf dimensions.
Outer Blanket Border
Border Round 1
Join cream at one corner.
Work sc evenly around the entire blanket.
At each corner:
(2 sc, ch 2, 2 sc)
Border Round 2
Ch 3.
Dc in each stitch around.
At each corner:
(2 dc, ch 3, 2 dc)
Decorative Autumn Round
Switch between burgundy, rust, mustard and brown at selected intervals.
Work small popcorns separated by cream sections.
A useful sequence is:
popcorn, sc in next 3–4 sts, popcorn.
Adjust the spacing so each side finishes symmetrically at the corners.
Scalloped Final Edge
Join cream or mustard according to the desired finish.
Skip 2 stitches.
Work 5 dc into the next stitch.
Skip 2 stitches.
Sl st in the next stitch.
Repeat around.
At corners, work a larger shell of 7 dc if necessary to prevent the edge from pulling inward.
The reference uses a strongly textured autumn perimeter, so a mixed-color scallop can also be used.
Optional Multicolor Scallops
Work individual shells in burgundy, mustard, rust and brown.
Change color after each shell or after every two shells.
Carry no unused yarn across long distances.
Fasten off and weave the ends into the dense border rounds.
The extra finishing work is substantial, but it produces the multicolor frame visible around the photographed throw.
Keeping the Leaf Points Defined
Do not sew through the final few millimeters of each serrated point.
Attach the broader lobe fabric instead.
After washing, reshape each point while damp.
If a point continues to curl, pin it during drying.
The cream background should remain visible between neighboring lobes. That negative space is what makes the five-point silhouette readable.
Creating Stronger Raised Veins
Use surface slip stitch for the primary veins.
If more relief is required, work a second surface line immediately beside the center vein only.
Avoid doubling all five ribs.
Excess surface crochet makes the appliqué stiff and increases the chance that the leaf edges will lift from the square.
Keep every surface stitch slightly looser than a normal slip stitch.
Making Smaller Leaves
For smaller squares, use a thinner yarn and smaller hook rather than removing random rows from individual lobes.
Another option is to shorten the center lobe by two rows and each side lobe by one row.
Make one complete test leaf.
Block it.
The final leaf should occupy roughly 65–75% of the square width for a proportion similar to the reference.
Making Larger Squares
Add extra cream rows to the background square before working its border.
Keep the leaf unchanged.
This increases the amount of cream negative space and creates a calmer blanket surface.
If the square is enlarged substantially, increase the leaf proportionately by using a slightly larger hook rather than adding uncontrolled stitches to the lobe edges.
Using the Design for a Cushion
One maple-leaf square can become a cushion front.
Add additional cream border rounds until the panel matches the pillow insert.
For a 40 cm cushion, enlarge the square with alternating solid and decorative rounds.
Make a solid cream back panel.
Join three sides.
Insert the pillow form and close the fourth side, or add buttons for a removable cover.
Using the Squares for a Table Runner
Make one row of maple-leaf squares.
A sequence of five 21 cm squares creates a runner approximately 105 cm long before the outside border.
Alternate burgundy, mustard and rust leaves.
Add the same multicolor dotted edging.
This uses the complete blanket motif without requiring a separate pattern.
Assembly
- Crochet one cream background square, add its structural frame and block it to establish the master measurement.
- Make one burgundy maple leaf with all five lobes, the stem, serrated edge and raised veins.
- Block the leaf to approximately 13–15 cm wide and center it on the master square.
- Sew the leaf to the square while leaving the smallest serrated points slightly free from the background.
- Make the remaining cream squares and maple leaves in burgundy, rust and mustard.
- Add the decorative autumn accent rounds, keeping the finished dimensions consistent across every square.
- Arrange all blocks into the planned grid and distribute the three leaf colors before making permanent joins.
- Join squares into rows with cream yarn, then connect the completed rows using the same seam.
- Work the structural outer border followed by the multicolor popcorn or scalloped rounds.
- Block the complete blanket flat, align the square grid and reshape every maple-leaf point before drying.
The completed blanket should form a regular cream grid with clearly separated raised maple leaves and a continuous autumn-colored perimeter.
7 Technical Tips
- Leave 2–3 cm of cream visible around the widest part of every leaf. An oversized appliqué hides the square frame and makes adjacent blocks visually merge.
- Stop each raised vein 5–10 mm before the leaf edge. Surface slip stitches worked directly into a pointed tip can contract the lobe and make it curl upward.
- Compare every fifth square with the blocked master. A repeated 5 mm gauge increase becomes 4 cm across an eight-square blanket row.
- Sew through the broad sections of each lobe rather than every serration. Stitching all points flat removes the raised edge that gives the appliqué its dimensional appearance.
- Keep joining seams the same length as the blocked square edge. A seam even 1 cm shorter can create visible channels through a multi-row blanket.
- Use the 65–75% rule for leaf width relative to square width. Larger leaves crowd the border, while much smaller leaves lose the bold maple-leaf proportion shown in the reference.
- Weave appliqué tails through at least 5 cm of dense cream or leaf stitches. Open decorative border spaces provide too little friction for a secure long-term finish.
Choosing the Autumn Palette
The cream background is responsible for most of the contrast. Keep it consistent throughout the blanket.
Burgundy should be the darkest leaf color. Rust provides the dominant middle value, while mustard creates the brightest accents.
Chestnut brown works best in small quantities around the border rather than as a major leaf color.
A practical starting balance is approximately 35% rust, 35% burgundy and 30% mustard for the leaf motifs. The exact distribution can change according to the number of squares.
Care and Final Blocking
Follow the yarn manufacturer’s washing instructions.
Support the complete blanket when wet instead of lifting it from one corner.
Lay it flat and align the square seams first.
Check the outer dimensions.
Then reshape the maple leaves individually.
Pull the center lobe upward, the two upper lobes diagonally outward and the lower lobes slightly downward.
Straighten each stem.
Lift the free serrated points after the blanket dries so the appliqués retain their dimensional surface.
Conclusion
The defining element of this maple leaf granny square crochet blanket is the separation between a dense cream block and a raised five-lobed appliqué. Start with one 20–22 cm master square and one 13–15 cm maple leaf, block both pieces, and confirm their proportions before producing the full set. Keep the veins loose, leave several serrated points free and distribute burgundy, rust and mustard leaves across the grid before joining. The next practical step is to weigh that completed sample so the full yarn requirement can be calculated from actual consumption. Share the finished blanket on Pinterest or Instagram with #AutumnMapleLeafGrannyBlanket. Which leaf color would you place in the center square: burgundy, rust or mustard?