Introduction
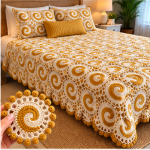
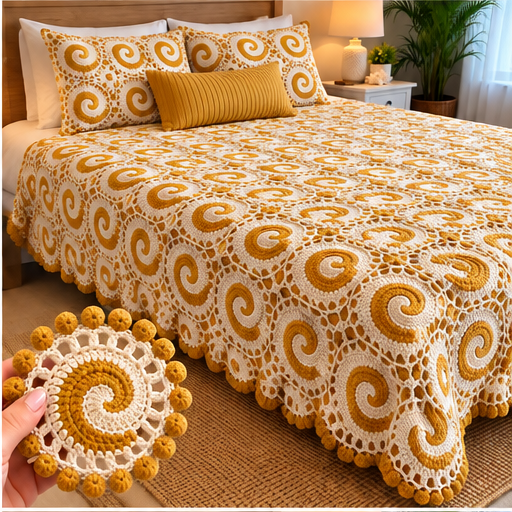
The mustard spiral has to complete its turn before the cream field takes over, or the motif reads as a broken circle instead of a continuous curl. This spiral crochet bedspread pattern recreates the photographed mustard-and-cream coverlet with round spiral medallions, open lace connectors and a dimensional bobble edge. Use smooth cotton or cotton-blend yarn and a 3.5–4.0 mm hook for a modular intermediate project suitable for bedspreads and matching pillow fronts.
The Design: What Makes This Spiral Bedspread Different
The bedspread is built around contrast rather than complicated color changes. Each major motif contains a cream spiral nested inside a mustard spiral, followed by a pale circular field. An open chain-and-post round creates visual separation before the motifs meet neighboring units.
The second defining feature is the dimensional perimeter. Mustard bobbles or compact puff motifs punctuate the outside edge, producing the dotted border visible around the hand-held sample and along the bedspread.
For this two-color crochet bedspread, consistent orientation matters. If several spirals rotate clockwise while others appear reversed, the grid loses its visual rhythm. Mark the top of the first completed motif and use it as the master for every later piece.
Project Info at a Glance
| Skill Level | Construction | Motif Target | Hook | Best For |
|---|---|---|---|---|
| Intermediate | Two-color spiral medallions with openwork joins | Approx. 16–18 cm | 3.5–4.0 mm | Throws, bedspreads and pillow panels |
The motif dimensions are project targets for this photo-inspired construction rather than measurements taken directly from the image. Make one complete sample, wash it and block it before calculating the bedspread grid.
Materials and Tools
Yarn
- Warm cream — DK or light worsted cotton/cotton blend — main background and spiral
- Mustard gold — DK or light worsted cotton/cotton blend — contrasting spiral and bobble edging
Choose two yarns from the same product line when possible. Equal fiber content and thickness make the spiral rounds easier to balance and reduce differences in blocked motif size.
For a full bedspread, determine yarn quantity by weighing one finished motif. Add a separate allowance for joining, the perimeter and sampling rather than estimating consumption from the photograph.
Tools
- 3.5–4.0 mm crochet hook
- Warm cream yarn
- Mustard gold yarn
- Yarn needle
- Scissors
- Locking stitch markers
- Tape measure
- Blocking mats and pins
Abbreviations
- MR — magic ring
- ch — chain
- sl st — slip stitch
- sc — single crochet
- hdc — half double crochet
- dc — double crochet
- tr — treble crochet
- sp — space
- st/sts — stitch/stitches
- FO — fasten off
Pattern — Two-Color Spiral Medallion
This is an original photo-inspired construction rather than an exact transcription of a published pattern. The central spiral is created by working two active colors from the same center and extending them in alternating sections.
Starting the Two-Color Center
Yarn A: cream. Yarn B: mustard.
With cream, make a MR.
Step 1: Ch 1, work 1 sc, 1 hdc and 2 dc into the ring.
Pull the cream loop long and remove the hook without fastening off.
Join mustard into the same ring.
Step 2: Ch 1, work 1 sc, 1 hdc and 2 dc into the ring.
Pull the mustard loop long.
Tighten the MR carefully.
The two color sections should sit beside one another rather than on top of each other.
Spiral Round 2 — Cream
Return the hook to the cream loop.
Work across the mustard stitches:
2 dc in first st, 2 dc in next st, dc in next 2 sts.
Pull the cream loop long and leave it waiting.
Spiral Round 2 — Mustard
Return the hook to the mustard loop.
Work across the cream section:
2 dc in first st, 2 dc in next st, dc in next 2 sts.
Pull the loop long.
The two colors should now begin wrapping around the center.
Spiral Round 3 — Cream
Pick up cream.
Work:
(2 dc in next st, dc in next st) ×3, then dc in remaining available stitches of the mustard section.
Leave the cream loop waiting.
Spiral Round 3 — Mustard
Pick up mustard.
Repeat the same increase distribution across the cream section:
(2 dc in next st, dc in next st) ×3, then dc in remaining available stitches.
Do not join the colors together yet.
Extending the Spiral
Continue alternating colors.
On each new pass, distribute increases across the active color section so the medallion lies flat.
Use this general progression:
Next pass: (2 dc, dc in next 2 sts) repeated across the section.
Following pass: (2 dc, dc in next 3 sts) repeated across the section.
Following pass: (2 dc, dc in next 4 sts) repeated across the section.
Work approximately 5–6 expanding passes per color for the substantial spiral shown in the photograph.
Place the motif flat after every cream-and-mustard pair. If the center cups, add an increase. If the outer edge waves, reduce the frequency of increases.
Tapering the Spiral Ends
The color sections should end gradually rather than stopping as blunt blocks.
At the end of the final cream pass, replace the final sequence of tall stitches with:
2 dc, 2 hdc, 2 sc, 2 sl st.
FO cream.
Complete the mustard spiral in the same manner:
2 dc, 2 hdc, 2 sc, 2 sl st.
FO mustard.
The two tapered ends should reinforce the impression of a continuous curl.
Cream Background Round
Join cream at any stable outer stitch.
Round 1: Ch 1 and sc evenly around the spiral medallion.
Add stitches where necessary to create a flat circular outline.
Join with sl st.
Round 2: Ch 3. Dc around, distributing increases approximately every 8–10 stitches as required by the actual circumference.
Join.
The cream field should visually isolate the mustard spiral before the open lace begins.
Decorative Cream Eyelet Round
Ch 1, sc in first stitch.
Repeat:
ch 2, skip 1 st, sc in next st.
Continue around.
Join with sl st.
This narrow eyelet band corresponds to the small openings visible between the solid spiral and the larger outer lace.
Open Lace Round
Sl st into the first ch-2 space.
Ch 4.
Work one dc into the next ch-2 space.
Repeat:
ch 4, dc in next ch-2 space.
Continue around and join.
Keep every ch-4 loop at the same tension. Unequal loops create an irregular perimeter before the bobbles are added.
Structural Lace Round
Sl st into the first ch-4 space.
Work:
(2 sc, ch 3, 2 sc) into the space.
Move to the next ch-4 space and repeat.
Continue around.
This round gives the outer lace enough substance for joining and for the dimensional mustard edging.
Mustard Bobble Edge
The hand-held motif has a ring of small mustard balls around its perimeter. These can be made as compact puff stitches rather than separate stuffed pieces.
Join mustard in the first outer ch-3 space.
Ch 2.
Work a puff:
Yarn over, insert hook into space, pull up loop four times.
Yarn over and pull through all loops.
Ch 1 tightly to close the puff.
Ch 2.
Sl st into the next available anchoring point.
Repeat around the motif.
Space the puffs evenly. The finished perimeter should look dotted without becoming so dense that the motif cups.
Alternative Round Bobble
For a more spherical border like the reference, work each mustard ornament as a small popcorn.
Work 5 dc into one outer space.
Remove the hook from the working loop.
Insert the hook into the first dc.
Pick up the dropped loop and pull it through the first dc.
Ch 1 to lock.
Continue to the next placement.
Use the same bobble method on every motif in one bedspread.
Blocking the Spiral Motif
Dampen the finished piece according to the yarn care instructions.
Place it on a blocking mat.
Pin opposite sides first.
Measure across the center.
Rotate the ruler 90 degrees and measure again.
Adjust until both diameters match.
Target approximately 16–18 cm before the motifs are joined.
Pin the lace loops rather than pulling directly on the mustard bobbles.
Allow the motif to dry completely.
Checking Spiral Direction
Select one blocked motif as the master.
Place a removable stitch marker at its top.
Lay every new motif beside it before joining.
The cream and mustard sections should rotate in the same visual direction.
A reversed motif is not structurally defective, but it becomes conspicuous inside a large regular grid.
If alternating directions are preferred, use them deliberately in a checkerboard arrangement rather than randomly.
Converting the Round Motif for Bedspread Joining
The photographed coverlet uses lace to bridge the circular motifs rather than forcing them into dense solid squares.
Join cream to one outer lace space.
Work a short chain bridge:
ch 4, sc in next outer space.
Repeat around.
At four equally spaced locations, use a slightly longer ch-6 loop.
These four larger loops act as primary joining points and help organize circular motifs into a grid.
Joining Two Motifs
Place two blocked motifs side by side.
On the final cream joining round of the second motif, work half of the intended chain.
For a ch-6 joining loop:
ch 3, sl st into the corresponding loop of the completed motif, ch 3.
Continue around.
Join at several neighboring loops rather than one point only.
Three attachment points provide better stability along each shared side.
Joining Four Motifs at an Intersection
When four circles meet, an open space remains at the center.
Do not pull all four motifs into a single tight stitch.
Instead, create a small cream connector ring.
Make a MR.
Work 8 sc into the ring.
Close the ring.
Use four evenly spaced stitches as attachment points to the neighboring motifs.
Connect with short ch-3 or ch-4 bridges.
This preserves the lace effect and prevents the intersection from becoming bulky.
Small Connector Medallion
For a more decorative junction, make a small cream flower.
Round 1: 6 sc in MR. (6)
Round 2: In each stitch work:
(sl st, ch 3, 2 dc, ch 3, sl st)
Repeat around for six small petals.
Attach alternate petals to surrounding spiral motifs.
This creates the floral-looking junctions visible between some of the larger motifs in the photographed bedspread.
Planning the Bedspread Grid
Measure the blocked motif including the joining lace.
If one repeat measures 17 cm:
9 motifs across = approximately 153 cm
12 motifs long = approximately 204 cm
A 9 × 12 arrangement requires:
108 spiral motifs.
The final border adds additional width and length.
Example Motif Layouts
| Grid | Motifs | Approx. Size at 17 cm per Repeat |
|---|---|---|
| 6 × 8 | 48 | 102 × 136 cm |
| 8 × 10 | 80 | 136 × 170 cm |
| 9 × 12 | 108 | 153 × 204 cm |
| 11 × 14 | 154 | 187 × 238 cm |
These dimensions are planning calculations. Use the actual blocked repeat of your own motif before choosing a grid.
Estimating Yarn for the Bedspread
Complete one motif using both colors.
Weigh it before joining.
For example, if one motif weighs 24 g and the bedspread requires 108 motifs:
24 × 108 = 2,592 g
Then add yarn for connector motifs, joining rounds, border and sampling.
For a two-color calculation, weigh the cream and mustard yarn balls before and after making one sample. The difference gives a useful per-motif consumption for each shade.
Keeping the Spiral Center Flat
A spiral center is worked differently from a conventional closed round because both colors remain active.
Do not assume that every pass requires the same number of increases.
Lay the work down frequently.
If the center forms a bowl, the circumference needs additional stitches.
If it develops ruffles, the increase rate is too high.
Make corrections in the solid spiral section before adding the cream background. The outer lace should not be used to disguise a distorted center.
Controlling the Color Transition
Do not cut one color after every short section.
The visual spiral depends on both yarns remaining active and advancing around one another.
When one color is waiting, enlarge its working loop enough that it cannot accidentally unravel.
A locking stitch marker can secure that loop.
Pick up the next color without twisting the two working strands around each other at the back.
Untangle the yarn balls after each full pair of passes.
Matching Spiral Pillow Covers
The photographed bed uses matching decorative pillow fronts made from the same spiral units.
Block enough motifs to cover the dimensions of the intended pillow insert.
A rectangular pillow can use two or three motifs across with connector lace filling the gaps.
For a larger square pillow, arrange a 2 × 2 or 3 × 3 grid.
Join the motifs using the same cream chain bridges as the bedspread.
Add a solid fabric or crocheted back so the pillow insert does not push through the open lace.
Plain Ribbed Accent Pillow
The reference also includes a solid mustard rectangular cushion.
For a coordinated crochet version, ch to the desired pillow height.
Work hdc BLO across each row.
Continue until the panel reaches the required width.
Make a second matching panel or extend one long rectangle to fold around the insert.
Join the edges with sc.
This solid texture provides visual relief from the highly patterned spiral motifs.
Bedspread Border
After all motifs are joined, establish a stable cream perimeter.
Border Round 1
Join cream at an outer joining point.
Work sc around the complete bedspread.
Use chain stitches to bridge deep lace openings rather than filling every gap with dense stitches.
At each corner work:
(2 sc, ch 3, 2 sc)
Border Round 2
Ch 3.
Dc around.
At each corner work:
(2 dc, ch 3, 2 dc)
Open Lace Border
Ch 1, sc in first stitch.
Repeat:
ch 4, skip 3 sts, sc in next st.
Continue around.
Adjust the skipped stitches near corners so the fabric remains flat.
Mustard Bobble Border
Join mustard in the first outer chain space.
Work one compact puff or popcorn.
Move to the next space with sl st or a short chain bridge.
Repeat around the entire perimeter.
At corners, add one extra bobble if required to turn without pulling the border inward.
This repeats the dotted mustard treatment from the individual motif shown in the foreground of the photograph.
Alternative Scalloped Edge
If the bobble border is too heavy for a large bedspread, substitute a flatter shell.
In the first chain space work:
5 dc.
Sl st in the next space.
Repeat around.
Use mustard for the shells if you want the same strong color termination without the weight of hundreds of puff stitches.
Assembly
- Crochet one complete cream-and-mustard spiral center while keeping both working colors active.
- Add the solid cream field, eyelet round, open lace and selected mustard bobble treatment.
- Wash and block the master motif, then record its finished diameter and repeat measurement.
- Make the remaining motifs with every spiral oriented in the same direction unless an alternating layout was planned deliberately.
- Arrange the blocked medallions into the required bedspread grid before making permanent joins.
- Join neighboring motifs with cream chain bridges at three or more points along each shared side.
- Fill four-motif intersections with small cream rings or connector flowers rather than pulling the large circles tightly together.
- Check the assembled grid after every completed row and correct any join that shortens one side.
- Work the cream structural border followed by the openwork perimeter and mustard bobbles or shells.
- Lightly block the complete bedspread, aligning the motif rows while preserving the dimensional outer details.
The finished coverlet should form a regular field of matching two-color spirals connected by lighter cream lace.
7 Technical Tips for Better Spiral Crochet Motifs
- Secure every waiting color with a locking marker. A loop that loses even several stitches can change the width of one spiral arm and make it visibly narrower than the other.
- Check the center after every two color passes. A rise greater than about 5 mm indicates that the increase rate needs adjustment before the outer rounds are added.
- Mark the top of the master motif. Randomly reversed spirals become conspicuous when 50 or more medallions are arranged in straight bedspread rows.
- Keep outer ch-4 loops within roughly 2–3 mm of one another. Unequal lace loops create inconsistent spacing between joined motifs.
- Use at least three joining points along each shared motif edge. One attachment behaves like a hinge and allows circular medallions to rotate out of alignment.
- Reduce bobble density if the edge begins cupping. Dimensional stitches consume more horizontal space than flat sc and can contract a circular perimeter when packed too closely.
- Compare both blocked diameters before joining. A motif more than about 5 mm larger than the master can push an entire row out of alignment.
Choosing Mustard and Cream Yarn
The reference uses a warm golden mustard rather than bright yellow. Pair it with a creamy off-white rather than a stark blue-white for a softer two-color contrast.
Use smooth yarn because the spiral shape depends on a clearly readable boundary between the colors.
Cotton provides strong stitch definition and responds well to blocking. A cotton-acrylic blend can reduce the weight of a large bedspread while retaining enough structure for the openwork.
Avoid combining yarns with substantially different elasticity. If the mustard yarn stretches more than the cream, the two arms of the spiral can expand at different rates after washing.
Making the Motif Smaller
Stop the spiral one or two passes earlier.
Add the cream background immediately after tapering the two colors.
Reduce the outer lace from two rounds to one.
This produces a smaller medallion while preserving the central curl.
Make a blocked sample before calculating the bedspread because reducing a single round can remove several centimeters from the finished diameter.
Making the Motif Larger
Add another alternating cream-and-mustard pass before tapering the spiral ends.
Distribute increases more widely as the circumference grows.
Then add one additional cream dc round before beginning the eyelet section.
Do not enlarge the motif only by lengthening the outer chains. Oversized chain loops make the joining field unstable while leaving the spiral itself visually undersized.
Care and Finishing
Weave color-change tails through solid stitches rather than through the open lace.
Inspect the joining intersections before washing.
Follow the yarn manufacturer’s care instructions.
Support the weight of the wet bedspread rather than lifting it by one edge.
Dry flat when practical.
While damp, align the motif rows and reshape the outer lace by hand.
Do not flatten the mustard bobbles with heavy pressure. Their dimensional texture is part of the border design.
Conclusion
The two active colors are the technical core of this spiral crochet bedspread pattern. Make one complete cream-and-mustard medallion first, block it to the 16–18 cm target and use that piece as the orientation and size master for every later motif. Keep the spiral flat before adding lace, join neighboring circles at several points and use small connectors instead of pulling four motifs into a tight intersection. Your next step is to crochet one test spiral and record its blocked diameter and yarn weight before calculating the full bedspread. Save the finished project to Pinterest or share it on Instagram with #MustardSpiralBedspread. Would you keep every spiral mustard and cream, or reverse the colors on alternating rows?