Introduction
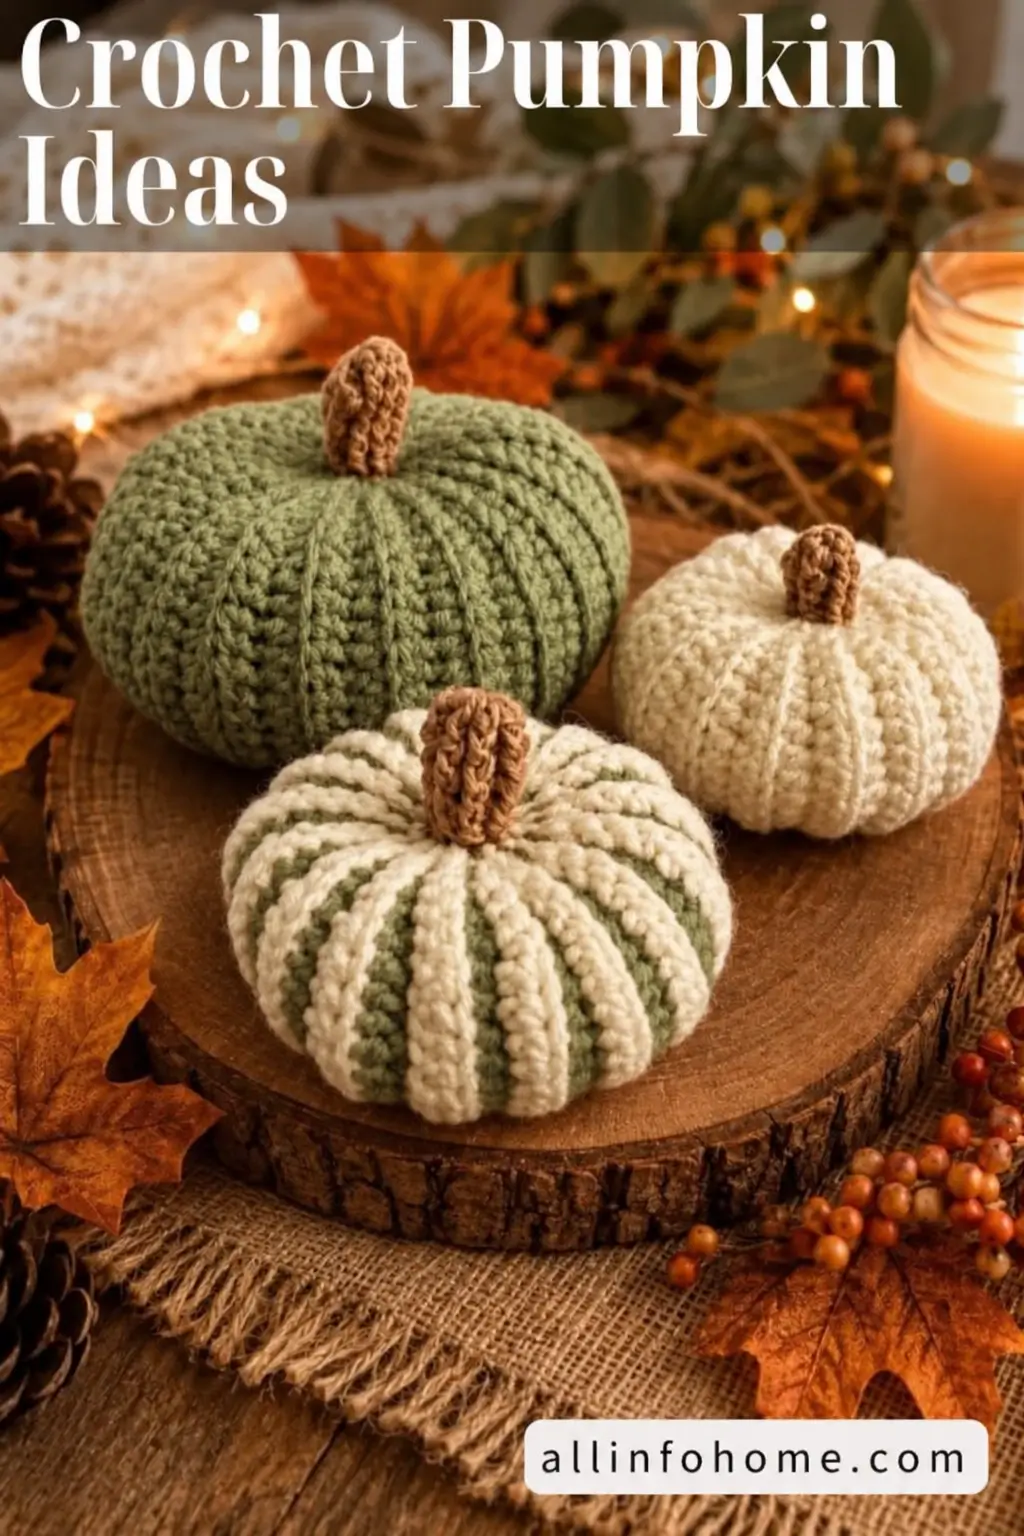
The striped pumpkin only works if every cream ridge lands directly over the sage channels beneath it. This ribbed crochet pumpkin pattern recreates the three-piece reference set with sage, ivory and two-color bodies, short brown stems and pronounced vertical segmentation. Worsted-weight yarn and a 5 mm hook produce dense decorative fabric, while the rectangle-to-tube construction makes three coordinated sizes possible without complicated round shaping.
The Design: What Makes These Crochet Pumpkins Different
All three pumpkins use vertical ribbing, but color and proportion keep the set from looking repetitive. The large sage pumpkin has a broad, compressed profile; the medium ivory version is rounder; and the front pumpkin alternates cream ridges with narrow sage channels. Working the bodies as ribbed rectangles gives you predictable vertical lines before stuffing begins.
Construction is equally important after the seam closes. The top and bottom are gathered, then a long sculpting strand passes through the center and around the exterior to deepen the pumpkin sections. Published ribbed crochet pumpkin patterns use the same rectangle, seam, gather and stuffing method. 0
The common failure is overstuffing. Too much fiberfill stretches the ribbing sideways and turns a squat pumpkin into a ball.
Project Info at a Glance
| Skill Level | Construction | Finished Size | Hook | Best For |
|---|---|---|---|---|
| Easy / Advanced Beginner | Ribbed rectangles, seamed and stuffed | Approx. 10–20 cm wide | 5.0 mm | Autumn tables, shelves and centerpieces |
A current three-size ribbed pumpkin reference lists approximately 10 × 7.5 cm, 15 × 10 cm and 20 × 12.5 cm. Another published worsted-weight rib pumpkin uses a 5 mm hook and 73–137 m of yarn. 1
Materials and Tools
Yarn
- Sage green — worsted weight #4 — approximately 60–100 g for the large pumpkin
- Warm ivory — worsted weight #4 — approximately 40–70 g for the medium pumpkin
- Ivory and sage — worsted weight #4 — approximately 40–60 g total for the striped pumpkin
- Medium brown — worsted weight #4 — approximately 10–15 g for three stems
The gram amounts are project allowances for this photo-inspired set. Published patterns vary from roughly 40–90 m for three-size worsted pumpkins to 73–137 m for another worsted ribbed design, so weighing one completed body gives a more reliable estimate for multiples. 2
Tools
- 5.0 mm crochet hook for pumpkin bodies
- 4.0 mm crochet hook for stems
- Polyester fiberfill
- Yarn needle with a large eye
- Scissors
- Stitch markers
- Tape measure
Abbreviations
- ch — chain
- sc — single crochet
- hdc — half double crochet
- sl st — slip stitch
- MR — magic ring
- BLO — back loop only
- st/sts — stitch/stitches
- FO — fasten off
An invisible decrease is worked through the front loops of two stitches before completing one sc, although decreases are not required for these rectangle-constructed pumpkin bodies.
Pattern — Step by Step
This is an original photo-inspired construction rather than a transcription of a published pattern. The method follows established ribbed-pumpkin geometry: crochet a rectangle, join it into a tube, gather both openings, stuff the body and add external sculpting strands. 3
Large Sage Pumpkin
Yarn: sage green, worsted weight #4.
Foundation: Ch 31.
Row 1: Hdc in second ch from hook and in each chain across. (30)
Row 2: Ch 1, turn. Hdc BLO in each stitch across. (30)
Rows 3–48: Repeat Row 2. (30)
Check the rectangle before fastening off. Its rows should form deep parallel ribs from one long edge to the other.
FO leaving approximately 100 cm of yarn for seaming and gathering.
Seaming the Large Pumpkin
Bring Row 1 and Row 48 together with the ribbed sides aligned.
Whip stitch or slip stitch the two short edges together to create a tube.
Do not pull the seam tighter than the surrounding rows.
Turn the tube so the preferred seam surface faces inward.
Closing the Bottom
Thread the long yarn tail onto a needle.
Run the needle in and out through the row ends around one open edge.
Use approximately one gathering point per rib.
Pull firmly until the opening closes.
Pass through the gathered center several times and knot securely on the inside.
Stuffing the Large Pumpkin
Add fiberfill in small sections.
Push stuffing toward the outer wall first, then fill the center.
Stop while the ribbed fabric still compresses easily under your fingers.
The target is a broad pumpkin approximately 18–20 cm wide, not a tightly packed sphere.
Published ribbed pumpkin references include large versions around 20 cm wide, supporting this scale for the largest piece in the set. 4
Closing the Top
Run a strong yarn strand through the row ends around the open top.
Pull the opening closed gradually while redistributing the stuffing.
Push the center downward with a finger before the final tightening.
Secure the gathered opening but leave a small central area available for the stem.
Sculpting the Large Pumpkin
Thread approximately 150 cm of matching sage yarn onto a long needle.
Insert through the bottom center and bring the needle out through the top.
Carry the yarn down the exterior in one rib channel.
Insert through the bottom center again and return through the top.
Pull until a shallow groove forms.
Repeat around the pumpkin to create approximately 8 sections.
Published rectangle pumpkins commonly use external wraps to form six or more segments after stuffing. 5
Keep every wrap in a natural rib valley so the sculpting strands become visually integrated with the crochet texture.
Medium Ivory Pumpkin
Yarn: warm ivory, worsted weight #4.
Foundation: Ch 25.
Row 1: Hdc in second ch from hook and across. (24)
Row 2: Ch 1, turn. Hdc BLO across. (24)
Rows 3–38: Repeat Row 2. (24)
FO leaving a long tail.
Join the short edges into a tube.
Gather and close the bottom.
Stuff to a broad rounded shape.
Gather the top.
Add 7–8 external sculpting wraps, positioning each strand in a rib channel.
Target approximately 14–16 cm wide.
Small Two-Color Striped Pumpkin
The front pumpkin differs structurally because its cream ridges are separated by sage channels.
Yarn A: warm ivory. Yarn B: sage green.
Foundation: With sage, ch 21.
Row 1: Sc in second ch from hook and across. (20)
Row 2: With ivory, ch 1, turn. Sc BLO across. (20)
Row 3: With ivory, ch 1, turn. Sc BLO across. (20)
Row 4: Change to sage. Ch 1, turn. Sc BLO across. (20)
Row 5: With sage, ch 1, turn. Sc BLO across. (20)
Rows 6–36: Repeat the four-row color sequence:
2 rows ivory → 2 rows sage.
End after a complete color repeat.
FO leaving a long tail in the final color.
Making the Raised Cream Ribs
The reference image shows stronger cream ribs than a simple two-color stripe would create.
Lay the rectangle flat with the right side facing upward.
Join ivory yarn along the first suitable vertical ridge.
Work surface slip stitches from one long edge to the other.
Repeat over selected ivory ridges around the rectangle.
Keep every surface stitch loose enough for the panel to remain flat.
Do not add raised ribs after stuffing; working them on the flat rectangle gives more consistent tension.
Finishing the Striped Pumpkin
Join the short ends of the rectangle, matching the color sequence across the seam.
Gather the bottom.
Add fiberfill until the pumpkin reaches approximately 12–14 cm wide.
Gather the top.
Use sage sculpting yarn through the darker channels if additional segmentation is needed.
Pull only until the cream ribs become visibly separated. Excessive tension can bury the sage sections underneath the raised cream bands.
Brown Crochet Stem — Large
Yarn: medium brown. Use a 4.0 mm hook.
Round 1: Make a MR and work 6 sc into the ring. (6)
Round 2: Sc in each stitch around. (6)
Rounds 3–8: Repeat Round 2. (6)
Round 9: 2 sc in each stitch around. (12)
FO leaving a 25 cm sewing tail.
A published ribbed-pumpkin stem similarly begins with 6 sc and works several rounds without increases. 6
Brown Crochet Stem — Medium
Round 1: 6 sc in MR. (6)
Rounds 2–6: Sc around. (6)
Round 7: 2 sc in each stitch. (12)
FO leaving a sewing tail.
Brown Crochet Stem — Small
Round 1: 6 sc in MR. (6)
Rounds 2–5: Sc around. (6)
Round 6: 2 sc in each stitch. (12)
FO leaving a sewing tail.
Shaping the Crochet Stems
The stems in the photograph are short and slightly irregular rather than perfectly cylindrical.
Add a very small amount of stuffing to the large stem if needed.
Leave the medium and small stems unstuffed if the fabric is already firm.
Compress the upper section between your fingers so it curves slightly.
Sew through several different points around the 12-stitch base when attaching the stem. This distributes tension and prevents it from leaning sharply to one side.
Attaching the Stems
Position the stem over the gathered top opening.
Thread the brown tail onto a yarn needle.
Sew through one stem-base stitch and into the pumpkin fabric.
Move to the opposite side of the stem and repeat.
Continue around the full base.
Before the final stitches, push the stem downward slightly so its widened base covers the gathered opening.
Secure the tail inside the pumpkin.
Controlling the Pumpkin Shape
A ribbed rectangle naturally wants to form a cylinder. Stuffing and sculpting convert that cylinder into the flattened pumpkin profile.
For a wider pumpkin, increase the number of rows in the rectangle rather than adding more stitches to every row.
For a taller pumpkin, increase the starting chain.
A current three-size ribbed pattern uses the same principle, with finished examples around 10, 15 and 20 cm wide. 7
Another rectangle pattern produces a pumpkin approximately 20.5 cm wide from a 25.5 × 51 cm flat panel, further illustrating the relationship between rectangle proportions and finished width. 8
Why Back-Loop Crochet Creates Pumpkin Ribs
Working only through the back loop leaves the unused front loop visible across the fabric.
Once the rectangle is rotated into its finished orientation, those ridges run vertically from the gathered bottom to the gathered top.
Single crochet BLO produces compact, pronounced ribs. Half double crochet BLO creates a somewhat taller and softer rib.
Published ribbed pumpkins use both methods. One Ravelry design specifies single crochet BLO with worsted cotton and a 5 mm hook, while other rectangle constructions use ribbed half double crochet. 9
Stuffing the Pumpkins Correctly
Stuffing density directly controls the final silhouette.
Begin around the outer circumference.
Add smaller pieces rather than one large clump.
Keep the central top and bottom areas slightly less dense so they can be pulled inward during sculpting.
Stop adding fiberfill when the pumpkin feels full but still compresses by approximately 2–3 cm under moderate finger pressure.
If the ribs spread until the underlying loops become widely separated, remove some stuffing before closing the top.
Creating Deeper Pumpkin Segments
The reference pumpkins have visible channels between rounded sections.
Use a long strand of matching yarn after both openings have been closed.
Pass through the center.
Bring the strand around the outside and return through the center.
Pull gently.
Repeat at evenly spaced positions.
For a subtle pumpkin, use six wraps. For the more segmented appearance shown in the reference, use approximately eight.
Check the shape after every wrap. Adding all the strands before adjusting tension can make one side substantially tighter than the other.
Making the Sage Pumpkin Larger
Increase both rectangle dimensions while preserving its broad proportion.
For example, start with approximately 36–40 stitches rather than 30 and continue the ribbing until the rectangle wraps comfortably into the desired circumference.
Published patterns confirm that large ribbed pumpkins can be produced simply by increasing the rectangle dimensions rather than changing construction. 10
Make the stem slightly taller as the body grows, but avoid scaling it proportionally. Realistic decorative stems usually remain relatively short compared with pumpkin diameter.
Making Mini Crochet Pumpkins
For a miniature version, use approximately:
Ch 15–17 for the starting height and work enough ribbed rows to form a rectangle roughly twice as long as it is tall.
A published three-size tutorial gives a mini finished pumpkin around 6 cm wide × 4 cm tall and a small version around 7.5 cm wide × 5 cm tall. 11
Use less stuffing than expected. Mini pumpkins become spherical quickly because there is less fabric available to absorb excess filling.
Alternative Single-Crochet Ribbing
If sharper ribs are preferred, substitute sc BLO for hdc BLO.
Chain the required height.
Row 1: Sc across.
Row 2 onward: Ch 1, turn, sc BLO across.
Continue until the rectangle reaches the required length.
A documented ribbed version uses a 20-stitch rectangle worked for 40 rows before seaming, gathering and adding six exterior segment wraps. 12
Assembly
- Crochet the large sage rectangle in back-loop ribbing and check that every ridge runs parallel from edge to edge.
- Make the medium ivory body and the smaller two-color body, matching their rectangle proportions before seaming.
- Add the raised ivory surface ribs to the striped rectangle while the fabric is still flat.
- Join the short edges of each rectangle to create three tubes with continuous vertical ribbing.
- Gather and secure the bottom opening of each tube before adding fiberfill in small sections.
- Close the top openings while leaving the centers slightly indented for the brown stems.
- Pass matching yarn through each pumpkin center and around the exterior to create six to eight controlled segments.
- Crochet the three brown stems separately, adjusting their heights to the corresponding pumpkin sizes.
- Sew each stem over its gathered top opening using stitches distributed evenly around the widened stem base.
- Redistribute the stuffing by hand and adjust individual sculpting strands until every pumpkin rests level on a flat surface.
The finished set should contain three stable, squat pumpkins with vertical ribs, recessed centers and short brown stems.
7 Technical Tips for Better Ribbed Crochet Pumpkins
- Keep every row at exactly the same stitch count. One missed BLO stitch creates a tapered rectangle, which makes the finished pumpkin noticeably narrower at one side of the seam.
- Leave at least 80–100 cm for gathering a medium or large body. A short tail can require an additional knot at the most highly stressed point of the pumpkin.
- Stop stuffing while the body still compresses by roughly 2–3 cm. Excess fiberfill stretches the rib channels and prevents the sculpting strands from forming deep sections.
- Place every exterior shaping strand inside a rib valley. A strand running over the crest of a raised rib flattens the texture and becomes more visible.
- Match the first and final color bands before seaming the striped pumpkin. A mismatched seam creates one unusually wide sage or cream section at the back.
- Keep the stem base within approximately 2–4 cm depending on pumpkin size. An oversized stem base covers the central depression and makes the top appear flat.
- Secure sculpting yarn through the center at least twice before trimming. A loose shaping strand can relax during handling and cause one pumpkin segment to expand beyond its neighbors.
Choosing Colors for the Three-Pumpkin Set
The photograph avoids conventional bright orange and instead uses muted sage, warm ivory and medium brown.
Choose a green with gray or olive undertones rather than a saturated emerald shade.
The cream should be warm enough to contrast gently with the sage while remaining distinct from the brown stems.
For the striped pumpkin, use the exact sage and cream yarns selected for the two solid pumpkins. Repeating those colors makes the striped piece visually connect the other two.
The same construction also works in rust, mustard, taupe or terracotta if a warmer palette is preferred.
Making the Pumpkins Sit Flat
A stuffed pumpkin can roll if the bottom gathering point protrudes.
Before closing the bottom completely, push the gathered fabric slightly inside the body.
Secure it in that recessed position.
After stuffing, press the pumpkin firmly against a flat table.
Pass the main sculpting strand from the top center through the bottom center and pull gently. This draws both centers inward and creates a broader contact area underneath.
If one section remains lower than the others, redistribute stuffing rather than tightening only that segment.
Using the Pumpkins as a Table Centerpiece
Varying the three sizes produces a more readable grouping than making identical bodies.
Place the large sage pumpkin toward the rear.
Set the medium ivory pumpkin slightly forward and to one side.
Position the striped pumpkin at the front so its two-color rib construction remains visible.
No permanent attachment is required. Keeping the pumpkins separate allows the set to be rearranged on shelves, trays and seasonal tables.
These pieces contain fiberfill and are intended as decorative objects rather than heat-resistant trivets.
Care and Storage
Follow the yarn manufacturer’s washing instructions.
If the pumpkins require washing, use a method appropriate for both the outer yarn and polyester filling.
Reshape them while damp.
Press the top and bottom centers inward and redistribute the filling toward the outer sections.
Allow stuffed pieces to dry thoroughly before storage.
Do not compress them under heavy seasonal decorations for extended periods. Long-term compression can flatten the ribbing and distort the fiberfill.
Conclusion
The rectangle proportions control the final shape of this ribbed crochet pumpkin pattern, so make the smallest body first and confirm the rib direction before cutting yarn for the full set. Use sage and ivory worsted yarn, keep the stuffing compressible, and place every sculpting strand inside a natural rib channel. The striped version needs extra attention at the seam so its cream and sage bands remain balanced. Your next step is to crochet one 20-stitch test rectangle and check the BLO texture before producing all three pumpkins. Save the set to Pinterest or share it on Instagram with #SageCrochetPumpkins. Would you make the striped pumpkin mostly cream, as shown, or reverse it to sage ribs over an ivory base?