Introduction
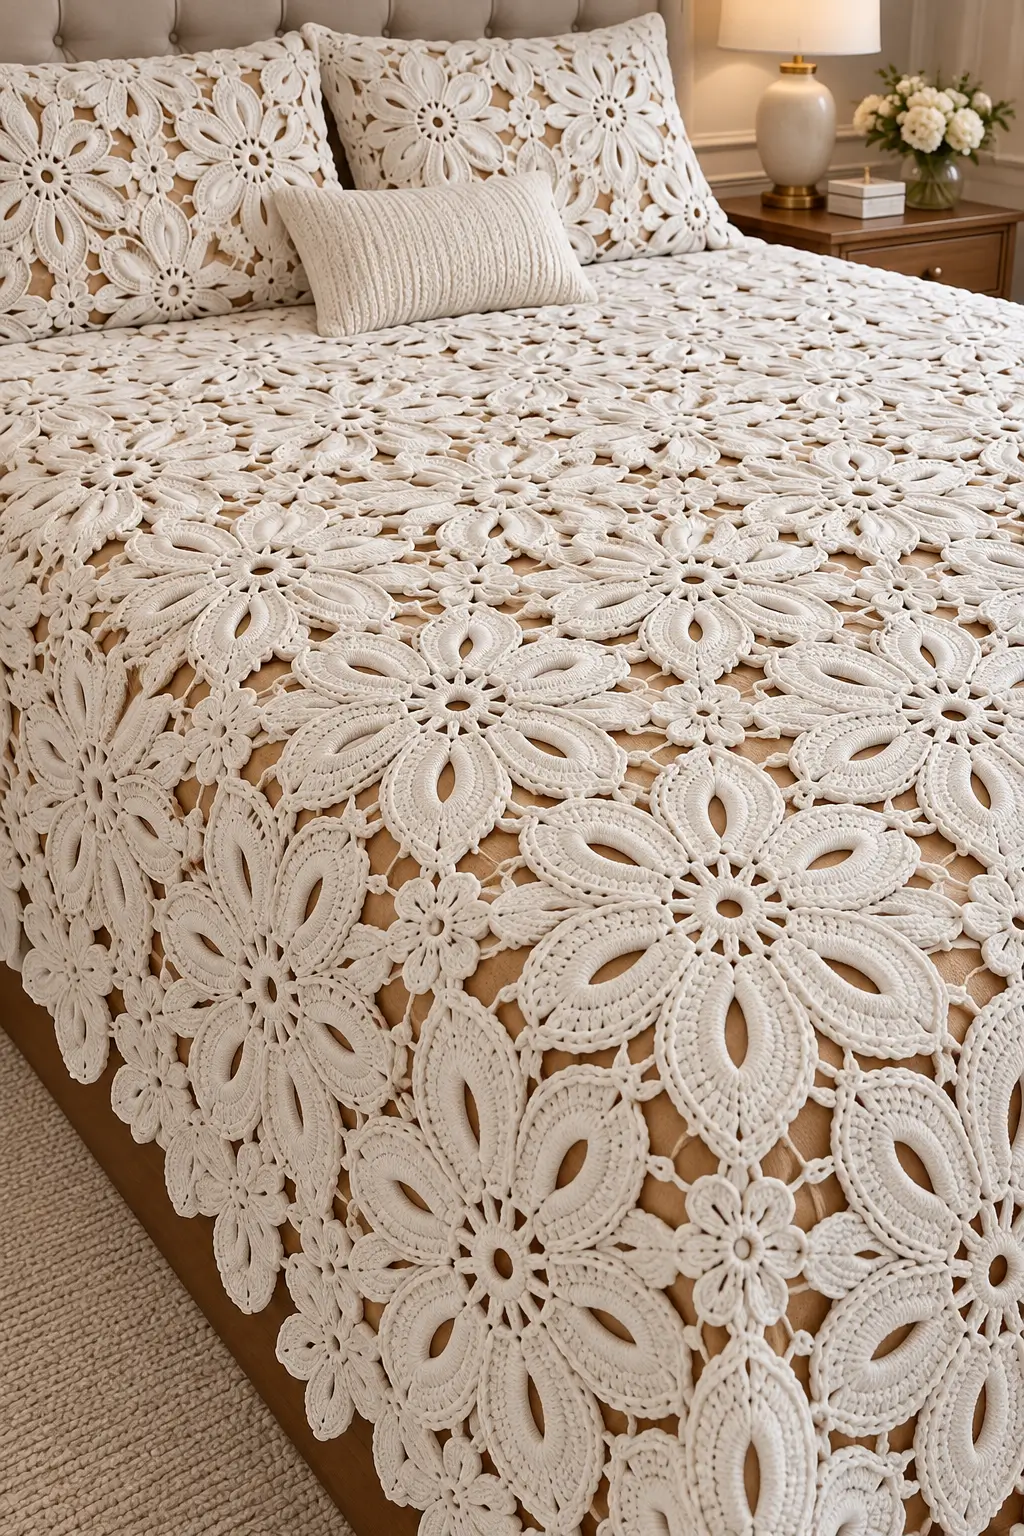
The open teardrop inside every large petal is the structural signature of this bedspread; close that opening and the entire lace composition changes. This Irish lace crochet bedspread pattern uses ivory cotton, six-petal floral medallions, smaller connector flowers and chain-net joins. The modular construction can be adapted to different bed sizes and is best suited to advanced intermediate crocheters who can control motif size and joining tension.
The Design: What Makes This Floral Bedspread Different
The photographed coverlet is built from individual motifs rather than continuous rows. Large flowers dominate the layout, each with six elongated petals surrounding an open center ring. Every petal contains a long teardrop-shaped opening, reducing weight while preserving a substantial raised outline. Smaller flowers occupy the spaces between major motifs, and narrow chain bridges connect everything into an irregular lace field.
That combination creates the appearance associated with Irish crochet lace motifs: solid dimensional elements suspended within much lighter connecting spaces. The principal construction risk is inconsistent petal size. A difference of only a few millimeters becomes obvious when six petals meet around one center and neighboring flowers are joined together. Make one blocked master motif before beginning production.
Project Info at a Glance
| Skill Level | Construction | Large Motif Target | Hook | Best For |
|---|---|---|---|---|
| Advanced Intermediate | Separate floral motifs with chain-net joins | Approx. 20–24 cm | 2.5–3.5 mm | Bedspreads, coverlets and decorative throws |
The measurements above are working targets for this photo-inspired reconstruction rather than measurements taken directly from the photographed bedspread. Make and block one complete flower before calculating the finished layout.
Materials and Tools
Yarn
- Warm ivory — cotton or cotton-blend yarn — main flowers, small flowers and connecting mesh
A smooth, tightly plied cotton gives the petal edges enough definition to remain visible against the open connecting mesh. For a large bedspread, purchase as much of the main yarn as practical from the same dye lot because every component is worked in one color.
Tools
- 2.5–3.5 mm crochet hook
- Ivory cotton or cotton-blend yarn
- Yarn needle
- Sharp scissors
- Locking stitch markers
- Tape measure
- Blocking mats
- Rust-resistant pins
Abbreviations
- MR — magic ring
- ch — chain
- sl st — slip stitch
- sc — single crochet
- hdc — half double crochet
- dc — double crochet
- tr — treble crochet
- dtr — double treble crochet
- sp — space
- st/sts — stitch/stitches
An invisible decrease is worked through the front loops of two adjacent stitches before completing one single crochet, reducing the ridge created by a conventional decrease.
Irish Lace Crochet Bedspread Pattern
This is an original photo-inspired construction based on the visible architecture of the reference image rather than an exact transcription of a published design. Three components create the bedspread: large six-petal flowers, smaller connector flowers and an open chain network.
Large Six-Petal Flower Motif
Center Ring
Yarn: warm ivory.
Round 1: Make a MR. Ch 1 and work 12 sc into the ring. Join with sl st. (12 sc)
Do not pull the ring completely closed. Leave a small circular opening similar to the visible centers in the photograph.
Round 2: Ch 1. Work 2 sc in each stitch around. Join with sl st. (24 sc)
Place a marker after every four stitches. These six sections establish the positions of the six petals.
Petal Foundation
Each petal begins as a long chain loop rather than a solid block of stitches.
Round 3: Ch 18.
Skip the next 3 stitches of the center and sl st into the fourth stitch.
Repeat five more times:
ch 18, skip 3 sts, sl st in next st.
You should now have 6 long chain loops distributed evenly around the center.
Check all loops before continuing. They should be approximately equal in length when laid flat.
Building the First Petal
Sl st into the first ch-18 loop.
Work along one side of the loop:
3 sc, 3 hdc, 5 dc, 3 tr.
At the upper end work:
(2 tr, ch 3, 2 tr)
Continue down the opposite side of the same chain loop:
3 tr, 5 dc, 3 hdc, 3 sc.
Sl st into the center attachment point.
This creates an elongated petal with a large open teardrop through its middle.
Remaining Five Petals
Repeat the same sequence around each remaining ch-18 loop:
3 sc, 3 hdc, 5 dc, 3 tr, (2 tr, ch 3, 2 tr), 3 tr, 5 dc, 3 hdc, 3 sc.
Anchor each petal with a sl st before moving to the next loop.
After all six petals are complete, lay the motif flat.
The petals should radiate evenly from the center without overlapping heavily.
Second Petal Layer
The photographed petals have substantial outlines, so add a second pass around each one.
Join ivory yarn at the base of the first petal.
Work sc into each sc section.
Work hdc into each hdc section.
Work dc along the middle of the petal.
As you approach the tip, work tr stitches.
Into the ch-3 tip space work:
(2 tr, ch 2, 2 tr)
Reverse the stitch heights down the opposite side:
tr → dc → hdc → sc.
Sl st at the petal base.
Repeat around all six petals.
Raised Petal Outline
The large petals in the reference have a corded appearance around their inner and outer edges.
For additional relief, work a surface-slip-stitch line along the outer boundary of each petal.
Start at the base.
Insert the hook through the fabric and pull up an ivory loop.
Work loose surface slip stitches toward the point.
Continue around the point and return toward the petal base.
Fasten off on the wrong side.
Repeat for all six petals.
Keep the surface loops relaxed. Tight outlining contracts the petal and can distort the teardrop opening.
Inner Teardrop Edge
To make the central opening of each petal more defined, join ivory yarn at the base of the teardrop.
Work sc evenly around the chain-loop opening.
At the narrow upper tip work:
(sc, ch 1, sc)
Continue down the opposite side.
Join with sl st at the base.
This additional round makes the open center look deliberate rather than like an oversized chain space.
Small Connector Flower
The photograph uses small six-petal flowers between the large medallions. These fill otherwise awkward spaces and provide attachment points for the connecting mesh.
Small Flower Center
Make a MR.
Round 1: Work 12 sc into the ring. Join with sl st. (12)
Small Flower Petals
Each petal uses two center stitches.
Into the first two-stitch section work:
sl st, ch 3, 3 dc in next st, ch 3, sl st.
Repeat around.
You should have 6 small petals.
Fasten off, leaving a tail of approximately 15 cm.
Alternative Raised Small Flower
For a more dimensional connector flower, work:
sc, hdc, 3 dc, hdc, sc
across each two-stitch petal section.
Add a second round of sc around the petal edges if additional definition is required.
Use the same small-flower construction throughout one bedspread so the negative spaces remain consistent.
Blocking the Large Flower Motif
Block every large motif before calculating the final bedspread layout.
Dampen the flower according to the yarn care instructions.
Place the center on a blocking mat.
Pin the center of the first petal tip.
Pin the opposite petal next.
Continue with the remaining four petals, working in opposite pairs.
Measure from the center ring to every petal tip.
Adjust the pins until those six measurements are approximately equal.
Shape each teardrop opening by placing pins along its inner edge without overstretching the chain foundation.
Target approximately 20–24 cm across for the large photo-inspired flower.
Blocking the Small Flowers
Small connector motifs need consistent dimensions because several may sit between two larger flowers.
Pin all six petal tips.
Keep the center approximately circular.
Do not stretch the small flowers until their diameter approaches that of the large motifs’ petal openings.
Their function is to fill negative space, not compete with the primary flowers.
Planning the Bedspread Layout
Do not begin by permanently joining motifs.
Block at least 6 large flowers and 6 small flowers first.
Place the large motifs on a bed or other flat surface.
Rotate alternate flowers slightly so their petal tips occupy the gaps between neighboring motifs.
Place small flowers wherever three or four large-petal edges create an open area.
Leave narrow spaces between motifs for the connecting mesh.
The photographed bedspread is intentionally open. Packing the flowers edge-to-edge removes much of the lace effect.
Connecting Chain Mesh
The connecting network should remain visually lighter than the flowers.
Join ivory yarn to the outer edge of a large petal.
Ch 5.
Sl st into a nearby point on the next motif.
Ch 5.
Attach to another available petal edge.
Continue creating small chain bridges between motifs.
Where a larger space remains, use:
ch 5, sc around an existing chain bridge, ch 5.
This creates an irregular net without requiring every motif to touch directly.
Building a Stable Lace Network
Each large flower should connect to neighboring motifs at several independent points.
A single chain bridge allows the motif to rotate.
Use approximately 3–5 attachment points along every side of a large flower that faces another motif.
Keep attachment chains relaxed.
If the motifs pull toward one another when the work is laid flat, increase the bridge from ch 5 to ch 6 or ch 7.
If the chain hangs loosely, shorten it by one stitch.
Joining a Small Flower into the Mesh
Position the small flower inside the intended opening.
Join yarn to one small petal tip.
Ch 3–5 depending on the distance.
Sl st to the nearest large motif.
Return to another small-flower petal and repeat.
Connect at least four of the six small petals.
Use all six attachment points when the flower occupies a larger opening.
The motif should remain centered after the surrounding fabric is lifted from the table.
Join-As-You-Go Option
Experienced crocheters can connect motifs while working the final petal-outline round.
When a petal reaches an intended attachment point, replace a chain stitch with a sl st into the corresponding point on the neighboring motif.
Continue the petal edging.
This reduces sewing and loose ends but requires an established layout before the next motif is made.
For a first large bedspread, individually blocked motifs followed by mesh joining provide greater control over alignment.
How Many Large Flowers Are Needed?
The exact number depends on the blocked flower diameter and the amount of open mesh between motifs.
Do not calculate quantity from the photograph alone.
If one large motif blocks to 22 cm and the effective joined repeat measures approximately 20 cm after overlap and mesh spacing, a 160 cm-wide coverlet needs roughly:
160 ÷ 20 = 8 motif repeats across
A 220 cm length requires approximately:
220 ÷ 20 = 11 repeats
An 8 × 11 planning grid contains 88 major motif positions, although the irregular layout may require fewer complete flowers along the edges.
Estimating Yarn for the Bedspread
Weighing sample motifs provides the most reliable estimate.
Complete one large flower, including its surface outline and inner teardrop edging.
Weigh it.
Next, weigh one finished small flower.
For example, if a large motif weighs 32 g and the design needs 80:
32 × 80 = 2,560 g
If 50 small motifs weigh 6 g each:
6 × 50 = 300 g
Add yarn for the mesh, border and a working reserve.
This sample-based method is substantially more accurate than assigning a fixed yarn quantity to an image whose fiber and dimensions are unknown.
Creating a Straight Bedspread Edge
Irish-style motif layouts naturally create an irregular perimeter.
For the straighter edge shown along parts of the photographed coverlet, position large flowers so selected petal tips finish close to the intended boundary.
Fill deep gaps with small flowers.
Use short chain bridges to establish a working edge.
Then crochet a foundation round of sc across those chains and motif edges.
Do not pull protruding flowers inward merely to create a straight line. Add connecting fabric instead.
Scalloped Outer Border
Once the structural perimeter is established, add a restrained scalloped edge.
Border Round 1
Join ivory yarn at any stable outer point.
Work sc evenly around the entire bedspread.
Where the edge crosses a mesh opening, work sc directly into the chain bridge.
Keep the stitch spacing uniform.
Border Round 2
Ch 1, sc in first stitch.
Repeat:
ch 3, skip 2 sts, sc in next st.
Continue around.
Final Shell Round
Sl st into the first ch-3 space.
Work:
5 dc in ch-3 space, sl st in next space.
Repeat around the perimeter.
Use a larger 7-dc shell where additional fullness is required around a corner.
Matching Floral Pillow Cover
The large pillows in the photograph repeat the same oversized flower language as the bedspread.
Measure the pillow insert.
Arrange blocked large and small motifs until they cover the required front dimensions.
Connect the flowers with the same chain-net technique.
For practical use, add a plain crocheted or fabric backing rather than leaving both sides openwork.
Join the front and back around three sides.
Add buttons, ties or an envelope overlap on the remaining edge if the cover needs to be removable.
Making the Large Flower Smaller
Reduce the petal foundation from ch 18 to approximately ch 14–15.
Adjust the stitch progression so the tallest stitches still occur near the petal tip.
For example:
2 sc, 3 hdc, 4 dc, 2 tr
before the tip section can replace the longer sequence.
Repeat the same reduction on all six petals.
Block one finished sample before changing every motif in the project.
Making the Flower Larger
Increase the foundation loop to approximately ch 20–22.
Add extra dc stitches through the middle section of each petal rather than adding many additional tr stitches.
Too many tall stitches make the petal tip unstable.
Retain the open teardrop center.
A larger flower also requires longer connecting chains, so build a small sample arrangement before calculating a bed-sized layout.
Creating the Raised Corded Effect
The photograph shows pronounced borders around many petal sections.
A simple surface slip stitch gives moderate relief. For a heavier corded effect, hold a second strand of ivory yarn along the petal edge and crochet over it with sc.
Do not pull the carried strand tight.
At the petal tip, leave enough slack for the curve to remain flat.
Continue down the opposite side and secure the carried strand at the base.
Test this treatment on one motif because additional corded edging increases both yarn consumption and weight.
Maintaining Consistent Petal Openings
The teardrop holes are among the most visible repeated elements in the bedspread.
Measure the first blocked opening from base to tip.
Use that measurement as the standard for later flowers.
If an opening is too narrow, the stitches around its chain foundation are probably too tight.
If it is unusually broad, the foundation chain or surrounding stitches may be too loose.
Correct tension during crochet rather than stretching every opening to shape during blocking.
Assembly
- Crochet one six-petal flower from the open center ring through the elongated teardrop petals.
- Add the second petal pass, inner opening edge and optional raised surface outline.
- Block the master flower and record its diameter plus the center-to-tip measurement.
- Make and block the required large flowers using the master motif as the dimensional reference.
- Crochet the smaller six-petal connector flowers and block them separately.
- Arrange all motifs on a flat surface with open spaces preserved between neighboring petals.
- Connect major motifs with relaxed chain bridges, adding small flowers to larger negative spaces.
- Check the assembled lace after every few motifs and lengthen any chain bridge that pulls the work out of plane.
- Build a stable outer foundation around the irregular motif edge, then add the decorative scalloped border.
- Block the completed coverlet lightly, shaping the large flowers and mesh without flattening the raised petal outlines.
The completed bedspread should remain open and flexible while every large flower retains six clearly separated teardrop petals.
7 Technical Tips for Better Irish Lace Floral Motifs
- Measure every petal from the center ring to its tip. A difference greater than about 5 mm becomes conspicuous when six petals radiate from one circular center.
- Keep all six ch-18 foundations at the same tension. One tight chain produces a narrow teardrop opening that blocking cannot reliably match to the other five.
- Use at least 3–5 mesh attachment points between neighboring large motifs. A single bridge acts as a hinge and allows heavy flowers to rotate out of alignment.
- Increase a pulling chain bridge by one or two stitches. Trying to stretch a bridge that is 5–10 mm too short can distort both motifs attached to it.
- Keep surface-slip-stitch outlines loose. A tight raised edge contracts the outer petal curve and causes the tip to cup upward.
- Block opposite petals in pairs. Pinning clockwise around the flower can gradually pull the center off position before the sixth petal is secured.
- Weave each motif tail through at least 5 cm of solid stitches. Open connecting mesh provides poor anchoring for short tails and can expose them after laundering.
Choosing Yarn for an Ivory Lace Bedspread
The yarn must support both solid petals and open mesh. Cotton is particularly suitable because it gives the large motifs defined edges and responds predictably to blocking.
Mercerized cotton creates sharper stitch definition and a slight sheen. Matte cotton produces a softer surface closer to the visual character of the reference image.
A cotton blend can reduce total weight in a large coverlet, but make a washed sample before committing to the full project.
A bed-sized lace piece contains many meters of joining mesh. Any substantial difference in shrinkage between the motif yarn and joining yarn can distort the layout, so use the same yarn for both whenever possible.
Controlling the Weight of the Finished Bedspread
Large solid motifs can make a cotton bedspread heavy even when the connecting field is open.
Do not add unnecessary solid rounds to the petals.
The teardrop openings serve a structural purpose by removing fabric from the center of each large lobe.
Keep the connecting network mostly chain-based rather than filling every opening with dense stitches.
When working on a large assembled section, support its weight on a table or bed. Allowing completed motifs to hang from the working join can stretch chain bridges before the project is finished.
Washing and Reblocking
Follow the yarn manufacturer’s care instructions.
Support the full weight of the coverlet when wet.
Lay the piece flat and straighten the outer perimeter first.
Next, reshape the largest flowers.
Open each teardrop with your fingers and align the six petal tips.
Adjust small connector flowers last.
Do not pull the chain mesh aggressively. Its job is to maintain spacing between motifs, not become the dominant visual structure.
Allow the coverlet to dry completely before placing it on the bed.
Conclusion
The elongated open petals are the measurement to establish first in this Irish lace crochet bedspread pattern. Crochet one complete six-petal flower, block it to the selected 20–24 cm target and record both its diameter and yarn weight before making the full set. Keep the teardrop openings consistent, use small flowers to control larger gaps and connect the motifs with relaxed chain bridges rather than forcing their edges together. Your next step is to produce one large flower and one connector flower as the dimensional masters for the project. Save the design to Pinterest or share the completed coverlet on Instagram with #IvoryIrishLaceBedspread. Would you keep every connector flower small, or introduce a second medium-size flower between the large motifs?