Introduction
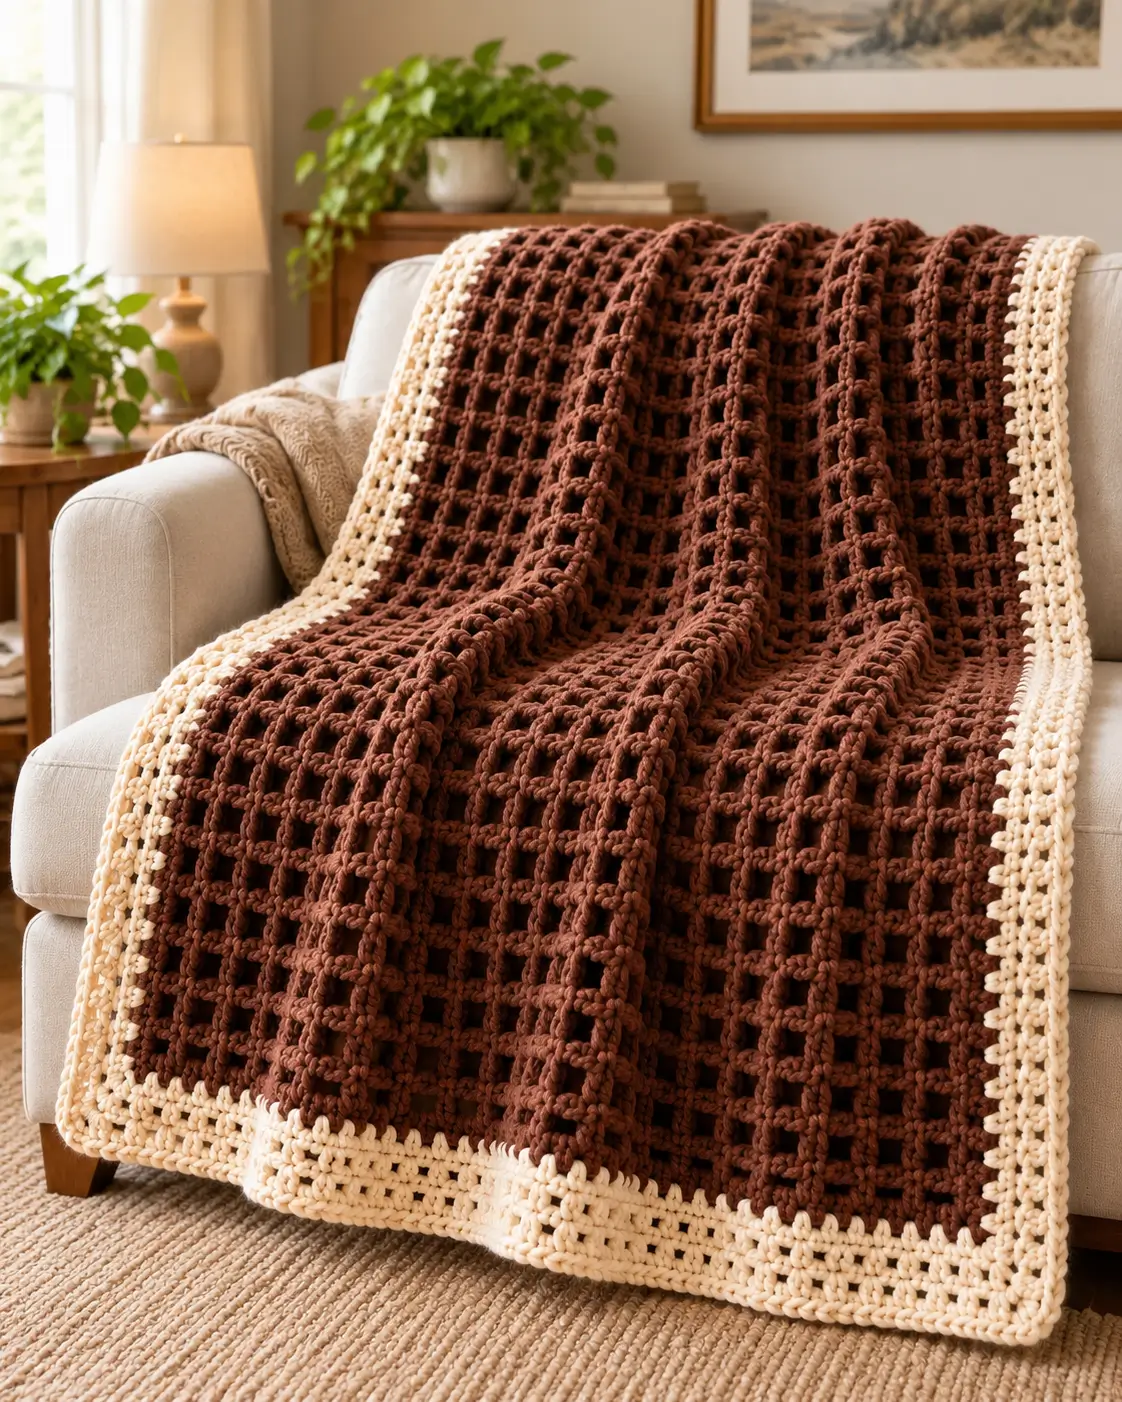
A chocolate-brown grid framed in cream needs raised posts, not sewn-on strips. This chunky waffle crochet blanket uses bulky acrylic yarn, an 8 mm hook, and a two-row texture repeat to build an approximately 50 × 60 inch (127 × 152 cm) throw. The written instructions suit an advanced beginner who can work double crochet and front-post stitches. One continuous panel also avoids joining individual squares.
The Design: What Makes This Brown-and-Cream Throw Different
The photograph shows a brown field with recessed rectangular pockets and a cream frame. To recreate that geometry, this pattern uses front-post double crochet rather than sewn-on strips. Vertical ridges develop from repeated post placement; alternating wrong-side stitches create horizontal crossings. The result approximates the raised lattice visible in the image, though its original stitch cannot be identified with certainty.
Bulky yarn gives each recess definition without the obscured stitch placement common to velvet. A 114-stitch working width retains plain edge stitches that stabilize the textured rows. Four compact cream border rounds frame the chocolate brown crochet throw without fringe or corner ornaments. One frequent mistake is placing a post stitch through the top loops as well as around the post. That accidentally adds stitches, disrupts the waffle grid, and makes the edges spread.
Project Info at a Glance
| Skill Level | Time | Finished Size | Hook | Best For |
|---|---|---|---|---|
| Advanced beginner | Maker-dependent; no verified project time | Target ~50 × 60 in (127 × 152 cm), after edging | 8 mm (US L/11), subject to gauge | Sofa or chair throw |
Important distinction: The size above is a calculated target for the new pattern below, not a measurement taken from the photograph or a tested finished sample. A comparable published bulky waffle blanket measured about 55 × 65 in with an 8 mm hook and a 10-stitch/6-row gauge over 4 in. Reference: Heart Hook Home.
Materials and Tools
Yarn
- Chocolate brown — CYC #5 bulky — approximately 1,100–1,300 g used; purchase 7 × 200 g balls. Suggested yarn: Premier Puzzle Solids, Brown (2162-14).
- Cream — CYC #5 bulky — approximately 120–200 g used; purchase 1 × 200 g ball. Suggested yarn: Premier Puzzle Solids, Cream (2162-12).
The manufacturer specifies 200 g / 328 yd (300 m) per ball for both solid shades. Seven brown balls provide 2,296 yd; one cream ball provides 328 yd. These are purchase quantities with a margin, not audited consumption from a completed prototype. Crochet the gauge sample first, weigh it, and add another ball if the calculated use exceeds the yarn on hand. Yarn specification and colors.
Tools
- 8 mm crochet hook, or the size that achieves the target fabric gauge
- Six locking stitch markers: four for corners and two for row ends
- Large-eye tapestry needle, scissors, flexible tape measure
- Kitchen scale readable to 1 g for yardage planning
- Blocking mats or clean towels for arranging the border flat
There is no stuffing, shaping wire, sewn applique, or safety-eye hardware in this design. Work with one strand of yarn throughout; holding two strands together would invalidate the stated gauge and yarn estimate.
Abbreviations and Construction Rules
ch = chain; sc = single crochet; dc = double crochet; FPdc = front-post double crochet; sl st = slip stitch; st(s) = stitch(es); RS = front/right side; WS = reverse/wrong side; rep = repeat.
For FPdc, yarn over, insert the hook from front to back to front around the vertical post of the stitch directly below, pull up a loop, then complete a normal double crochet. Work around that post instead of into its top loops; the two methods must never be applied to the same stitch position.
All blanket rows are worked flat and turned. The ch 2 at the start of a row does not count as a stitch. Place the first actual double crochet into the first stitch; every completed blanket row contains 114 stitches.
Pattern — Step by Step
1. Gauge Swatch: Check the Raised Grid
With brown yarn and an 8 mm hook, ch 29. In the third chain from the hook, work 1 dc, then dc to the end for 27 stitches. Follow the Row 2 and Row 3 sequences below, scaled to 27 stitches, until the sample is at least 6 in (15 cm) tall.
Rest the fabric without stretching it. Measure an interior 4 × 4 in (10 × 10 cm) square, counting complete stitches and rows. Aim for 10 working stitches × 6 rows, as reported for a comparable bulky waffle blanket; this is a reference gauge to test, not proof that every brand will match. If 4 in contains 12 stitches, try a larger hook. With only 8 stitches, try a smaller one. Record the new gauge before beginning the full panel.
2. Brown Main Panel (Make 1)
Yarn: chocolate brown. Construction: 84 turned rows, 114 stitches per row. Foundation multiple: 3n + 2 chains. The two-row post-stitch principle follows established waffle-stitch construction; the 116-chain width and 84-row length are calculated for this image-inspired variation.
Foundation: Ch 116 loosely.
Row 1 (WS): Dc in the third ch from the hook and in each remaining chain. Ch 2, turn. (114 sts)
Row 2 (RS): Dc in the first st; [FPdc around next st, dc in next 2 sts] × 37; FPdc around next st; dc in final st. Make a two-chain turning chain and rotate the work. (114 sts)
Row 3 (WS): Dc in each of the first 2 sts; [FPdc around each of the next 2 sts, dc in following st] × 37; dc in final st. Turn with ch 2. (114 sts)
Rows 4–83: Repeat Row 2 on every even-numbered row and Row 3 on every odd-numbered row. After each row, chain two and turn. (114 sts on every row)
Row 84 (RS): Repeat Row 2, but do not make another turning chain. (114 sts)
Fasten off the brown yarn with an approximately 8 in (20 cm) tail. Do not shorten the tail until after it has been woven securely through the back of several stitches. The working panel should be approximately 45.6 × 56 in (116 × 142 cm) only if your washed or rested gauge matches 10 stitches and 6 rows per 4 in.
Row-math checkpoint: Row 2 contains 1 + (37 × 3) + 1 + 1 = 114 positions. Row 3 contains 2 + (37 × 3) + 1 = 114 positions. FPdc replaces a regular stitch at its position, so it never increases the total.
3. Cream Border (Four Rounds)
Yarn: cream. Work around all four edges with the RS facing up. Use joined rounds rather than a spiral, and start near a corner.
Border Round 1: Attach cream with a sl st, ch 1, then sc across the top edge at one sc per brown stitch. At each corner, work 3 sc into the corner location. Across each vertical side, distribute roughly 5 sc over every 3 row ends as a starting ratio; add or subtract a stitch if the fabric cups or ripples. Along the foundation edge, work approximately 1 sc per established brown stitch. Join with a sl st to the first sc.
Border Round 2: Ch 1, sc in every sc around, placing 3 sc in the center sc of each three-stitch corner. Close with a sl st.
Border Round 3: Repeat Round 2, keeping the center of each corner marked. Slip stitch to the first sc.
Border Round 4: Repeat Round 2 once more. Finish with a sl st, fasten off, and leave an 8 in (20 cm) tail for weaving.
This produces an approximate 1.5–2 in (4–5 cm) band on each edge depending on single-crochet row height. A four-round border is intentional: the photograph has a substantial light-colored frame, not a thin one-stitch outline. It also hides the raw ends of the taller textured rows.
4. Verify the Waffle Texture Before Finishing
Lay the throw with Row 2 facing upward. The raised vertical posts should form repeated columns, while the other face shows a flatter rib structure. Keep the dark field as a single uninterrupted rectangle; no patch assembly or separate lattice overlay is required.
Use a tape measure at three horizontal positions and three vertical positions. Differences of more than 1 in (2.5 cm) across equivalent measurements often indicate altered tension or border spacing. Rework the affected edge if it gathers, since steam alone is not a substitute for correcting stitch distribution.
Assembly and Finishing — 10 Steps
- Place the brown rectangle RS up on a clean, level surface and square the corners without pulling the fabric.
- Confirm the last textured row has 114 stitches and the lower foundation has a matching working width.
- Identify the four corner positions with locking markers before joining the cream yarn.
- Work the first border round along every edge, shifting stitches on the vertical sides until they lie flat.
- Inspect each corner for a clearly marked center stitch, then finish the remaining three cream rounds.
- Lay the border flat and compare opposite edges; any rippling calls for fewer edge stitches on the next attempt.
- Thread the brown tail through the backs of similarly colored posts for at least 4 in (10 cm), reverse direction, and repeat.
- Weave cream tails inside the cream edging rather than across the dark main panel, where they may show.
- Launder or steam only according to the yarn label, then dry flat or arrange the blanket at its final dimensions.
- Measure width and length after drying, photograph both faces, and document the actual gauge and yarn used.
The blanket is complete when the border lies flat, the tails are secured, and the final dimensions have been recorded.
7 Technical Tips for a More Accurate Throw
- Prevent a drifting stitch count: Put a marker in the first and last stitch of the row and recount all 114 positions every sixth row. A missed edge stitch slowly tapers an otherwise rectangular panel.
- Prevent compressed waffle cells: When working FPdc, pull each post stitch up to the same height as the neighboring dc. Short front-post stitches can pucker the grid into narrow vertical channels.
- Prevent an oversized foundation: Measure the foundation after Row 5, not immediately after chaining 116. Waffle fabric contracts across the width once the post stitches develop.
- Prevent a cream border that waves: Begin with about five sc for every three dc row ends, then check the surface after the first full round. Excess side stitches make a visible ruffle, even if the corner groups are correct.
- Prevent pulled-in corners: Work three sc at every corner on each border round, placing the new group in the middle stitch below. One or two corner stitches cannot turn a thick, four-round border through 90 degrees cleanly.
- Prevent concealed errors in dark yarn: Count the FPdc columns under a bright work light after Rows 4, 10, and 20. Brown yarn can disguise a post placed around the wrong stitch until several rows later.
- Prevent loose woven ends: Keep each 8 in (20 cm) tail in yarn of the same color and change the weaving direction at least once. A single straight pass through open waffle spaces can slip free during laundering.
How to Resize the Blanket
The working panel is built on multiples of three stitches with two extra turning chains. For a narrower main body, ch 101 for 99 working stitches; for a wider one, ch 131 for 129 working stitches. That change adds or removes five three-stitch waffle units and leaves the same general edge treatment.
At the reference stitch gauge, 15 added stitches increase the untreated panel width by roughly 6 in (15.2 cm). For length, each six extra rows add approximately 4 in (10.2 cm) before the border. Add rows in pairs so the last complete pair retains the two-row texture. If your gauge differs, calculate the new width as working stitches ÷ measured stitches per inch and the length as rows ÷ measured rows per inch. Add twice the measured border width to each dimension.
Yarn estimates must scale with the fabric area, not merely the number of extra rows. A rough check multiplies the source yarn consumption by new area divided by source area; a weighed gauge swatch gives a more personal estimate. Reserve a separate quantity of cream so the four-round edging is not interrupted by a batch change.
Troubleshooting and Yarn Planning
Why does the panel curl toward the raised side? Front-post stitches draw yarn forward, and tight post loops exaggerate that pull. Try another sample with a looser post stitch or a hook 0.5–1 mm larger, and compare the fabric after it has rested.
Why are the squares slanted? Check that the Row 2 and Row 3 post groups are placed relative to the actual stitch immediately below, not to a distant ridge. Count each three-stitch unit before moving to the next; do not insert an extra dc to fill a gap.
Why does the throw use more yarn than expected? The stitch adds yarn around the height and circumference of the posts. A published 55 × 65 in bulky waffle blanket lists about 2,500 yd, and a different bulky 45 × 58 in waffle pattern lists 1,400–1,500 yd; this variation may fall between those examples, but tension changes the total substantially.
How should yarn use be calculated from a swatch? Weigh a 6 × 6 in sample after the yarn tails are removed. Divide its weight by 36 to get grams per square inch, multiply by the brown field area, and then add a separate allowance for the cream edging. Buy full balls rather than exactly the theoretical weight, because knots, swatching, and joining consume additional yarn.
Care and Display
Use the fiber content on the selected ball band as the care authority. Premier Puzzle Solids is a washable acrylic, but aggressive heat can alter the shape of synthetic fibers; follow the manufacturer’s drying and temperature settings. Support the wet blanket when transferring it rather than lifting from a single corner. Let it dry without hanging from a rail, which can stretch the long post-stitch columns.
For photographs, place the cream frame fully in view and add a second image at low angle to show the waffle relief. That combination records both the geometric layout and the stitch definition, which a folded or heavily draped blanket can obscure.
Conclusion
Measure the washed and dried sample against the target dimensions before photographing the finished throw. If the width differs by more than 5 cm, record the actual gauge and resize the foundation by groups of three stitches on the next version. This chunky waffle crochet blanket relies on repeat accuracy, stable corners, and a restrained cream frame rather than separate motifs. Pin a full-blanket image and a close-up of the raised stitch grid on Pinterest, then post the same two views on Instagram with #BrownCreamWaffleThrow. Include the finished dimensions and yarn weight in the caption. Would you keep the four-round cream border or make it six rounds wide?