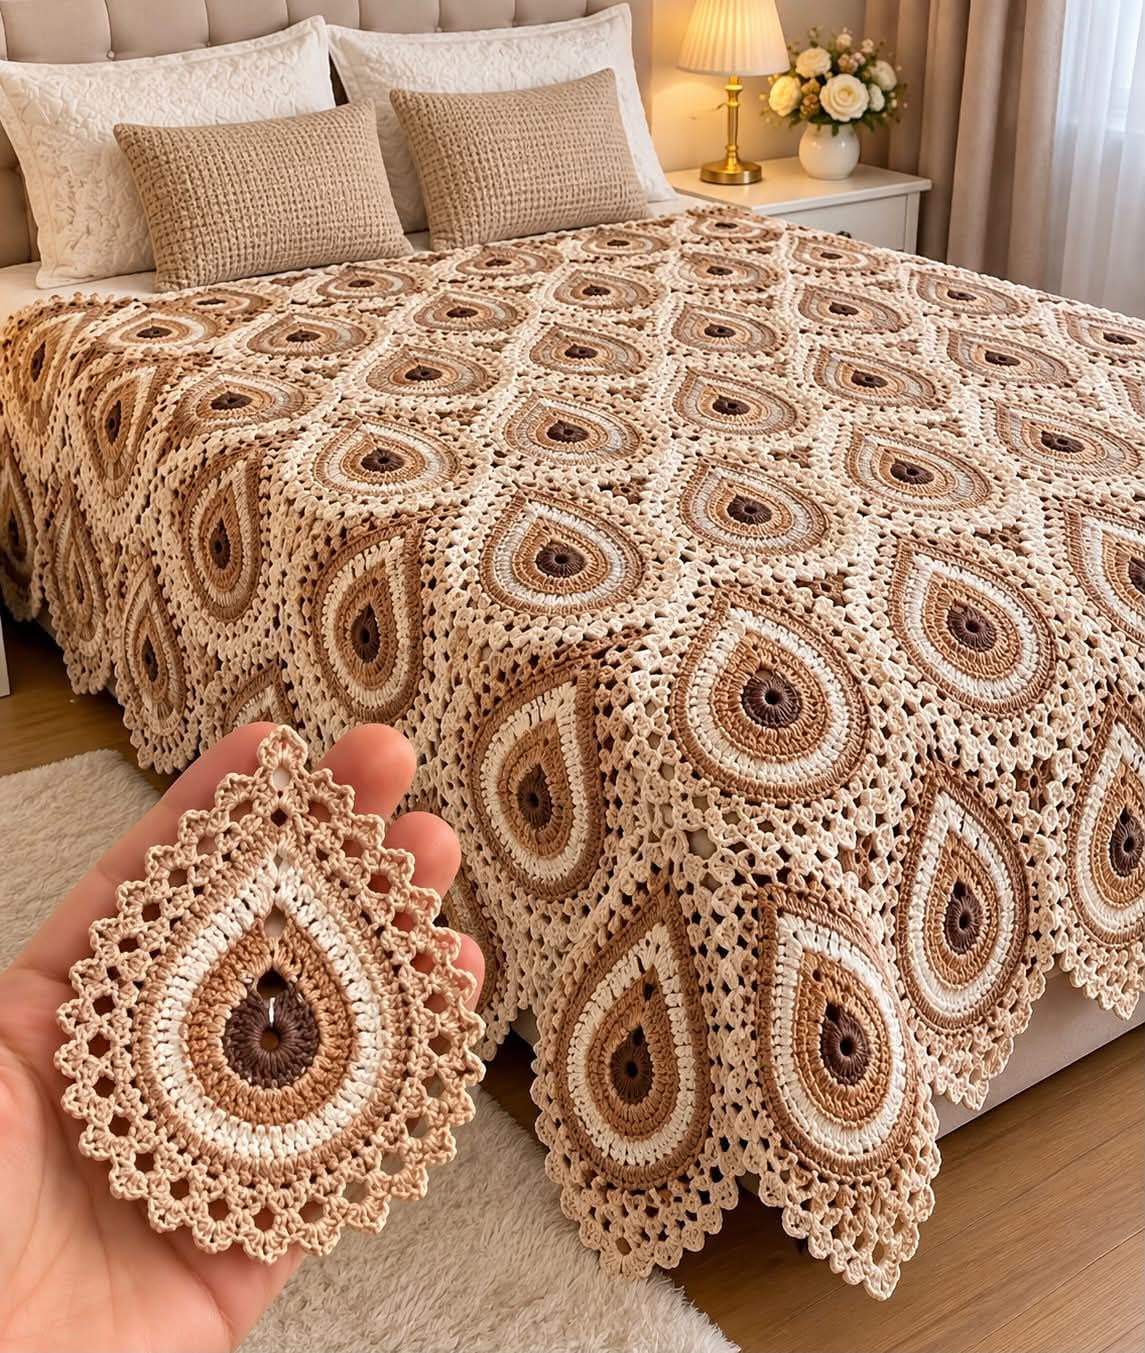
The pointed end of a teardrop must remain narrow while its lower half expands into a rounded medallion. This crochet teardrop motif bedspread pattern uses chocolate-brown centers, caramel and taupe bands, ivory accents, and cream lace connections to create a repeating bedcover. DK cotton with a 4 mm hook is a practical starting combination. The intermediate-to-advanced project is constructed from individual motifs, allowing the bedspread dimensions to be adjusted before assembly.
The Design: What Makes This Teardrop Bedspread Different
The photographed bedspread replaces conventional granny squares with elongated teardrop medallions. Each motif begins around a small circular opening and expands through several concentric bands before narrowing toward one pointed end. That change in shape is the defining feature.
The second structural decision is color placement. Dark chocolate anchors the center, caramel and taupe develop the surrounding rings, and ivory creates a bright transition into the lace border. Repeating those colors consistently gives the crochet paisley blanket its orderly appearance.
The third feature is the joining system. Open cream connections separate the medallions without hiding their outlines, creating the appearance of a continuous crochet lace bedspread. A common mistake is making the pointed end too broad. The result resembles an oval rather than a teardrop.
Project Info at a Glance
| Skill Level | Construction | Published Motif Reference | Hook | Best For |
|---|---|---|---|---|
| Intermediate to advanced | Individual teardrop motifs joined with lace | 13.5 × 9 cm | 4 mm with DK yarn | Bedspreads, coverlets, decorative throws |
The published 13.5 × 9 cm measurement belongs to a comparable DK paisley motif. The photographed bedspread may use larger or differently shaped units.
Make one sample and measure it after blocking before calculating the full project.
Materials and Tools
Yarn
- Dark chocolate-brown DK cotton — circular motif centers.
- Caramel DK cotton — inner teardrop bands.
- Warm taupe DK cotton — intermediate decorative rings.
- Natural ivory DK cotton — contrasting bands.
- Warm cream DK cotton — outer lace, joining, and border.
Choose yarns from the same range wherever possible. Differences in strand thickness can alter the shape of the pointed ends and prevent neighboring motifs from matching.
Do not calculate the total yarn quantity from the photograph alone. Weigh a completed sample motif, including its lace edging, before buying yarn for a large bedspread.
Tools
- 4 mm crochet hook
- Yarn needle
- Scissors
- Locking stitch markers
- Tape measure
- Blocking mats
- Rustproof pins
- Notebook or row counter
Abbreviations
- MR — magic ring
- ch — chain
- sl st — slip stitch
- sc — single crochet
- hdc — half double crochet
- dc — double crochet
- tr — treble crochet
- inc — two stitches worked into one stitch
- sp — space
- st/sts — stitch/stitches
- RS — right side
- WS — wrong side
An invisible decrease is generally unnecessary for this flat motif because its silhouette is developed through stitch placement, localized increases, and a pointed outer edge.
Understanding the Teardrop Construction
A teardrop motif differs from a circular medallion in one important respect: its increases cannot remain evenly distributed around the entire perimeter.
Evenly spaced increases produce a circle.
To create a teardrop, the rounded end needs more width while the pointed end remains comparatively narrow.
There are several ways to achieve that shape. Some patterns begin with an oval foundation. Others use short rows or freeform increases.
For this reconstruction, begin with a circular center, expand it into a flat medallion, and establish the teardrop outline with a shaped outer section.
Make the first motif as a sample. Its final outline determines how the lace connections should be positioned.
Teardrop Crochet Motif — Step by Step
The following sample establishes the central medallion and the principal color bands. The outer teardrop shaping is developed separately because its exact stitch distribution depends on the size and curvature selected for the finished motif.
Round 1 — Dark Circular Center
Yarn: dark chocolate brown.
Make a magic ring.
Ch 2. The starting chain does not count as a stitch.
Work 12 dc into the ring.
Join with sl st to the first dc.
Stitch count: 12 dc.
Pull the ring closed, leaving a small central opening if desired.
Fasten off.
Round 2 — Caramel Expansion
Yarn: caramel.
Join yarn in any stitch.
Ch 2.
Repeat around:
2 dc in next stitch, 1 dc in following stitch.
Join with sl st.
Stitch count: 18 dc.
Fasten off.
This round begins the caramel ring visible around the darker center.
Round 3 — Caramel Outer Ring
Join caramel again if necessary.
Ch 2.
Repeat around:
2 dc in next stitch, 1 dc in each of the next 2 stitches.
Join with sl st.
Stitch count: 24 dc.
Fasten off.
Check that the center remains flat.
Round 4 — Ivory Contrast Band
Yarn: natural ivory.
Join ivory in any stitch.
Ch 2.
Repeat around:
2 dc in next stitch, 1 dc in each of the next 3 stitches.
Join with sl st.
Stitch count: 30 dc.
Fasten off.
The ivory band should form a complete ring around the caramel center.
Round 5 — Taupe Outer Band
Yarn: warm taupe.
Join taupe in any stitch.
Ch 2.
Repeat around:
2 dc in next stitch, 1 dc in each of the next 4 stitches.
Join with sl st.
Stitch count: 36 dc.
Fasten off.
This completes the circular foundation for the sample medallion.
Marking the Teardrop Axis
Lay the completed medallion on a flat surface.
Choose one stitch position to become the pointed end.
Place a marker there.
Place a second marker directly opposite it to identify the rounded base.
Draw an imaginary line between the markers.
All later shaping should remain balanced around this line.
The point must remain centered over the dark circular opening.
If it shifts to one side, the finished motif will look twisted when joined into a bedspread.
Developing the Pointed End
Join taupe near the upper marker.
Work a short shaped section extending outward from the circular foundation.
Begin with a broad row of single crochet.
Use progressively shorter rows to taper the section.
Finish the tip with a small chain point.
For example, a seven-stitch shaping section can be reduced symmetrically through five stitches, three stitches, and one final stitch.
Use a turning chain at the beginning of each row.
Keep the decreases centered so both sides of the point remain balanced.
This is an adjustable shaping method, not a transcription of the photographed motif.
Blending the Point into the Rounded Base
The pointed section should not look like a triangle attached to a circle.
Work a transition round around the outside edge.
Use shorter stitches near the tip and taller stitches along the broad lower curves where additional fabric is needed.
At the deepest transition between the point and the rounded body, place stitches close together rather than leaving an abrupt corner.
Lay the motif flat after completing one side.
Mirror the same stitch-height progression on the opposite side.
Correct any visible difference before adding the lace edging.
Adding the Ivory Teardrop Outline
Yarn: natural ivory.
Join ivory near the rounded base.
Work one controlled edging round around the shaped medallion.
Use sc along narrow sections.
Use hdc or dc where additional height is required to smooth the lower curve.
At the upper point, work:
(sc, ch 2, sl st in second chain from hook, sc).
Continue around the opposite side.
Join with sl st.
Check that the ivory outline follows the teardrop without creating a second oversized point.
Creating the Open Lace Surround
Yarn: warm cream.
The photographed motifs have an open lace framework outside the colored teardrop bands.
Begin with a round of chain spaces.
Join cream at the rounded base.
Work sc into a suitable edge stitch.
Ch 3.
Skip a short section of the underlying edge and anchor with another sc.
Continue around the motif, adjusting the spacing to maintain an even openwork border.
Keep the chain loops smaller near the pointed end.
At the rounded base, the loops can be slightly more widely spaced.
Complete the round and lay the motif flat.
If the lace contracts the teardrop, increase the chain length or reduce the distance between anchor stitches.
Second Lace Round
Join cream into any chain space.
Work:
(sc, ch 4, sc) into the space.
Move to the next chain space.
Repeat around.
At the pointed end, replace ch 4 with ch 3 if the lace becomes too loose.
Join with sl st.
This creates a second openwork layer around the medallion.
Decorative Picot Edging
The foreground motif shows small rounded points around its outer edge.
A picot-style finish can reproduce that effect.
Join cream in a chain space.
Work one sc.
Ch 3.
Sl st into the first chain to create a picot.
Work another sc into the same space.
Continue to the next chain space.
Repeat around the motif.
Use consistent tension so the decorative points remain similar in size.
Fasten off.
Checking the Completed Sample Motif
Place the motif right side up.
Check the center opening.
Compare the caramel and ivory bands.
Confirm that the pointed end aligns with the center.
Measure the maximum length from the tip to the rounded base.
Measure the maximum width across the broadest section.
Record both dimensions.
Block the motif before making the remaining units.
All later motifs should follow the same stitch placement and blocking measurements.
Planning the Bedspread Layout
The photographed bedspread contains repeated teardrop motifs arranged in a regular grid.
All motifs appear to follow a consistent orientation across the main surface.
Before joining, place several completed motifs on a table or floor.
Position their pointed ends in the same direction.
Leave space for the lace connections.
Measure the distance between motif centers.
This measurement determines the repeat size of the completed bedspread.
Do not calculate the number of motifs using only their individual widths. The open joins add extra space between neighboring units.
How Many Teardrop Motifs Are Needed?
First measure the intended bedspread width and length.
Include the desired drop over the sides and foot of the bed.
Then measure one blocked motif plus its planned joining allowance.
For example, suppose a completed motif repeat occupies 15 cm across and 18 cm vertically after joining.
Ten repeats across would cover approximately 150 cm.
Twelve repeats vertically would cover approximately 216 cm.
That arrangement requires 120 motifs.
These dimensions are mathematical examples, not verified measurements of the photographed blanket.
Use your actual blocked sample and joining test to calculate the final number.
Joining the Teardrop Motifs
The photograph uses an open cream connection rather than a heavy solid seam.
Test the joining method with four motifs first.
Lay the motifs in a two-by-two arrangement.
Identify corresponding lace loops on neighboring edges.
Join matching loops with slip stitches or short chains.
Maintain the same number of connections along every comparable edge.
At the center where four motifs approach one another, leave a controlled opening.
Do not pull the joining yarn tightly.
A shortened join will distort the teardrop outlines and cause the blanket surface to ripple.
Joining Motifs into Rows
Arrange the motifs into horizontal rows.
Check that every pointed end faces the intended direction.
Join the first two motifs using the tested lace connection.
Add the remaining motifs one at a time.
Measure the completed row before beginning the next.
Make additional rows using the same joining tension.
Once all rows are complete, connect them with matching cream lace.
Keep the four-motif intersections consistent throughout the bedspread.
Filling the Spaces Between Motifs
Teardrop motifs do not fit together as neatly as squares.
The pointed end of one unit creates a different gap from its rounded base.
That difference must be addressed when planning the joining lattice.
Small chain bridges can connect adjacent lace loops.
Larger gaps may require a separate filler motif.
A simple filler can begin with a small chain ring and expand into four chain-loop arms.
Attach one arm to each neighboring teardrop.
Test the filler in a four-motif sample before using it throughout the blanket.
The goal is to maintain an even grid without forcing the teardrop edges into straight lines.
Adding the Bedspread Border
Once all motifs are joined, work a continuous border around the outer edge.
Begin with cream yarn.
Work one round of sc along the outside lace connections.
Place additional stitches where the edge curves inward.
Reduce excess stitches where the edge begins to ruffle.
At each outside corner, establish a clear turning point.
Continue around the entire bedspread.
Lay the blanket flat before adding the next round.
Scalloped Outer Edging
The photographed bedspread has a delicate decorative edge rather than a plain rectangular finish.
A small shell border can provide a similar effect.
Work sc into the first suitable stitch.
Skip two stitches.
Work five dc into the next stitch.
Skip two stitches.
Work sc into the following stitch.
Repeat along the edge.
Adjust the repeat near corners and irregular sections.
Do not force a full shell into a space that is too narrow.
The finished scallops should remain flat after blocking.
Assembly — 10 Steps
- Make the dark chocolate center and complete the caramel, ivory, and taupe medallion rounds.
- Mark the central axis and shape the pointed end of the first sample motif.
- Add the ivory outline and cream lace surround, keeping the outer edge flat.
- Block the sample and record its finished length, width, and yarn consumption.
- Calculate the number of motifs required for the desired bedspread dimensions.
- Make the remaining motifs with identical color placement and stitch structure.
- Arrange four motifs into a test panel and establish the open lace joining method.
- Join the complete bedspread in rows, maintaining consistent motif orientation.
- Add any required filler motifs, followed by the continuous cream border and scalloped edging.
- Weave in all tails, inspect the joins, and complete the final blocking.
The finished bedspread should have repeated teardrop medallions, aligned pointed ends, consistent neutral color bands, open cream joins, and a continuous decorative border.
7 Technical Tips
- Check the 12-stitch center before beginning the color bands. An extra stitch changes the increase distribution and can distort the circular opening.
- Mark the pointed end directly opposite the rounded base. A point positioned off the center axis makes the finished teardrop appear twisted.
- Compare completed motifs within approximately 5 mm after blocking. Larger differences accumulate across long rows and can produce uneven bedspread edges.
- Test the lace joining method on four motifs. Connections that are too short pull the teardrop outlines inward and create puckering.
- Keep the picot chains consistent at three stitches. Unequal picot lengths make the decorative perimeter appear irregular.
- Inspect the pointed end after each shaping row. Adding too much width near the tip changes the motif from a teardrop into an oval.
- Weave yarn tails through at least 4–5 cm of matching-color stitches. Dark brown tails carried behind ivory sections may show through the lace.
Choosing Yarn for a Teardrop Bedspread
The photograph shows defined stitches and relatively fine openwork.
Sport or DK cotton is a practical choice for reproducing that appearance.
A published DK paisley motif measures 13.5 × 9 cm using a 4 mm hook.
Another published paisley design uses sport-weight cotton with a 2 mm hook.
Those references demonstrate how yarn weight changes the scale and detail of the finished motif.
For a bedspread, choose yarn with enough drape to hang over the mattress without becoming rigid.
Make a complete sample before purchasing the full quantity.
Creating the Neutral Color Sequence
The photograph uses a controlled palette rather than random color changes.
Dark chocolate occupies the center.
Caramel forms the first substantial ring.
Ivory creates contrast between the brown bands.
Taupe adds another intermediate shade.
Warm cream dominates the lace framework.
Repeat this order across the entire project.
Changing the sequence between motifs can make the bedspread look patchwork rather than continuous.
For a softer appearance, reduce the contrast between caramel and taupe while retaining the dark center and pale outer lace.
Calculating Yarn Requirements
Published paisley motifs provide useful starting references, but their consumption figures vary with construction.
One DK paisley pattern specifies approximately 14–18 m for a 13.5 × 9 cm motif.
Another DK paisley sample weighs approximately 8 g.
Neither figure includes the exact lace border and joining system shown in the photograph.
For accurate planning, weigh each yarn color before making the sample.
Complete the full teardrop, including its outer lace.
Weigh the remaining yarn.
Record the amount used for chocolate, caramel, taupe, ivory, and cream separately.
Multiply each quantity by the required motif count.
Add yarn for the joins, filler motifs, outer border, and normal variation.
Preventing Distortion During Joining
Individual motifs may lie flat while the completed blanket develops waves.
This usually indicates a joining problem rather than a problem with every medallion.
Compare the lengths of corresponding lace connections.
Check whether the pointed ends are all facing the same direction.
Inspect the gaps between four neighboring motifs.
If one intersection is smaller than the others, the surrounding joins may be too tight.
Correct the test panel before joining additional rows.
Blocking can refine small variations, but it cannot correct severely shortened connections.
Blocking Teardrop Motifs
Block every motif before final assembly.
Dampen the crochet according to the yarn manufacturer’s instructions.
Place the motif on a blocking mat.
Pin the pointed end first.
Pin the rounded base directly opposite it.
Arrange the two curved sides symmetrically.
Pin the decorative picots without stretching them excessively.
Allow the motif to dry completely.
Use the blocked sample as a template for the remaining units.
Choosing the Bedspread Dimensions
Measure the mattress width and length.
Decide how far the bedspread should extend over the sides and foot.
Add the desired side drops to the mattress width.
Add the foot drop to the mattress length.
Compare those measurements with the finished motif repeat.
Round the number of motifs up to a complete row and column arrangement.
If the calculated panel is too wide, reduce the number of columns or choose a smaller hook and yarn combination.
Do not remove random motifs from the outer rows, because the teardrop lattice depends on a regular arrangement.
Care and Washing
Follow the yarn manufacturer’s washing instructions.
Large cotton bedspreads become heavy when wet.
Support the fabric across its full width when lifting it.
Avoid hanging a wet lace bedspread from one narrow edge.
The weight can stretch the open joins and alter the pointed motifs.
Dry flat whenever practical.
Reshape the teardrop tips and lace openings while the fabric is damp.
Inspect the decorative picots after drying and adjust any that have folded beneath the surrounding stitches.
Conclusion
The dark centers, concentric neutral bands, and open cream lattice define this crochet teardrop motif bedspread pattern. Begin with one sample medallion, establish a centered pointed end, and block the complete lace-edged motif before calculating the blanket dimensions. The next step is a four-motif joining test, which will reveal whether the lace connections need additional length or filler sections. Record the finished repeat size and yarn consumption before making the full bedspread. Share the completed neutral crochet coverlet on Pinterest or Instagram using #TeardropCrochetBedspread. For this particular design, would you keep the chocolate-brown centers or replace them with caramel for a lighter overall appearance?









