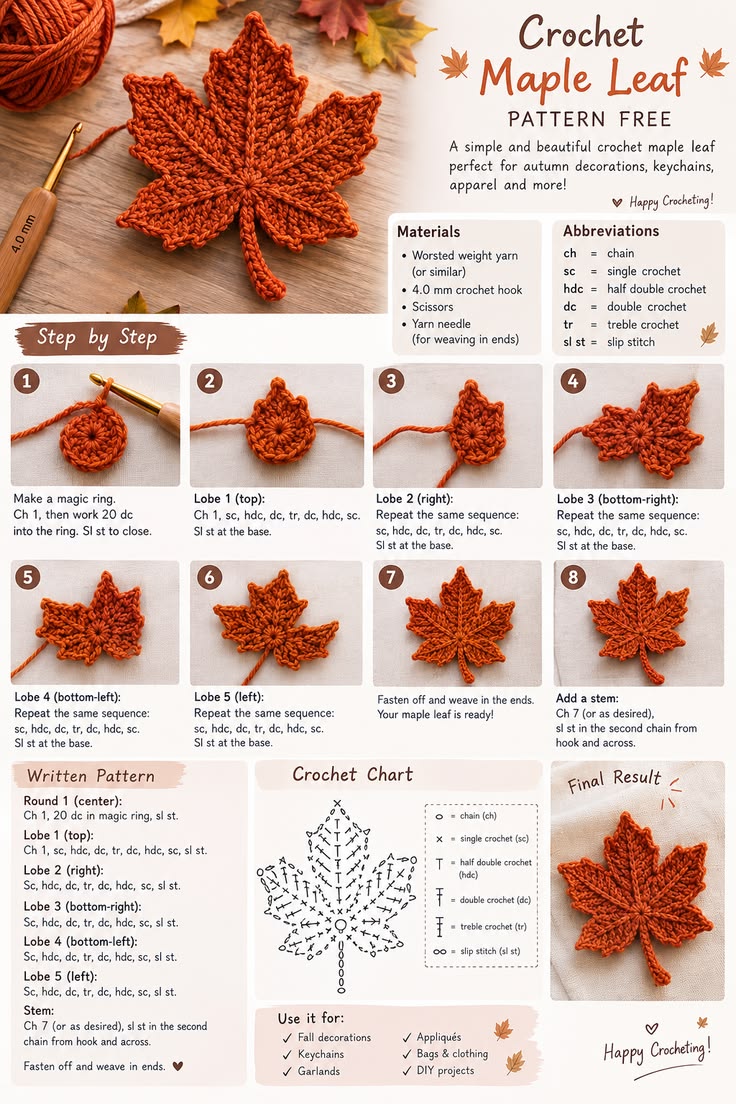
A maple leaf loses its identity when the two lower points grow as tall as its center spear. This free crochet maple leaf pattern deliberately separates five lobe sizes, deep valleys, pointed tips, a narrow stem, and raised-looking stitch lines. Use worsted-weight yarn with a 4 mm hook for a compact autumn appliqué. The advanced-beginner motif works for garlands, table decorations, bags, wreaths, and gift embellishments.
The Design: What Makes This Maple Leaf Different
The center point controls the silhouette. It must extend beyond both upper side lobes, while the two lower lobes remain shorter and angle toward the stem. That unequal hierarchy produces a maple outline instead of a five-point star.
Stitch height supplies the second structural tool. Single crochet establishes valleys, hdc begins the rise, dc adds width, and treble crochet produces the taller sections near a point. The sequence then reverses as each lobe descends.
A third decision concerns the center. The photographed crochet maple leaf appliqué has visible lines radiating from its base toward the points. Surface crochet can reproduce that definition after the main fall crochet leaf is finished. A frequent mistake is tightening those surface stitches until the motif cups.
Project Info at a Glance
| Skill Level | Time | Reference Size | Hook | Best For |
|---|---|---|---|---|
| Advanced beginner | 30–60 minutes | Approx. 7.5–12 cm depending on yarn and tension | 4 mm | Appliqués, garlands, wreaths, table décor |
A published worsted-weight maple leaf measures approximately 7.6 × 7.6 cm with a 3.5 mm hook. Another published leaf measures approximately 11.4 × 5.1 cm including its stem in sport yarn. The image itself specifies worsted yarn and a 4 mm hook, so make and measure one sample before producing a matching set.
Materials and Tools
Yarn
- Burnt-orange or rust worsted-weight #4 yarn — one small quantity per leaf.
A published 3-inch worsted maple leaf uses approximately 4 g of yarn. Treat that figure as a small-leaf benchmark rather than an exact requirement for this reconstruction.
Tools
- 4.0 mm crochet hook
- Yarn needle
- Scissors
- 2 locking stitch markers
- Blocking mat
- Rustproof pins
Abbreviations
- MR — magic ring
- ch — chain
- sl st — slip stitch
- sc — single crochet
- hdc — half double crochet
- dc — double crochet
- tr — treble crochet
- st/sts — stitch/stitches
- sp — space
- RS — right side
An invisible decrease is not required because the flat leaf is shaped through stitch height, skipped stitches, chain points, and slip-stitch valleys rather than decreases.
Free Crochet Maple Leaf Pattern — Step by Step
This reconstruction starts with a compact round center and distributes the five lobes around it. Count the foundation carefully before beginning the points because an extra stitch on one side changes the symmetry of the complete motif.
Leaf Center
Yarn: burnt orange.
Round 1: Make an MR. Ch 2, then work 11 dc into the ring. Join with sl st to the first dc. (12)
Round 2: Ch 1. Work 2 hdc in each stitch around. Join with sl st. (24)
Pull the magic ring closed.
Place a marker at the top-center position and another directly opposite it.
The 24-stitch foundation should lie flat before lobe shaping begins.
Lower Right Lobe
Sl st to the first designated lobe position.
Ch 1.
Work sc into the first foundation stitch.
In the next stitch work hdc.
In the next stitch work dc.
In the next stitch work:
(dc, ch 2, sl st in second ch from hook, dc).
Work hdc in the next stitch.
Work sc in the next stitch.
Sl st into the following foundation stitch to create the valley.
This is one of the two smallest principal lobes.
Upper Right Lobe
Ch 1.
Work sc in the next available foundation stitch.
Work hdc in the next stitch.
Work dc in the next stitch.
In the next stitch work 2 tr.
At the lobe tip work:
ch 3, sl st into the first chain.
Work 2 tr back into the same tip position.
Work dc in the next stitch.
Work hdc in the next stitch.
Work sc in the next stitch.
Sl st into the next available foundation position.
This lobe should extend clearly beyond the lower-right point.
Center Lobe
The center lobe is the tallest part of the leaf.
Ch 1.
Work sc at the lobe base.
Work hdc in the next position.
Work dc in the next position.
Work tr in the next position.
At the central tip work:
(2 tr, ch 3, sl st in first chain, 2 tr).
Descend with tr, dc, hdc, and sc.
Anchor the lobe with sl st at the valley.
Before continuing, compare the center point with the upper-right lobe. The center should project noticeably farther outward.
Upper Left Lobe
Mirror the upper-right lobe.
Begin with sc.
Increase stitch height through hdc and dc.
Use treble crochet through the tallest section.
Create a ch-3 pointed tip.
Descend through dc, hdc, and sc.
Anchor with sl st.
Lay the leaf flat and compare the upper-left and upper-right points.
A difference of more than approximately 5 mm is conspicuous on a small appliqué.
Lower Left Lobe
Mirror the lower-right lobe.
Work sc, hdc, and dc toward the point.
Create a compact ch-2 tip.
Return with dc, hdc, and sc.
Anchor with sl st at the lower center.
The two lower lobes should angle slightly downward rather than extending horizontally.
Secondary Maple Points
The reference leaf has more definition than five smooth petals. Add small points along the outside edges without allowing them to compete with the principal lobes.
At a suitable outer stitch work:
(sc, ch 2, sl st in second ch from hook, sc).
Continue with sc or hdc toward the main lobe tip.
Repeat once on the opposite side of that lobe if space permits.
Do not add the same number of secondary points everywhere. The center and upper side lobes can support more edge detail than the two compact lower lobes.
Defining the Lobe Valleys
Work sl st into every major valley between two principal lobes.
If a valley remains too shallow, work the next edging stitch one position farther away rather than filling the gap with a tall stitch.
The deepest recesses should appear beside the center lobe.
The lower valleys can remain slightly shallower.
This unequal depth helps separate the five-point maple structure.
Stem
From the lower center, ch 8.
Beginning in the second chain from the hook, sl st in the first 2 chains.
Sc in each remaining chain back toward the leaf.
Join to the lower center with sl st.
The stem should be narrow compared with the lower lobes.
For a slightly thicker stem, rotate the work and sl st along the unused side of the foundation chain.
Fasten off with a tail of approximately 10 cm.
Raised Center Vein
The photographed leaf shows a strong line running from the base toward the center point.
Join the same burnt-orange yarn at the base of the stem.
Work loose surface slip stitches along the center axis.
Continue toward the tallest point.
Stop approximately 5–8 mm before the outer tip.
Fasten off on the reverse side.
The surface stitches should sit on top of the leaf without shortening it.
Raised Side Veins
Join yarn beside the central surface line.
Work a short diagonal line of surface slip stitches toward the upper-right lobe.
Stop before reaching its pointed edge.
Repeat toward the upper-left lobe.
Add shorter branches toward both lower lobes.
Each branch should appear to originate from the central vein.
Do not pull the branch stitches tight. Surface crochet that is shorter than the underlying fabric causes the finished leaf to cup.
Optional Edge Round
If the leaf needs a stronger outline, work one restrained edging pass.
Join yarn at the stem base.
Sc along straight sections.
At each small point work:
(sc, ch 2, sl st in second ch from hook, sc).
At the three tallest principal points use ch 3 instead of ch 2.
Work sl st at each deep valley.
Continue around the complete leaf.
Join and fasten off.
If the edge begins to ruffle, remove stitches rather than attempting to flatten excess fabric during blocking.
Assembly and Finishing
- Close the magic ring firmly and check that the 24-stitch foundation lies flat.
- Shape the lower-right lobe first and keep its point compact.
- Build the taller upper-right lobe, followed by the longest center point.
- Mirror the upper and lower lobes on the left side and compare paired points before fastening off.
- Add secondary points only where they sharpen the silhouette without competing with the five main lobes.
- Work slip stitches into the major valleys to separate neighboring points clearly.
- Crochet the narrow stem from the lower center and reinforce its second edge if required.
- Add the raised central surface-crochet vein, followed by four shorter diagonal branches.
- Weave all tails through at least 4 cm of dense stitches on the wrong side.
- Wet-block the leaf with separate pins at the stem, five main points, secondary points, and major valleys.
The completed leaf should have one dominant center lobe, two matching upper side lobes, two shorter lower lobes, a narrow stem, deep valleys, and raised lines radiating from the lower center.
7 Technical Tips
- Count all 24 foundation stitches before shaping the lobes. Losing one foundation position shifts the center point away from the stem axis and produces an asymmetric leaf.
- Keep the center point approximately 10–20% longer than the upper side lobes. Five equal points produce a star-like silhouette rather than a convincing maple leaf.
- Compare the paired upper lobes before starting the lower-left section. On a leaf around 8–12 cm wide, a difference greater than approximately 5 mm is immediately visible.
- Use slip stitches in the four principal valleys. Substituting dc or tr at those positions fills the recesses and makes adjacent lobes merge visually.
- Stop every surface-crochet vein 5–8 mm before the edge. Running the vein through the point thickens the tip and makes the silhouette look blunt.
- Pin all five major points separately during blocking. Pulling only on the top and stem leaves the side lobes rounded and prevents the valleys from opening.
- Weave the final tail through at least 4 cm of dense center stitches. A tail placed along the pointed perimeter can pull the edge inward when tightened.
Why the Five Lobes Should Not Be Identical
A simplified diagram can make a maple leaf look as though one stitch sequence should simply be repeated five times. That approach is quick, but it removes an important botanical proportion.
The center point should dominate.
The upper side points provide most of the width.
The lower pair is shorter and sits closer to the stem.
One current published construction describes the sequence as small lobe, large lobe, center lobe, large lobe, small lobe. That hierarchy is a useful check while shaping this reconstruction.
Measure the points from the center rather than comparing only their stitch counts. Treble stitches, chain tips, yarn elasticity, and tension can change their actual lengths.
Choosing Yarn for the Maple Leaf
The image specifies worsted-weight yarn with a 4 mm hook, and current published maple-leaf patterns support that combination.
Cotton produces particularly crisp points because it has relatively little spring. Wool and wool blends create a softer outline but respond well to blocking. Acrylic works for garlands, appliqués, and other decorations where heat resistance is not required.
Use a smooth yarn rather than a highly textured novelty fiber if the raised veins are important. The center and branch lines need to remain visible against the surrounding stitches.
For a coordinated fall set, use the same yarn in rust, mustard, burgundy, olive, and cream rather than mixing different yarn weights.
How Much Yarn Does One Leaf Need?
A published 3-inch maple-leaf appliqué made with worsted yarn uses approximately 4 g. Another published pattern uses roughly 9–14 m of worsted yarn, although its dimensions depend on yarn and hook choice.
Those numbers are useful planning references, not exact consumption figures for this reconstruction.
For accurate batch production, weigh the yarn before making the first leaf.
Finish the motif, add the stem and veins, and weave in every tail.
Weigh the remaining ball.
The difference is the practical yarn consumption for your hook, tension, yarn, and chosen edging.
Changing the Leaf Size
The safest way to resize this motif is to change yarn and hook together rather than adding random stitches to the lobes.
Use sport or DK yarn with a smaller hook for gift tags and small appliqués.
Worsted yarn with a 3.5–4 mm hook produces a useful decoration or garland leaf.
Bulky yarn with a larger matching hook creates a more substantial table decoration.
After changing yarn weight, make one sample and check the proportions. The center point should still remain tallest, and the lower lobes should remain clearly shorter than the upper pair.
Blocking the Five Points
Dampen the finished leaf according to the yarn manufacturer’s care instructions.
Place it right side up on a blocking mat.
Pin the stem first.
Next pin the center point so it aligns directly with the stem.
Pin the upper-left and upper-right lobes at equal distances from the center axis.
Add the two lower points.
Push each major valley inward and secure it with a separate pin.
Finally position the secondary points.
Do not stretch the raised veins. Arrange them with the fingers after the main outline has been established.
Leave the motif pinned until fully dry.
Troubleshooting a Cupped Maple Leaf
If the center lies flat but the lobe edges rise, inspect the final edging first. Too few edge stitches can contract the perimeter.
If the entire leaf folds along its center, check the raised vein. Tight surface slip stitches act like a drawstring.
If only one lobe curls, compare its stitch count and stitch heights with the corresponding lobe on the opposite side.
Do not attempt to correct a substantial stitch-count error entirely through blocking. Remove the affected section and correct the crochet structure.
A finished appliqué should rest flat before aggressive pinning is applied.
Using the Finished Maple Leaves
Small leaves can be sewn to bags, hats, scarves, napkin rings, and seasonal fabric projects. Several motifs can be threaded onto a chain for an autumn garland.
For a wreath, make the same pattern in several yarn colors and rotate the leaves slightly when attaching them.
A group of rust, mustard, olive, burgundy, and cream leaves can also be scattered across a fall table.
When making a set, block every leaf against the first finished sample if consistent sizing matters.
For keychains or frequently handled ornaments, use firm cotton and reinforce the stem because that narrow section receives the greatest pulling force.
Conclusion
The lobe hierarchy matters more than repeating one stitch sequence five times in this free crochet maple leaf pattern. Keep the center point longest, mirror the upper side lobes, shorten the lower pair, and use slip stitches to preserve four visible valleys. Make one worsted-weight sample with the 4 mm hook next, block it, and record the finished dimensions before producing a garland or table set. Share the finished leaves on Pinterest or Instagram with #RustMapleLeafCrochet. For this specific maple shape, would you keep the single burnt-orange color shown in the reference or make the five lobes in graduated autumn shades?









