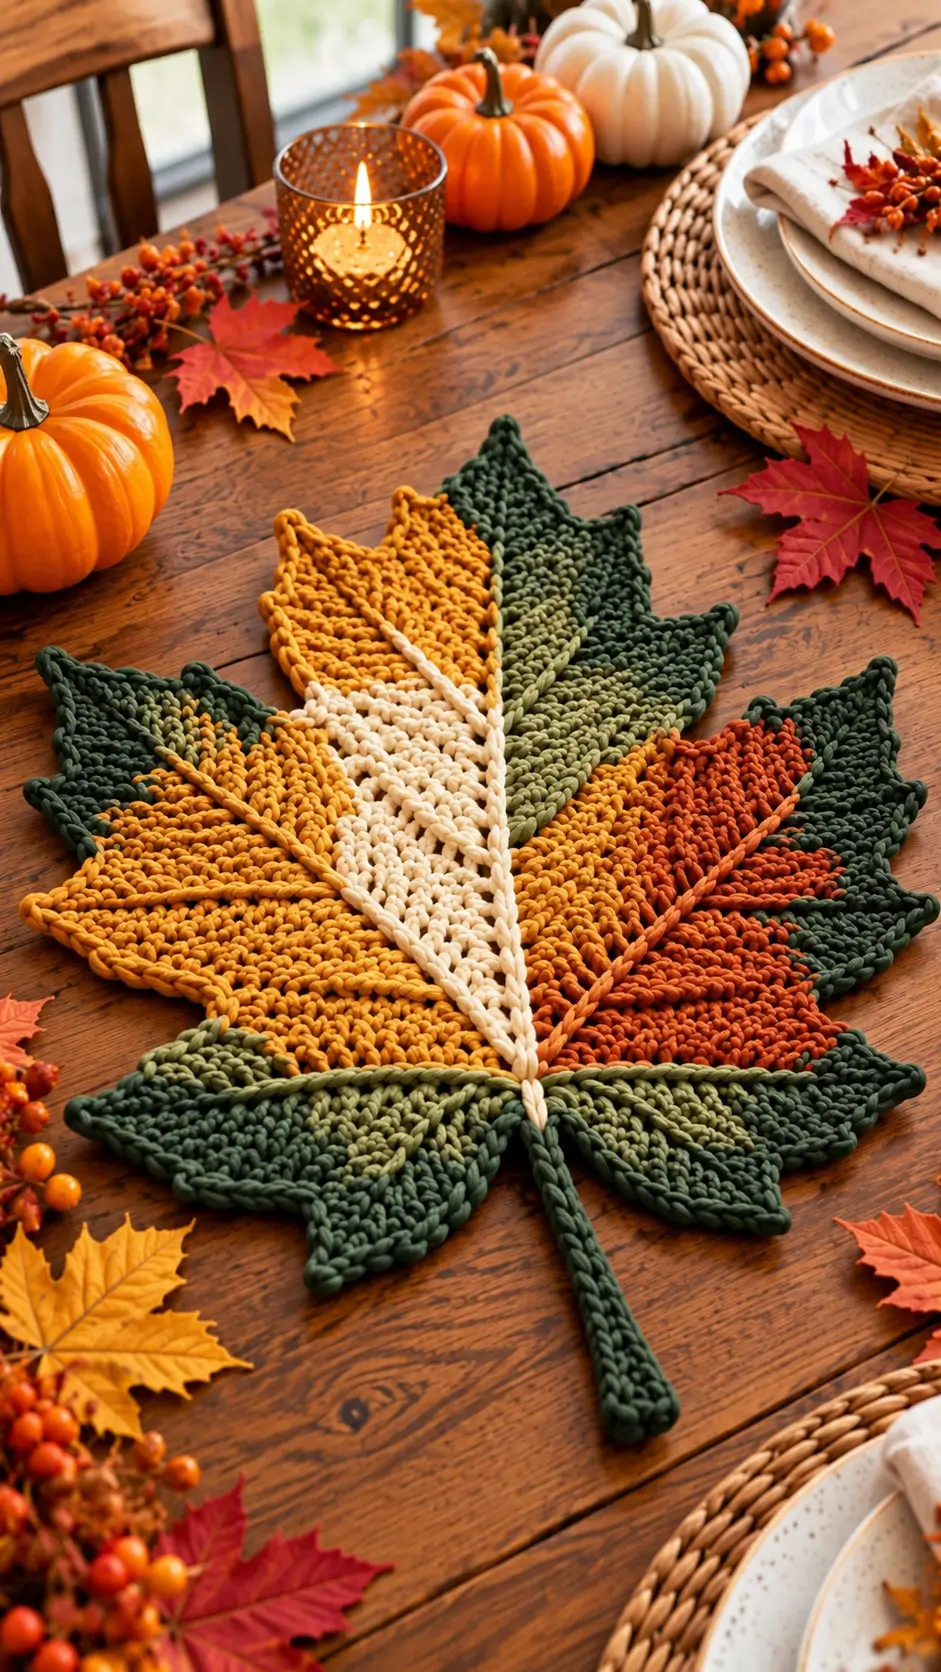
Five maple lobes already compete for space; dividing those same lobes into mustard, rust, cream, olive, and forest-green sections adds a second geometry to solve. This crochet maple leaf placemat pattern uses an oversized five-point silhouette, raised central vein, branching surface veins, long stem, and blocked autumn colors. Work it in firm Aran, chunky, or super-bulky yarn for a substantial intermediate-level table mat.
The Design: What Makes This Maple Leaf Different
The central vein controls both shape and color placement. It begins at the stem, runs through the cream center, and divides the leaf into left and right structures before smaller veins branch toward individual points. That line needs to remain visually continuous even where the background changes from mustard to rust or olive.
Lobe hierarchy matters just as much. The center point is tallest, the upper side lobes provide width, and the lower pair angles outward before tapering toward the stem. The photographed multicolor crochet leaf then adds smaller perimeter points to sharpen the silhouette.
A common failure in a fall crochet placemat is treating all five lobes as equal triangles. The result resembles a star. Different lobe lengths and deep valleys are required for a recognizable maple outline.
Project Info at a Glance
| Skill Level | Construction | Published Large Reference | Hook Range | Best For |
|---|---|---|---|---|
| Intermediate | Flat five-lobe motif | Approx. 40.6 × 48.3 cm | 5–10 mm depending on yarn | Placemats, centerpieces, fall table décor |
A published large maple-leaf placemat measures roughly 16 × 19 inches and uses super-bulky T-shirt yarn with a 10 mm hook. Another Aran-weight placemat measures 14.5 × 15 inches with a 5 mm hook. These are scale references, not claimed measurements for the photographed leaf.
Materials and Tools
Yarn
- Mustard-gold yarn — major left and upper color sections.
- Burnt-orange yarn — right-center autumn section.
- Cream yarn — central color block and selected raised veins.
- Olive-green yarn — center-right and lower sections.
- Dark forest-green yarn — outer points, lower sections, edging, and stem.
Use all five colors in the same yarn family and weight. Firm cotton, recycled cotton, or T-shirt-style yarn gives the large points enough structure for table use.
Tools
- 5–10 mm crochet hook, selected for the chosen yarn
- Yarn needle
- Scissors
- Locking stitch markers
- Tape measure
- Blocking mats
- Rustproof pins
Abbreviations
- MR — magic ring
- ch — chain
- sl st — slip stitch
- sc — single crochet
- hdc — half double crochet
- dc — double crochet
- tr — treble crochet
- sp — space
- st/sts — stitch/stitches
- RS — right side
- WS — wrong side
An invisible decrease is only useful where a lobe needs controlled tapering; most of this flat leaf is shaped by stitch height, shortened rows, slip stitches, and pointed tips.
Crochet Maple Leaf Placemat Pattern — Construction
Make a small gauge sample before starting the full leaf. Large cord-like yarn changes dimensions quickly, and moving from a 5 mm to a 10 mm hook can alter both finished scale and the stiffness of the mat.
Central Foundation
Yarn: cream.
Make an MR.
Round 1: Ch 3 and work 11 dc into the ring. Join with sl st. (12)
Round 2: Ch 2. Work 2 hdc in each stitch around. Join. (24)
Place a marker at the top and bottom of the circle. These marks establish the center axis.
The final leaf will extend outward from this compact foundation rather than remaining circular.
Central Cream Section
Continue with cream through the vertical center.
Work outward from the marked axis using rows of sc, hdc, and dc.
Increase gradually toward the upper half so the cream section widens before narrowing toward the central point.
Keep the lower portion narrower because it must flow directly into the stem.
Do not fasten off until the center reaches the intended upper branching position.
Mustard Upper-Left Section
Yarn: mustard gold.
Join mustard beside the upper cream section.
Work outward with sc at the inner edge, hdc through the transition, and dc through the broad middle area.
Use tr near the highest portion of the lobe.
Taper back toward the valley with dc, hdc, and sc.
Finish the outer point with:
Ch 2, sl st into the second chain from the hook.
Return toward the center using shorter stitches.
Mustard Upper-Center Lobe
Join mustard above the cream center.
This point should become one of the tallest sections in the entire leaf.
Work sc at both lower edges.
Progress through hdc and dc toward the middle.
Use tr stitches through the upper center.
Taper the final rows until only the pointed tip remains.
At the tip work a ch-3 picot.
The completed point should extend higher than the neighboring side lobes.
Olive Upper-Right Section
Yarn: olive green.
Join beside the central upper section.
Work a broad wedge using graduated stitch heights.
Keep the inner edge close to the central vein and expand toward the outer half.
Form the point with a compact picot.
Taper back toward the next valley.
Forest-Green Upper Point
Yarn: dark forest green.
Extend the olive section outward with forest green.
Work sc along the lower edge, hdc through the transition, and dc toward the point.
Use a small group of taller stitches immediately before the tip.
Work a ch-2 picot at the point.
Return with progressively shorter stitches.
This dark section forms the strong outside cap visible in the reference.
Mustard Left Main Lobe
Join mustard to the left side of the central foundation.
This lobe supplies a substantial portion of the leaf’s width.
Work outward in increasing stitch heights:
sc → hdc → dc → tr.
Maintain the tallest stitches through the middle third.
Reduce the height toward the outside valley.
Add one or two small secondary points with ch-2 picots.
Do not make this lobe as tall as the central upper point.
Forest-Green Left Outer Cap
Join dark green at the outside of the mustard lobe.
Work along its outer edge using sc and hdc.
Add dc only where additional width is needed.
Create a sharp outer point with:
(sc, hdc, ch 2, sl st in second ch from hook, hdc, sc).
Work back toward the mustard section.
Burnt-Orange Right Main Lobe
Yarn: burnt orange.
Join on the right side of the cream center.
Work outward with sc, hdc, dc, and tr.
Keep the orange region broad through the center and taper it strongly toward the valley.
Form the main orange point with a ch-2 or ch-3 picot.
Work back toward the center with mirrored stitch heights.
Forest-Green Right Outer Cap
Join forest green to the outside of the burnt-orange section.
Repeat the structural approach used on the left outer cap.
The color areas do not need identical widths, but the two outside lobe tips should remain visually balanced across the central axis.
Lower-Left Olive Lobe
Yarn: olive green.
Join below the large mustard section.
Work outward with sc and hdc before moving into dc through the broad center.
Create a pointed outer tip.
Reduce stitch height on the return path.
This lobe should angle downward rather than extending horizontally.
Lower-Left Forest-Green Point
Join forest green along the outer edge of the olive section.
Add a narrow pointed cap.
Keep this point shorter than the major side lobe above it.
Use slip stitches at the valley to preserve a deep separation.
Lower-Right Olive Lobe
Repeat the lower-left structural proportions on the opposite side.
The photographed leaf uses more green through the bottom than through the upper color blocks.
Keep this section broad near the center and narrow toward its outer point.
Lower-Right Forest-Green Point
Add the final dark-green outer cap.
Use sc and hdc along the lower edge and taller stitches only near the widest portion.
Finish with a sharp picot.
Return to the lower central axis with short stitches.
Creating the Five Main Maple Lobes
Lay the leaf flat before working the raised veins.
Identify the five dominant points.
The center lobe should be tallest.
The upper-left and upper-right lobes should finish slightly lower and provide most of the horizontal width.
The lower-left and lower-right lobes should remain shorter and angle toward the stem.
Use slip stitches in the deepest valleys.
If a valley looks shallow, do not add another tall stitch simply to fill the space. Deep recesses are part of the maple silhouette.
Dark-Green Perimeter
Join forest-green yarn near the stem base.
Work sc along the first lower edge.
Change to hdc where the edge needs additional height.
At a principal point work:
(sc, hdc, ch 2, sl st in second ch from hook, hdc, sc).
Return to sc as the edge approaches a valley.
Work a sl st in the deepest part of each valley.
Continue around the complete leaf.
The edging should define the outline without covering the mustard, orange, cream, or olive sections.
Raised Central Vein
Yarn: cream or pale neutral.
Join at the lower center where the stem will begin.
Work surface slip stitches directly along the center axis.
Continue through the cream color block and toward the tallest lobe.
Keep the surface stitches slightly loose.
A tight central vein shortens the leaf and causes the left and right halves to fold upward.
Fasten off near the upper point.
Raised Left Branch Veins
Join the appropriate vein color beside the central midrib.
Surface sl st diagonally toward the main mustard lobe.
Stop approximately 1–2 cm before the outer perimeter.
Make a second branch toward the lower olive lobe.
Where the photograph changes vein color, switch yarn at a color boundary rather than carrying a contrasting strand across the surface.
Raised Right Branch Veins
Repeat the vein construction on the right half.
Run one branch toward the upper olive section.
Add another toward the burnt-orange lobe.
Work a lower branch through the olive-green bottom section.
All branch veins should appear to originate from the central midrib.
Long Forest-Green Stem
Yarn: dark forest green.
Join at the bottom center of the leaf.
Ch 18.
Beginning in the second chain from the hook, sc back toward the leaf.
For a thicker placemat stem, work along the opposite side of the foundation chain with a second row of sc.
At the tip work 3 sc to round the end.
Join the stem securely into the lower central section.
Fasten off.
Strengthening the Stem
A large table mat places more stress on the stem than a small appliqué.
If the stem twists, join forest green at its base.
Surface sl st along the center toward the end.
Turn and return along the opposite side.
Keep the final centimeter narrow so the stem still looks tapered.
Assembly and Finishing
- Make the cream central foundation and mark its vertical axis before adding any large color sections.
- Build the tallest upper lobe, then compare every later point against its height.
- Add the mustard, burnt-orange, olive, and forest-green sections while maintaining five dominant lobes.
- Work the dark-green perimeter, using slip stitches in the deepest valleys and picots at the major tips.
- Lay the leaf flat and correct any lobe that differs noticeably from its paired opposite section.
- Surface-crochet the raised central vein from the stem position toward the highest point.
- Add diagonal branch veins into the major left and right lobes.
- Crochet the long forest-green stem and reinforce it if the heavy yarn allows it to twist.
- Weave all color-change tails through matching sections on the reverse side rather than carrying them across contrasting blocks.
- Wet-block the complete mat, pinning the stem, five main points, secondary points, and valleys individually.
The completed table mat should have five clearly ranked maple lobes, a straight central axis, a long tapered stem, distinct autumn color blocks, deep valleys, and raised veins that visually connect the separate sections.
7 Technical Tips
- Keep the center lobe approximately 10–20% taller than the paired upper side lobes. Five equal-height points turn the maple silhouette into a star.
- Check paired lobe tips before fastening off. A difference greater than about 1 cm is conspicuous on a placemat around 40 cm wide.
- Stop raised branch veins 1–2 cm before the dark perimeter. Running a contrasting vein through the outer border breaks the continuous forest-green outline.
- Use slip stitches at every major valley. Filling a valley with dc or tr stitches rounds the perimeter and visually joins two separate lobes.
- Keep surface slip stitches loose enough to follow the fabric. A tight center vein can shorten a 40 cm leaf by several centimeters and make both halves cup upward.
- Pin each of the five main points separately during blocking. Pinning only the overall width leaves the smaller perimeter points rounded and the valleys too shallow.
- Weave each color-change tail through at least 5 cm of matching fabric. Carrying mustard or orange tails beneath cream sections can remain visible on a reversible table mat.
Choosing Yarn for an Oversized Maple Leaf
Yarn selection controls both scale and stability. A verified large placemat pattern uses super-bulky T-shirt yarn with a 10 mm hook and finishes at roughly 40.6 × 48.3 cm. Another published placemat uses Aran yarn with a 5 mm hook and measures approximately 36.8 × 38.1 cm.
Those dimensions show why hook size alone cannot determine the finished measurement. Fiber thickness, stitch construction, and tension all contribute.
For a substantial centerpiece similar to the reference, select a firm yarn that does not collapse around the pointed edges. Cotton and recycled cotton are practical choices for a table mat.
Make all five colors from the same yarn range. Differences in thickness can cause one color block to expand faster than its neighbors.
Planning the Autumn Color Blocks
Sketch the leaf before starting if the five-color placement matters.
Place cream through the central axis.
Use mustard across a large portion of the left and upper structure.
Reserve burnt orange for one strong right-side region.
Place olive through transitional and lower sections.
Use forest green at multiple outer points, along the perimeter, and through the stem.
The colors should not be divided into five equal wedges. The reference uses irregular botanical sections, which keeps the mat from resembling a geometric pinwheel.
Keeping the Color Changes Clean
Complete the final yarn-over of the stitch before a color change with the new color.
Drop the previous yarn to the wrong side.
Do not carry a dark strand behind a large cream area unless the fabric is thick enough to hide it completely.
For widely separated sections, fasten off and rejoin instead.
After several rows, inspect the reverse side. Long floats can catch on plates, cutlery, or table decorations and should be avoided in a placemat.
Calculating Yarn Requirements
Published maple-leaf placemats demonstrate a wide consumption range. The large super-bulky reference uses approximately 73–120 m, while a smaller worsted cotton placemat uses about 85–91 m.
A five-color reconstruction needs its yarn divided by section rather than equally.
Weigh all five yarn balls before starting.
Complete one leaf, weave in the tails, then weigh each color again.
Record consumption separately for mustard, orange, cream, olive, and forest green.
If making four matching placemats, multiply each measured amount by four and add a small allowance for gauge variation and trimming.
Keeping the Leaf Flat
Place the project on a flat table after every major lobe.
If an outer section ruffles, too much fabric has been added along its perimeter.
If it cups, the outer edge may need more width.
Do not correct a local problem by changing every lobe. Adjust only the affected section.
Surface crochet is another source of distortion. The raised vein must sit on the fabric without contracting it.
After each branch vein, place the leaf flat again and check that the lobe still reaches its original position.
Blocking the Finished Placemat
Dampen the finished leaf according to the yarn’s care instructions.
Place the stem on a straight vertical line.
Pin the highest center point first.
Next pin the two major upper side points at balanced distances from the axis.
Pin the two lower lobes.
Add pins to every secondary point only after the five main lobes are positioned.
Push the valleys inward before pinning them.
Arrange the raised veins with the fingers rather than flattening them beneath pins.
Leave the placemat undisturbed until fully dry.
Using the Finished Maple Leaf
A 35–48 cm leaf works as a centerpiece or oversized individual table mat. Smaller versions can be used beneath serving dishes, pumpkins, candles, or autumn floral arrangements.
For a complete dining set, repeat the same five colors but alter their placement slightly on each leaf. Keep the dark-green perimeter and stem consistent so the collection remains coordinated.
A single oversized leaf can also be displayed on a sideboard or coffee table.
If hot cookware will be placed directly on the mat, choose an appropriate heat-tolerant natural fiber and avoid synthetic fibers that are unsuitable for high temperatures.
Conclusion
The raised vein system is the defining feature of this crochet maple leaf placemat pattern. Build the five unequal lobes first, check the silhouette on a flat surface, and add the cream and colored surface veins only after the background geometry is stable. For your first full-size sample, record the blocked width, height, hook size, and yarn consumption by color before making a coordinated table set. Photograph the finished fall arrangement for Pinterest or Instagram with #AutumnMapleLeafPlacemat. For this particular five-color leaf, would you keep the cream center vein or change it to mustard so the central line blends into the surrounding autumn sections?









