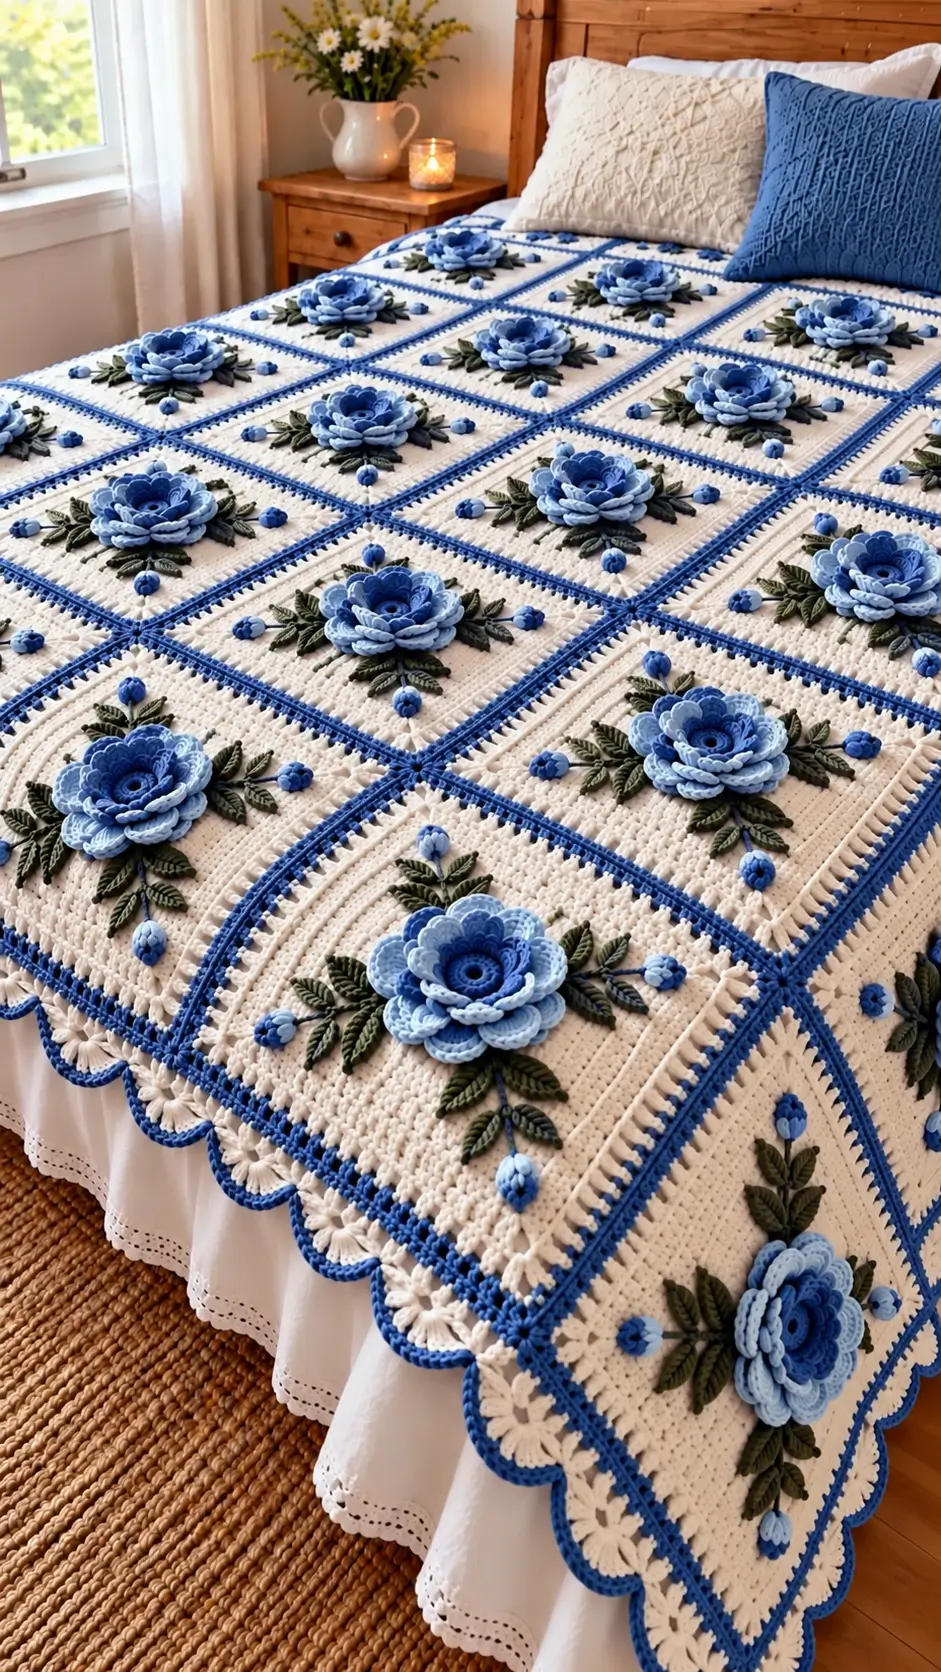
A blue rose this deep cannot be treated like a flat granny-square flower: four overlapping petal tiers have to rise above the cream panel without pulling its corners inward. This 3D rose granny square blanket pattern combines dark and powder-blue petals, olive leaves, small buds, cream backgrounds, blue joins, and a scalloped border. DK or worsted yarn with a 4–5 mm hook provides a practical starting range for this intermediate-to-advanced bedspread.
The Design: What Makes This Rose Blanket Different
The flower occupies only the center of a much larger square. That proportion matters. Keeping the cream background broad gives each dimensional rose physical clearance and prevents neighboring flowers from colliding when the bedspread folds over the mattress edge.
The second decision is layering. Darker blue sits toward the rose center, while powder blue becomes more prominent through the outer petals. Green leaves extend beyond the flower, and four small buds fill otherwise empty sections of the cream panel. The maker therefore sees a complete botanical composition rather than an isolated crochet rose granny square.
A common failure in a 3D crochet flower blanket is enlarging the rose whenever a larger square is required. That creates excessive weight. Expand the cream background instead and keep the rose diameter consistent.
Project Info at a Glance
| Skill Level | Construction | Published Rose-Square References | Hook Reference | Best For |
|---|---|---|---|---|
| Intermediate–advanced | Large joined floral panels | 13–20.3 cm for compact published squares | 4–5 mm | Bedspreads, throws, statement cushions |
Published rose granny squares include a 13 cm version and an approximately 20.3 cm version. The photographed panels appear proportionally larger because several additional cream rounds surround the floral composition. Make one complete sample and measure it after blocking before calculating a bedspread layout.
Materials and Tools
Yarn
- Royal or denim blue DK/worsted yarn — rose center, inner petals, joining lines, and border accents.
- Powder blue DK/worsted yarn — middle and outer rose petals plus flower buds.
- Dark olive-green DK/worsted yarn — leaves and bud bases.
- Medium leaf-green DK/worsted yarn — optional leaf highlights.
- Cream/ivory DK/worsted yarn — large square backgrounds and primary border.
Keep the five yarns within the same weight category. The dimensional flower already adds thickness; using a substantially heavier blue yarn can make the center too bulky for the cream panel.
Tools
- 4–5 mm crochet hook
- Yarn needle
- Locking stitch markers
- Scissors
- Tape measure
- Blocking mats
- Rustproof pins
Abbreviations
- MR — magic ring
- ch — chain
- sl st — slip stitch
- sc — single crochet
- hdc — half double crochet
- dc — double crochet
- tr — treble crochet
- BLO — back loop only
- FLO — front loop only
- sp — space
- st/sts — stitch/stitches
Invisible decreases are useful only if a bud needs tapered shaping; the main rose obtains its depth from separate petal layers rather than decreases.
3D Rose Granny Square Blanket Pattern — Step by Step
Work one complete floral panel before starting blanket production. The reconstruction uses successive petal layers over a stable circular center, then adds leaves, buds, and a large cream square around the finished flower.
Dark-Blue Rose Center
Yarn: royal/dark blue.
Round 1: Make an MR. Work 6 sc into the ring. Join with sl st. (6)
Round 2: Work 2 sc in each stitch around. Join. (12)
Round 3: Work (sc, inc) around. Join. (18)
Do not pull the center into a tight cup. The foundation should remain flat enough to support the raised petals.
First Rose Petal Layer
Work in the front loops of the center structure.
Create six evenly spaced petal bases.
Into each petal position work:
(sc, hdc, 2 dc, hdc, sc).
Anchor between petals with sl st.
Repeat around to make six compact inner petals.
Keep these petals relatively upright. Their purpose is to form the tight center of the rose.
Second Dark-Blue Petal Layer
Work behind the first petal layer.
Create six larger chain spaces, positioning each new petal between two petals from the previous round.
Into each space work:
(sc, hdc, 4 dc, hdc, sc).
Repeat around.
Pull the first layer gently forward so the second tier remains visible.
Third Powder-Blue Petal Layer
Change to powder blue.
Create eight evenly distributed loops behind the dark-blue petals.
Into each loop work:
(sc, hdc, 2 dc, 2 tr, 2 dc, hdc, sc).
Repeat around the flower.
The powder-blue layer should sit lower and spread farther outward than the dark center.
Fourth Outer Petal Layer
Continue with powder blue.
Create eight larger petal spaces behind the third layer.
Into each space work:
(sc, hdc, 3 dc, 3 tr, 3 dc, hdc, sc).
Anchor each petal securely at its base.
Arrange the petals so their outside edges overlap slightly without folding directly on top of one another.
Fasten off.
Outer Rose Definition
If additional definition is needed, join powder blue near the base of an outer petal.
Work loose surface slip stitches around the outer edge of that petal.
Fasten off at its base.
Repeat on the remaining outer petals.
Do not work one continuous tight round around the entire flower because that can pull the petal layer into a bowl.
Large Leaf — Make 4
Yarn: dark olive green.
Ch 10.
Beginning in the second chain from the hook work:
sc, hdc, dc, 3 tr, dc, hdc, sc.
Work 3 sc in the final chain and rotate to the opposite side of the foundation.
Work:
sc, hdc, dc, 3 tr, dc, hdc, sc.
Join at the base.
Surface sl st from the base toward the tip to form the central vein.
Fasten off, leaving approximately 20 cm for sewing.
Small Leaf — Make 4
Ch 7 with olive green.
Beginning in the second chain work:
sc, hdc, 2 dc, hdc, sc.
Work 3 sc in the end chain.
Mirror the sequence down the opposite side.
Surface sl st through the center if a raised vein is wanted.
Leave a sewing tail.
Light-Blue Bud — Make 4
Yarn: powder blue.
Round 1: 6 sc in MR. (6)
Round 2: (sc, inc) ×3. (9)
Round 3: Sc around. (9)
Round 4: (sc, dec) ×3. (6)
Fasten off.
Do not stuff the bud heavily. A flat or very lightly filled bud is more suitable for a bedspread surface.
Green Bud Base — Make 4
With olive green, ch 5.
Work a small pointed leaf using sc, hdc, dc, hdc, sc.
Make a second small leaf from the same base.
Sew the powder-blue bud between the two green points.
Leave a long green tail for attaching the complete bud to the square.
Arranging the Botanical Center
Place the rose in the middle of the future panel.
Position four large leaves diagonally around it.
Add the smaller leaves between those primary leaves.
Place one blue bud toward each major corner direction.
Pin the complete arrangement before sewing anything.
The foliage should extend beyond the rose but remain well inside the future joining edge.
Sew through the leaf centers rather than attaching every outer edge. A partially free leaf edge preserves the dimensional appearance.
Cream Foundation Behind the Flower
Yarn: cream.
The large square can be built separately and the botanical composition sewn onto it, which gives better control over the oversized panel.
Round 1: Make an MR. Ch 3 and work 11 dc into the ring. Join. (12)
Round 2: Work 2 dc in each stitch. Join. (24)
Round 3: Work (dc, 2 dc in next stitch) around. Join. (36)
Round 4: Work (dc in next 2 stitches, 2 dc in next stitch) around. Join. (48)
The circular center provides a flat foundation behind the rose.
Turning the Cream Circle into a Square
Mark four evenly distributed corner positions.
Work progressively taller stitches as each corner approaches.
At every corner work:
(2 dc, ch 2, 2 dc).
Return to shorter stitches after the corner.
Repeat on all four sides.
Join and inspect the shape.
The square should lie flat before any extension rounds are added.
Cream Extension Round 1
Ch 3.
Dc across each side.
At every corner ch-2 space work:
(2 dc, ch 2, 2 dc).
Join.
Cream Extension Round 2
Work one dc in each stitch across the sides.
Create occasional ch-1 spaces near the outer portion if a lighter background matching the photograph is wanted.
At each corner work:
(2 dc, ch 2, 2 dc).
Join.
Cream Extension Round 3
Repeat the established square expansion.
Check all four side measurements after the round.
The panel must remain square before the decorative inner frame is added.
Raised Cream Frame Detail
The reference panels show narrow raised lines running parallel to the outer edges.
Join cream to a suitable horizontal loop one or two rounds inside the perimeter.
Work surface slip stitches along the first side.
Turn the corner cleanly and continue around the remaining sides.
Make a second raised line farther inward if desired.
Keep the surface stitches loose enough that the square remains flat.
Blue Panel Edging
Yarn: royal blue.
Join blue at one corner.
Work sc evenly across each cream side.
At every corner work:
(sc, ch 2, sc).
Join and fasten off.
This blue round creates the strong grid visible between the cream floral panels.
Attaching the Rose Composition
Center the completed rose over the cream panel.
Pin it through the innermost petal foundation rather than through the outer petals.
Sew the rose base securely to the cream fabric.
Leave the upper portions of the petals free.
Arrange the large leaves around the rose and sew along their central veins.
Add the smaller leaves.
Finally attach the four buds, keeping their flower heads free enough to remain raised.
Planning the Bedspread Layout
Measure one blocked panel before deciding how many motifs to make.
The photograph uses large squares, so fewer motifs are required than for a conventional 10–15 cm granny-square blanket.
Suppose a finished panel measures 24 cm.
Six panels across produce approximately 144 cm before joining and border adjustments.
Seven panels produce approximately 168 cm.
Eight panels produce approximately 192 cm.
Measure the mattress plus the desired side drops and select the closest complete motif count.
Resize the blanket by changing the number of panels rather than altering the rose itself.
Joining the Floral Panels
Arrange all blocked panels on a flat surface.
Rotate every motif so its foliage and buds follow the same orientation.
Using royal blue, join corresponding outer stitches with a flat slip-stitch join.
Keep the blue join visible from the right side.
Join panels into horizontal strips first.
Next join the strips vertically.
At four-square intersections, pass through the corner spaces without creating a thick knot.
The completed grid should form narrow blue lines around every cream panel.
Outer Cream Border
Join cream to one blanket corner.
Border Round 1: Sc evenly around the complete blanket.
Work 3 sc at every outer corner.
Border Round 2: Work hdc around, increasing at the corners.
Border Round 3: Create evenly spaced ch-2 openings around the perimeter.
These spaces become the foundations for the decorative scallops.
Large Cream-and-Blue Scalloped Border
Join cream into the first border space.
Work:
(sc, hdc, 5 dc, hdc, sc) into the space.
Move to the next designated space and repeat.
Continue around the blanket.
At the four corners, use a larger shell or two adjacent shells so the border can turn without cupping.
Join royal blue at the edge of the first cream scallop.
Work sc around the outside of each shell.
At the center of each scallop, work:
(sc, ch 1, sc).
Continue around the entire perimeter.
Fasten off.
Assembly
- Make one complete layered blue rose and check that all petal tiers remain distinct.
- Crochet four large leaves, four small leaves, and four light-blue buds for the botanical arrangement.
- Make and block one oversized cream panel before calculating the number required for the bedspread.
- Attach the rose at the center, followed by the large leaves, smaller foliage, and four buds.
- Repeat the complete panel, comparing each finished block against the master measurement.
- Block all panels individually while keeping the raised roses free from blocking pins.
- Arrange the squares in the final bedspread grid and join horizontal strips with royal-blue yarn.
- Join the strips vertically, matching all blue corner intersections.
- Work the cream outer border and finish it with large scallops edged in royal blue.
- Weave every remaining tail into matching-color dense stitches and complete a light final blocking of the cream background and border.
The completed bedspread should show centered layered roses, balanced foliage, four small buds per floral composition, flat cream panels, narrow blue grid lines, and an evenly distributed scalloped perimeter.
7 Technical Tips
- Keep every rose at least 2–3 cm inside the joining edge. Petals extending into the seam zone become compressed when neighboring panels are joined.
- Compare each blocked panel to the master within approximately 5 mm. A 5 mm difference repeated across eight panels creates a 4 cm discrepancy before the border is added.
- Do not block through the raised petals. Pin the cream background around the flower because direct pressure flattens the outer powder-blue petal tier.
- Stop leaf tips at least 1 cm from the blue joining round. A leaf caught in the seam pulls the botanical arrangement off center.
- Keep surface-crocheted frame lines loose. Tight slip stitches shorten the cream panel and cause the corners to curl upward.
- Test five border scallops before continuing around the bedspread. Ruffling indicates excessive shells; an inward-curving edge indicates insufficient spacing.
- Weave structural tails through at least 5 cm of dense fabric. Rose and leaf attachment tails shorter than this can loosen under the repeated flexing of a bedspread.
Controlling the Four Rose Layers
The flower needs visible depth without becoming a rigid mound. The inner dark-blue petals should stand highest and remain relatively compact. Each subsequent tier increases in width and sits lower.
Pull the first tier forward after completing the second. Repeat after every new layer.
Do not steam-press the rose.
If the outer petals curl excessively, first check the number of stitches worked into each petal base. Excess fabric in a confined chain space creates ruffling that cannot be corrected by flattening the complete flower.
The powder-blue outer petals should overlap slightly while retaining separate rounded edges.
Keeping the Rose Centered
Mark the horizontal and vertical center lines of the cream panel before sewing on the flower.
Place the rose directly over their intersection.
Measure from the flower center to all four blue edges.
After positioning the large leaves, repeat the measurement because foliage can make an accurately centered rose appear visually displaced.
Pin the four buds last. Their positions should balance the empty cream areas without forming another rigid square around the rose.
Estimating Yarn for a Bedspread
A documented 8-inch rose granny square uses approximately 75 yards of yarn for its rose and about 30 yards for the background, but the photographed design has a much larger cream field, additional foliage, buds, seams, and border.
Do not multiply those published figures directly to purchase yarn for this reconstruction.
Instead, weigh each yarn ball before making the first complete panel.
Finish the rose, leaves, buds, cream background, and blue edge. Weave in the ends.
Weigh the remaining yarn by color.
Record consumption for royal blue, powder blue, green, and cream separately.
Multiply each result by the planned number of panels, then add yarn for the joins and outer border.
Choosing Yarn and Hook Size
Current 3D rose-square patterns provide useful material benchmarks. Published designs use Cotton 8/8 with a 4 mm hook, DK with a 4 mm hook, Cotton 8/8 with a 4.5 mm hook, and Aran yarn with a 5 mm hook.
For a bedspread, the sample needs enough density to support the rose without producing an excessively heavy background.
DK cotton or a cotton-acrylic blend gives crisp leaves and petals while reducing some of the weight associated with a large Aran blanket.
Worsted acrylic is another practical option when a lighter fiber is preferred.
Use one hook for the complete panel unless the dimensional rose becomes noticeably looser than the background.
Blocking the Oversized Floral Panels
Block each cream panel before joining the blanket.
Pin the four corners first and measure the sides.
Measure both diagonals next.
Add pins along the cream edges until the panel forms an accurate square.
Keep pins away from the blue rose and raised leaves.
Shape the foliage with the fingers while the cream background is damp.
Once dry, remove the pins and compare the panel to the master sample.
After joining, block the blue seams and outer scalloped border lightly without compressing the flowers.
Making a Matching Cushion
One oversized floral panel can become the front of a statement cushion.
If the blocked square is smaller than the selected cushion insert, add cream extension rounds before working the royal-blue edge.
For the back, make two overlapping cream crochet panels to form an envelope closure.
Join the front and back through the royal-blue perimeter.
Keep the dimensional rose only on the front.
A bed pillow used for sleeping should not have the large raised flower on its contact surface, but a decorative cushion can repeat the complete botanical composition.
Conclusion
The oversized cream panel is what makes this 3D rose granny square blanket pattern practical at bedspread scale. Keep the layered blue rose consistent, place the foliage well inside the joining edge, and expand the background rather than enlarging every petal. Make one finished panel next, block it, record its dimensions and weigh each yarn color before calculating the full blanket quantity. Once assembled, photograph the raised roses from an angle that shows all four petal tiers and share the result on Pinterest or Instagram with #BlueRoseCrochetBedspread. For this specific design, would you keep the dark-blue center with powder-blue outer petals, or reverse those two shades?









