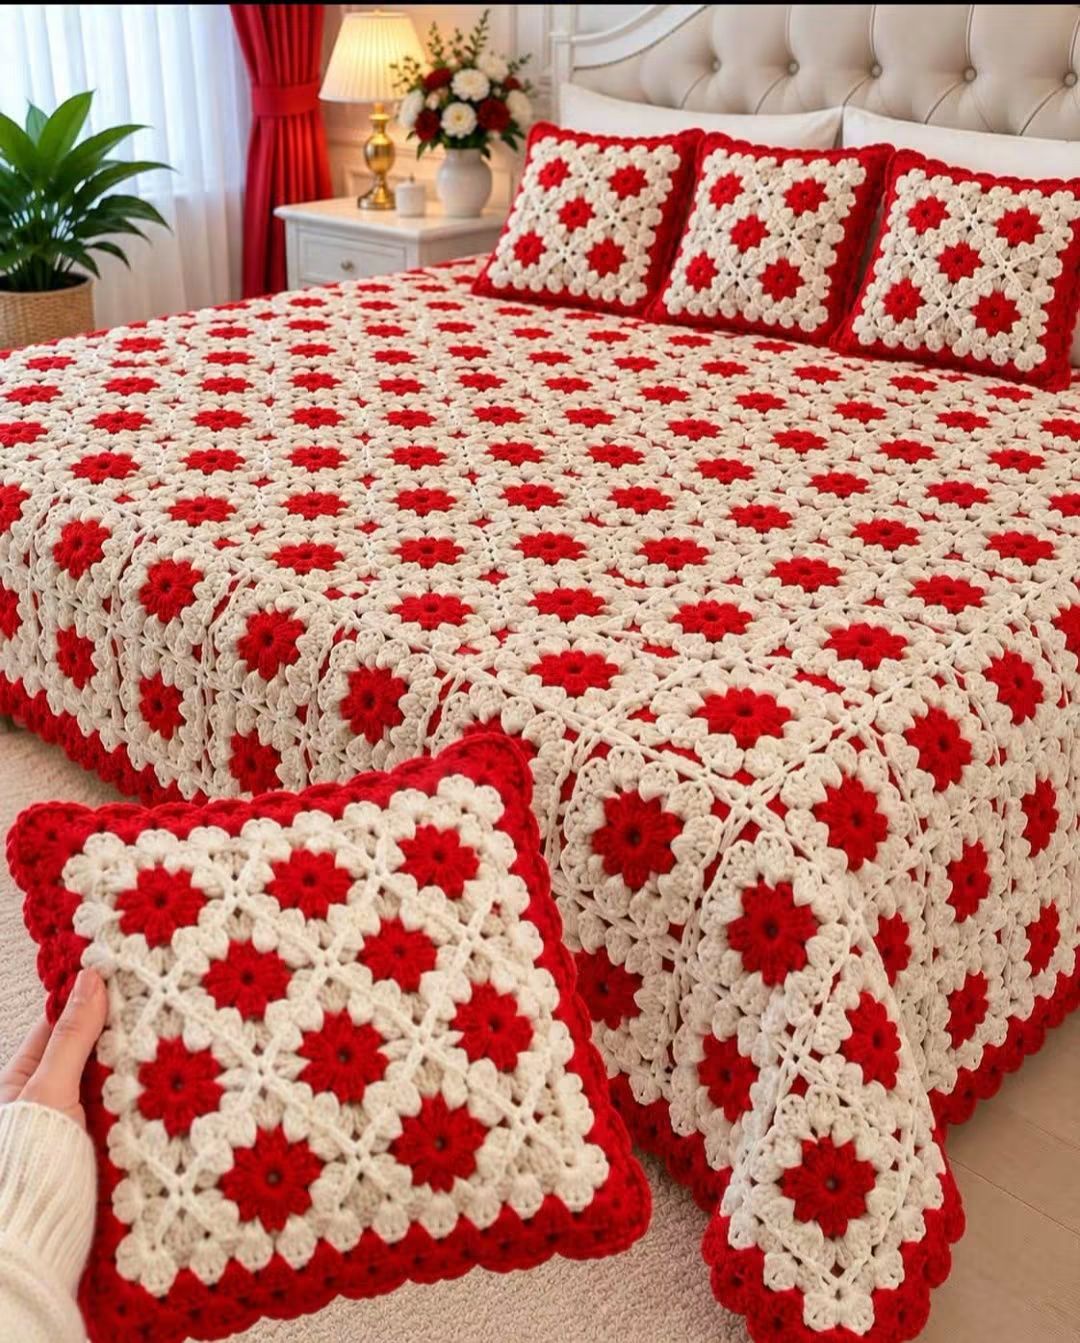
Nine red flowers fit across the foreground cushion, but the bedspread repeats the same geometry dozens of times without letting the cream lattice lose alignment. This red flower granny square blanket pattern uses compact red centers, cream cluster rounds, open corners, invisible-looking cream joins, and a red scalloped finish. Choose DK or worsted yarn with a matching hook. The modular construction works for bedspreads, throws, and coordinated cushion covers.
The Design: What Makes This Flower Blanket Different
The red flower is intentionally compact. Most of each block remains cream, so the finished bedspread reads as a light-colored grid punctuated by evenly spaced red flowers rather than a dense field of color. Open spaces around the floral center also reduce weight across a bed-size project.
The second structural decision is the joining system. Cream edges meet cream edges, allowing the seams to disappear into the background while the red centers remain isolated. The cushions reverse that balance at the perimeter by adding a strong red frame.
A common mistake with a crochet flower granny square is changing gauge halfway through production. A difference of only 5 mm per motif becomes several centimeters across a large floral granny square blanket. Make one blocked master square and compare later motifs against it.
Project Info at a Glance
| Skill Level | Construction | Published Square Range | Hook Reference | Best For |
|---|---|---|---|---|
| Advanced beginner/intermediate | Joined individual motifs | Approx. 9.5–16 cm | 3–6 mm depending on yarn | Bedspreads, throws, cushions |
A useful published reference is a 14 × 14 cm flower granny square made with #3 light yarn and a 3.5 mm hook. Current patterns also range from approximately 9.5 cm to 16 cm, so the final dimensions must be calculated from the blocked motif rather than from the photograph.
Materials and Tools
Yarn
- Bright red DK or worsted yarn — flower centers, cushion frames, and outer blanket accent.
- Cream or warm ivory DK or worsted yarn — flower surroundings, square backgrounds, joins, and primary blanket fabric.
Use yarns from the same weight category. Mixing a heavy red yarn with a noticeably lighter cream yarn changes the flower diameter and can make the center buckle.
Tools
- 3.5–5 mm crochet hook for common DK/worsted versions
- Yarn needle
- Locking stitch markers
- Scissors
- Tape measure
- Blocking mats
- Rustproof pins
Abbreviations
- MR — magic ring
- ch — chain
- sl st — slip stitch
- sc — single crochet
- hdc — half double crochet
- dc — double crochet
- sp — space
- st/sts — stitch/stitches
- RS — right side
- WS — wrong side
An invisible decrease is not required for this flat motif because the flower and square are shaped with cluster placement, chain spaces, and four corner increases.
Red Flower Granny Square Blanket Pattern
Make one complete test square first. Block it to the dimensions you want, then record the hook size, yarn, final width, and weight. Use that motif as the master square for the complete project.
Red Flower Center
Yarn: bright red.
Round 1: Make an MR. Ch 3, then work 11 dc into the ring. Join with sl st to the top of the beginning ch-3. (12 dc)
Pull the magic ring firmly closed.
Round 2: Ch 1. Work one compact petal group around each pair of stitches.
For each petal group, work:
(hdc, 2 dc, hdc) into the designated stitch space, then sl st at the next anchor.
Repeat evenly around the center to create six small rounded flower sections.
Join and fasten off red.
The flower should remain relatively flat. Large three-dimensional petals would change the appearance of the photographed bedspread.
Cream Transition Round
Yarn: cream.
Join cream behind one red petal.
Round 3: Ch 3.
Work groups of 3 dc into the spaces between red flower sections.
Separate neighboring groups with ch 1.
Continue around the complete flower and join with sl st.
The cream round should surround the red flower without covering its outer edge.
Establishing Four Corners
Round 4: Sl st to the next ch-1 space.
Ch 3 and work 2 dc in the same space.
Continue with 3-dc groups around the motif.
At four evenly distributed positions work:
(3 dc, ch 2, 3 dc).
These four ch-2 spaces become the square corners.
Join with sl st.
Lay the motif flat and confirm that the red flower remains centered between the four corners.
Openwork Cream Round
Round 5: Ch 3.
Work 3 dc into each side space, separating selected groups with ch 1.
At every corner work:
(3 dc, ch 2, 3 dc).
Continue around all four sides.
Join with sl st.
The chain spaces create the light lattice effect visible throughout the bedspread.
Second Cream Expansion Round
Round 6: Sl st to the first working space.
Ch 3 and work the established 3-dc groups across the side.
Work one group into each appropriate space.
At each corner work:
(3 dc, ch 2, 3 dc).
Join at the end of the round.
Check the square on a flat surface before continuing.
Decorative Cream Cluster Round
The photographed motifs have small rounded cream details around their outer sections.
Round 7: Ch 1.
In selected spaces work a compact cluster:
(sc, 3 dc, sc).
Move to the next space with a sl st or short chain according to the spacing required.
Keep all four corners open enough for the final square round.
Continue around the motif.
Final Square Edge
Round 8: Work sc or hdc evenly around the complete motif.
At every corner ch-2 space work:
(2 hdc, ch 2, 2 hdc).
Join with sl st.
Fasten off, leaving a tail long enough to weave securely through the cream stitches.
Measure the square after blocking rather than immediately after fastening off.
Blocking the Master Square
Dampen the first completed motif according to the yarn’s care instructions.
Pin the four corners first.
Measure the top, bottom, left, and right edges.
Next measure both diagonals.
If the sides match but the diagonals differ substantially, the motif is skewed.
Adjust the pins until the four corners sit at approximately 90 degrees.
Arrange the red flower in the center without stretching it.
Allow the square to dry completely before recording its final dimensions.
Making the Blanket Motifs
Use the blocked master square as a physical gauge template.
Complete the remaining red centers in batches if that working method helps maintain tension. Follow with the cream rounds, but finish each motif completely before adding it to the blanket layout.
Check every fifth square against the master.
If a motif is more than approximately 5 mm larger or smaller, identify the cause before making another batch.
Common causes include changing hook position, substituting yarn, adding an extra chain between clusters, or working the cream rounds at a looser tension.
Planning the Bedspread Layout
The photographed blanket uses a regular grid with flowers aligned horizontally and vertically.
Measure the bed at the intended finished coverage.
Include the mattress top plus any desired drop over the sides and foot.
Next measure one blocked square.
For example, if a motif finishes at 14 cm and the desired width is approximately 196 cm, fourteen motif positions provide about 196 cm before accounting for the exact joining method and border.
Do the same calculation for the length.
Do not purchase yarn based only on this first calculation. Make and join a three-square test strip first because seams can alter the effective measurement.
Joining the Squares
Yarn: cream.
Arrange all motifs with the right sides facing upward.
Check that every red flower is oriented consistently.
Place the first two squares side by side.
Join corresponding cream edge stitches with mattress stitch, slip stitch, or a flat crochet join.
Keep the joining tension equal to the motif edges.
Continue until one complete horizontal strip is assembled.
Make the remaining strips in the same manner.
Join the horizontal strips together, matching every four-square intersection carefully.
The finished seams should remain visually subordinate to the repeated red flowers.
Preserving the Openwork Intersections
The reference blanket shows small openings where the cream square structures meet.
Do not fill every corner with a dense seam.
Anchor the surrounding stitches while preserving the central opening where possible.
After joining four neighboring motifs, place the section flat.
The opening should remain centered and approximately symmetrical.
If one junction is much larger than the others, add a concealed cream stitch behind it.
Avoid pulling the four corners tightly into a knot because that produces visible bumps across the bedspread.
Blanket Foundation Border
Once all motifs are joined, attach cream yarn at one outer corner.
Border Round 1: Sc evenly around the complete bedspread.
At each outer corner work 3 sc.
Where motif seams meet the perimeter, work through stable edge stitches rather than large chain spaces.
Border Round 2: Work hdc around, placing 3 hdc at each corner.
Fasten off cream if a red final border is desired.
Red Scalloped Blanket Border
Yarn: bright red.
Join red at one corner.
Ch 1.
Skip the required number of stitches for the selected gauge, then work:
5 dc in one stitch, skip the next spacing section, sl st in the following stitch.
Repeat around the perimeter.
At each corner, increase the shell size or place two shells around the turn so the border remains flat.
Do not force the same repeat count onto every side if it creates ruffling.
Join and fasten off.
Matching 3 × 3 Cushion Front
The foreground cushion clearly uses nine motifs arranged in three rows of three.
Make nine squares using the same yarn, hook, and blocked dimensions as the blanket motifs.
Arrange them in a 3 × 3 grid.
Join three squares to create Row 1.
Repeat for Rows 2 and 3.
Join the three rows with cream yarn.
Block the completed nine-square panel before adding its red frame.
Red Cushion Frame
Join red yarn at one corner of the nine-square panel.
Frame Round 1: Sc evenly around, working 3 sc at each corner.
Frame Round 2: Hdc around, increasing at each corner.
Frame Round 3: Work scallops using groups of 5 dc separated by slip stitches.
The photograph shows a substantial red perimeter, so additional red rounds can be added before the scallops if the cushion front needs more width.
Measure after each round rather than adding border rounds automatically.
Cushion Back
A practical removable cover can use two overlapping crochet panels.
Measure the finished front after blocking.
Crochet two red or cream rectangles that together cover the reverse side with approximately 8–12 cm of overlap.
Place the cushion front right side down.
Position both back panels over it.
Join through the front and back edges around all four sides.
Turn the cover right side out and insert the cushion form.
The envelope overlap should lie flat without exposing the insert.
Assembly
- Make one complete red-and-cream flower square and block it to establish the master dimensions.
- Produce the remaining motifs, comparing every fifth square with the blocked master.
- Block all blanket squares to matching dimensions before any large-scale joining begins.
- Arrange the motifs in a regular grid with the red flowers aligned horizontally and vertically.
- Join squares into horizontal strips with cream yarn, keeping the seams flat.
- Join the strips and preserve the small openwork intersections between neighboring motifs.
- Work the cream foundation border around the assembled bedspread.
- Add the red scalloped outer edge, adjusting shell spacing at each corner.
- Join nine matching motifs in a 3 × 3 arrangement for each cushion front and add the red frame.
- Weave all yarn tails through dense matching-color stitches and complete a light final blocking.
The finished set should show evenly spaced red flowers, a consistent cream lattice, flat motif joins, matching openwork intersections, and a continuous red scalloped finish.
7 Technical Tips
- Compare every fifth motif with the blocked master. A 5 mm error repeated across fourteen squares changes the blanket width by approximately 7 cm.
- Keep the red flower centered before establishing the four cream corners. A flower displaced by one cluster makes the completed square appear crooked even when all four sides measure correctly.
- Measure both diagonals during blocking. If a 14 cm square has diagonals differing by more than roughly 5 mm, correct the skew before joining.
- Do not tighten the cream joining seam. A seam shorter than the motif edge produces channels across the bedspread and prevents it from lying flat.
- Keep four-square intersections open rather than knotting them tightly. Dense corner joins create hard bumps exactly where the photograph shows small decorative spaces.
- Test the red scallop repeat across one complete side before finishing the border. Too many shells create ruffles; too few shells pull the edge inward.
- Weave every yarn tail through at least 4–5 cm of dense matching stitches. Red tails carried into open cream spaces remain visible from the front and can distort the lattice.
Calculating How Many Squares You Need
The number of motifs depends on the blocked square size and required bed coverage.
Measure the mattress first. Add the desired drop on both sides, then add any extra length required at the foot.
Suppose the desired finished width is 210 cm and one joined motif contributes 14 cm.
Divide 210 by 14. The result is 15 motif positions across.
Repeat the calculation for the required length.
Remember that the border adds several additional centimeters. If the motif grid already reaches the full target measurement, the finished blanket may become wider than planned after edging.
Estimating Yarn Consumption
Do not estimate a bedspread from the weight of an unrelated flower-square pattern.
Instead, make five complete motifs with the exact yarn and hook planned for the project.
Weigh the red and cream yarn before starting.
After five motifs are finished, weigh both yarns again.
Divide each quantity used by five to calculate average consumption per square.
Multiply those averages by the total motif count.
Add cream for all joining seams and foundation border rounds.
Add a separate red allowance for the outer scallops and cushion frames.
This method also accounts for the particular tension and flower size of the reconstruction.
Choosing DK or Worsted Yarn
Current flower granny-square patterns support a broad yarn range. A published 12 cm example uses sport yarn and a 3 mm hook, while current DK designs use hooks around 4.5 mm. Aran examples use approximately 5–6 mm hooks.
DK yarn makes a lighter bedspread and produces more compact motifs. Worsted or Aran yarn increases the scale and reduces the number of blocks required for the same coverage, but the finished blanket becomes heavier.
For a large bedspread, make a full sample square in each candidate yarn before purchasing the project quantity.
Compare weight as well as width. A small increase in grams per square becomes substantial when repeated across more than one hundred motifs.
Keeping Every Flower the Same Size
The red flower determines the visual rhythm of the complete bedspread.
Count the center stitches every time rather than working the ring by eye.
Keep the same number of petals and the same stitch sequence in each petal.
When joining cream, place the first cream group at the same point relative to the red flower on every motif.
Stack finished flowers over the master sample periodically.
A slight variation in the cream square can be corrected during blocking, but a visibly larger red center remains obvious after assembly.
Blocking a Large Modular Blanket
Block individual squares before joining rather than relying entirely on a final blanket blocking.
Once assembled, place the blanket flat and inspect the seams.
Dampen only the areas that require correction if full wet blocking is impractical.
Align the outer edges with a tape measure and check that the corners remain square.
Arrange the red scallops while damp so every shell projects outward instead of folding beneath the blanket.
Allow the bedspread to dry flat before folding or placing it on the bed.
Coordinating the Blanket and Cushions
The strongest connection between the pieces is repetition. Use exactly the same flower motif for the bedspread and cushion fronts.
The foreground cushion demonstrates a useful 3 × 3 arrangement. Larger pillow inserts can use more motifs or a wider red frame rather than altering the dimensions of the individual square.
Keep the red border treatment consistent across every cushion.
If three cushions are displayed together, matching motif size matters more than making every pillow border the same number of rounds. Adjust the red frame to fit the selected insert while preserving the scalloped outer edge.
Conclusion
Square consistency determines the finish of this red flower granny square blanket pattern. Make one master motif, block it, and record its dimensions before producing the bedspread in batches. Keep the red flowers centered, preserve the cream openwork at four-square intersections, and test the scalloped border repeat before working around the full perimeter. For the cushions, join nine matching motifs into the visible 3 × 3 layout and adjust the red frame to the insert size. Share the finished set on Pinterest or Instagram with #RedFlowerGrannyBedspread. For this exact design, would you keep every flower red or add a few reversed cream flowers with red backgrounds?









