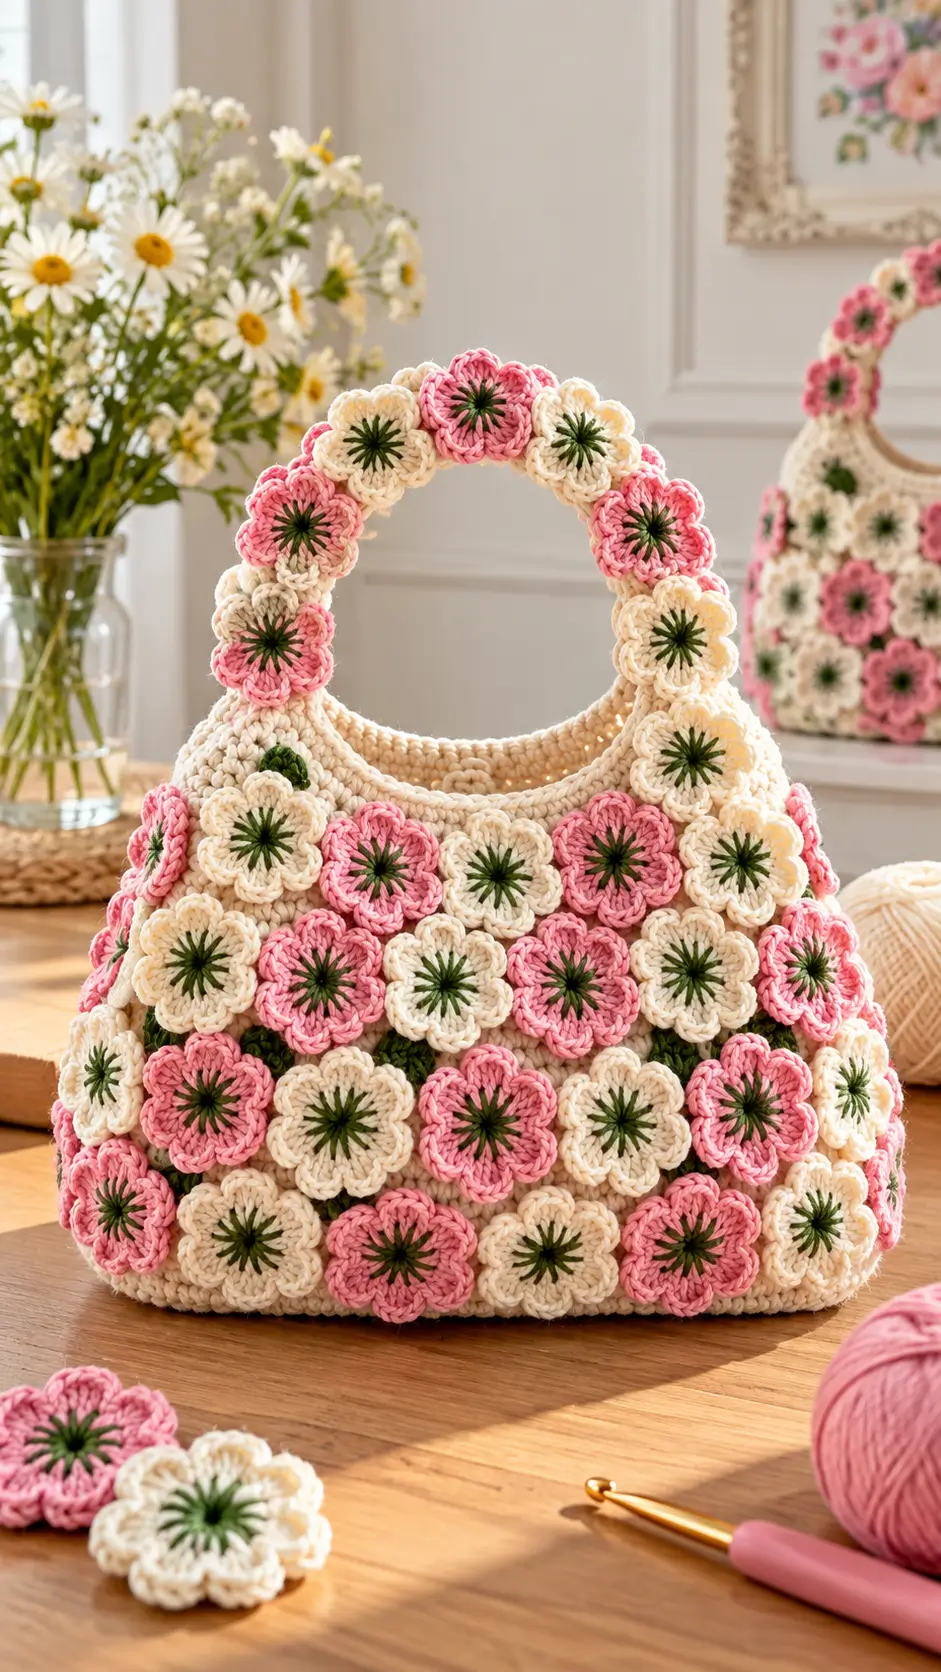
Thirty-plus five-petal flowers turn this handbag’s front panel into a structural surface rather than a single decorative motif. This crochet flower bag pattern uses DK cotton, a 3.5 mm hook, a solid cream base and layered pink-and-cream appliqués. Plan for a body near 26 cm wide and an intermediate skill level. The dense fabric makes the design practical when a lightweight, non-mesh handbag is required.
The Design: What Makes This Flower Bag Different
The photographed bag depends on three structural decisions. First, a solid cream body sits behind the flowers; the motifs are decoration rather than the load-bearing wall. That prevents keys and small objects from escaping through motif gaps. Second, the handle rises directly from the upper body and is worked as a substantial band. Its width spreads carrying force across the opening instead of concentrating it at two thin attachment points.
Finally, the five-petal crochet flowers overlap. That overlap hides much of the underlying fabric and produces the unusually dense surface seen in the reference image. The floral crochet handbag therefore requires more motifs than a conventional granny-square tote.
A frequent mistake is spacing the flowers before the bag is blocked to its final dimensions. The gaps become larger after the body expands. Pin the complete arrangement on the finished shell first.
Project Info at a Glance
| Skill Level | Time | Finished Size | Hook | Best For |
|---|---|---|---|---|
| Intermediate | 12–18 hours | Approx. 26 × 26 cm body | 3.5 mm | Structured handbag / floral accessory |
The 26 cm dimension and 3.5 mm hook are based on comparable DK flower-handbag specifications. Exact dimensions of the photographed bag may vary according to yarn, tension and blocking.
Materials and Tools
Yarn
- Cream — DK cotton — approximately 220–250 g — choose a firm, tightly spun cotton.
- Pink — DK cotton — approximately 70–100 g — use the same yarn line as the cream yarn.
- Dark olive green — DK cotton — approximately 15–25 g — for flower centers and small leaf accents.
A dense appliqué bag consumes substantially more yarn than its dimensions suggest. Buy a little extra cream yarn when possible because the main shell, handle and part of the flower arrangement all use this color.
Tools
- 3.5 mm crochet hook
- Yarn needle
- Locking stitch markers
- Sharp scissors
- Pins or removable clips
- Optional cotton lining fabric
- Optional magnetic snap
- Optional plastic canvas for the base
Abbreviations
- MR — magic ring
- sc — single crochet
- inc — 2 sc in one stitch
- dec — single crochet decrease
- sl st — slip stitch
- ch — chain
- hdc — half double crochet
- dc — double crochet
- tr — treble crochet
- BLO — back loop only
- FO — fasten off
For an invisible decrease, insert the hook through the front loops of the next two stitches, yarn over, draw through both front loops, then complete the single crochet.
Crochet Flower Bag Pattern — Step by Step
The bag begins with an oval base. Its solid walls rise from the base before the handle and individual flowers are added.
Bag Base
Yarn: cream.
Ch 37.
R1: Starting in second ch from hook, 35 sc, 3 sc in final ch. Work along the opposite side of the foundation chain: 34 sc, 2 sc in final chain (74).
R2: inc, 34 sc, inc ×3, 34 sc, inc ×2 (80).
R3: (sc, inc), 34 sc, (sc, inc) ×3, 34 sc, (sc, inc) ×2 (86).
R4: (2 sc, inc), 34 sc, (2 sc, inc) ×3, 34 sc, (2 sc, inc) ×2 (92).
R5: sc evenly around in BLO (92).
R6: sc around (92).
Do not cut the yarn. Continue directly into the body.
Bag Body
Yarn: cream.
R7: sc around (92).
R8: sc around (92).
R9: sc around (92).
R10: sc around (92).
R11: sc around (92).
R12: sc around (92).
R13: sc around (92).
R14: sc around (92).
R15: sc around (92).
R16: sc around (92).
R17: sc around (92).
R18: sc around (92).
R19: sc around (92).
R20: sc around (92).
R21: sc around (92).
R22: sc around (92).
R23: sc around (92).
R24: sc around (92).
R25: sc around (92).
R26: sc around (92).
Flatten the bag and mark the approximate side folds. Check that the opening sits level before beginning the handle transition.
Upper Edge and Integrated Handle
Yarn: cream.
R27: sc around (92).
R28: sc around (92).
Flatten the opening. Mark a centered span of approximately 30 stitches on the front and a matching span on the back. The remaining stitches form the shoulder areas beside the handle opening.
For each handle side, work upward in rows.
Row 1: 12 sc, ch 1, turn (12).
Rows 2–18: 12 sc, ch 1, turn (12).
Row 19: dec, 8 sc, dec, ch 1, turn (10).
Rows 20–30: 10 sc, ch 1, turn (10).
Make four uprights in total: two on the front and two on the back. Join the corresponding upper ends across the top with approximately 20–24 chains, or enough chains to form a comfortable arch.
Work 4–6 rows of sc around each handle arch until the band measures approximately 3–4 cm wide.
Join the front and back handle bands together where extra rigidity is required.
Fasten off. Weave the yarn tail through at least 4 cm of dense crochet fabric.
Five-Petal Cream Flowers
Make approximately 18–22. Yarn: cream with dark olive-green centers.
A finished flower diameter of approximately 4.5–5.5 cm works well for this bag size.
R1: With dark olive green, 6 sc in MR (6).
R2: inc ×6 (12). Sl st to first stitch.
Change to cream.
R3: Form five evenly spaced petals around the center using ch 2, dc groups and sl st anchors.
R4: Work around each petal with sl st, sc, hdc, 2 dc, hdc, sc, sl st.
Fasten off. Leave a 20 cm tail for sewing.
Five-Petal Pink Flowers
Make approximately 18–22. Yarn: pink with dark olive-green centers.
R1: With dark olive green, 6 sc in MR (6).
R2: inc ×6 (12).
Change to pink.
R3: Form five evenly spaced petals with ch-2 and dc groups.
R4: Edge each petal with sl st, sc, hdc, 2 dc, hdc, sc, sl st.
Fasten off. Leave a 20 cm sewing tail.
Alternate pink and cream without creating a strict checkerboard. The photographed bag uses controlled irregularity, with occasional clusters of the same color.
Dark-Green Starburst Centers
Make one for every flower.
Thread approximately 45 cm of dark olive-green yarn onto a yarn needle.
Bring the yarn from the back to the outer edge of the center ring. Pass it toward the middle, return to the outer edge approximately one stitch away, and repeat until 8–12 radial spokes surround the center.
Keep the tension controlled. Pulling these stitches too tightly will cup the flower.
Knot on the reverse and weave the tails under the center stitches where they will be hidden against the handbag.
Handle Flowers
Make approximately 9–12 total using a mixture of cream and pink.
Use the same flower instructions rather than reducing the motif diameter. Full-size flowers create the continuous floral arch visible in the design.
Position one flower at the top center of the handle first. Add the remaining motifs down both sides, checking the spacing after every two or three flowers.
Leave 20 cm tails on the handle motifs. These flowers experience more movement than those attached to the body.
Optional Green Leaves
Make 3–5 if additional green accents are required.
Ch 7.
Row 1: sl st in second ch, sc, hdc, dc, hdc, 3 sc in final ch. Rotate to work down the opposite side: hdc, dc, hdc, sc, sl st.
Fasten off with a 15 cm tail.
Position the leaves behind flowers rather than over the petals. Green should remain a secondary accent.
Optional Fabric Lining
A fabric lining reduces stretching when the bag carries heavier objects.
Measure the blocked bag from side to side and from the opening to the base. Cut two fabric panels with approximately 1.5 cm seam allowance around the edges.
Sew the panels together along the sides and bottom. Fold the upper allowance toward the wrong side and hand-sew the lining approximately 5–8 mm below the crochet opening.
If using a magnetic snap, install it in the lining before sewing the lining into the handbag.
Assembly
- Block the bag body first. Align the base and upper opening and allow the shell to reach its final dimensions before arranging the flowers.
- Stabilize the handle. Complete all handle seams and compare both sides. A difference greater than 5 mm can make the arch visibly uneven.
- Prepare every flower. Weave the center tails, complete the green starburst details and block the motifs to approximately equal diameters.
- Place the center flowers. Begin near the visual center of the front panel and work outward. Allow neighboring petals to overlap by approximately 5–10 mm.
- Fill the front panel. Alternate pink and cream irregularly. Avoid creating long uninterrupted rows of one color.
- Cover the side transitions. Allow several flowers to wrap slightly around each side rather than ending the decoration at a vertical line.
- Decorate the handle. Pin the top-center motif first, then distribute flowers down both sides. Keep enough of the inner opening exposed for comfortable carrying.
- Sew the flowers securely. Attach each motif through its center and selected petal tips. Leaving parts of the petals unattached maintains their dimensional appearance.
- Add leaves and lining. Position optional leaves behind the flowers. Attach the lining below the upper crochet edge.
- Weave every remaining tail. Pass load-bearing tails in more than one direction through dense stitches before trimming them.
The completed handbag should have a stable cream shell beneath a dense surface of raised pink and cream flowers.
7 Technical Tips for a Better Crochet Flower Bag
- Control marker drift. Place a locking marker in the first stitch of every oval-body round. Losing the starting point by two stitches can shift the curved ends and twist the upper opening.
- Check body stretch before flower placement. Fill the handbag temporarily with folded fabric before pinning the motifs. Otherwise, expansion can expose gaps of 1–2 cm between flowers.
- Keep decreases flat. Use an invisible decrease when shaping the handle. A conventional decrease can create a raised bump along the inner edge.
- Watch the flower centers. The embroidered green spokes should be firm without contracting the motif. Loosen them if the flower center shrinks by more than approximately 3 mm.
- Measure handle tension. Compare both handle sides after every five rows. A one-row difference can move the top of the arch away from the centerline.
- Pin before sewing. Arrange at least one complete row of flowers before permanently attaching the first motif. A repeated 5 mm spacing error across six flowers creates roughly 3 cm of displacement.
- Secure the sewing tails. Leave approximately 20 cm for attaching each flower and weave the finished tail in two directions. Short tails hidden in a single stitch channel can work loose when the bag flexes.
Conclusion
The final layout depends more on motif density than complicated bag shaping. Finish the cream shell first, block it to approximately 26 cm, then make enough pink and cream flowers to cover the actual surface instead of relying on a fixed motif total. Your next step is to crochet three test flowers and check their blocked diameter against the 5 cm target before making the remaining motifs. Save this crochet flower bag pattern to Pinterest and share your finished handbag on Instagram with #PinkCreamFlowerBag. When arranging your flowers, which area needs denser coverage on your bag: the lower corners or the handle arch?









