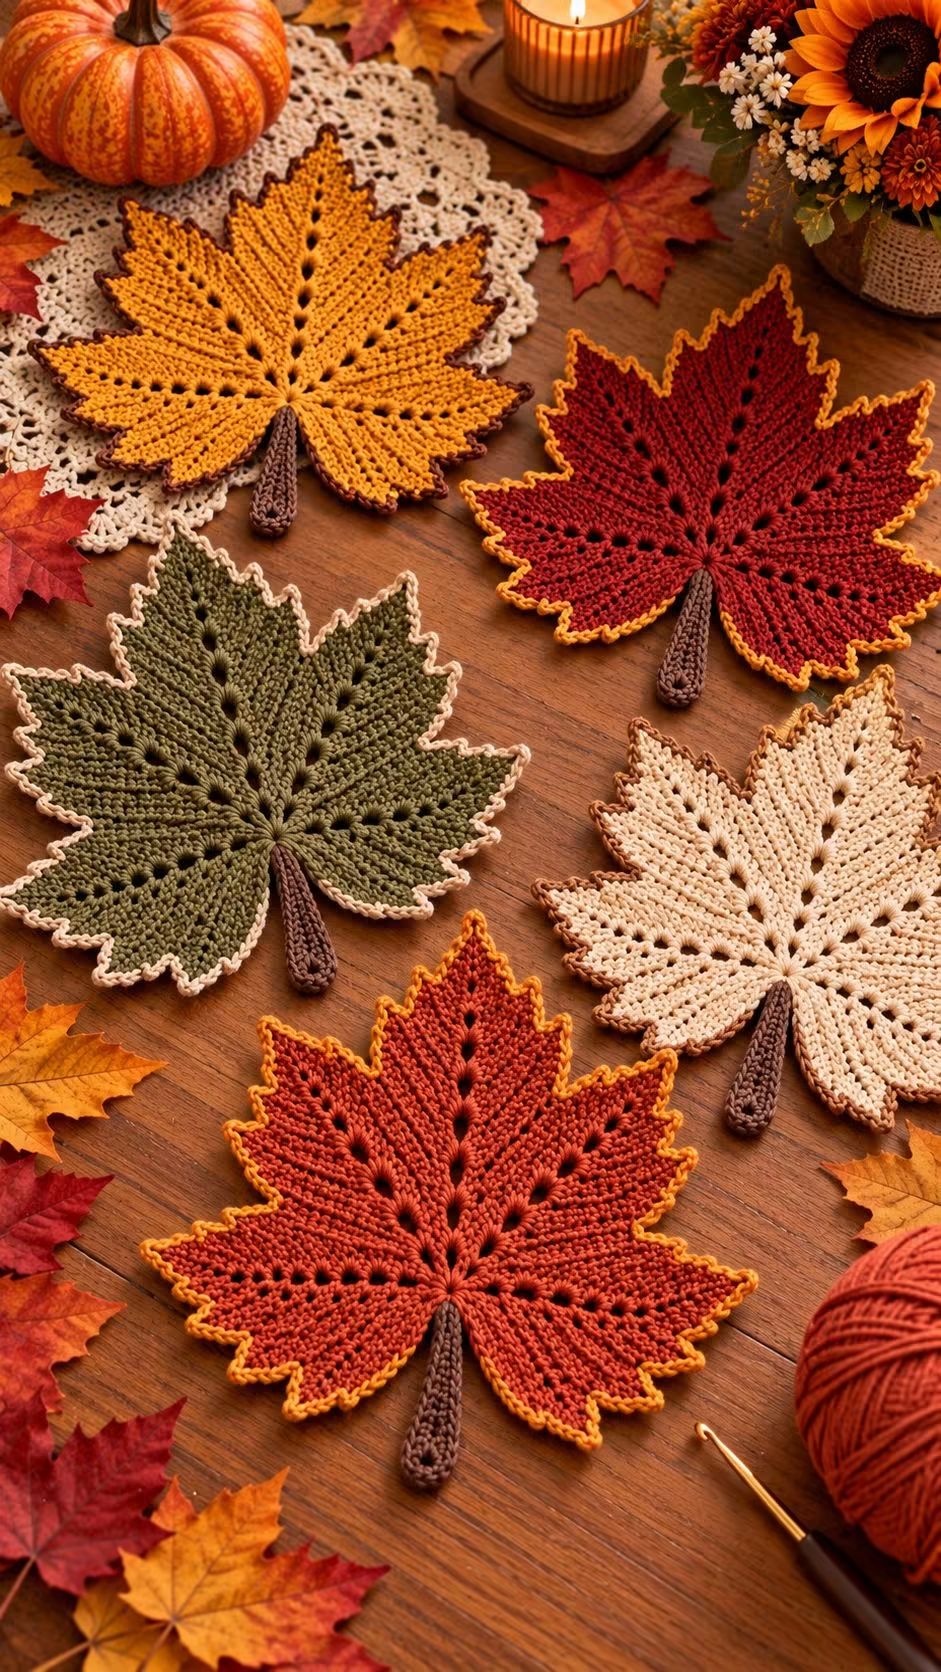
A maple leaf stops looking like a maple leaf when its central point becomes the same height as its lower lobes. This crochet maple leaf placemat pattern preserves that hierarchy with one tall center lobe, paired side lobes, two lower sections, openwork veins, a narrow stem, and a pointed contrasting edge. Work it in firm cotton or cotton-blend yarn for an intermediate-level autumn table mat that can be repeated in red, mustard, olive, cream, and burnt orange.
The Design: What Makes This Maple Leaf Different
The silhouette depends on five dominant lobes radiating from one compact lower center. The central lobe extends farthest, the upper side lobes spread outward, and the lower pair angles toward the stem. Smaller points between those sections create the serrated perimeter visible in the reference.
Open chain spaces form the second structural element. They radiate outward like leaf veins and divide a relatively large field of crochet into directional sections. A contrasting outline then sharpens every point without making the entire mat thicker.
The most common mistake with a crochet maple leaf pattern at placemat scale is making all five lobes identical. A maple silhouette requires hierarchy. The central point must remain longest, while deep valleys clearly separate the neighboring sections.
Project Info at a Glance
| Skill Level | Construction | Target Size | Hook | Best For |
|---|---|---|---|---|
| Intermediate | Center-out flat motif | Approximately 25–35 cm | 4 mm starting point | Placemats, centerpieces, fall table decor |
The finished dimensions depend on yarn weight, tension, and hook size. Published maple-leaf patterns range from small appliqués to large placemats, so make one blocked sample before producing a complete matching set.
Materials and Tools
Yarn
- Mustard gold cotton or cotton-blend yarn — leaf body option.
- Deep red yarn — leaf body option.
- Olive green yarn — leaf body option.
- Cream yarn — leaf body option.
- Burnt orange yarn — leaf body option.
- Brown yarn — stems and optional edging.
- Gold, cream or brown yarn — contrasting perimeter.
Use yarns of the same weight when making a coordinated set. A thicker edging yarn changes the dimensions of the points and can make the perimeter ripple.
Tools
- 4 mm crochet hook
- Yarn needle
- Locking stitch markers
- Scissors
- Tape measure
- Blocking mat
- Rustproof pins
Abbreviations
- MR — magic ring
- ch — chain
- sc — single crochet
- hdc — half double crochet
- dc — double crochet
- tr — treble crochet
- dtr — double treble crochet
- sl st — slip stitch
- sp — space
- st/sts — stitch/stitches
- RS — right side
The pattern uses changing stitch heights rather than amigurumi decreases to form the pointed leaf silhouette.
Crochet Maple Leaf Placemat Pattern
This is a photo-inspired construction rather than a transcription of an unidentified designer’s pattern. Make one complete sample and block it before deciding how many leaves are required for the table setting.
Leaf Center
Yarn: chosen main leaf color.
Round 1: MR, ch 1, work 6 sc into the ring. Join with sl st. (6)
Round 2: Ch 1, work 2 sc in each stitch around. Join. (12)
Round 3: Ch 2, work 2 hdc in each stitch around. Join. (24)
The center should remain flat. If it cups at this stage, loosen the working tension before continuing into the larger lobes.
Establishing the Five Vein Sections
The next stage divides the circular foundation into five visual sections. Each open space will become a vein leading toward one major lobe.
Round 4: Work groups of dc separated by ch-1 spaces around the center, distributing five principal chain spaces as evenly as possible.
Place a stitch marker in each major ch-1 space.
These markers are more important than the individual stitch count from this point forward. They establish the five axes that control the leaf shape.
Central Maple Lobe
Work back and forth into the first marked section.
Row 1: Join yarn at the marked space. Ch 3, work dc across the section.
Row 2: Ch 3, turn. Increase once at each side of the row.
Row 3: Work evenly across.
Row 4: Increase near each edge to widen the lower half of the lobe.
Row 5: Work evenly.
Row 6: Begin tapering by reducing one stitch near each side.
Row 7: Continue tapering.
Row 8: Work hdc toward the center and finish the tip with a narrow group of dc, tr, ch 2, sl st, ch 2, tr and dc.
The center lobe must finish higher than every other section. Fasten off only if the edging will be added separately.
Upper Side Lobe — Make 2
Join yarn at the marked space immediately beside the central lobe.
Row 1: Ch 3 and work dc across the allocated section.
Row 2: Increase at both ends.
Row 3: Work evenly.
Row 4: Increase once toward the outside edge.
Row 5: Begin tapering.
Row 6: Work toward the point using sc, hdc, dc, tr, ch 2, sl st, then reverse the stitch heights down the second side.
Fasten off.
Repeat on the opposite side. Both upper side lobes should match each other but remain shorter than the central lobe.
Lower Side Lobe — Make 2
Join yarn in one of the two remaining lower marked sections.
Row 1: Ch 2 and work hdc across.
Row 2: Increase once near the outside edge.
Row 3: Work dc across the middle section.
Row 4: Shape the tip with hdc, dc, tr, ch 2, sl st, ch 2, tr, dc and hdc.
Row 5: Return toward the center using progressively shorter stitches.
Fasten off.
Repeat for the second lower lobe.
These lobes should angle toward the lower sides of the leaf rather than extending horizontally.
Creating the Smaller Serrated Points
The photographed leaves have multiple small teeth between the five dominant lobes. These details are added during the perimeter round.
Join the main color near the base of the leaf.
Work sc along a straight section.
At a small point, work:
(hdc, dc, ch 2, sl st in second ch from hook, dc, hdc) into the designated edge space.
Continue with sc toward the next point.
At a deeper valley between major lobes, use one or more slip stitches rather than tall stitches. This pulls the edge inward and makes the neighboring points more pronounced.
Repeat around the leaf while preserving five clearly dominant lobes.
Openwork Leaf Veins
The eyelet lines in the reference run from the lower center toward each principal point.
If the chain spaces established earlier already create strong veins, leave them open.
For additional definition, work surface slip stitches beside the chain spaces using the main leaf color.
Begin near the stem junction and follow the central line toward the top lobe. Add four shorter branches toward the side lobes.
Keep surface stitches loose. Tight surface crochet contracts the fabric and can cause the placemat to cup.
Brown Stem
Yarn: brown.
Join brown yarn at the lower center of the leaf.
Row 1: Ch 12.
Row 2: Starting in the second chain from the hook, work sc in each chain. (11)
Turn the work and crochet along the opposite side of the foundation chain.
Row 3: Work sc along the opposite side, placing 3 sc into the final chain to round the bottom.
Continue back toward the leaf and join with sl st.
For a thicker placemat stem, work one additional round of sc around the complete stem.
Fasten off and weave the tail into the dense stem stitches.
Contrasting Pointed Edge
Use gold for red and orange leaves, cream for olive leaves, or brown for cream and mustard leaves.
Join the contrasting yarn beside the stem.
Work one sc in each available edge stitch.
At each small serration, work (sc, ch 2, sl st in second ch from hook, sc).
At each major lobe point, work (sc, ch 3, sl st in second ch from hook, ch 1, sc).
In deep valleys, use slip stitches or closely spaced sc without adding extra chains.
Continue around the entire leaf and fasten off beside the stem.
The contrasting round should sharpen the existing outline. It should not create a new set of lobes.
Making the Five Autumn Colorways
The reference image uses one construction repeatedly while changing the leaf and edging colors. This is more effective than altering the stitch pattern for every mat because all pieces remain the same approximate dimensions.
Mustard Maple Leaf
Work the complete leaf in mustard gold. Use dark brown for the stem and a narrow brown perimeter.
Deep Red Maple Leaf
Work the body in dark autumn red. Use brown for the stem and mustard gold for the pointed edging.
Olive Green Maple Leaf
Work the main body in muted olive. Add a brown stem and cream perimeter.
Cream Maple Leaf
Use warm ivory or natural cotton for the body. Finish with a brown stem and medium-brown edge to keep the points visible against a light table surface.
Burnt Orange Maple Leaf
Work the complete body in rust or burnt orange. Add a dark brown stem and mustard-gold edge.
Assembly and Finishing
- Make the circular center and mark the five principal vein positions.
- Shape the tall central lobe before working the paired side lobes.
- Complete both lower lobes and compare the leaf for left-right symmetry.
- Add the smaller serrated points around the perimeter.
- Define the five open vein lines without tightening the center.
- Crochet the brown stem from the lower center.
- Work the contrasting edging around every lobe and valley.
- Weave all yarn tails into dense sections rather than open vein spaces.
- Wet-block the leaf and pin every major and minor point individually.
- Allow the placemat to dry completely before removing the pins.
The finished maple leaf should lie flat with five dominant lobes, a centered stem, clearly separated valleys, visible vein lines, and sharp perimeter points.
7 Technical Tips for Crochet Maple Leaves
- Mark all five vein positions before shaping the lobes. Moving one marker by several stitches changes the width of two neighboring sections and makes the leaf visibly asymmetric.
- Keep the center lobe approximately 10–20% longer than the upper side lobes. Equal-height points produce a star-like silhouette rather than a recognizable maple leaf.
- Use short stitches in every deep valley. Double crochet placed continuously between two lobes fills the indentation and removes the sharp separation visible in the reference.
- Check the center after every major section. Excessive stitches around the lower junction cause rippling that becomes difficult to correct once the border is added.
- Keep surface-crochet veins loose. Tight slip stitches shorten the distance from the center to the lobe and can lift the tip several millimeters from the table.
- Pin every major point during blocking. A 1 cm difference between paired side lobes is easy to see when several matching placemats are arranged together.
- Weave tails through at least 4–5 cm of dense stitches. Avoid hiding ends inside the open eyelet veins because the yarn remains visible and has less friction holding it in place.
How to Size a Crochet Maple Leaf Placemat
Maple-leaf patterns vary widely in scale. Small DK appliqués can measure less than 10 cm, while heavy-yarn placemats can approach 40–50 cm. The hook number alone therefore cannot determine the finished size.
For a table mat similar in proportion to the reference, target approximately 25–35 cm across the widest lobes. Measure from the left upper side point to its matching point on the right rather than including the stem.
If the first sample is too small, changing from DK to worsted cotton is usually cleaner than adding arbitrary rounds around the completed outline. Extra perimeter rounds can soften the deep valleys that make the maple shape recognizable.
When making a set, block the first leaf and trace its outline onto paper. Place each subsequent wet leaf over that template while pinning. This gives all colorways approximately the same final dimensions.
Choosing Yarn for a Maple Leaf Placemat
Cotton or a cotton-rich blend works well when the leaf will sit directly on a table. The fiber produces visible stitch definition and allows the serrated points to hold their shape after blocking.
DK yarn creates smaller, finer motifs. Medium-weight cotton with a hook around 4 mm produces a more substantial piece suitable for table décor.
Acrylic can also form the shape, but test the blocked fabric first. A soft yarn with substantial drape may allow the long lobes to curl or fold when the placemat is moved.
Keep the stem yarn at the same weight as the leaf body. Using a substantially thicker brown yarn can pull the lower center out of proportion.
How to Keep the Five Lobes Symmetrical
Symmetry begins at the center rather than at the outer points. Divide the available foundation evenly before working any lobe.
Make the central section first. Then complete one upper side lobe and immediately work its opposite partner. Follow the same sequence for the lower pair.
Compare paired sections before adding the perimeter. Count rows, measure from the center to each tip, and check the number of edge stitches.
Do not rely on blocking to correct major stitch-count differences. Blocking can refine a point or open a vein, but it cannot make a substantially narrower lobe match its opposite partner.
Blocking the Pointed Leaf Shape
Blocking is a construction step for a large flat maple leaf rather than an optional cosmetic finish. The narrow points and deep valleys need controlled positioning to display the intended silhouette.
Wet the finished leaf according to the yarn manufacturer’s care instructions and remove excess water without twisting the fabric.
Pin the stem first. Next pin the central lobe, followed by the matching upper side points and lower side points.
Add pins to the smaller serrations only after the five main lobes are balanced. Push the deep valleys slightly inward so the sections remain visually separate.
Measure across the two upper side lobes and check that the central lobe aligns with the stem. Leave the piece pinned until completely dry.
Using the Maple Leaves as Fall Table Decor
A single large leaf can function as a centerpiece mat beneath lightweight decorative objects. A coordinated set can be distributed around individual place settings without requiring every leaf to use the same color.
The photograph demonstrates a useful palette strategy: repeat the same construction in mustard, burgundy, olive, cream, and burnt orange, then connect the group visually with brown stems and narrow contrasting edges.
For smaller decorations, reduce the yarn weight and hook size while keeping the same general proportions. The resulting motifs can be used for garlands, wreaths, table runners, or seasonal appliqués.
For placemat use, keep the central fabric relatively flat. Extremely raised surface stitches or bulky embellishments can make cups and plates unstable.
Conclusion
The defining measurement in this crochet maple leaf placemat pattern is the relationship between its five lobes, not simply the overall width. Keep the central point longest, match the paired side sections, preserve deep valleys, and align the brown stem with the central vein. Make one sample in firm cotton, block it to the target dimensions, and use that leaf as the template for every additional autumn colorway. Share the completed set on Pinterest or Instagram with #AutumnMapleLeafPlacemat. For this specific five-color set, which leaf would you place at the center of the table: burnt orange, deep red, mustard, olive, or cream?









