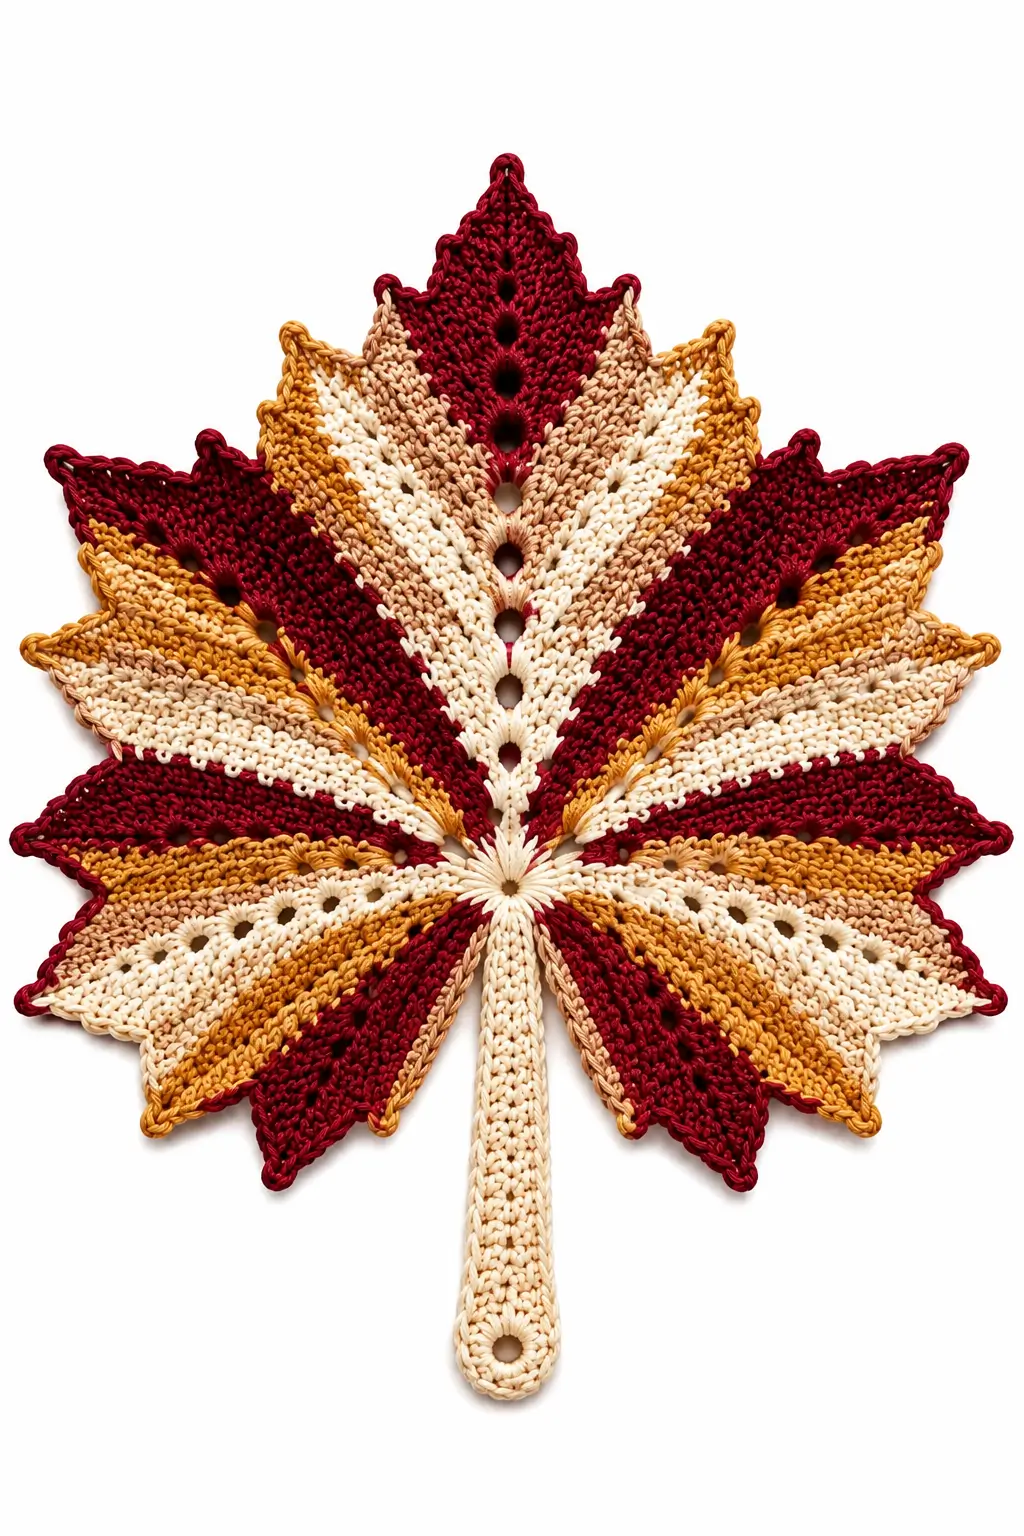
A maple leaf loses its identity quickly when the five main lobes are made too equal. This crochet maple leaf pattern uses a tall center point, graduated side lobes, openwork vein holes and a long stem to reproduce the photographed autumn motif. Burgundy, mustard, cream and tan create the striped foliage effect. Use firm cotton or cotton-blend yarn with a 3.5–4 mm hook for a large intermediate decorative leaf.
The Design: What Makes This Crochet Maple Leaf Different
The central lobe is deliberately longer than the four side lobes, establishing the characteristic maple silhouette before the smaller serrations are added. Open chain spaces run outward from the base and act as visible vein lines while also separating the color sections.
Color placement is structural rather than random. Burgundy frames several outer points, cream creates a strong central vein, and mustard and tan bridge the high-contrast sections. The long cream stem continues that center line below the leaf.
A common mistake when making a large crochet maple leaf is adding too many stitches in the valleys. Those extra stitches round the indentations and turn five separate lobes into one broad fan. Keep valleys compact and place expansion toward the points instead.
Project Info at a Glance
| Skill Level | Working Time | Target Size | Hook | Best For |
|---|---|---|---|---|
| Intermediate | 4–6 hours | Approx. 30–35 cm including stem | 3.5–4 mm | Table décor, wall hanging, placemat, fall centerpiece |
The photograph contains no ruler or yarn label, so the finished measurement above is a reconstruction target rather than a measurement taken from the original piece. Yarn thickness and blocking can change the final dimensions substantially.
Materials and Tools
Yarn
- Burgundy cotton — DK or light worsted — approximately 35–45 g
- Mustard gold cotton — DK or light worsted — approximately 25–35 g
- Cream cotton — DK or light worsted — approximately 30–40 g
- Light tan cotton — DK or light worsted — approximately 20–30 g
Choose yarns from the same weight category. Mixing a thin cream yarn with a heavy burgundy yarn changes the lobe dimensions even when the stitch counts remain identical.
Tools
- 3.5–4 mm crochet hook
- Yarn needle
- Scissors
- Stitch markers
- Measuring tape
- Blocking mats
- Rust-resistant blocking pins
Abbreviations
- MR — magic ring
- ch — chain
- sl st — slip stitch
- sc — single crochet
- hdc — half double crochet
- dc — double crochet
- tr — treble crochet
- inc — increase
- dec — decrease
- st/sts — stitch/stitches
- sp — space
- BLO — back loop only
This pattern uses chain spaces for the decorative vein openings. Keep those chains relaxed so the leaf does not contract along the center lines.
Pattern Notes
This is a photo-inspired reconstruction. The image shows the finished leaf but does not provide an identifiable original written pattern, gauge, yarn specification or hidden construction details.
The leaf is built outward from a compact lower center. Five major lobes form the main silhouette. Smaller pointed sections are added along the edges, followed by a long stem.
Color changes can be placed according to the photograph or adjusted independently. Carrying four colors across the entire leaf creates unnecessary bulk, so fasten off and rejoin yarn when sections are separated by several rows.
Central Base
Begin with cream.
Make an MR.
Round 1: Ch 1, work 10 sc into MR. Join with sl st. (10)
Round 2: Ch 1, work 2 sc in each st around. Join. (20)
Round 3: Ch 1, repeat (sc, inc) around. Join. (30)
Fasten off.
The circular base is intentionally small. Most of it becomes visually absorbed into the five expanding lobes.
Central Maple Lobe
Begin with cream and change through tan, burgundy and mustard as desired.
Join yarn to 7 stitches across the upper center of the base.
Row 1: Ch 1, sc across 7 sts. Turn. (7)
Row 2: Ch 1, inc, sc in next 5 sts, inc. Turn. (9)
Row 3: Ch 1, sc in next 4 sts, ch 1, skip next st, sc in next 4 sts. Turn. (9 positions)
Row 4: Ch 1, inc, sc to ch-1 sp, sc in ch-1 sp, sc across to final st, inc. Turn. (11)
Row 5: Ch 1, sc in next 5 sts, ch 1, skip next st, sc in next 5 sts. Turn. (11 positions)
Row 6: Ch 1, inc, sc to center sp, sc in sp, sc across, inc. Turn. (13)
Rows 7–9: Continue the same principle, maintaining one center opening while increasing one stitch at each outer edge every second row.
Stop increasing when the lobe reaches approximately 15–17 stitches across.
Shaping the Central Point
Once the required width has been reached, begin reducing.
Decrease Row 1: Dec, work established pattern across, dec.
Next Row: Work even while maintaining the central vein opening.
Repeat these two rows until 7 stitches remain.
Next Row: Dec, sc across, dec. (5)
Next Row: Dec, sc, dec. (3)
Final Point: Ch 4, sl st in second ch from hook and next 2 ch, sl st into center stitch.
Fasten off.
Upper Left Lobe
Join yarn beside the central lobe.
Work over approximately 6 base stitches.
Row 1: Sc across. (6)
Row 2: Inc, sc across to final st, inc. (8)
Row 3: Sc in next 3 sts, ch 1, skip 1 st, sc across. (8 positions)
Row 4: Inc, work across while filling the ch-1 sp with 1 sc, inc. (10)
Row 5: Work even.
Row 6: Inc at both ends. (12)
Continue until the upper side lobe reaches approximately 75–80% of the central lobe length.
Decrease one stitch at each end every second row until 3 stitches remain.
Ch 3 and sl st back down the chain to form the terminal point.
Fasten off.
Upper Right Lobe
Repeat the upper-left-lobe construction on the opposite side.
Mirror the vein opening so it angles outward from the lower center rather than running vertically.
Match the total number of rows to the left lobe before blocking.
Fasten off.
Lower Left Lobe
Join mustard, burgundy or cream yarn at the lower-left portion of the base.
Row 1: Sc across 6 sts. (6)
Row 2: Inc, sc in next 4 sts, inc. (8)
Row 3: Sc across. (8)
Row 4: Inc, sc across to final st, inc. (10)
Row 5: Sc in next 4 sts, ch 1, skip 1 st, sc across. (10 positions)
Row 6: Work across, filling the ch-1 space with sc. (10)
Row 7: Inc at both ends. (12)
Rows 8–9: Work even.
Begin decreasing one stitch at both edges every row until 4 stitches remain.
Dec twice. (2)
Ch 3 and sl st back toward the lobe.
Fasten off.
Lower Right Lobe
Repeat the lower-left-lobe instructions in mirror image.
The two lower lobes should be broader than their final pointed tips suggest. Do not shorten the widest section excessively or the finished leaf will resemble a three-point leaf rather than a five-lobed maple leaf.
Creating the Secondary Points
The photograph has multiple smaller teeth between the five dominant tips.
Join yarn at the base of one lobe.
Work sc evenly along the edge.
At a planned small point work:
sc, hdc, dc, ch 2, sl st in second ch from hook, dc, hdc, sc.
Continue with sc toward the next point.
At a larger secondary point work:
sc, hdc, dc, tr, ch 3, sl st in first ch, tr, dc, hdc, sc.
Repeat around the leaf as required.
Place fewer stitches in the deep valleys between the main lobes.
Deep Lobe Valleys
When the edging reaches a deep valley, work one sc into the final edge stitch of the first lobe.
Sl st into the lowest valley stitch.
Skip unnecessary edge spaces.
Work one sc into the first edge stitch of the next lobe.
This pulls the valley inward.
If three or four stitches are worked around the bottom of the valley, the indentation becomes rounded and the maple silhouette weakens.
Openwork Vein Line
The reference uses repeated holes as a strong visual feature.
To create a center vein during a lobe row, work to the center stitch.
Ch 1.
Skip one stitch.
Continue across.
On the next row, work one stitch into the ch-1 space.
Repeat the opening every second or third row.
Do not stack large chain spaces directly above one another on every row. A continuous vertical gap can weaken the fabric.
Diagonal Side Veins
Side-lobe openings can be shifted by one stitch every second openwork row.
For example, place the first opening 4 stitches from the inner edge.
Place the next opening 5 stitches from the inner edge.
Move the following opening to 6 stitches.
This creates a diagonal eyelet line that visually radiates from the leaf center.
Color Placement
The photographed leaf uses broad wedges rather than narrow stripes.
Use burgundy for the top central lobe and several outer sections.
Place cream along the main center and through selected lower lobes.
Use tan between cream and mustard to soften the transition.
Place mustard toward several outer points.
A practical sequence is:
Burgundy → Tan → Cream → Mustard → Burgundy.
Reverse that sequence on neighboring lobes to prevent the complete motif from looking mechanically striped.
Changing Colors Cleanly
Work the final stitch of the old color until two loops remain on the hook.
Pull the new color through those loops.
Continue with the new yarn.
If the previous color will not be required again within a short distance, cut it and weave the tail into the same-colored section.
Avoid carrying dark burgundy behind cream because the unused strand can show through the lighter stitches.
Long Crochet Stem
Use cream for the closest match to the photograph.
Join yarn at the bottom center of the leaf.
Ch 31.
Beginning in the second ch from hook, sc across. (30)
Ch 1 and turn.
Row 2: Sc across. (30)
Row 3: Sc across. (30)
Do not fasten off.
Rounded Stem End
At the free end of the stem, work 5 sc around the end.
Continue up the opposite long side with evenly spaced sc.
At the leaf base, sl st securely into the central foundation.
Fasten off.
The stem should remain narrow compared with the lower lobes. If it becomes wider than approximately 2–2.5 cm with the chosen yarn, remove one row.
Optional Hanging Hole
The photograph shows a small opening near the rounded stem end.
To reproduce it, modify the middle stem row near the bottom.
Work to the final 4–5 stitches.
Ch 3.
Skip 3 stitches.
Continue across.
On the next row, work 3 sc into the ch-3 space.
When edging the rounded end, keep the opening centered.
This creates a practical hanging point if the leaf will be displayed on a wall or hook.
Optional Raised Center Vein
If more definition is required, use cream yarn to surface crochet from the leaf base toward the central point.
Insert the hook through the fabric and pull up a loop.
Work surface slip stitches along the center line.
Stop approximately 1 cm before the terminal point.
Fasten off on the back.
Keep the surface stitches loose. Tight stitches will fold the central lobe lengthwise.
Outer Border
A burgundy border strengthens the silhouette on sections where the interior colors are light.
Join burgundy at a lower edge.
Sc around the perimeter.
At each small point work:
(sc, ch 2, sc) in the point space.
At each dominant lobe tip work:
(sc, ch 3, sc) in the tip space.
At deep valleys work:
sc2tog across the two edge spaces nearest the indentation.
Continue around and join with sl st.
Fasten off.
Blocking the Maple Leaf
Blocking determines whether the motif reads as a maple leaf or a broad irregular star.
Place the damp leaf on a blocking surface.
Pin the central lobe first.
Pin the two upper side lobes at matching angles.
Position the lower two lobes next.
Pull the deep valleys inward and pin them separately.
Shape every secondary point only after the five major lobes have been established.
Straighten the stem and pin its rounded end last.
Allow the piece to dry fully before removing any pins.
Correcting a Rounded Leaf
If the blocked leaf looks too circular, inspect the valleys first.
Remove excess edging stitches from the deepest indentations.
Lengthen the center point with one additional decrease row if necessary.
Pin the two upper side lobes farther outward.
Do not solve a rounded silhouette by adding points everywhere. More serrations increase visual clutter without correcting the underlying five-lobe proportions.
Correcting Curling Edges
An edge that curls upward usually indicates insufficient edge length or excessive tension.
Move up one hook size for the border if necessary.
Add an occasional extra sc along long convex sections.
If the edge ripples instead, too many stitches have been added.
Remove selected increases and block the leaf again before making further changes.
Making a Smaller Maple Leaf
Use sport-weight cotton with a 3–3.5 mm hook.
Reduce each major lobe by approximately two expansion rows.
Shorten the stem to approximately 20–24 chains.
Retain the same five-lobe proportions.
Reducing only the hook size can make the fabric excessively stiff, so match the hook to the selected yarn.
Making a Larger Maple Leaf
Use worsted cotton with a 4.5–5 mm hook.
Add one or two expansion rows to each major lobe before beginning the decrease section.
Increase the stem length proportionally.
For a large table centerpiece, target approximately 35–40 cm across after blocking.
Using the Leaf as a Placemat
Choose washable cotton and omit highly raised surface details.
Block the motif very flat.
Weave every yarn tail through several stitches so color changes cannot loosen during laundering.
Measure the finished motif against the intended dinnerware before making a complete set.
This decorative leaf should not automatically be treated as a hot pad. Heat suitability depends on the selected fiber and construction.
Using the Leaf as Wall Décor
Retain the opening at the bottom of the stem or add a small hanging loop to the reverse.
For a vertical display, apply a light fabric-safe stiffening treatment only if compatible with the yarn.
Another option is to sew the finished leaf to a fabric backing so the five lobe points remain positioned after hanging.
Autumn Color Variations
- Burgundy + mustard + cream + tan — closest to the reference
- Burnt orange + rust + gold + cream — traditional fall version
- Olive + camel + brown + ivory — woodland palette
- Terracotta + sage + cream + mustard — muted botanical version
- Deep red + orange + yellow + brown — high-contrast foliage
- Plum + dusty rose + beige + cream — softer decorative palette
7 Technical Tips for a Better Crochet Maple Leaf
- Measure the central lobe before beginning the side lobes. Keep each upper side lobe approximately 75–80% of the center-lobe length or the five points will compete visually.
- Use only one slip stitch at the deepest valleys. Adding three or more ordinary edge stitches around a valley can widen the indentation by more than 1 cm and round the silhouette.
- Keep chain-1 vein spaces relaxed. Tight chains shorten the lobe along the eyelet line and can make the fabric fold toward the front.
- Pin all five dominant points before the smaller serrations. Beginning with minor points makes it difficult to maintain equal left-right proportions during blocking.
- Keep the stem below approximately 2–2.5 cm wide for a 30–35 cm leaf. A wider stem visually overpowers the lower lobes and makes the motif appear top-heavy.
- Cut dark yarn before crossing a large cream section. Burgundy carried behind light stitches can remain visible through the fabric and the open vein holes.
- Check left and right lobe lengths within approximately 5 mm before final blocking. Large differences remain visible even when the smaller edge points are symmetrical.
Finishing the Crochet Maple Leaf
Lay the dry leaf on a flat surface and compare the left and right sides. The upper lobes should extend farther than the lower pair, while the central point remains the longest section.
Inspect every color change from the back. Weave tails into matching colors rather than carrying burgundy beneath cream or mustard sections.
Check the openwork veins next. Each hole should remain visible without becoming large enough to distort the surrounding stitches.
Finally, straighten the long stem and inspect its junction with the leaf. Reinforce that point with several hidden stitches if the motif will be lifted or hung by the stem.
Care and Storage
Follow the washing instructions for the selected yarn. Cotton motifs usually require reshaping after washing because pointed lobes can soften as the fibers relax.
Dry the leaf flat and reshape all five major points while damp.
Store it flat when possible. Folding directly through the center vein can create a persistent crease through the cream section and distort the openwork holes.
Conclusion
Establish the tall center lobe before shaping the four side lobes, because that proportion controls the entire maple silhouette. Keep the valleys compact, distribute the burgundy, mustard, tan and cream in broad sections, then add the long stem only after the leaf body lies correctly. Blocking should begin with the five dominant points rather than the smaller serrations. Your next step is to make the center section and measure its blocked length before repeating the side-lobe construction. Save this crochet maple leaf pattern to Pinterest and share your finished version on Instagram with #MulticolorCrochetMapleLeaf. Which lobe would you make predominantly burgundy in your color arrangement?









