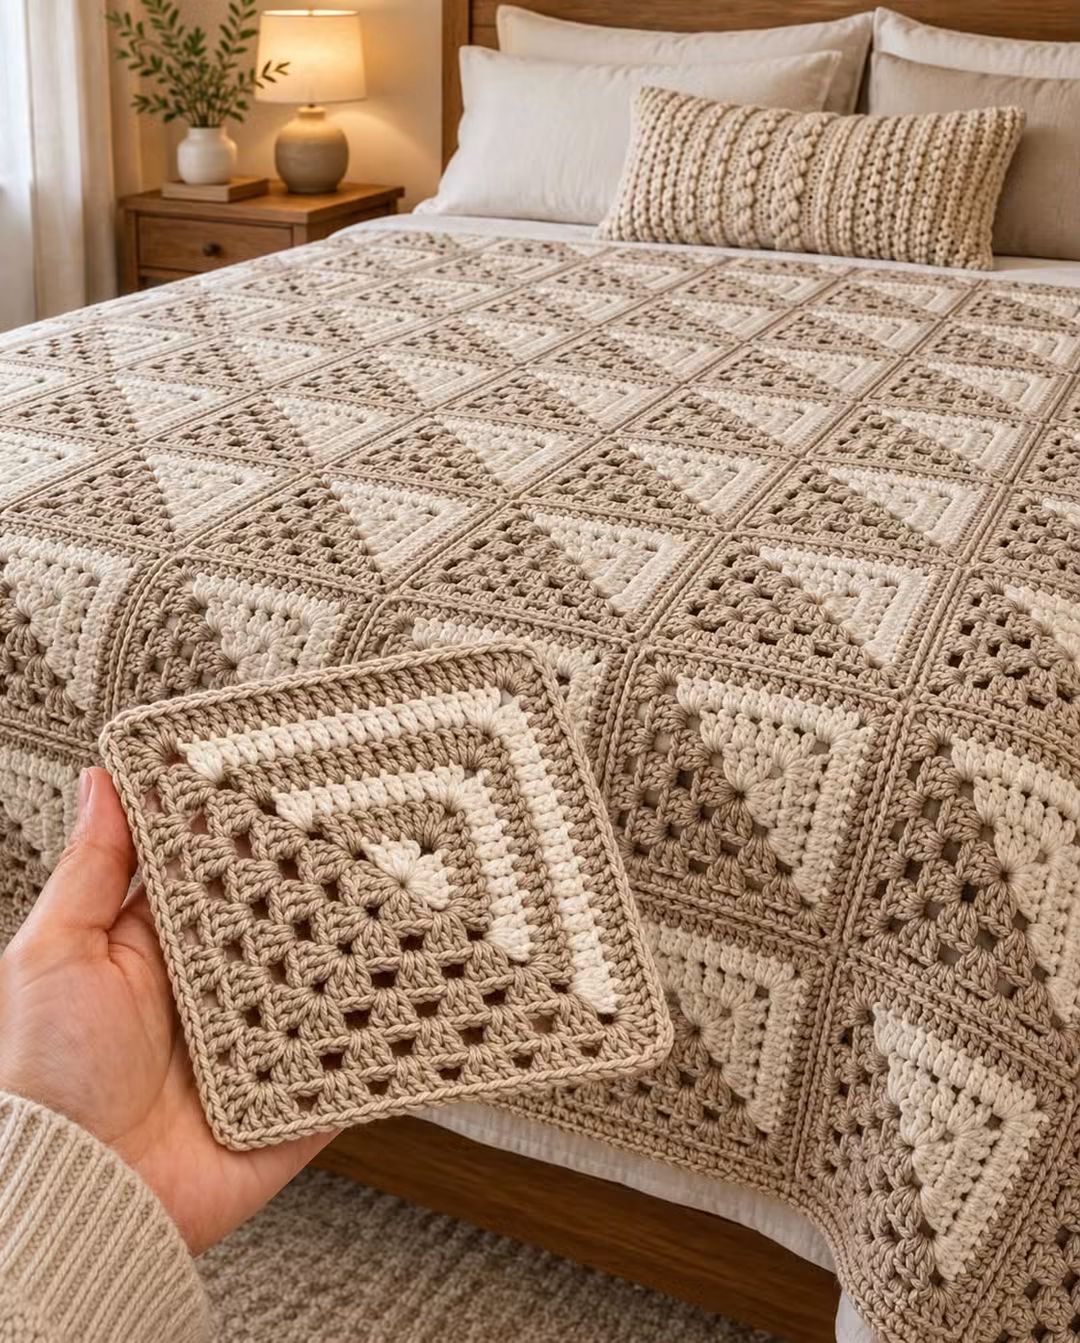
Every square in this bedspread depends on the diagonal staying aimed at the same corner; rotate one motif incorrectly and the larger geometric pattern breaks. This two color granny square blanket pattern uses cream and warm taupe yarn, open granny clusters and solid border rounds. Make each square separately, block it to a consistent size, then assemble the motifs into a reversible geometric bedspread.
The Design: What Makes This Granny Square Blanket Different
The photographed blanket combines traditional granny-square construction with diagonal two-color placement. Cream and taupe divide individual motifs into triangular sections, while alternating square orientation produces larger diamonds and zigzag forms across the bed. Diagonal two-color granny squares are an established construction and are particularly useful for quilt-inspired layouts.
The second structural feature is the border surrounding each motif. A denser outer round gives every square a clear frame and creates visible grid lines after joining.
Consistency matters more here than on a randomly arranged scrap blanket. Every finished two color crochet granny square must have the same dimensions and corner count. Even a 5 mm difference repeated across eight or nine motifs can distort an entire blanket row.
Project Info at a Glance
| Skill Level | Square Size | Suggested Hook | Yarn | Construction |
|---|---|---|---|---|
| Intermediate | Approx. 12.5–15 cm | 5–5.5 mm | Worsted #4 | Individual squares, joined |
Published worsted-weight granny-square patterns commonly produce motifs around 5 inches with a 5.5 mm hook. A traditional half-granny worked in medium-weight yarn with a 5.5 mm hook measures approximately 6.75 inches across its short sides. Use the blocked measurement of your first completed motif to calculate the actual blanket dimensions rather than relying on an unblocked estimate.
Materials and Tools
Yarn
- Warm cream yarn — Worsted #4 — quantity depends on blanket size
- Warm taupe yarn — Worsted #4 — approximately the same quantity
- Taupe joining yarn — reserve additional yarn for seams and border
For a bed-sized project, buy all yarn before beginning when possible. Dye-lot differences become particularly visible across large uninterrupted cream or taupe sections.
Tools
- 5 mm or 5.5 mm crochet hook
- Yarn needle
- Scissors
- Locking stitch markers
- Measuring tape
- Blocking boards
- Rust-resistant pins
Abbreviations
- MR — magic ring
- ch — chain
- sl st — slip stitch
- sc — single crochet
- hdc — half double crochet
- dc — double crochet
- st/sts — stitch/stitches
- sp — space
- ch-sp — chain space
- rep — repeat
- RS — right side
- WS — wrong side
A granny cluster consists of 3 dc worked into the same chain space unless another stitch combination is specified.
Pattern Construction Notes
This is a photo-inspired blanket reconstruction. The image shows the finished geometric layout but does not provide the original designer’s written pattern, gauge or yarn information.
The method below uses established granny-square and half-granny construction to create the same general visual language: diagonal cream-and-taupe sections, open cluster rows, framed square edges and a modular bedspread layout.
Make one test square first. Wash or damp-block it, allow it to dry completely and record the final measurement. Use that number for all blanket calculations.
Two Color Granny Square Pattern
Square A – Diagonal Cream and Taupe
This square creates the strongest geometric effect in the blanket.
Color A: cream
Color B: taupe
First Cream Half-Triangle
Using cream, make an MR.
Row 1: Ch 4, work 3 dc in MR, ch 2, 3 dc in MR, ch 1, dc in MR. Turn.
Row 2: Ch 4, 3 dc in first ch-1 sp, ch 1, (3 dc, ch 2, 3 dc) in center ch-2 sp, ch 1, 3 dc in final ch-sp, ch 1, dc in turning chain. Turn.
Row 3: Ch 4, work (3 dc, ch 1) in each ch-1 sp until the center corner is reached. Work (3 dc, ch 2, 3 dc) in the center corner. Continue (ch 1, 3 dc) in each remaining space. Ch 1, dc in turning chain.
Row 4: Repeat Row 3.
Fasten off.
This produces one triangular half-granny. Traditional half-granny construction expands by adding another cluster space to each side on every row.
Second Taupe Half
Make an identical half-granny triangle in taupe.
Do not add extra rows to compensate for tension. If one triangle is larger, correct the tension or remake it before joining.
Joining the Two Triangles
Place the cream and taupe triangles together along their long diagonal edges.
Using taupe or cream, slip stitch through corresponding edge loops from one corner to the opposite corner.
Keep the seam relaxed.
The joined unit should now form a square divided diagonally into cream and taupe.
Alternative Continuous Two-Color Square
A diagonal granny square can also be crocheted as one continuous motif with color changes rather than two separately sewn triangles. This reduces seaming and can produce a flatter center.
Begin a conventional granny square and assign cream to two adjacent sides and taupe to the other two. Change color at the corner spaces that define the diagonal.
On every new round, continue working the same color along its two sides.
Keep the color boundary running from one corner directly to the opposite corner.
For a blanket containing dozens of motifs, make three test squares before selecting the method. Use whichever construction produces the cleanest diagonal with your yarn.
Square B – Cream-Dominant Diagonal Square
The photograph also contains motifs where cream occupies more visual space.
Work the first three granny rows in cream.
Introduce taupe along one triangular side on the following round.
Continue with cream through the opposite section.
Finish with a taupe framing round.
The purpose is not to create a mathematically equal 50/50 division. This variation interrupts repetition while retaining the same neutral palette.
Square C – Taupe-Dominant Diagonal Square
Reverse Square B.
Use taupe for the larger triangular field and cream for the contrasting section.
Keep the final dimensions identical to Squares A and B.
All square variations need the same number of stitches along their outer edges before joining.
Adding a Solid Frame to Each Granny Square
The reference blanket has clearly defined square boundaries. A compact frame gives the motifs that architectural appearance.
Join taupe at any corner.
Frame Round 1: Ch 1, sc evenly around all four sides. Work (sc, ch 2, sc) in each corner.
Join with sl st.
Frame Round 2: Ch 1, sc in each st around. Work (sc, ch 2, sc) in every corner ch-2 sp.
Join and fasten off.
Count the stitches along all four sides of the first square. Record the count and reproduce it on every remaining motif.
Optional Textured Frame
For a slightly more pronounced frame similar to the raised lines visible in the image, replace Frame Round 2 with half double crochet.
Round: Ch 2, hdc in each st around, working (hdc, ch 2, hdc) in every corner.
Do not switch repeatedly between sc and hdc framing from square to square. Different frame heights produce inconsistent motif dimensions.
Blocking Every Square
Blocking before assembly is particularly useful for a large granny-square blanket. It makes the motifs easier to align during seaming.
Pin each square to the target measurement. For example, if the first successful blocked motif measures 14 cm, block every subsequent motif to approximately 14 × 14 cm.
Position the four corners first.
Then pin the midpoint of each side.
Add more pins only where required to straighten the edge.
Allow every motif to dry fully before removing it from the board.
Planning the Blanket Size
Calculate blanket dimensions from the blocked square size.
If one square measures 14 cm:
| Layout | Approx. Motifs | Approx. Motif Area Before Border |
|---|---|---|
| Baby / Small | 6 × 7 = 42 | 84 × 98 cm |
| Throw | 9 × 11 = 99 | 126 × 154 cm |
| Large Throw | 10 × 12 = 120 | 140 × 168 cm |
| Bedspread | 12 × 14 = 168 | 168 × 196 cm |
| Large Bedspread | 14 × 16 = 224 | 196 × 224 cm |
Seams and the final border alter these measurements slightly. Measure the joined fabric before deciding how many border rounds to add.
Creating the Geometric Layout
Lay all blocked squares on a large floor or bed before joining.
Start with one diagonal square positioned cream-upper-left and taupe-lower-right.
Rotate the next motif 90 degrees.
Continue rotating adjacent motifs to form diamonds, hourglass shapes and zigzag lines.
The reference image uses repeated directional changes rather than positioning every diagonal identically.
Photograph the final arrangement before picking up the squares. The photograph becomes the assembly map and prevents accidental rotation during joining.
Joining the Granny Squares
Flat Slip-Stitch Join
Place two squares side by side with right sides facing upward.
Join taupe yarn at the first corresponding corners.
Insert the hook through the matching outer loops of both squares.
Work one loose slip stitch through each corresponding stitch pair.
Continue to the opposite corner.
Fasten off only if the joining plan requires it.
This method creates a visible but relatively flat line between motifs and works well with the framed construction shown in the reference.
Invisible Mattress Seam Alternative
For a less visible join, thread a yarn needle with matching outer-frame yarn.
Position the squares right side up.
Pass the needle through corresponding outer loops on each square, alternating from side to side.
Pull the seam closed every few centimeters rather than tightening every stitch individually.
Do not pull hard enough to gather the edges.
Efficient Row-by-Row Assembly
Join the motifs into horizontal strips first.
For a 9 × 11 throw, make eleven strips containing nine squares each.
Check every strip against the layout photograph.
Next, join the long horizontal edges of the strips.
At each four-square intersection, align all corners before proceeding. Misalignment at one junction becomes increasingly visible across the next several rows.
Outer Blanket Border
Once all squares are joined, work a compact neutral border around the complete blanket.
Use taupe.
Border Round 1: Join yarn at any corner. Ch 1 and sc evenly around the blanket. Work (sc, ch 2, sc) in each corner.
Border Round 2: Sc in each st around. Work (sc, ch 2, sc) in each corner space.
Change to cream.
Border Round 3: Hdc in each st around. Work (hdc, ch 2, hdc) in each corner.
Change back to taupe.
Border Round 4: Sc in each st around, with (sc, ch 2, sc) at every corner.
Fasten off.
Add further plain rounds if a wider bedspread border is required.
Keeping the Border Flat
A border that pulls the blanket inward has too few stitches. Add stitches evenly along the affected side rather than compensating only at the corners.
A ruffled border contains too many stitches.
For every new round, check the blanket on a flat surface before continuing. Correcting Round 2 is easier than removing five completed border rounds.
Yarn Planning for a Bed-Sized Blanket
Large granny-square blankets require substantially more yarn than small throws. Published granny blanket patterns vary widely according to size, stitch density and yarn weight; one multi-size Aran blanket listing spans approximately 1,205 to 8,194 m from small blanket through king sizes.
For this design, the most reliable calculation comes from weighing completed test motifs.
Make four finished squares and weigh them together.
Divide by four to determine average grams per square.
Multiply that number by the total number of motifs.
Add approximately 15–20% for joining, border, swatching and yarn variation.
Example: if one square weighs 25 g and the blanket needs 120 squares, the motifs require approximately 3,000 g. Adding 15% gives a working purchase estimate of approximately 3,450 g.
Balancing Cream and Taupe Yarn
A true half-and-half layout uses roughly similar quantities of both colors, but the photographed design contains cream-dominant and taupe-dominant sections.
Track yarn consumption after the first 10 motifs.
If cream is being used substantially faster, buy additional cream before the original dye lot disappears.
Reserve some taupe specifically for joining and the final border. Using the last taupe skein on motifs can leave the assembly stage short of matching yarn.
Making a Matching Crochet Pillow
The cushion visible behind the blanket uses a different textured construction, but the blanket motifs can also be adapted into a coordinated pillow.
For a granny-square version, make enough motifs to cover the required cushion dimensions.
Join them using the same taupe seam.
Create a matching back panel or sew the crochet panel to a fabric cushion cover.
Keep decorative raised stitches away from areas that need a smooth zipper or button closure.
Alternative Neutral Color Combinations
- Warm cream + mushroom taupe — closest to the photographed blanket
- Ivory + camel — warmer neutral palette
- White + light gray — cooler geometric version
- Oatmeal + chocolate brown — stronger contrast
- Cream + sage — muted botanical variation
- Natural cotton + terracotta — warmer contemporary version
Choose colors with enough contrast to reveal the diagonal divisions. Two nearly identical beige shades can make the geometric layout disappear from normal viewing distance.
7 Technical Tips for a Better Granny Square Blanket
- Block every motif to within approximately 5 mm of the target size. A 1 cm difference repeated across ten squares can create a visibly uneven blanket row.
- Mark the cream corner on every diagonal square. Accidentally rotating one motif 90 degrees interrupts the diamond pattern after the blanket is assembled.
- Count every outer frame edge. Joining a 30-stitch edge to a 32-stitch edge forces puckering or skipped stitches into the seam.
- Keep slip-stitch joins loose enough to bend freely. A tight joining row acts like a drawstring and makes the blanket fold along the grid lines.
- Pin all four corners before blocking the sides. Stretching one side first can turn a 14 cm square into a rectangle.
- Leave at least 12–15 cm yarn tails at color changes. Short tails can loosen where the cream-and-taupe diagonal receives repeated handling.
- Check each four-square intersection before continuing the seam. A corner displaced by more than about 5 mm becomes obvious when several grid lines meet.
Preventing Uneven Granny Squares
Use the same hook for every motif and avoid switching between hooks from different manufacturers without checking their actual shaft dimensions.
Count the clusters after every round.
If the center begins twisting, alternate the direction of work by turning after rounds where the construction permits it.
Do not force a smaller square to match larger motifs during blocking. A significant size difference usually comes from tension or a missing cluster and should be corrected at the crochet stage.
Preventing the Finished Blanket from Skewing
Join squares that have already been blocked to the same dimensions.
Assemble horizontal strips and measure each strip before connecting it to the next one.
Lay the project flat after every two or three joined rows.
If one side begins shortening, inspect the seams for skipped edge stitches. Do not attempt to correct a distorted grid by adding extra stitches only to the final border.
Care and Washing
Follow the washing instructions for the specific yarn used.
Support the weight of a wet bed-sized blanket rather than lifting it from one corner. Saturated yarn can place considerable strain on granny-square seams.
Dry the blanket in a shape that keeps the grid approximately square.
After washing, reshape the corners and border before the fabric dries completely.
Finishing the Two Color Granny Square Blanket
Inspect the blanket from the foot of the bed before weaving the final joining tail. This viewing angle makes incorrectly rotated motifs easier to identify than examining the project from directly above.
Check all intersections, then complete the outer border. Weave taupe tails through taupe frames and cream tails through cream sections so contrasting fibers do not show on the front.
Measure the completed blanket after its final blocking or wash. Record both dimensions, square count and yarn consumption if a matching blanket will be made later.
Conclusion
Begin with one diagonal motif and block it before committing yarn to the complete bedspread. That measurement determines the square count, finished dimensions and realistic yarn requirement. Keep every cream-and-taupe diagonal oriented according to a photographed layout plan, join motifs only after their outer edges match, and check the grid repeatedly during assembly. The same construction can be scaled from a small throw to a full bed covering simply by changing the number of squares. Save this two color granny square blanket pattern to Pinterest and share the finished neutral version on Instagram with #TwoColorGrannyBlanket. Would you arrange the diagonals as large diamonds or alternating zigzag rows?









