Crochet Bunny Applique Pattern for a Baby Dress
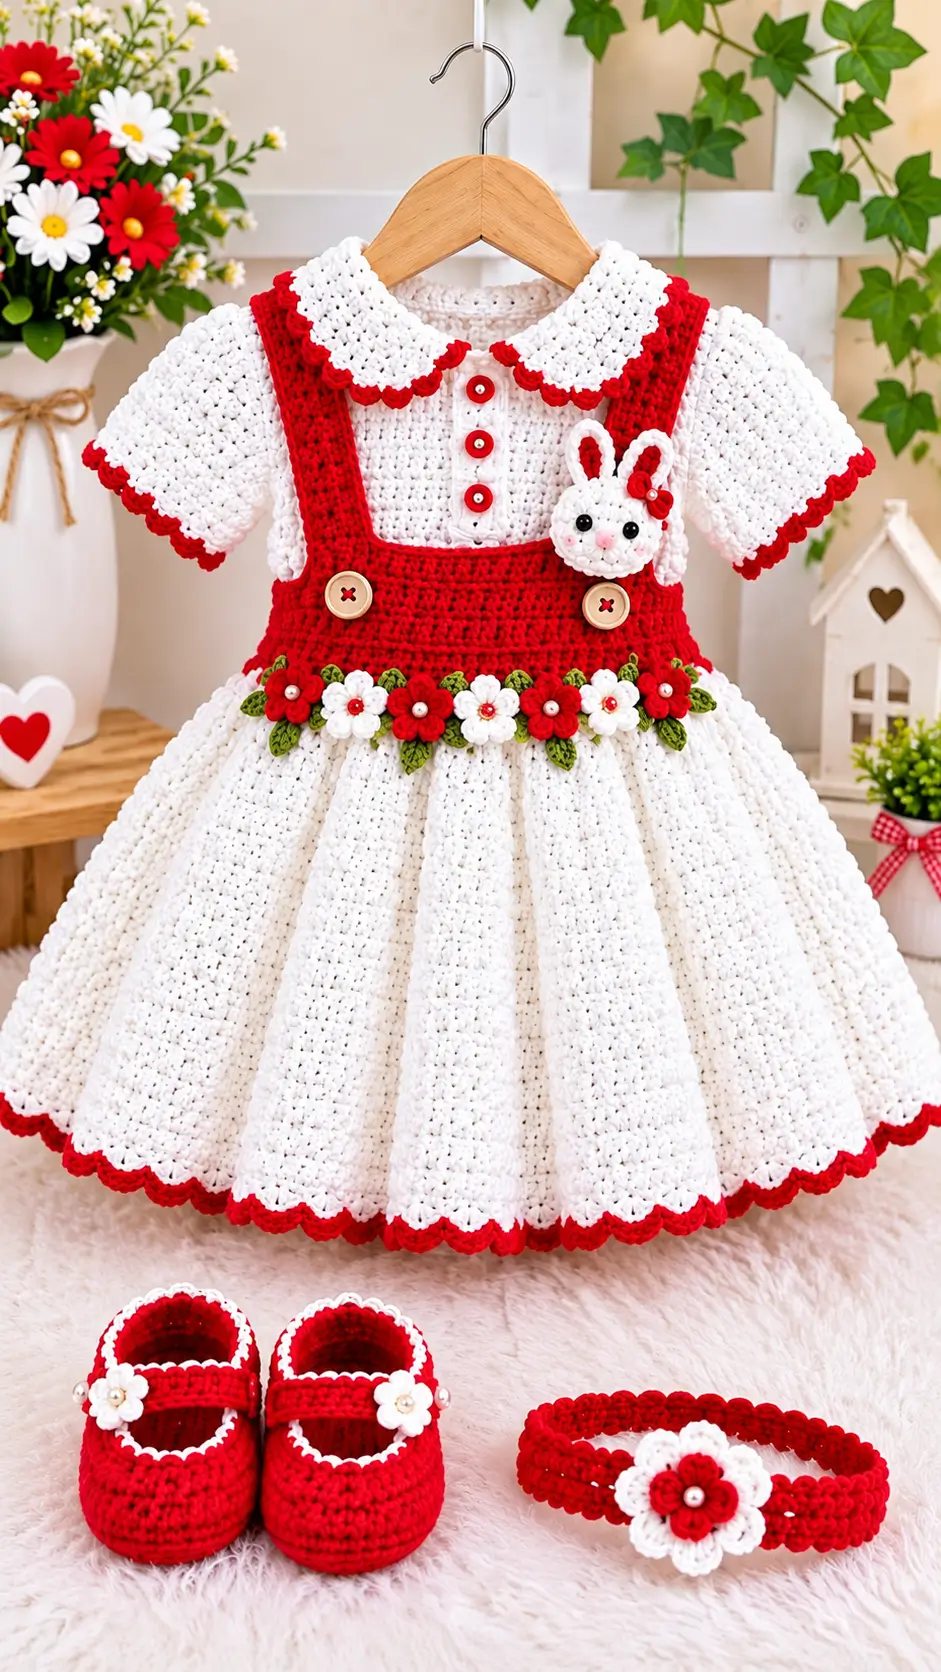
A rabbit attached to a narrow suspender cannot afford oversized ears: they would fold past the strap before the face reads clearly. This crochet bunny applique pattern builds a compact white rabbit with red inner ears, cheeks, and a side flower inspired by the photographed dress. Use DK yarn, a 2.75–3 mm hook, and embroidered eyes for a garment-scale motif. The project suits an intermediate beginner and works as a decorative element for dresses, bags, blankets, and other crochet projects.
The Design: What Makes This Bunny Different
The photographed rabbit is dominated by its face rather than a visible torso, so this version treats the head as the structural base. A 30-stitch circular plateau keeps the motif compact while leaving enough surface for readable facial spacing. The ears are narrow and vertically oriented because wide floppy ears would interfere with the suspender edge.
Red inner-ear panels connect the bunny crochet applique visually to the dress without enlarging the silhouette. Two tiny cheek circles soften the lower face while remaining flat enough for garment use. The flower sits beside one ear rather than directly above the head, preserving the rabbit outline.
A common mistake in a small bunny crochet pattern is scaling the eyes without scaling their spacing. Large or widely separated eyes make a small face look disproportionately broad.
Project Info at a Glance
| Skill Level | Time | Finished Size | Hook | Best For |
|---|---|---|---|---|
| Intermediate beginner | 1–2 hours | Approx. 6–8 cm | 2.75–3 mm | Dress appliqués, bags, blankets, decorative motifs |
The 6–8 cm measurement is the target size for this photo-inspired construction. Published bunny appliqués vary considerably in finished dimensions depending on yarn weight, hook size, and construction method.
Materials and Tools
Yarn
- White — DK/light worsted — approximately 8–12 g — smooth cotton or cotton/acrylic yarn.
- Red — DK/light worsted — approximately 2–3 g — preferably from the same yarn family as the white.
- Pink — DK yarn or embroidery thread — less than 1 g for cheeks and nose.
- Black — embroidery thread — a small amount for the eyes and mouth.
- Green — DK yarn — less than 1 g if adding the optional leaf.
Tools
- 2.75–3 mm crochet hook
- Embroidery needle
- Yarn needle
- Polyester stuffing — optional and used sparingly
- Stitch markers
- Pins
- Scissors
Safety note: Embroidered eyes are preferable when the bunny is attached to clothing intended for babies or small children. Avoid beads, loose buttons, or other detachable facial components.
Abbreviations
- MR = magic ring
- sc = single crochet
- inc = two single crochet stitches in one stitch
- dec = single crochet decrease
- sl st = slip stitch
- ch = chain
- hdc = half double crochet
- dc = double crochet
- BLO = back loop only
For an invisible decrease, insert the hook through the front loops of the next two stitches, yarn over, draw through, and complete one single crochet.
Pattern — Step by Step
Work in continuous spirals unless a section states otherwise. Place a stitch marker in the first stitch of each round.
Head
Yarn: white
R1: 6 sc in MR (6)
R2: inc ×6 (12)
R3: (sc, inc) ×6 (18)
R4: (2 sc, inc) ×6 (24)
R5: (3 sc, inc) ×6 (30)
R6: sc around (30)
R7: sc around (30)
R8: sc around (30)
R9: (3 sc, dec) ×6 (24)
R10: (2 sc, dec) ×6 (18)
R11: (sc, dec) ×6 (12)
R12: dec ×6 (6)
If a slightly raised face is wanted, add only enough stuffing to remove the hollow center. Keep the back comparatively flat.
Fasten off. Leave approximately 20 cm of yarn for sewing.
Body / Mounting Base
Yarn: white
The body is intentionally shallow because the bunny is designed primarily as an appliqué rather than a freestanding amigurumi figure.
R1: 6 sc in MR (6)
R2: inc ×6 (12)
R3: (sc, inc) ×6 (18)
R4: (2 sc, inc) ×6 (24)
R5: (3 sc, inc) ×6 (30)
R6: sc around (30)
R7: (3 sc, dec) ×6 (24)
R8: (2 sc, dec) ×6 (18)
R9: (sc, dec) ×6 (12)
R10: dec ×6 (6)
Do not heavily stuff the body. Fasten off and leave a 20 cm sewing tail.
Arms / Front Legs — Make 2
Yarn: white
R1: 6 sc in MR (6)
R2: inc ×6 (12)
R3: sc around (12)
R4: sc around (12)
R5: dec ×6 (6)
R6: sc around (6)
Flatten the opening. Do not stuff.
Fasten off and leave a 15 cm tail for sewing.
Back Legs — Make 2
Yarn: white
R1: 6 sc in MR (6)
R2: inc ×6 (12)
R3: (sc, inc) ×6 (18)
R4: sc around (18)
R5: (sc, dec) ×6 (12)
R6: dec ×6 (6)
Flatten each piece so it behaves as an appliqué rather than a projecting foot.
Fasten off and leave a 15 cm sewing tail.
Outer Ears — Make 2
Yarn: white
Ch 11.
Row 1: Starting in the second chain from the hook, sc, hdc, dc in the next 5 ch, hdc in the next 2 ch, 3 sc in the final ch. Continue along the opposite side of the foundation chain with hdc in the next 2 ch, dc in the next 5 ch, hdc, sc.
Join with a sl st.
Row 2: Ch 1 and sc around. Place 2 sc at the upper curve where required to keep the ear flat.
Fasten off. Leave a 15 cm sewing tail.
Inner Ears — Make 2
Yarn: red
Ch 8.
Row 1: Starting in the second chain from the hook, sc, hdc, dc in the next 3 ch, hdc, 3 sc in the final ch. Continue down the opposite side with hdc, dc in the next 3 ch, hdc, sc.
Fasten off with a 12 cm tail.
Position each red panel centrally over a white outer ear. Keep a visible white border around the red section before sewing it into position.
Cheek Patches — Make 2
Yarn: pale pink
R1: 6 sc in MR (6)
R2: inc ×6 (12)
Join with a sl st and fasten off with a 10 cm sewing tail.
For particularly small cheeks, complete only R1 and use the six-stitch circle.
Side Flower
Yarn: red and white
With red yarn:
R1: 6 sc in MR (6)
Change to white.
R2: Work (sl st, ch 2, 2 dc, ch 2, sl st) into each stitch around.
This produces six petals.
Fasten off and leave a 15 cm sewing tail. Add a small embroidered red center rather than a bead when making the motif for children’s clothing.
Optional Leaf — Make 1
Yarn: green
Ch 6.
Starting in the second chain from the hook, work: sl st, sc, hdc, sc, sl st.
Continue along the opposite side of the chain: sl st, sc, hdc, sc, sl st.
Fasten off and leave approximately 10 cm for attachment.
Face
Mark the horizontal center of the head before adding the facial features. Place the centers of the embroidered eyes approximately 12–16 mm apart on the compact version.
Use repeated black satin stitches to create each eye approximately 4–5 mm wide. Keep both eyes at the same height.
Position the pink nose centrally below the eyes. Work three or four short horizontal stitches to create the nose, then add one short vertical black stitch underneath.
Form the mouth with two short diagonal stitches extending from the bottom of the central vertical stitch.
Position the cheek patches below and slightly outside the eyes. Pin both cheeks before sewing so their placement can be compared.
Assembly
- Pin the head over the upper half of the body base and align the vertical centerlines before sewing.
- Sew the head securely to the body using small mattress stitches while keeping bulky knots on the hidden side.
- Embroider both eyes, the nose, and the mouth. Attach the two cheek patches symmetrically below the eyes.
- Position the front legs behind the lower edge of the head so only their rounded ends remain visible.
- Place the back legs behind the body and sew around their upper edges rather than attaching the entire foot surface.
- Pin the ears at approximately the 11 o’clock and 1 o’clock positions. Compare their height and angle before sewing.
- Attach each red inner-ear panel to its corresponding white outer ear using red yarn or matching thread.
- Sew the flower beside one ear to reproduce the asymmetric accessory placement visible in the reference design.
- Mount the completed bunny to the suspender, bodice, bag, blanket, or other backing with small stitches approximately every 5–7 mm around the hidden perimeter.
- Weave each yarn tail through at least 3 cm of crocheted fabric before trimming. Inspect the finished appliqué for loose loops and detachable components.
The completed bunny should remain substantially flat against its mounting surface, with the ears forming most of its vertical height.
7 Technical Tips for a Cleaner Bunny Applique
- Prevent missed round beginnings: place a locking stitch marker in the first stitch of every head round. A one-stitch drift becomes obvious when the decreases start and can rotate the face away from the ear centerline.
- Control overstuffing: keep the finished head under approximately 15 mm thick when using it as a garment appliqué. Excess filling pulls the rabbit away from the fabric and puts unnecessary strain on the mounting stitches.
- Reduce decrease gaps: work invisible decreases through the front loops during R9–R12 of the head. Conventional decreases can produce visible openings, particularly when white yarn is used.
- Check eye placement before stitching: mark both eye positions before embroidering either eye permanently. A difference of only 3–4 mm is noticeable on a face this small.
- Correct loose tension with the hook: if the fabric exposes stuffing, change from a 3 mm to a 2.75 mm hook before modifying the stitch counts. Altering both variables simultaneously makes the final dimensions difficult to control.
- Prevent twisted ears: pin both ears first and measure from each ear tip to the center of the head. A difference greater than approximately 5 mm creates a visibly uneven silhouette.
- Secure yarn tails: weave every sewing tail through at least 3 cm of dense crochet and reverse direction once before cutting it. A short straight weave can pull free when a garment stretches or is washed.
How to Adjust the Bunny Size
The simplest way to resize this crochet bunny applique pattern is to change yarn and hook size while retaining the same stitch counts. Thinner yarn with a smaller hook produces a reduced motif without changing the rabbit’s proportions.
For a very small dress appliqué, test the pattern with DK cotton and a 2.5–2.75 mm hook. For a larger blanket or bag decoration, light worsted or worsted yarn can increase the finished dimensions.
Avoid adding another standard increase round unless a much larger head is required. Increasing from 30 to 36 stitches changes the circumference and also requires corresponding adjustments to the ears, cheeks, eye spacing, body, and limbs.
Attaching the Bunny to a Crochet Dress
Finish the complete rabbit before sewing it to the garment. This allows the appliqué to be repositioned without repeatedly handling the finished dress.
Lay the garment flat and pin the rabbit in place. On a suspender similar to the photographed design, center the bunny over the strap and check that neither ear extends into the neckline or arm opening.
Use matching yarn or strong sewing thread to attach the motif around its perimeter. Place attachment stitches approximately 5–7 mm apart. Additional hidden stitches behind the head can prevent the center from lifting.
Do not pull the attachment thread tightly enough to gather the strap underneath. The garment should remain flat when the bunny is completely attached.
Finishing the Bunny
Check the ear angles, cheek placement, and facial symmetry before weaving the final tails. Lightly reshape the ears with your fingers rather than stretching the stitches.
When the motif is intended for children’s clothing, inspect every attachment point from both sides. Embroidered facial features remove the need for plastic eyes, and embroidered flower centers remove another small detachable component.
The narrow red inner ears are particularly important for recreating the visual relationship between the bunny and the red-and-white dress. Keep those panels smaller than the outer ears so a continuous white border remains visible.
Conclusion
The photographed rabbit works because its proportions are controlled by the narrow red suspender: a broad head, vertical ears, and small facial details keep the character readable without covering the surrounding crochet work. Make one test motif before attaching it permanently, then adjust hook size rather than changing the increase sequence if the width needs correction. For infant clothing, use embroidered facial details instead of detachable embellishments. Save this crochet bunny applique pattern to Pinterest and share the finished version on Instagram with #RedSuspenderBunny. When choosing the final colors, compare one detail closely: should the inner ears match the red dress exactly or use a slightly darker red?









