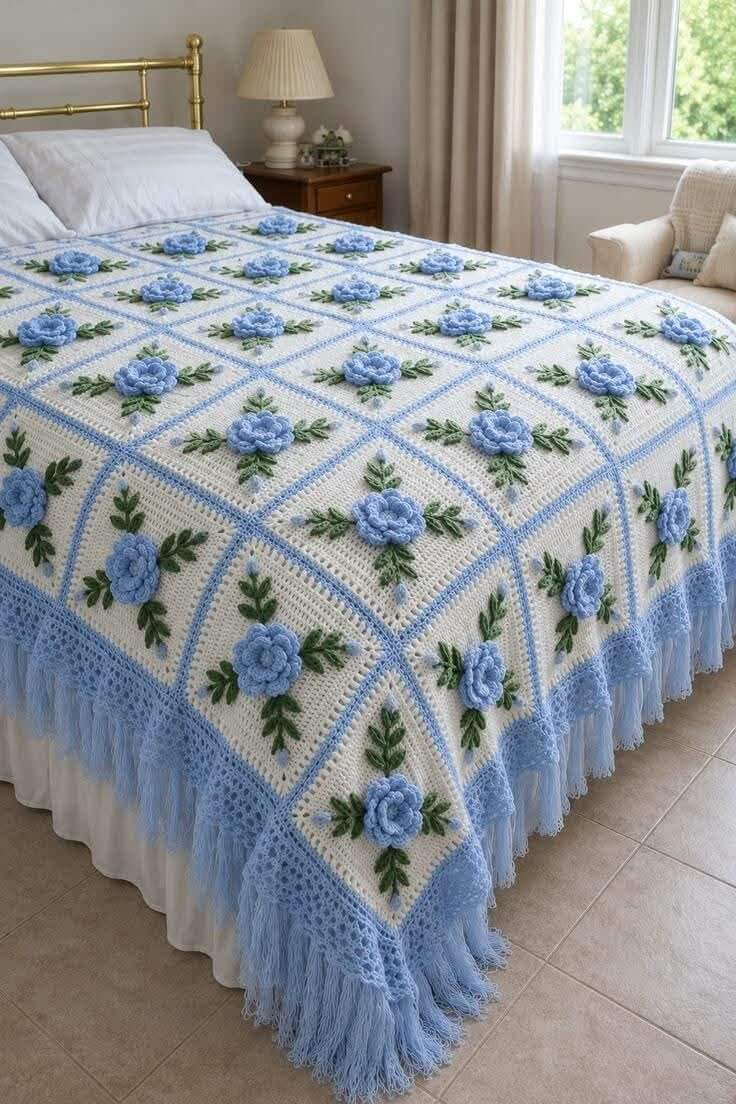
A blue rose has to rise far enough above its square to remain recognizable after dozens of motifs are joined. This 3D rose granny square blanket uses cream DK squares, layered blue flowers, green leaves and blue contrast joins. A 3.5 mm hook targets compact 10 cm motifs, with intermediate-level shaping. Modular construction also lets you alter the final bedspread dimensions without rewriting the flower.
The Design: What Makes This Rose Blanket Different
The photograph depends on three structural decisions. First, the rose is substantially raised rather than represented by a flat color motif; overlapping petal layers create the required depth. Second, green leaf sprays extend beyond the flower, breaking up the large cream field and making each block read as a floral composition rather than a plain granny square with an appliqué.
Third, pale-blue joins are intentionally visible. Hiding the seams would remove the grid that organizes the entire blue rose crochet blanket.
The common mistake with a rose granny square pattern of this type is making every flower first and ignoring square gauge. A difference of only 5 mm per block becomes several centimeters across a bed-sized assembly. Block the cream bases to one measurement before adding the dimensional surface pieces.
Project Info at a Glance
| Skill Level | Time | Finished Size | Hook | Best For |
|---|---|---|---|---|
| Intermediate | Multi-session project | 10 × 10 cm benchmark square; blanket scalable | 3.5 mm | Throws, bedspreads, floral afghans |
The 10 cm motif and 3.5 mm hook are documented benchmarks for a DK rose granny square. The complete reference blanket is visibly much larger, but its exact physical measurements cannot be derived from the photograph.
Materials and Tools
Yarn
- Ivory/cream — DK weight — quantity determined by square count — smooth cotton, acrylic or cotton-blend
- Powder blue — DK weight — flowers, joins, border and fringe
- Leaf green — DK weight — leaves
- Optional pale blue — DK weight — secondary details if a two-tone flower is desired
A documented 10 cm rose granny square uses approximately 10 m of flower-color yarn, 3 m green and 5 m cream. Treat those quantities as motif benchmarks rather than exact consumption figures for this reconstruction because the photographed blanket also contains additional leaves, joining yarn, lace and fringe.
Tools
- 3.5 mm crochet hook
- Tapestry needle
- Sharp scissors
- Locking stitch markers
- Blocking pins
- Blocking mats
- Measuring tape
- Fringe gauge or firm cardboard
No stuffing or safety eyes are required.
Abbreviations
- MR — magic ring
- ch — chain
- sc — single crochet
- hdc — half double crochet
- dc — double crochet
- tr — treble crochet
- inc — increase
- sl st — slip stitch
- st/sts — stitch/stitches
- sp — space
- BLO — back loop only
- FLO — front loop only
- RS — right side
Invisible decrease is an amigurumi technique and is not required for this flat modular blanket construction.
Pattern — Step by Step
Work the blanket as individual cream squares, then make the roses and leaves separately. Sew the dimensional elements to each blocked square before joining. This method makes the raised flower easier to control and avoids forcing the rose itself to carry the square’s geometry.
Cream Square Base — Make as Many as Required
Yarn: ivory DK. Target finished measurement: approximately 10 × 10 cm per square.
R1: MR, ch 3, 2 dc, ch 2, (3 dc, ch 2) ×3, join with sl st. Four 3-dc groups.
R2: Sl st to corner. Ch 3, 2 dc, ch 2, 3 dc in same corner; ch 1. In each remaining corner work (3 dc, ch 2, 3 dc, ch 1). Join.
R3: Sl st to corner. Work (3 dc, ch 2, 3 dc) in corner, ch 1, 3 dc in side ch-1 sp, ch 1. Repeat around. Join.
R4: Repeat the established granny-square sequence, placing (3 dc, ch 2, 3 dc) in each corner and 3 dc in each side ch-1 space, separated by ch 1.
R5: Continue in the same manner.
R6: Continue until the motif measures approximately 10 cm or reaches the dimension selected for the complete blanket.
Block every square to an identical measurement before attaching flowers.
Fasten off. Weave the tail through at least 4 cm of reverse-direction stitches.
Layered Blue Rose — Make 1 Per Square
Yarn: powder blue DK.
R1: 6 sc in MR, join with sl st. (6)
R2: FLO, (sl st, ch 2, 2 hdc, ch 2, sl st) in each st around. Six small inner petals.
R3: Return to the unused back loops of R1. Work 2 sc in each loop. (12)
R4: (sl st in next st, ch 3, 2 dc in next st, ch 3, sl st in same st) ×6. Six middle petals.
R5: Working behind the petals, attach yarn around the R3 stitch posts. (Ch 4, anchor with sc around the next suitable post) ×6 to create six rear petal loops.
R6: In each ch-4 loop work (sc, hdc, 3 dc, hdc, sc). Six outer petals.
R7: Create six larger loops behind R6: (ch 5, sc around the next rear anchor) ×6.
R8: In each loop work (sc, hdc, dc, 3 tr, dc, hdc, sc).
The outer petals should overlap but must not be pulled tightly against the center.
Fasten off. Leave a 25 cm tail for sewing the rose to the square.
Green Leaves — Make 4 to 6 Per Square
Yarn: leaf green.
Foundation: Ch 8.
R1: Beginning in second ch from hook: sl st, sc, hdc, dc, hdc, sc, 3 sc in final ch. Rotate to work down the opposite side of the foundation chain.
Continue with sc, hdc, dc, hdc, sc, sl st.
For a visible central vein, sl st loosely through the back ridge of the starting chain.
Fasten off. Leave a 15 cm tail.
Make four leaves for a simpler motif. For the fuller botanical arrangement visible in the reference photograph, make six leaves and position three on each side of the rose.
Small Leaf Sprigs — Optional, Make 2 Per Square
Yarn: leaf green.
Ch 11.
Working down one side, make (ch 4, sl st in second ch, sc in next ch, hdc in next ch, sl st into main stem) at approximately every second stem chain.
Repeat on the opposite side, offsetting the leaves.
Fasten off. Leave a 20 cm sewing tail.
These small sprigs reproduce the branching greenery visible around many of the blue flowers in the reference.
Flower Assembly on Each Square
Place the rose in the visual center of the blocked cream square. Pin it before sewing.
Arrange two or three leaves to the left and the same number to the right. Their tips should point toward the square corners rather than directly toward the side edges. This orientation preserves the diagonal floral movement visible in the reference image.
Sew the leaves first. Attach each leaf through its central vein, leaving the outer edges free.
Next, sew the rose through the rear-most round only. Do not stitch down the outer petal edges; flattening them removes the dimensional effect.
Blue Contrast Joining
Yarn: powder blue DK.
Arrange the completed motifs in the desired grid. Choose the number of rows and columns according to the required mattress, throw or bedspread dimensions.
Place two squares with wrong sides together.
Join blue yarn at a corner.
Joining Row: Ch 1, sc through the corresponding edge stitches or spaces of both squares. Keep the seam on the right side when recreating the visible blue grid shown in the photograph.
Fasten off at the opposite corner.
Join complete horizontal rows first, then work the vertical seams.
For a flatter alternative, place right sides together while joining. This produces a less prominent grid than the reference blanket.
Foundation Border
Yarn: powder blue DK.
R1: Attach blue yarn at any blanket corner. Ch 1 and sc evenly around the complete perimeter. Work 3 sc in each corner.
R2: Ch 3, dc in each stitch around, working (2 dc, ch 2, 2 dc) in each corner.
R3: Ch 1, sc around; work (sc, ch 2, sc) into each corner space.
This stable foundation separates the modular square grid from the more open lace section.
Openwork Blue Border
Yarn: powder blue DK.
R1: Ch 4, skip 2 sts, sc in next st; repeat around. Adjust the final repeat near each corner so the edge remains flat.
R2: Sl st into first ch-4 space. Ch 3, 4 dc in same space, sc in next ch-4 space; repeat 5 dc in next space, sc in next space around.
R3: Ch 5, sc into center dc of next shell; repeat around.
R4: In each ch-5 space work (sc, ch 3, 2 dc, ch 3, sc).
R5: Ch 4, sc in next ch-3 space; repeat around.
R6: Work 5 dc in each ch-4 space, separating shells with sc where required.
The reference blanket has a broad border. Repeat compatible mesh and shell rounds until the edging measures approximately 8–12 cm, adjusting the depth according to the final blanket scale.
Fasten off and weave in the tail.
Fringe
Yarn: powder blue DK.
Cut strands approximately 28–32 cm long. Fold each group in half so the installed fringe hangs approximately 14–16 cm before final trimming.
Use groups of four to six strands.
Insert the crochet hook through a final border space, pull the folded midpoint through, then draw all loose ends through the resulting loop. Tighten evenly.
Repeat at consistent intervals around the required outer edges. The photographed bedspread uses dense fringe, so spacing of approximately 1–2 cm produces a closer visual match than widely separated tassels.
After installation, lay the blanket flat and trim the fringe to one consistent length.
Assembly
- Crochet all ivory square bases and count them before beginning the decorative work.
- Block every square to the same target measurement, using approximately 10 × 10 cm as the benchmark for this version.
- Crochet one layered powder-blue rose for each square.
- Make four to six green leaves per square and add optional branching sprigs.
- Pin the leaves first, keeping matching motifs oriented consistently across the grid.
- Sew each leaf through its center line while leaving the edges free.
- Center each rose over its leaf arrangement and sew only through the flower’s rear structure.
- Join the motifs with powder-blue yarn, completing horizontal seams before vertical seams.
- Crochet the foundation and openwork border around the assembled blanket.
- Attach equal fringe groups, trim them to one finished length and weave in every remaining yarn tail.
The completed piece consists of blocked modular squares, raised floral appliqués, visible contrast seams, an openwork border and fringe.
7 Technical Tips for a Consistent Rose Blanket
- Square creep: A 5 mm discrepancy repeated across ten motifs produces a 5 cm alignment problem. Measure each blocked square against one physical 10 cm template rather than comparing squares only with their neighbors.
- Rose collapse: Sewing through the outer petal edges makes a dimensional flower look flat. Anchor the flower through its rear round and allow the final two petal layers to remain free.
- Off-center flowers: A rose displaced even 10 mm becomes conspicuous once the blue grid is assembled. Mark both horizontal and vertical center lines on the square before pinning.
- Leaf rotation: Leaves pointing randomly make repeated squares appear incorrectly rotated. Establish one sample arrangement and photograph or sketch the orientation before assembling the remaining motifs.
- Puckered joining: Tight single-crochet seams shorten the square edges and make the blanket ripple. Keep the joining loops approximately the same height as the edge stitches and compare each completed seam against an unjoined row.
- Border flare: Too many stitches around the perimeter make the lace wave outward. If the foundation round begins to flare, remove excess stitches before adding the shell rounds.
- Uneven fringe: Cutting every strand individually creates visible length variation. Wind yarn around a 14–16 cm cardboard gauge, cut along one edge and use equal strand groups at every attachment point.
Finishing the 3D Rose Granny Square Blanket
The defining requirement of this 3D rose granny square blanket is controlled repetition: identical cream blocks, consistently centered blue flowers, matching green leaf angles and visible blue seams. Start by making one complete 10 cm sample motif with DK yarn and a 3.5 mm hook, then measure it before calculating the number of squares required for your bed or throw.
Block the bases before assembly rather than attempting to correct size differences during joining. Once the grid is complete, add the blue lace border and fringe as a single finishing stage. Save the finished layout to Pinterest and share the completed blanket on Instagram with #BlueRoseGrannySquareBlanket. For your version, will the green leaves point toward all four corners or form the two-sided sprays shown in the reference?









