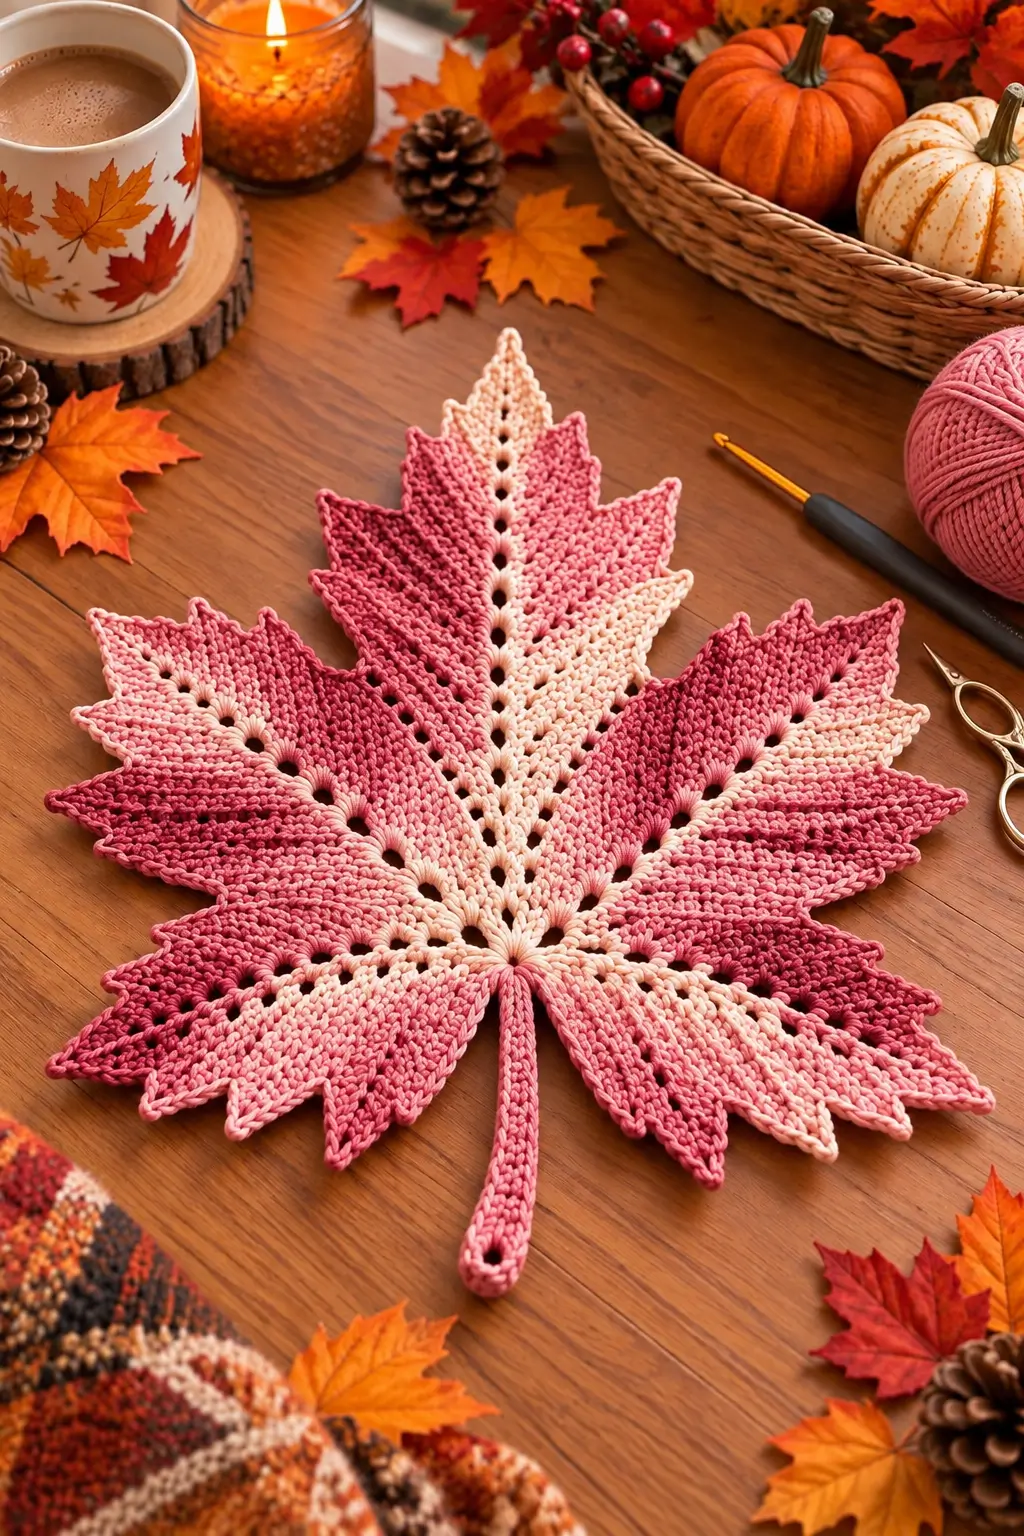
A maple leaf stops reading as a maple leaf when its lower lobes compete with the tall center point. This pink crochet maple leaf pattern preserves that hierarchy with five major lobes, smaller serrated points, open vein lines and a long stem. Worked in cream, blush, rose and deep pink cotton, the intermediate project is designed as a large decorative table leaf approximately 25 cm tall.
The Design: What Makes This Pink Maple Leaf Different
The photographed leaf uses color direction to reinforce its anatomy. Cream follows portions of the central vein, blush occupies transitional areas, and darker rose shades concentrate across selected outer lobes. The result is an ombre effect without horizontal striping.
Five principal sections control the silhouette. The center lobe is longest, the two upper side lobes establish most of the width, and the lower pair remain shorter. Open chain spaces radiate outward as stylized veins.
The serrated perimeter is equally important. Large points establish the five lobes while smaller teeth break up their edges. A common mistake with a crochet maple leaf placemat is enlarging every point equally. Keep a clear size hierarchy or the motif becomes star-shaped.
Project Info at a Glance
| Skill Level | Time | Finished Size | Hook | Recommended Yarn |
|---|---|---|---|---|
| Intermediate | 4–6 hours | Approx. 25 × 23 cm, excluding extended stem variation | 3.5 mm | Worsted #4 cotton |
A published maple-leaf placemat worked with worsted-weight cotton and a 3.5 mm hook measures approximately 10 × 9 inches, or 25.5 × 23 cm, and uses approximately 85–91 m of yarn. Smaller published maple-leaf motifs vary considerably, confirming that yarn thickness and construction have a major effect on finished dimensions.
Materials and Tools
Yarn
- Cream — Worsted #4 cotton — approximately 20–25 g
- Blush pink — Worsted #4 cotton — approximately 20–25 g
- Medium rose — Worsted #4 cotton — approximately 25–30 g
- Deep raspberry pink — Worsted #4 cotton — approximately 25–30 g
Plan for approximately 85–100 m total for a large decorative leaf. Buy slightly more if you want to control exactly where each color transition occurs.
Tools
- 3.5 mm crochet hook
- Yarn needle
- Scissors
- 5–10 locking stitch markers
- Measuring tape
- Blocking mat
- Rust-resistant blocking pins
Abbreviations
- MR — magic ring
- ch — chain
- sl st — slip stitch
- sc — single crochet
- hdc — half double crochet
- dc — double crochet
- tr — treble crochet
- inc — 2 sc in the same stitch
- dec — sc2tog
- st/sts — stitch/stitches
- sp — space
- ch-sp — chain space
- RS — right side
- WS — wrong side
Work decreases through the front loops when a less visible sc2tog is required. Keep all vein chains relaxed so the decorative openings remain visible after blocking.
Before Starting the Pattern
This pattern is a photo-inspired reconstruction. The photograph provides the visual target, but it does not contain the original designer’s written instructions or stitch counts. The construction below creates an original five-lobed maple leaf using the visible proportions, open veins, serrated edges and pink color placement as design references.
Work the leaf flat. The five major sections are built from a compact central foundation and shaped separately. Secondary points are added during perimeter finishing.
Pink Ombre Color Plan
Do not change colors at identical heights across all five lobes. The photographed effect is irregular and follows the vein structure.
- Center vein: cream and blush
- Central lobe: cream at the upper tip, blush and medium rose below
- Left upper lobe: medium rose with deep raspberry sections
- Right upper lobe: blush, medium rose and deep raspberry
- Lower-left lobe: blush transitioning into medium and deep rose
- Lower-right lobe: cream/blush near the center with deeper pink toward the edge
- Stem: medium rose or deep raspberry
Pink Crochet Maple Leaf Pattern – Step by Step
Central Foundation
Yarn: blush pink
Make an MR.
Round 1: Work 10 sc into MR. Join with sl st. (10)
Round 2: Ch 1, 2 sc in each st around. Join. (20)
Round 3: Ch 1, repeat (sc in next st, inc in next st) around. Join. (30)
Fasten off only if a color change is required.
Place five markers around the center to identify the axes for the center, upper-left, upper-right, lower-left and lower-right lobes.
Central Lobe
The central lobe controls the total height. Make it approximately 20–30% longer than either lower lobe.
Begin with blush pink.
Row 1: Join yarn and sc across 6 foundation sts. Turn. (6)
Row 2: Ch 1, inc, sc in next 4 sts, inc. Turn. (8)
Row 3: Ch 1, sc in next 3 sts, ch 2, skip 2 sts, sc in next 3 sts. Turn. (6 sc + ch-2 sp)
Row 4: Ch 1, inc, sc to ch-sp, 2 sc in ch-sp, sc across to final st, inc. Turn.
Row 5: Ch 1, sc across. Turn.
Row 6: Ch 1, inc in first st, sc across, inc in final st. Turn.
Change to cream.
Row 7: Sc toward the center, ch 2, skip 2 center sts, sc across. Turn.
Row 8: Sc across, working 2 sc into the ch-2 sp.
Row 9: Inc, sc across, inc.
Row 10: Sc across.
Row 11: Sc to the central vein, ch 2, skip 2 sts, sc across.
Row 12: Sc across, replacing the ch-2 sp with 2 sc.
Change to blush or medium rose if required by the selected color arrangement.
Rows 13–16: Continue in sc, increasing at both edges on alternate rows until the lobe reaches its required width.
Central Lobe Decreases
Row 17: Ch 1, dec, sc across to final 2 sts, dec.
Row 18: Sc across.
Repeat Rows 17–18 until 5 sts remain.
Next Row: Dec, sc, dec. (3)
Tip: Ch 3, sl st into second ch from hook, sl st into next ch, sl st into center st.
Fasten off.
Upper-Left Lobe
Use medium rose, changing to deep raspberry toward the outside.
Row 1: Join yarn across the next 6 marked foundation sts. Sc across. Turn. (6)
Row 2: Inc, sc in next 4 sts, inc. (8)
Row 3: Sc in next 3 sts, ch 2, skip 2 sts, sc across.
Row 4: Inc at both edges and work 2 sc in the ch-sp.
Row 5: Sc across.
Row 6: Inc, sc across, inc.
Row 7: Sc to the vein position, ch 2, skip 2 sts, sc across.
Row 8: Sc across, working 2 sc into the ch-sp.
Rows 9–12: Continue the same expansion principle, adding one vein opening approximately every third row.
Change to deep raspberry.
Rows 13–14: Sc across.
Begin decreasing one stitch at each edge on alternate rows.
Continue until 3 sts remain.
Ch 3, sl st into second ch from hook, sl st in next ch, sl st into center st.
Fasten off.
Upper-Right Lobe
Work this lobe to the same approximate dimensions as the upper-left lobe.
Begin with blush or cream near the center, change to medium rose through the middle and finish selected outside rows in deep raspberry.
Row 1: Sc across 6 foundation sts. (6)
Row 2: Inc, sc across, inc. (8)
Row 3: Create a centered ch-2 vein opening.
Rows 4–12: Expand symmetrically while keeping the vein openings aimed toward the final point.
Rows 13 onward: Decrease at both edges on alternate rows until 3 sts remain.
Finish with a ch-3 point.
Fasten off.
Place the motif flat before continuing. Both upper side points should sit at approximately equal distances from the center.
Lower-Left Lobe
The lower lobe must be visibly shorter than the upper side lobe.
Begin with blush pink.
Row 1: Sc across 6 marked foundation sts. (6)
Row 2: Inc, sc across, inc. (8)
Row 3: Inc, sc across, inc. (10)
Row 4: Sc in next 4 sts, ch 2, skip 2 sts, sc across.
Row 5: Sc across, working 2 sc into the ch-sp.
Change to medium rose.
Rows 6–8: Sc across, maintaining the established width.
Row 9: Dec, sc across, dec.
Row 10: Sc across.
Change to deep raspberry.
Repeat the decrease sequence until 3 sts remain.
Ch 2, sl st into second ch from hook and sl st into center st.
Fasten off.
Lower-Right Lobe
Repeat the lower-left construction with mirrored proportions.
Use cream or blush for the section nearest the center, medium rose through the middle and deep raspberry on selected outer rows.
Work exactly the same number of shaping rows as the left lower lobe.
Finish with a ch-2 point and fasten off.
Adding the Smaller Maple Points
The primary lobes alone create a simplified leaf. The photograph has additional serrations, so work smaller points along the perimeter.
Join matching yarn at the base of a lower lobe.
Sc evenly toward the first secondary point.
For a small point, work:
sc, hdc, ch 2, sl st into second ch from hook, hdc, sc.
For a medium point, work:
sc, hdc, dc, ch 2, sl st into second ch from hook, dc, hdc, sc.
For a larger secondary point, work:
sc, hdc, dc, tr, ch 3, sl st into first ch, tr, dc, hdc, sc.
Do not use the large version beside every serration. The five original lobe tips must remain the dominant points.
Shaping the Deep Valleys
Maple-leaf valleys need to remain narrow and deep.
As you approach a valley, reduce stitch height from dc to hdc to sc.
At the lowest position work one sl st.
Then climb the opposite side using sc, hdc and taller stitches as required.
Avoid placing an increase at the bottom of a valley. Extra stitches there make the indentation spread outward and weaken the silhouette.
Creating the Open Veins
The photographed design uses a strong central row of openings with smaller diagonal lines extending through the side lobes.
For a narrow opening:
Ch 1, skip 1 st.
On the next row, work one sc into the ch-1 sp.
For the larger openings visible along the central vein:
Ch 2, skip 2 sts.
On the following row, work two stitches into the ch-2 sp.
Position the openings approximately 1–2 cm apart.
The central holes should form a clear line from the base junction toward the tip of the tallest lobe.
Long Pink Crochet Stem
Yarn: medium rose
Join yarn at the bottom center of the leaf.
Foundation: Ch 30.
Row 1: Sc in second ch from hook and across. (29)
Row 2: Ch 1, turn, sc across. (29)
Row 3: Ch 1, turn, sc across. (29)
At the lower end, work 3 sc into the final stitch and continue along the opposite edge if a rounded cord-like stem is preferred.
Sl st into the leaf base.
Fasten off.
Optional Hanging Hole
The photographed stem includes a small opening near its lower tip.
When approximately 4 stitches remain before the rounded end, work:
Ch 3, skip 2 sts.
Continue across.
On the return row, work 3 sc around the ch-3 sp.
This creates a small reinforced hanging hole without adding a separate loop.
Changing Colors Cleanly
Stop immediately before the final yarn-over of the last stitch in the old color.
Complete that yarn-over with the new color.
Leave a 12–15 cm tail from both colors.
Place changes beside a vein or along a lobe boundary whenever possible. The structural break makes the transition less abrupt.
Do not carry unused yarn through long sections of cream or blush. Dark carried strands may remain visible between the lighter stitches.
Assembly and Finishing
- Place the leaf flat and align the tallest central lobe with the stem.
- Compare the two upper side lobes from their tips to the center junction.
- Check that the lower lobes are shorter than the upper pair.
- Complete all secondary points while preserving the five dominant lobe tips.
- Inspect every open vein and correct any chain space that has been pulled closed.
- Finish the stem and optional hanging hole before blocking.
- Weave dark-pink tails through dark sections and cream tails through the lightest areas.
- Dampen the cotton according to the yarn manufacturer’s instructions.
- Pin every major and secondary point individually while pulling each valley slightly inward.
- Allow the leaf to dry completely before removing the pins and recording the final dimensions.
The finished leaf should have five clearly ranked lobes, a straight central vein, symmetrical upper sections, shorter lower lobes and a narrow stem aligned with the tallest point.
Blocking the Pink Maple Leaf
Pin the stem and central point first. These two positions establish the main axis.
Next, measure from the center junction to each upper side point. Adjust them until the dimensions are similar without overstretching either side.
Pin the lower lobes at shallower angles. They should not extend as far outward as the broadest upper sections.
Add a pin to every small perimeter point. Use separate pins in the valleys to pull those areas inward.
Do not stretch the chain-space veins sideways. Their openings should remain narrow and elongated rather than becoming circular holes.
How to Resize the Crochet Maple Leaf
Small Appliqué
Use sport-weight yarn and a 3 mm hook. Published sport-weight maple leaves can measure approximately 4.5 × 2 inches depending on construction.
Medium Decoration
Use DK cotton with a 3–3.5 mm hook. A decorative leaf around 15–17 cm makes a useful target for garlands and smaller table arrangements.
Large Placemat
Use worsted cotton and a 3.5 mm hook. A published placemat-scale maple leaf reaches approximately 25.5 × 23 cm with this yarn and hook combination.
Oversized Centerpiece
Use heavier cotton with a 4.5–5 mm hook, or add expansion rows before beginning each decrease section.
When adding rows, preserve the proportions. Add the most length to the central lobe, slightly less to the upper side lobes and the least to the lower pair.
Alternative Pink Color Arrangements
- Cream + blush + rose + raspberry — closest to the reference
- White + pale pink + dusty rose — lighter three-color version
- Blush + mauve + burgundy — darker gradient
- Peach + coral + raspberry — warmer variation
- Cream + lavender + plum — cool-toned version
- Single dusty rose — emphasizes the vein texture rather than color changes
For an irregular ombre effect, do not repeat the same sequence on every lobe. Keep the center lighter and distribute the darkest shade across selected outer sections.
7 Technical Tips for a Better Crochet Maple Leaf
- Keep the center lobe 20–30% longer than the lower pair. Five lobes of equal length create a star-like outline rather than the required maple silhouette.
- Mark the center of every lobe before making vein openings. Moving a ch-2 opening more than two stitches from the lobe axis produces a visibly crooked vein.
- Use only one slip stitch at each major valley. Several stitches packed into the lowest point make the indentation shallow and widen the gap between lobes.
- Compare mirrored lobes every four rows. Correct a difference greater than approximately 1 cm before starting the perimeter serrations.
- Leave 12–15 cm tails at every pink color change. Short tails are difficult to secure through dense cotton without pulling the transition out of shape.
- Pin every serration separately during blocking. One pin at the end of a complete lobe cannot maintain the smaller points visible along its perimeter.
- Keep the stem within approximately 5 mm of the central-lobe axis. A stem shifted sideways makes the complete motif look unbalanced even when the lobes themselves match.
Preventing Curling
If a lobe cups upward, first compare its stitch count with the matching lobe. Too few increases or unusually tight tension can reduce the outer circumference.
If the fabric ripples, check for excessive increases. Remove the extra stitches rather than relying on blocking to flatten a strongly distorted section.
Inspect the work before adding secondary points. The base lobes should already lie reasonably flat.
A small amount of movement in cotton can be corrected during blocking. Pronounced waves or cupping usually indicate a shaping problem.
Using the Leaf as Table Décor
The large format works as a decorative placemat, centerpiece mat or seasonal table accent. Several smaller versions can also be arranged along a runner while one large leaf anchors the center.
Use cotton if the piece will be washed frequently. After laundering, reshape the five main lobes and smaller points while damp.
A decorative crochet leaf should not automatically be treated as heat protection. If it will sit beneath hot cookware, choose fiber, thickness and construction specifically suited to that use.
Finishing the Pink Ombre Leaf
Inspect the wrong side before the final blocking. Dark raspberry tails should remain inside dark stitches because they can show through cream sections.
Check the central vein from the base to the top point. The openings should form a continuous visual axis even when the surrounding yarn color changes.
Measure across the widest two side points after drying. Record the width, total leaf height and stem length if additional matching leaves will be made.
For a coordinated set, keep the stitch counts identical but change the location of the four pink shades. Each leaf can then have a different gradient while retaining the same dimensions.
Conclusion
Establish the five lobe axes before adding color transitions, then keep the central section longer than every surrounding point. Position the cream and blush yarn near selected veins, move medium rose through the broader sections and reserve deep raspberry for several outer areas. Add the small serrations only after the five-lobe geometry lies flat, then block every point separately. Your next practical step is to swatch the chosen cotton with a 3.5 mm hook and record its width. Save this pink crochet maple leaf pattern to Pinterest and share the finished version on Instagram with #PinkOmbreMapleLeaf. Would you place the darkest raspberry section on the left or right side lobe?










Je voudrais le e modèle en français ou la grille, diagramme. Ces explications sont trop difficile pour moi pourtant je maîtrise l’anglais… Merci