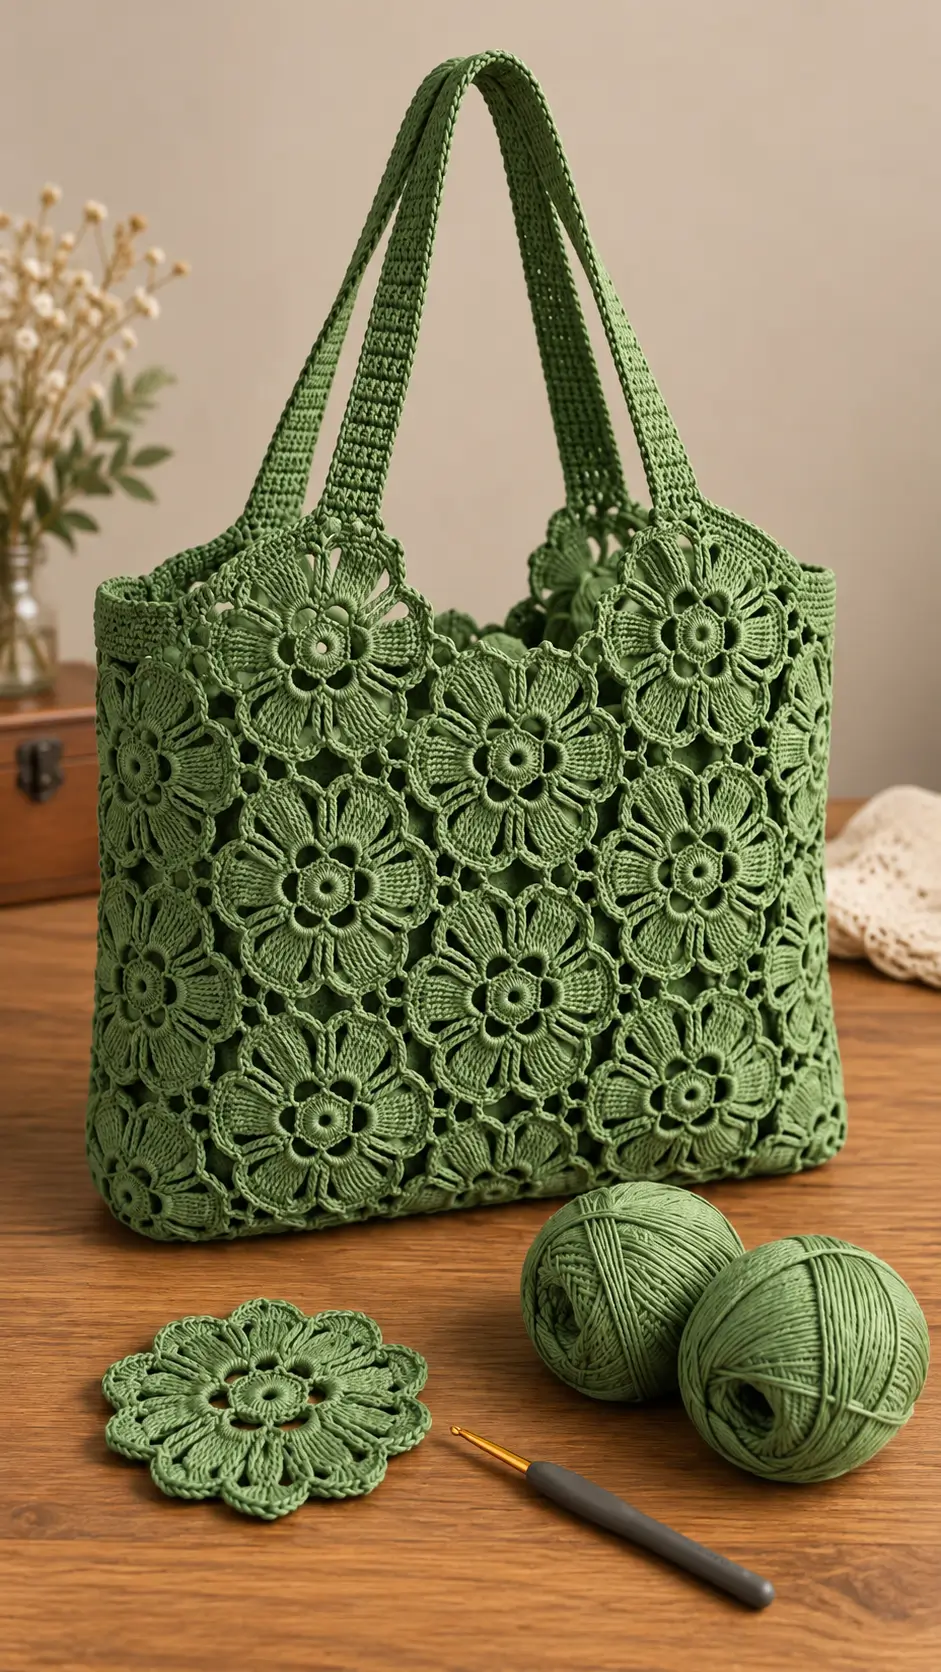
Eight broad petals control the geometry of this bag, because every panel measurement depends on the finished diameter of the flower. This crochet flower motif tote bag uses a single green cotton yarn, dimensional floral motifs, openwork joins, a firm upper border, and two long crocheted handles. The construction is suited to intermediate crochet skills and produces a reusable tote whose final dimensions can be adjusted by adding or removing motifs.
The Design: What Makes This Flower Motif Bag Different
The structure of this bag depends on the flowers rather than on a conventional solid crochet panel. Each large motif acts as both decoration and fabric, so consistent diameter is important. The raised petals create the dominant floral surface, while small open spaces between motifs prevent the finished panel from becoming excessively dense.
A second structural feature is the monochrome construction. Using the same sage-green yarn for the centers, petals, joins, border, and handles makes differences in stitch texture more visible. The third feature is the pair of wide flat handles. Their width distributes the load across more stitches than a narrow chain strap.
A frequent problem with a crochet floral tote is joining the motifs too tightly. Short joining chains pull adjacent flowers together, causing the panel to cup or ripple. Block one test flower first and use its finished diameter as the reference measurement for every remaining motif.
Project Information at a Glance
| Skill Level | Intermediate |
|---|---|
| Construction | Individual flower motifs joined into panels |
| Yarn | Cotton or cotton-blend yarn with firm stitch definition |
| Color | Sage / olive green |
| Reference Hook | 2.5 mm; adjust to match the selected yarn |
| Reference Yarn Amount | Approximately 200 g for a compact motif tote; a larger bag requires more |
| Construction Method | Motifs, openwork joining, upper border, and crocheted handles |
Materials and Tools
Yarn
- Sage green cotton yarn — use a firm multi-ply cotton with clear stitch definition.
- Main yarn quantity — start with at least 200 g for a compact bag. A large tote similar to the photographed version will require additional yarn.
- Accent yarn — none required for the monochrome version.
- Extra matching yarn — reserve yarn for joining, the upper border, and both handles before completing all motifs.
Tools
- 2.5 mm crochet hook as a starting reference; change hook size when required by your yarn.
- Tapestry needle for joining and weaving ends.
- Locking stitch markers for marking handle positions.
- Scissors.
- Blocking pins.
- Blocking mat.
- Tape measure.
- Optional fabric lining for additional structure.
- Optional magnetic closure.
Abbreviations
- MR — magic ring
- ch — chain
- sc — single crochet
- hdc — half double crochet
- dc — double crochet
- tr — treble crochet
- sl st — slip stitch
- st / sts — stitch / stitches
- sp — space
- rep — repeat
- BLO — back loop only
An invisible decrease is normally used for three-dimensional amigurumi shaping and is not required for this flat flower-motif construction.
Crochet Flower Motif Pattern
The photographed flowers contain broad dimensional petals surrounding a raised circular center. The following motif is an original construction based on that visible geometry. Make one complete flower first, block it, and measure the diameter before deciding how many motifs the finished bag needs.
Eight-Petal Flower Motif
Make enough motifs to create two main panels plus the required side and base sections. Use sage green throughout.
Round 1: Make an MR. Ch 1 and work 16 sc into the ring. Pull the ring closed and join with a sl st to the first sc. (16 sc)
Round 2: Ch 1, sc in the first st, ch 3, skip the next st. Repeat around. Join with a sl st. (8 sc, 8 ch-3 spaces)
Round 3: Sl st into the first ch-3 space. Work (sc, hdc, 3 dc, hdc, sc) into the same space. Repeat the sequence in every ch-3 space around. Join with a sl st. (8 petals)
Round 4: Work behind the first layer of petals. Sl st to the corresponding stitch from Round 2, ch 5, then sl st into the next corresponding stitch. Repeat around to create eight larger chain spaces behind the petals. (8 ch-5 spaces)
Round 5: In each ch-5 space work (sc, hdc, 2 dc, 3 tr, 2 dc, hdc, sc). Repeat around. Join with a sl st. (8 large petals)
Round 6: Sl st along the back of the work to a space between two petals. Ch 5 and sl st into the next space between petals. Repeat around. (8 ch-5 joining spaces)
Check that the motif lies flat. If the outer edge cups inward, increase each joining loop by one chain. If the edge ruffles, reduce each loop by one chain.
Fasten off, leaving a 15 cm tail when the motif will be sewn to an adjacent flower.
Raised Flower Center
The photographed bag has pronounced circular centers. Add this small layer when a more dimensional result is required.
Round 1: MR, 8 sc in ring. Join with sl st. (8)
Round 2: Work 2 sc in every stitch around. Join. (16)
Round 3: Ch 1. Work one sc in every stitch around. (16)
Fasten off and leave approximately 15 cm for sewing. Position the circle over the center of the flower and stitch around its outer edge. Keep the center flat rather than stuffing it.
Planning the Bag Size
Do not make the entire set of flowers before measuring the first blocked motif. The diameter of that flower determines the dimensions of the finished tote.
For example, if one blocked motif measures 10 cm across and the front uses three motifs across by three motifs high, the floral portion of the panel will be approximately 30 cm wide by 30 cm high before border adjustments. Joining tension can alter that measurement.
For a larger tote, increase the number of motifs rather than enlarging individual flowers indefinitely. Oversized motifs place longer unsupported sections between joins and can stretch more under load.
Blocking the Flower Motifs
Block every motif to the same diameter before assembly. A difference of only 5 mm per flower becomes significant when several motifs are joined across one panel.
Place the first finished flower on a blocking mat. Spread all eight petals evenly and pin the outer joining spaces at equal distances. Measure through the center from one outer edge to the opposite edge.
Record that measurement. Block every remaining flower to the same diameter.
Allow cotton motifs to dry completely before removing the pins. Do not stretch one flower merely to make it match an oversized motif; correcting the inconsistent motif is more stable than distorting the rest of the panel.
How to Join the Flower Motifs
The visible bag uses open spaces between the flowers, so the joining method should preserve some negative space rather than creating a solid seam.
Join-As-You-Go Method
Complete the first flower through its final joining round.
On the next motif, work the outer joining round until reaching the side that will connect to the completed flower. Instead of making the full center portion of the joining chain, work half the chain, insert the hook into the corresponding chain space on the neighboring motif, make a sl st, and complete the remaining chains.
Continue around the motif, connecting the required spaces to the adjacent flower.
Check the panel after every new motif. It must remain flat on a table without stretching. Tight joins cause the fabric to cup; oversized joining loops create loose gaps and allow the motifs to shift.
Sewn Joining Method
If all motifs have already been completed, arrange them face up on a flat surface. Use locking stitch markers to hold neighboring joining spaces together.
Thread a tapestry needle with matching yarn. Sew corresponding outer loops together using small whip stitches or mattress-style stitches. Do not sew through the raised petals.
Keep each join flexible. The connection should hold the flowers at their blocked dimensions rather than pull them toward one another.
Front and Back Panels
Arrange the motifs into two matching rectangles. The exact grid depends on the diameter of the blocked flowers and the required finished bag size.
Before permanent joining, lay the entire front arrangement on a flat surface. Check the width at the top, center, and bottom. Those three measurements should be nearly identical.
Join all flowers in the front panel. Repeat the same arrangement for the back.
Compare both completed panels by placing one directly over the other. Correct any significant difference before adding the sides or upper border.
Side Panels
The photographed tote has visible depth rather than functioning as a flat envelope bag. Create each side from a vertical strip of motifs or from an openwork crochet panel that matches the width of the intended gusset.
For a motif-based side, join flowers vertically until the strip matches the height of the front panel. Make a second identical strip for the opposite side.
Attach one long edge of the side strip to the front panel and the other long edge to the back panel.
Repeat on the opposite side.
Place the work flat after each seam. If the side strip is longer than the front edge, do not force the excess into the seam. Correct the join before proceeding.
Base of the Bag
A loaded crochet bag places substantial tension on its lower edge. The base therefore needs more support than the decorative center of the front panel.
One option is to continue the floral construction across the bottom. This gives the most consistent appearance but creates more open spaces.
For a firmer base, crochet a rectangular strip in sc.
Foundation: Chain until the strip matches the width of the finished front panel.
Row 1: Sc in the second chain from the hook and in every chain across. Turn.
Row 2: Ch 1, sc in every stitch across. Turn.
Repeat Row 2 until the base reaches the same depth as the side gussets.
Fasten off, leaving a long sewing tail. Attach one long edge to the front, the opposite long edge to the back, and the short ends to the side panels.
Upper Border
The upper edge needs stabilization before the handles are attached.
Round 1: Join yarn at one side seam. Work sc evenly around the entire opening. Place stitches consistently across each motif and joining space. Join with sl st.
Round 2: Ch 1. Sc in every stitch around. Join with sl st.
Round 3: Ch 1. Work one sc in every stitch around. Join.
Rounds 4–5: Repeat Round 3 if a deeper upper band is required.
Count the stitches along the front and back edges before marking the handles. The two sides should contain equivalent stitch counts so that the handles sit symmetrically.
Crochet the Handles
The image shows two long, flat handles rather than chain cords. A flat strap is preferable for a tote because it spreads force across a wider section of crochet.
Handle 1
Row 1: Ch 9.
Row 2: Sc in the second chain from the hook and in each remaining chain. (8 sc)
Row 3: Ch 1, turn. Sc in each stitch across. (8)
Repeat Row 3 until the handle reaches the required length.
For a shoulder tote, test the strap against the completed bag before fastening off. Crochet stretches under weight, particularly when the strap is worked lengthwise without reinforcement.
Fasten off and leave at least a 25 cm tail for attachment.
Handle 2
Repeat the first handle exactly. Count the rows rather than measuring only by eye. Both straps need the same row count and relaxed length.
Optional Handle Reinforcement
For reduced stretching, work one row of sl st along each long side of the strap. Keep those slip stitches loose enough that the handle remains flat.
A second option is to sew cotton webbing or fabric tape to the underside of each finished strap. Keep the reinforcement hidden from the front of the bag.
Assembly
- Block every flower motif to the same recorded diameter.
- Arrange and join the motifs for the front panel.
- Make the back panel with the same dimensions and motif arrangement.
- Construct two matching side sections and check their length against the front and back panels.
- Join the side sections to the front panel, then attach the back panel.
- Add the floral or solid rectangular base and reinforce the four lower corners.
- Work several rounds of sc around the complete upper opening.
- Mark the handle positions with locking stitch markers, measuring from both side seams rather than estimating placement visually.
- Sew each handle through multiple rows of the upper border and weave the attachment tails through several directions inside the fabric.
- Weave all remaining ends, block the assembled tote lightly, and add a lining or closure if required.
The completed bag should stand evenly with symmetrical handles and flower motifs that remain flat rather than pulling toward the joins.
Optional Fabric Lining
Openwork floral crochet can allow small objects to pass through the gaps. A fabric lining solves that problem and also reduces stress on the crocheted joins.
Measure the completed bag only after final blocking. Cut two fabric pieces for the front and back, adding seam allowance around all edges. Add separate side and base pieces when the tote has a substantial gusset.
Sew the fabric shell first. Insert it into the crochet bag with the wrong sides facing each other.
Turn the upper fabric edge inward and hand-sew it just below the crocheted upper border. Keep the stitches inside the dense border rather than passing them through the decorative petals.
A magnetic snap or internal pocket can be attached to the lining before the lining is sewn into the crochet shell.
7 Technical Tips for a Better Flower Motif Tote
- Control motif diameter. A 5 mm difference between flowers can accumulate into more than 1 cm across a multi-motif panel. Block and measure every motif before joining.
- Mark the beginning of border rounds. Losing the first stitch can shift the side seam and make the handle positions asymmetrical. Place a locking stitch marker in the first stitch of every upper-border round.
- Watch for cupping at the joins. A panel that lifts from the table has joining chains that are too short or tight. Increase the relevant chain spaces before adding more motifs.
- Do not overfill open spaces with joining stitches. Excessive stitches around a chain loop produce a ruffled seam. Match the same number of joining stitches at every equivalent connection point.
- Measure handle placement from the side seams. A difference of even 1–2 cm becomes visible when the bag hangs from the shoulder. Mark all four attachment points before sewing either handle permanently.
- Reinforce the lower corners. These points receive concentrated stress when the bag carries weight. Pass the joining yarn through each corner connection several times without pulling the fabric out of shape.
- Weave handle tails in multiple directions. A tail woven only horizontally can work backward through the stitches under repeated tension. Change direction at least twice and pass through dense border stitches rather than open chain spaces.
Adjusting the Size
The simplest way to resize this crochet flower motif bag is to change the motif grid rather than alter the flower itself.
For a wider bag, add another vertical column of flowers to both the front and back. Increase the base width by the same amount.
For a taller tote, add another horizontal row. Both side panels must receive the same increase.
For additional depth, widen the side strips and base while leaving the front and back unchanged.
Do not calculate dimensions from an unblocked motif. Cotton flowers can change noticeably after blocking, and multiplying that difference across several motifs can produce a bag that is significantly larger or smaller than planned.
Color and Yarn Changes
The photographed tote uses one green shade across every structural component. This makes the petal relief and openwork joining pattern the primary visual contrast.
A multicolor version can be made without changing the construction. Use one color for the center, another for the petals, and a third for the outer joining round. Keep yarn thickness consistent between colors.
Cotton is particularly suitable for this structure because the flower edges need enough definition to remain visible after assembly. Very soft yarn can blur the petal outlines, while highly elastic yarn can allow the finished tote to lengthen when loaded.
If substituting yarn, make one complete blocked flower before purchasing the full quantity. Record its diameter, weight, and yarn consumption, then multiply the approximate consumption by the planned number of motifs and add yarn for joins, border, base, and handles.
Finishing the Crochet Flower Tote Bag
Inspect every connection before the final blocking. Pay particular attention to the bottom corners, handle bases, and places where four motifs meet.
Lay the empty tote flat and compare the two side seams. The opening should remain level when the handles are placed together.
Lightly block the completed bag without aggressively stretching the handles. Shape the flower petals individually and align the upper border.
Allow the bag to dry flat. If a fabric lining has been added, follow the washing requirements of both the yarn and lining fabric rather than treating the crochet layer independently.
Conclusion
A successful crochet flower motif bag depends on repeatable motif dimensions, balanced openwork joins, a stable upper edge, and handles attached across enough fabric to carry the load. Start by making and blocking one eight-petal flower, record its exact diameter, and calculate the front-panel grid before producing the remaining motifs. Save the finished bag to Pinterest as a construction reference and share your completed version on Instagram with #FlowerMotifToteBag. For this specific design, the key customization decision is structural: will you keep the photographed monochrome sage-green flowers, or use contrasting centers while preserving the same eight-petal layout?









