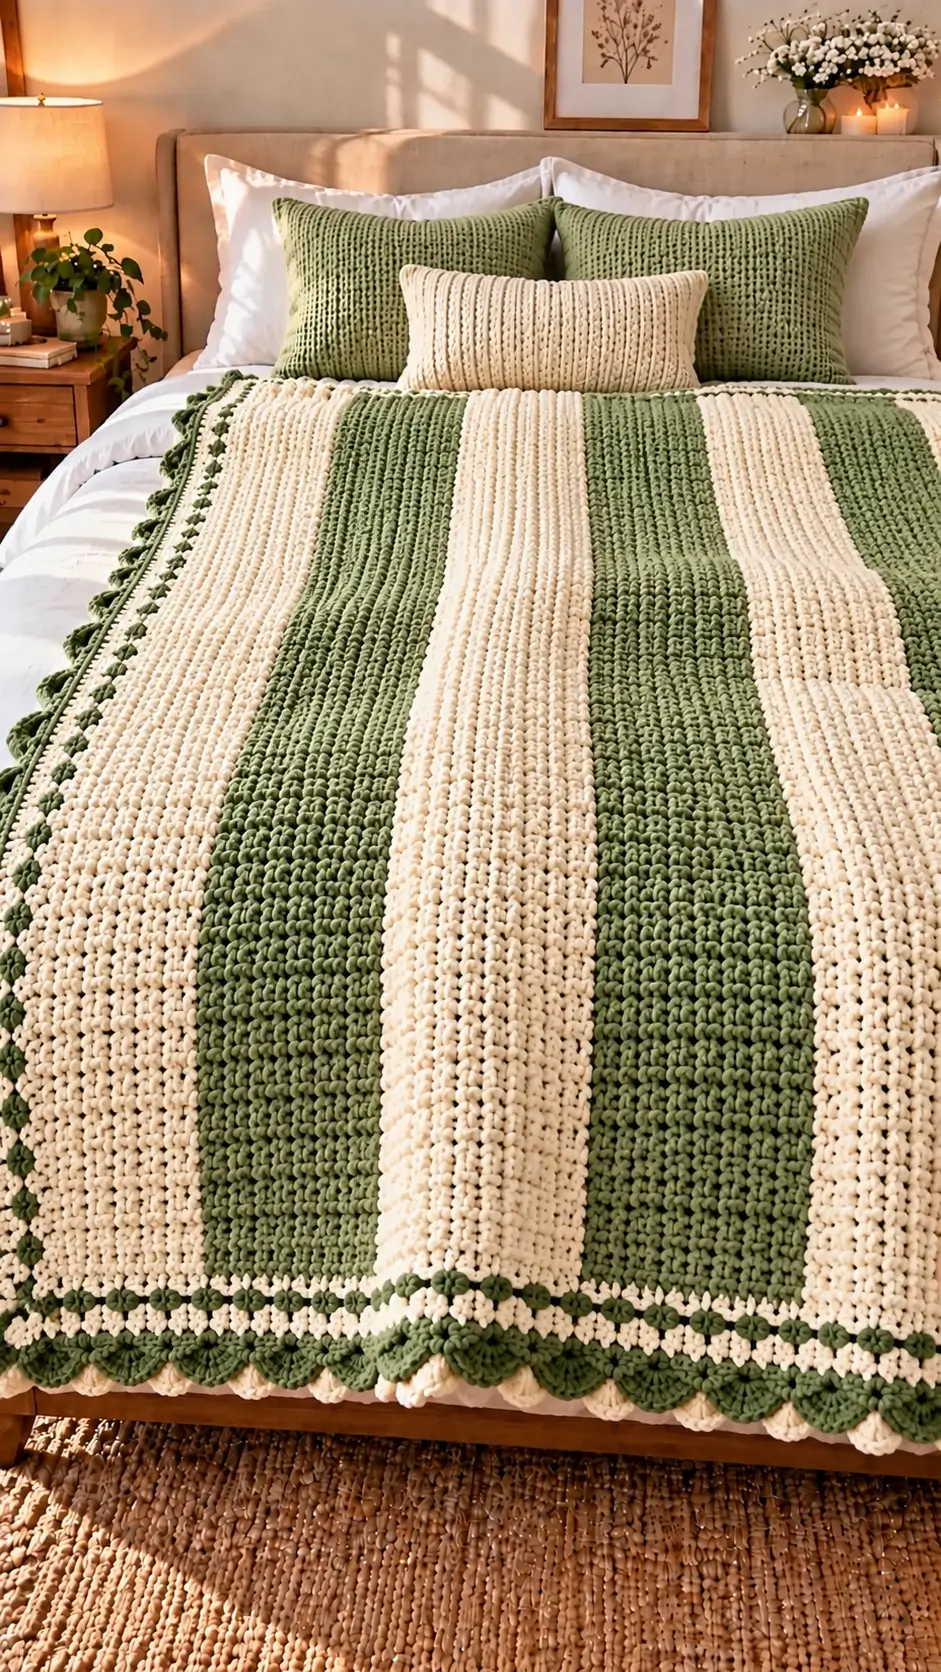
Broad sage columns separated by cream panels are the defining geometry of this green and cream striped crochet blanket. This photo-inspired version uses #5 bulky yarn, a 7 mm hook, and adjustable dimensions based on gauge; 127 × 152 cm works as a practical throw benchmark. The skill level is intermediate because the body is simple but the border requires accurate spacing. Its two-color construction also limits yarn changes.
The Design: What Makes This Blanket Different
The reference blanket depends on proportion more than complicated stitch work. Wide green and cream fields create the dominant structure, while narrow decorative rounds stop the border from competing with those stripes. A deeper scalloped final edge adds a second scale of repetition.
The photographed stripes appear vertical when the blanket is displayed on the bed. For a practical recreation, you can produce that orientation by working long rows from the foot toward the head, or crochet conventional horizontal rows and rotate the finished blanket before styling it. The second method is easier to resize.
A common mistake with a chunky striped crochet blanket is changing yarn weights between colors. Even small gauge differences distort the rectangle. Keep both colors in the same yarn line when possible. This also makes a sage green crochet blanket easier to block evenly.
Project Info at a Glance
| Skill Level | Time | Finished Size | Hook | Best For |
|---|---|---|---|---|
| Intermediate | Varies by size and gauge | 127 × 152 cm reference throw size | 7 mm | Throw, bed accent, large lap blanket |
The 127 × 152 cm dimension is used as a practical throw-size reference rather than a measurement extracted from the photograph. The uploaded blanket appears larger when displayed across the bed, so adjust the foundation count and length if you want a full bedspread.
Materials and Tools
Yarn
- Sage/olive green — #5 bulky yarn — quantity determined after swatching.
- Cream/ivory — #5 bulky yarn — quantity determined after swatching.
Use the same yarn line and weight for both colors. Mixing yarns with substantially different thicknesses can cause one stripe to become wider or shorter than the next.
Exact yarn consumption cannot be calculated reliably from the photograph alone. For a large blanket, make a measured swatch first and calculate yarn requirements from its weight or yardage before purchasing the full quantity.
Tools
- 7 mm crochet hook
- Locking stitch markers
- Yarn needle
- Sharp scissors
- Flexible measuring tape
- Blocking mats or a clean flat blocking surface
Abbreviations
- ch — chain
- sc — single crochet
- hdc — half double crochet
- dc — double crochet
- sl st — slip stitch
- st/sts — stitch/stitches
- sp — space
- rep — repeat
- MC — main color, sage green
- CC — contrast color, cream
Invisible decrease is an amigurumi shaping technique and is not required for this rectangular blanket.
Gauge and Sizing
Do not begin a bed-size project from a guessed chain count. Make a minimum 15 × 15 cm swatch using the yarn, hook, and main stitch intended for the blanket. Measure the central 10 cm without stretching the fabric.
A useful starting gauge for bulky yarn is approximately 11 stitches per 10 cm, but your own swatch determines the final foundation count.
If your measured gauge is 11 stitches per 10 cm and you want a 127 cm body width before edging:
127 ÷ 10 × 11 = 139.7 stitches
Round that result to a stitch count compatible with the pattern. For the construction below, 140 stitches works.
If your gauge differs, recalculate instead of copying 140 stitches.
Pattern — Step by Step
This is an original photo-inspired construction designed to reproduce the broad green and cream stripes and substantial decorative border visible in the reference image.
Main Blanket Panel
Yarn: sage green and cream.
For the 127 × 152 cm throw interpretation, begin with a foundation that produces approximately 127 cm at your personal gauge.
Using MC, ch 141.
Row 1: Hdc in second ch from hook and each ch across. (140)
Row 2: Ch 1, turn. Hdc in each st across. (140)
Rows 3–18: Repeat Row 2 in MC. (140)
Change to CC during the final yarn-over of Row 18.
Rows 19–36: Ch 1, turn. Hdc in each st across using CC. (140)
Change to MC.
Rows 37–54: Repeat Row 2 in MC. (140)
Change to CC.
Rows 55–72: Repeat Row 2 in CC. (140)
Change to MC.
Rows 73–90: Repeat Row 2 in MC. (140)
Change to CC.
Rows 91–108: Repeat Row 2 in CC. (140)
Change to MC.
Rows 109–126: Repeat Row 2 in MC. (140)
Continue alternating 18-row blocks until the blanket body reaches the required length.
Stop after a complete stripe when the body measures approximately 144–146 cm if targeting a finished length near 152 cm after adding the border.
Fasten off.
Narrow Cream Border
Yarn: cream.
Join CC in any corner.
Round 1: Ch 1. Sc evenly around the entire blanket. Work approximately one sc per row end along the sides and one sc in each stitch across the top and bottom. Work 3 sc in each corner. Join with sl st.
Do not force a predetermined stitch count along the side edges. The correct spacing is the spacing that allows the blanket to remain flat.
Round 2: Ch 1. Sc in every st around, working 3 sc in the center corner stitch at each corner. Join with sl st.
Fasten off CC.
Green Decorative Round
Yarn: sage green.
Join MC at a corner.
Round 3: Ch 1, sc in same st. Work sc around, increasing at each corner by placing 3 sc into the center corner stitch. Join with sl st.
Round 4: Ch 1. *Sc in next 3 sts, ch 1, skip 1 st.* Repeat around.
Modify the spacing by one stitch near a corner when required so the decorative repeat remains centered.
At each corner, work (sc, ch 2, sc) into the corner space.
Join with sl st and fasten off.
Cream Contrast Round
Join CC into any Round 4 chain space.
Round 5: Ch 1. Work 1 sc into each stitch and 1 sc into each ch-1 space. At each corner ch-2 space, work 3 sc.
Join with sl st.
Round 6: Ch 1. Sc evenly around, working 3 sc in each center corner stitch.
Join with sl st and fasten off.
The narrow cream section separates the main striped field from the heavier green scalloped edge.
Scalloped Edge
Yarn: sage green.
Before beginning, count each side independently. Place stitch markers at all four corners and test one complete shell repeat across the shortest edge.
Join MC after a corner.
Round 7: Ch 1, sc in same st. *Skip 2 sts, work 5 dc in next st, skip 2 sts, sc in next st.* Repeat along the side.
At each corner, adjust the final repeat so a shell sits as close to the center of the corner as possible. Do not stretch the border merely to force the repeat.
Continue around all four sides. Join with sl st.
Fasten off, leaving a 15 cm tail.
The photographed blanket appears to have a relatively deep decorative lower edge. You can add a second shell round for additional depth, but test it across one edge first to check that the border remains flat.
Color Placement
The design depends on relatively equal visual weight between sage and cream. Broad color blocks should remain the dominant feature, so avoid replacing them with narrow one- or two-row stripes.
For a bed display closer to the reference image, rotate the completed blanket so the stripe direction runs visually from the head of the bed toward the foot.
This changes the presentation without requiring unusual construction methods.
How to Resize the Blanket
Measure the intended finished dimensions first. If the blanket will be used on a bed, decide whether it should cover only the mattress surface or extend down the sides.
Crochet a gauge swatch in the actual main stitch and calculate the foundation using:
Desired width in cm ÷ 10 × stitches per 10 cm = required body stitches
For example, at 11 stitches per 10 cm, a 160 cm blanket body requires:
160 ÷ 10 × 11 = 176 stitches
For the half-double crochet construction used here, chain one additional stitch:
176 + 1 = 177 starting chains
Control the length by measurement instead of relying only on row count. Continue complete stripe blocks until the blanket reaches the target body length minus the planned border depth.
This sizing method also allows the pattern to be adapted for a lap blanket, throw, twin bed, full bed, queen bed, or another custom dimension.
How to Calculate Yarn Quantity
Buying yarn by grams alone can produce inaccurate estimates because two #5 bulky yarns may contain very different yardage per 100 g.
A swatch provides a more useful estimate.
Crochet a 20 × 20 cm sample in the main stitch. Weigh the completed sample.
A 20 × 20 cm swatch contains:
20 × 20 = 400 cm²
If the swatch weighs 25 g:
25 ÷ 400 = 0.0625 g per cm²
A 127 × 152 cm blanket body contains approximately:
127 × 152 = 19,304 cm²
The estimated body requirement would therefore be:
19,304 × 0.0625 = 1,206.5 g
Add additional yarn for the decorative border, gauge variation, joins, and swatching.
This calculation is an example only. Use the actual weight of your own swatch before purchasing yarn for a large blanket.
Assembly and Finishing
- Lay the completed main rectangle flat and measure all four sides before adding the border.
- Weave stripe-change tails into stitches of the matching color.
- Join the cream yarn at one corner and work the first stabilizing border round.
- Check the rectangle after Round 1 for cupping or ruffling before continuing.
- Add the second cream round while keeping all four corner increases centered.
- Work the green decorative rounds and mark each corner before continuing.
- Add the narrow cream contrast section without pulling the chain spaces tight.
- Pin the proposed scallop spacing along one edge before crocheting the complete final round.
- Weave every remaining tail through matching-color stitches and change direction at least once.
- Block the blanket to the planned dimensions and allow it to dry completely while lying flat.
The finished blanket should form a flat rectangle with broad alternating color fields and an evenly distributed scalloped perimeter.
7 Technical Tips for a Cleaner Blanket
- Mark the first and last stitch of every row. Missing the final stitch repeatedly creates a narrowing side edge, and the error becomes increasingly visible across a long blanket.
- Check the width after every 10 rows. A change greater than about 1 cm can indicate that your tension has tightened or loosened.
- Do not decrease along the border. Accidental decreases remove circumference and can cause the edge to cup inward instead of lying flat.
- Change colors during the final yarn-over of the preceding stitch. Completing the entire final stitch in the old color can leave a visible color dot at the beginning of the next stripe.
- Check bulky-yarn tension immediately after every join. A tight join can pinch the edge, so compare the new stitches with the preceding five stitches before continuing.
- Pin one complete scallop repeat before working the full edge. If the final shell lands fewer than three stitches from the corner, redistribute the repeat instead of forcing a partial shell into the gap.
- Leave at least 8–10 cm for weaving yarn tails. Weave through matching-color stitches and reverse direction so the tail is less likely to work free during laundering.
Conclusion
The final sizing decision should happen after the gauge swatch, not after the foundation chain is complete. Measure 10 cm of blocked fabric, calculate the required foundation count, and purchase compatible sage and cream yarn before beginning the full project. That sequence controls width, stripe proportion, and border behavior more reliably than estimating stitches from a photograph. Save this green and cream striped crochet blanket to Pinterest and share your finished version on Instagram with #GreenCreamStripedBlanket. Before choosing your stripe repeat, decide one design detail: should the sage panels remain the same width as the cream panels, or should the green sections be slightly wider?









