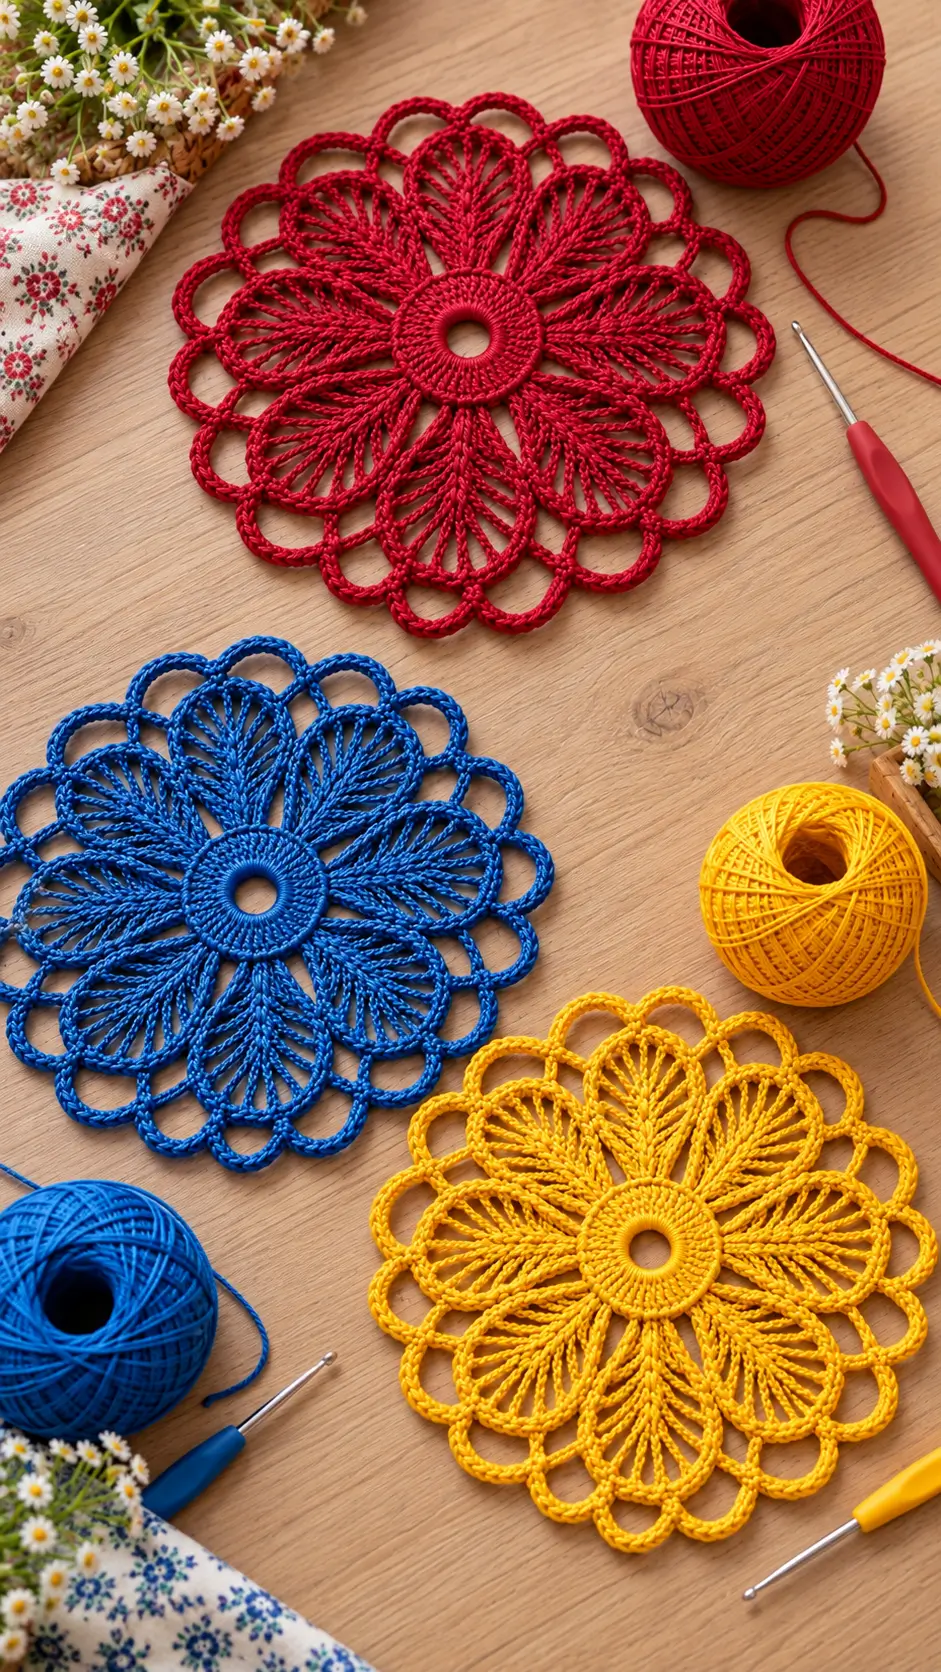
Ten narrow petals radiate from an open ring before a second halo of loops changes the silhouette completely. This crochet flower doily pattern uses sport-weight mercerized cotton, a 3 mm hook, and about one 50 g ball to produce a motif near 25 cm across. It suits intermediate crochet skills. The flat, open construction works particularly well under a small vase because the center remains compact while the perimeter supplies visual width.
The Design: What Makes This Flower Doily Different
The design depends on three structural zones: a firm annular center, ten elongated petals, and a perimeter made from oversized chain loops. Keeping the center dense prevents the long petal spokes from pulling the inner ring out of shape. Each petal is anchored at two points so its openwork can expand outward while retaining a distinct teardrop profile.
The second decision is spacing. A crochet flower motif with long spokes can buckle when too many stitches are forced into the center, so the petal bases are distributed evenly before the lace sections begin. Finally, the outer loops are attached after the petals rather than treated as wider petals. This gives the floral crochet doily two readable layers.
A common mistake is tightening long chains. Shortened chains pull neighboring petals together and produce a cupped rather than flat motif.
Project Info at a Glance
| Skill Level | Time | Finished Size | Hook | Best For |
|---|---|---|---|---|
| Intermediate | 3–5 hours | Approx. 25 cm | 3.0 mm | Table accent, vase mat, decorative motif |
The 25 cm target is based on comparable published sport-weight flower doilies made with a 3 mm hook. Exact diameter will vary according to yarn, tension, chain length, and blocking.
Materials and Tools
Yarn
- Deep red, royal blue, or golden yellow — sport / weight 2 mercerized cotton — allow 50 g.
- Accent yarn — none required; each photographed motif uses a single main color.
A smooth mercerized cotton with approximately 125–150 m per 50 g is suitable. The firm twist helps the long chains and petal outlines remain clearly defined after blocking.
Tools
- 3.0 mm crochet hook
- Tapestry needle
- Scissors
- 10 removable stitch markers
- Rustproof blocking pins
- Blocking mat
- Ruler or measuring tape
No stuffing or safety eyes are required because this is a flat lace project.
Abbreviations
- MR — magic ring
- ch — chain
- sc — single crochet
- hdc — half double crochet
- dc — double crochet
- tr — treble crochet
- sl st — slip stitch
- st/sts — stitch/stitches
- sp — space
- rep — repeat
- sk — skip
An invisible decrease is an amigurumi shaping method and is not used in this flat lace construction.
Crochet Flower Doily Pattern — Step by Step
Pattern note: These instructions are an original interpretation of the visible flower geometry. The motif is worked in joined rounds because accurate petal alignment is important for a flat lace design.
Center Ring
Yarn: chosen main color.
R1: Ch 16. Join with sl st in first ch, taking care not to twist. (16 ch)
R2: Ch 1, work 2 sc around the chain ring for each foundation chain position; join with sl st. (32 sc)
R3: Ch 1, sc in each st around; join with sl st. (32 sc)
R4: Ch 1, *3 sc, inc*; rep around. Join with sl st. (40 sc)
R5: Ch 1, sc in each st around; join with sl st. (40 sc)
The center should form a flat ring rather than a solid disk. Its open center is one of the defining details of the design.
Do not cut the yarn.
Petal Foundation — Make 10
Yarn: main color.
R6: Ch 1, *sc in next 2 sts, ch 18, sk 2 sts, sc in next 2 sts*; repeat 10 times around. Join with sl st.
You should now have 10 ch-18 loops.
Place the work on a flat surface before continuing. Every loop should extend approximately the same distance from the center. If one chain is noticeably shorter, remake it before adding the petal stitches.
Openwork Petals — Make 10
Work around each ch-18 loop rather than inserting the hook into every individual chain where indicated.
R7: Sl st to first loop. In each ch-18 loop work (sc, hdc, dc, 12 tr, dc, hdc, sc) around the loop. Sl st into the foundation stitch between petals before moving to the next loop.
Repeat for all 10 petals.
R8: For each petal, sl st to its first sc, ch 1, sc in first 3 sts, *ch 3, sk 1 st, sc in next st* across the central section, then sc in the final 3 sts. Sl st at the petal base.
This round adds definition to the petal while retaining the large open spaces that create the lace structure.
Radiating Petal Spokes
Yarn: main color.
The spoke chains create the distinctive radiating structure visible inside each flower petal.
Spoke 1: Join yarn at the left base of the petal. Ch 12–15, adjusting only enough to reach the first third of the petal edge without pulling. Sl st to the edge.
Spoke 2: Sl st along the edge approximately 2 sts, ch 14–17 back toward the base, then sl st at the base.
Continue alternating attachment points until approximately 7–9 radiating spokes fill the petal.
Repeat the process for all ten petals.
Fasten off after each petal or carry the working yarn discreetly along the base.
The spoke chains use a small working range rather than one fixed number because their exact length depends on treble-stitch height and individual crochet tension. Each spoke should lie flat without pulling either attachment point inward.
Outer Scallop Foundation
Yarn: main color.
Join yarn in the valley between two petals.
R9: *Ch 14, attach with sc near the outer left shoulder of the next petal; ch 14, attach with sc in the next petal valley.* Repeat around all 10 petals.
The round creates 20 large outer loops, with two loops associated with each petal.
Check the motif on a flat surface after every four loops. A loop that stands away from the table is probably too long. A loop that pulls neighboring petals together is too short.
Outer Loop Edging
R10: Sl st into the first ch-14 loop. Work 16 sc around the loop rather than into individual chain stitches.
Repeat 16 sc around every ch-14 loop. Join with sl st.
Working around the chains allows the stitches to slide slightly during blocking. This makes the outer arches easier to distribute evenly.
Fasten off and leave a 15 cm tail.
Optional Reinforced Center
The photographed motifs have a substantial band surrounding the center opening. Add this section if your center looks too narrow in proportion to the petals.
Join yarn to any center-edge stitch. Work one round of closely spaced slip stitches around the opening, placing the stitches through the exposed foundation loops.
Keep the tension relaxed. Tight stitches can reduce the center opening and cause the surrounding fabric to rise.
Fasten off. Weave the yarn tail toward the outer section of the center rather than repeatedly circling the opening.
Blocking the Crochet Flower Doily
Blocking determines the final geometry of this round crochet doily. Prepare the cotton according to its care instructions, remove excess water without twisting, and place the motif on a blocking mat.
Pin the center first. Measure the opening vertically, horizontally, and diagonally so that it remains circular rather than becoming oval.
Next, pin the tip of each of the ten petals at equal radial distances from the center. Opposite petals should form straight lines through the center.
Shape the twenty outer loops last. Their highest points should establish a consistent outer circle rather than forming ten uneven pairs.
For the stated project target, block toward approximately 25 cm in diameter. Stop earlier if reaching that measurement requires excessive stretching.
Assembly and Finishing
- Center the ring. Place the completed motif flat and check that the opening remains circular rather than oval.
- Align the petals. Position all ten petal tips at equal distances from the center before inserting the final blocking pins.
- Match opposite petals. Align petal 1 with petal 6, then repeat with the remaining opposite pairs.
- Arrange the spokes. Spread the spoke chains inside every petal so neighboring chains do not cross.
- Set the petal shoulders. Pin both sides of each petal at equivalent positions to prevent left-right distortion.
- Shape the outer loops. Divide the twenty loops evenly around the perimeter and keep their arches similar in height.
- Measure the diameter. Check several directions rather than measuring across only one pair of petals.
- Weave the tails. Run each tail through dense center or edging stitches for several centimeters, then reverse direction once.
- Allow the cotton to dry flat. Remove the pins only when the motif is completely dry and holds its intended outline.
- Check the perimeter. Place the unpinned doily on a hard, flat surface and confirm that the center, petals, and scallops lie flat without buckling.
The finished motif consists of one open center ring, ten openwork flower petals, radiating internal spokes, and twenty perimeter loops.
7 Technical Tips for Better Flower Doily Results
- Mark all ten petal divisions before starting the foundation loops. A misplaced attachment can produce nine correctly spaced petals and one compressed section. Correct the spacing before adding the petal stitches.
- Measure the first long chain before repeating it. If an 18-chain loop measures 6 cm, keep the remaining loops within roughly 2–3 mm of that relaxed measurement. Equal stitch counts alone cannot compensate for major tension differences.
- Watch for rippling around the center. A center that already forms waves contains more fabric than its circumference can accommodate. Adding the petal rounds will magnify that problem rather than remove it.
- Check the motif after every two petals. A twisting petal often means its stitches have accumulated on one side of the foundation loop. Slide the stitches around the chain before continuing.
- Keep the spoke chains free from visible stretch. A taut spoke behaves like a drawstring and narrows the petal. Add one chain if the spoke lifts the petal edge when the work lies flat.
- Pin all ten petal tips before the outer loops. Pinning the scallops first can lock an inaccurate circumference into place and leave one side several millimeters narrower than the other.
- Weave yarn tails through at least 3 cm of dense crochet. Open chain spaces provide little friction and can expose cut ends. The center rounds and single-crochet perimeter are better finishing areas.
Gauge and Finished Size
Gauge in openwork crochet behaves differently from gauge in dense fabric. Measuring a conventional square of single crochet does not accurately predict the finished diameter because the long chains, treble height, spoke tension, and blocking method all affect the final measurement.
For this project, aim for approximately 25 cm across after blocking. Treat that number as a target rather than forcing the crochet to reach an exact diameter.
Measure the radius after the first several petals have been completed. If the projected diameter is substantially larger than intended, changing hook size at this stage saves more work than trying to compress the finished lace during blocking.
A smaller hook creates firmer stitches and usually reduces the finished diameter. A larger hook increases both scale and openness. Changing yarn weight has an even greater effect because it alters the thickness of the petal outlines as well as the overall dimensions.
Choosing Yarn for Crisp Openwork
Mercerized cotton is particularly suitable for reproducing the sharply defined structure shown in the reference image. Its relatively low elasticity helps long chains retain their blocked positions, while the smooth yarn surface keeps individual spokes visually distinct.
Sport-weight cotton also provides enough substance around the center to contrast with the open petals. For this version, allow approximately 50 g of sport-weight mercerized cotton.
A single-color construction gives the petal spokes maximum definition. Deep red produces a strong graphic outline, royal blue emphasizes the open spaces, while golden yellow makes the individual radial chains especially easy to distinguish.
Changing to substantially thicker yarn affects more than the final diameter. Wider yarn reduces the negative space between the spokes and makes the outer scallops visually heavier. For that reason, worsted-weight yarn will create a different proportion rather than simply a larger copy.
How to Keep the Flower Flat
Flatness depends on the relationship between circumference and stitch quantity. If the center contains too many stitches, it develops waves. If it contains too few, the motif begins to cup upward.
Long petal chains create another source of distortion. Keep them relaxed while crocheting, but do not deliberately enlarge them. Consistency matters more than loose tension.
After completing several petals, place the project on a table without stretching it. The center should contact the surface and the petals should extend outward naturally. Correct visible distortion before continuing to the outer border.
The perimeter can also expose small spacing errors. Twenty equal-looking loops require ten evenly positioned petals underneath them. This is why stitch markers at the petal divisions are more useful than trying to correct the circle during the final round.
Conclusion
Block the ten petal tips first, then use the twenty outer loops to establish the final circle; reversing that order makes asymmetry harder to correct. After drying, record the finished diameter, yarn used, and hook size so a second motif can match the first. This crochet flower doily pattern can then be repeated in red, blue, or yellow to reproduce the three-color arrangement shown in the reference image. Save the finished version to Pinterest or share it on Instagram with #TenPetalFlowerDoily. For the next sample, compare one variable only: would a 2.5 mm hook sharpen the long petal spokes without making the outer loops too small?









