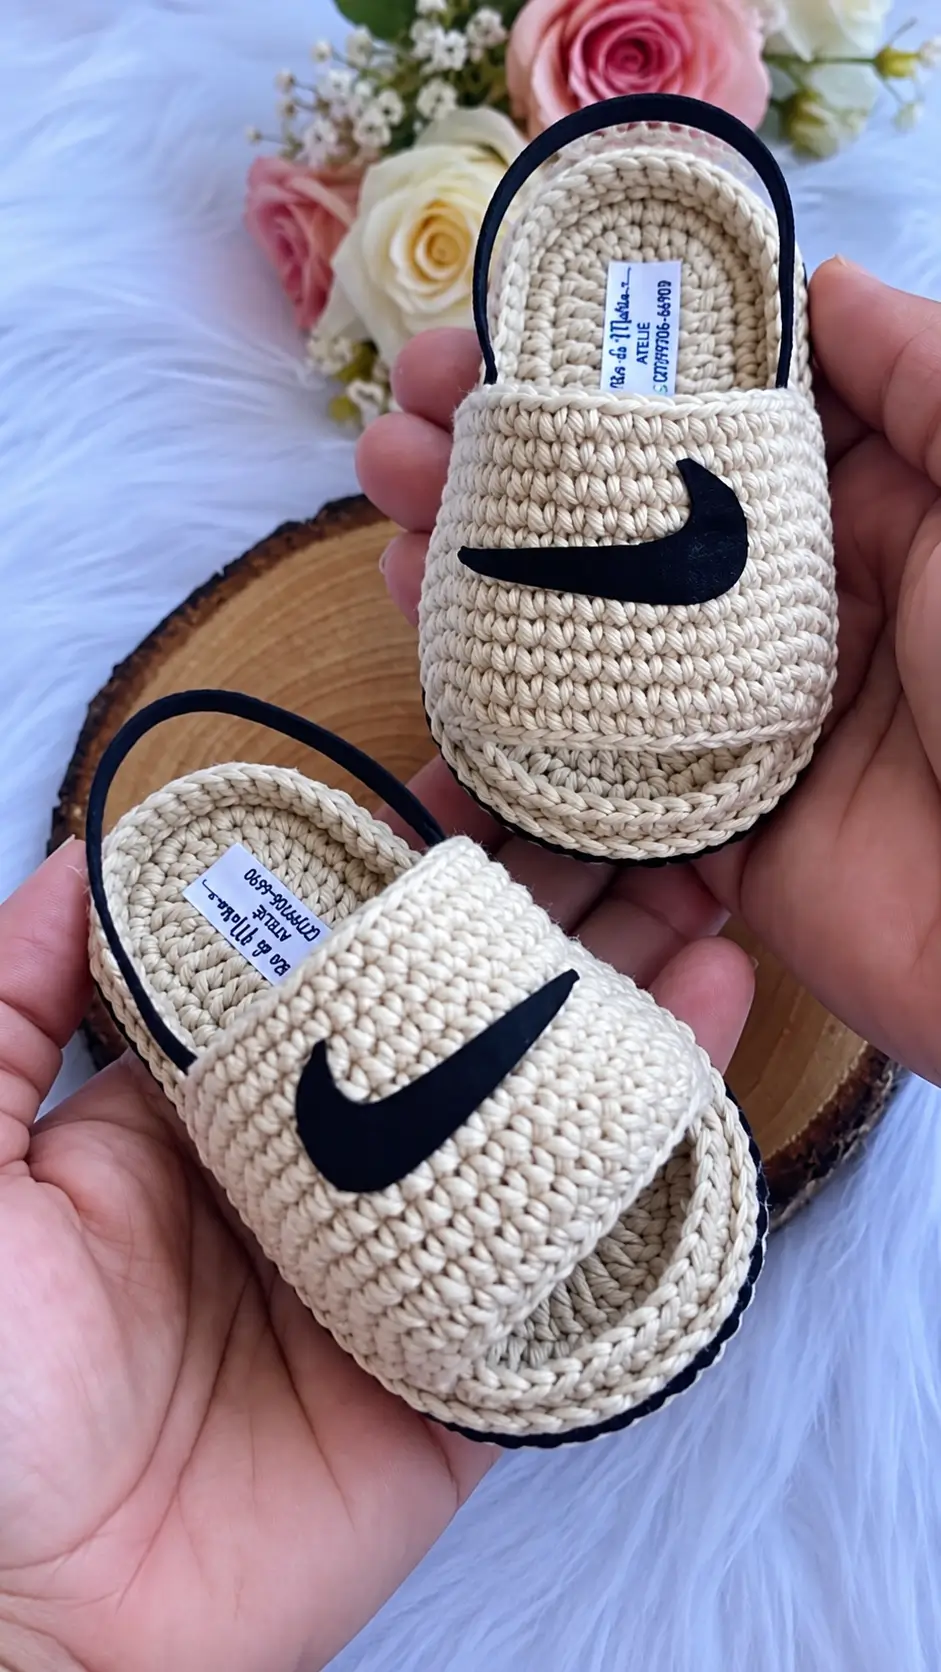
A low sneaker cannot hide poor toe shaping behind laces. This crochet baby sneakers pattern uses DK cotton, a 3.25 mm hook and a 9 cm target sole to reproduce the compact slip-on structure visible in the reference. The project suits an intermediate crocheter because the upper requires controlled decreases and measured assembly. Its laceless opening also removes loose tie cords from the finished design.
The Design: What Makes These Baby Sneakers Different
The photograph shows three structural choices that separate this shoe from standard crochet booties. First, the upper sits low below the ankle rather than extending into a cuff. That keeps the silhouette close to a slip-on sneaker. Second, the broad vamp covers most of the forefoot; its decreases therefore need to remain centered or the opening will twist sideways.
A defined sole ridge provides the third feature. Working the first upper round through the back loops leaves a visible edge between the sole and sidewall. The most common construction error is shaping the toe before identifying its center. That creates an asymmetric crochet baby shoes pattern even when both soles match. This baby booties crochet pattern instead marks the center front before decreases begin.
Project Info at a Glance
| Skill Level | Time | Finished Size | Hook | Best For |
|---|---|---|---|---|
| Intermediate | 3–5 hours per pair | Approx. 9 cm sole | 3.25 mm | 0–3 month sizing reference |
The 9 cm measurement is used as the target for this version. Individual yarn tension and gauge can change the finished dimensions, so measure the sole before beginning the upper.
Materials and Tools
Yarn
- Natural ivory/cream — DK cotton — up to 25 g — choose a smooth, tightly spun cotton.
- Black — DK cotton — approximately 2–5 g for piping if crocheted rather than applied.
- Black appliqué material — thin washable felt or fabric — one small scrap for the curved side motif.
Tools
- 3.25 mm crochet hook
- Tapestry needle
- Scissors
- Locking stitch markers
- Measuring tape
- Pins
- Washable textile adhesive — optional
Do not add safety eyes, stuffing or hard decorative pieces. None appears in the reference photograph, and they have no structural purpose in this project.
Abbreviations
- ch = chain
- sc = single crochet
- hdc = half double crochet
- inc = 2 stitches in one stitch
- dec = single crochet decrease
- sl st = slip stitch
- BLO = back loop only
- st/sts = stitch/stitches
An invisible decrease catches the front loops of the next two stitches before completing one sc, reducing bulk where the toe contracts.
Pattern – Step by Step
Unlike spherical amigurumi, a wearable sneaker should not start with a 6-sc magic ring. It requires an elongated foundation chain. A magic-ring construction would produce a circular base instead of a foot-shaped sole.
Sole – Make 2
Yarn: natural ivory. Target length: approximately 9 cm.
R1: Ch 11. Starting in second ch from hook, sc 9, 3 sc in final ch. Work along the opposite side: sc 8, 2 sc in final ch. (22)
R2: Inc, sc 8, inc ×3 around toe, sc 8, inc ×2 around heel. (28)
R3: Distribute 8 increases around the two curved ends while keeping the long sides flat. (36)
R4: Distribute 8 increases around the curves, placing no unnecessary increases through the straight middle side sections. (44)
R5: Distribute 8 increases around the heel and toe curves. (52)
R6: Sc around without increasing. (52)
Measure the sole now. The target length is approximately 9 cm from the back of the heel to the tip of the toe.
Fasten off only if you want a separate sole seam. Otherwise continue directly into the sidewall.
Sole Sidewall – Make 2
Yarn: natural ivory.
R1: Join at center heel. Sc BLO around. (52)
R2: Sc around. (52)
R3: Sc around. (52)
The BLO round turns the work upward and creates the defined ridge between the flat sole and vertical shoe wall. If the sole starts cupping before the first sidewall round is complete, check the foundation tension and finished sole measurement.
Fasten off. Leave a 15 cm tail if the vamp will be sewn to the sidewall.
Toe/Vamp – Make 2
Yarn: natural ivory.
The broad upper extends from the toe toward the ankle opening. Mark the center of the toe before attaching this panel.
Row 1: Ch 17. Starting in second ch from hook, sc 16. (16)
Row 2: Ch 1, turn, sc 16. (16)
Row 3: Ch 1, turn, dec, sc 12, dec. (14)
Row 4: Ch 1, turn, sc 14. (14)
Row 5: Ch 1, turn, dec, sc 10, dec. (12)
Row 6: Ch 1, turn, sc 12. (12)
Row 7: Ch 1, turn, dec, sc 8, dec. (10)
Row 8: Ch 1, turn, sc 10. (10)
Row 9: Ch 1, turn, dec, sc 6, dec. (8)
Fasten off. Leave a 25 cm sewing tail.
Pin the wide edge around the front of the sole. The narrow end points toward the ankle opening. The panel should curve over the forefoot rather than lie flat against the sole.
Heel and Quarter Panel – Make 2
Yarn: natural ivory.
Row 1: Ch 29, sc 28. (28)
Row 2: Ch 1, turn, sc 28. (28)
Row 3: Ch 1, turn, dec, sc 24, dec. (26)
Row 4: Ch 1, turn, sc 26. (26)
Row 5: Ch 1, turn, dec, sc 22, dec. (24)
Row 6: Ch 1, turn, sc 24. (24)
Row 7: Ch 1, turn, sc 24. (24)
Row 8: Ch 1, turn, sc 24. (24)
Do not close the upper into a tube before testing its placement against the sole. Pin the center of Row 1 to the center heel and bring both sides forward until they meet the vamp edges.
Fasten off. Leave a 30 cm sewing tail.
Ankle Opening Edge
Yarn: natural ivory.
Join the yarn at the back center after the heel panel and vamp are sewn in place.
R1: Sc evenly around the complete ankle opening. Keep the stitch spacing consistent rather than forcing a predetermined stitch total.
R2: Sl st loosely around.
Fasten off and weave the tail toward the heel.
The second round should stabilize the opening without shrinking it. If the top edge curls inward, remove the slip-stitch round or work it with a hook approximately 0.5 mm larger.
Black Edge Piping – Make 2
Yarn: black.
The reference shows a thin dark line tracing the rear and side edge of the opening. Surface crochet creates this line without adding a bulky structural round.
Join black yarn near the inside heel. Work one loose line of surface sl st along the designated edge, stopping before the front vamp.
Fasten off. Leave a 10 cm tail, pull it to the inside and weave through several stitches.
Curved Side Appliqué – Make 2
Material: washable black felt, fabric or an original crocheted curved motif.
Cut a narrow curved side accent approximately 4–4.5 cm long for a 9 cm shoe. Round the thicker end and taper the opposite end.
The reference photograph contains a recognizable commercial-style side mark. If finished shoes will be sold, replace it with an original crescent, stripe or curved geometric appliqué rather than reproducing a trademarked logo.
Position the appliqué on the outer side of each shoe. Keep its lowest edge approximately 8–10 mm above the sole ridge.
Sew around the perimeter using small black stitches. A washable textile adhesive can also be used when appropriate for the selected appliqué material.
Optional Crocheted Curved Accent – Make 2
Yarn: black.
Row 1: Ch 13, sc in second ch, hdc 3, sc 5, sl st 3.
Row 2: Turn without ch, sl st 3, sc 5, hdc 2, 3 hdc in final st.
Fasten off with a 20 cm tail. Curve the strip while pinning it to the shoe, then sew it flat.
This version creates an abstract tapered stripe rather than an exact commercial logo.
Inner Label – Optional, Make 2
The reference includes a small fabric label inside each shoe. A handmade version can use a soft woven maker label no wider than approximately 20 mm.
Stitch around the label edges. Keep knots and yarn tails away from the central interior surface.
Assembly
- Place both finished soles side by side and confirm that their heel-to-toe lengths differ by no more than 2 mm.
- Mark the exact center front and center heel of each sole with locking stitch markers.
- Pin the broad edge of each vamp around the toe, keeping its center aligned with the center-front marker.
- Sew the vamp to the sidewall with small mattress or whip stitches. Check every few stitches that the left and right edges remain symmetrical.
- Center the heel panel at the back and pin its lower edge to the sidewall before sewing.
- Bring both quarter-panel ends forward to meet the sides of the vamp. Overlap only enough to remove gaps because excessive overlap reduces the ankle opening.
- Work the natural-color ankle edging, then add the black piping around the rear and side edge.
- Pin one curved black appliqué to the outer side of each shoe. Compare both shoes from above before permanently stitching either motif.
- Weave structural tails for at least 3 cm, reverse direction through adjacent stitches, then trim.
- Measure the finished sole again and record its actual centimeter length rather than assigning a baby size solely from the pattern label.
The completed pair should have matching oval soles, centered low vamps, open ankle sections and symmetrical side accents.
7 Technical Tips for Better Crochet Baby Sneakers
- Prevent toe drift: Mark the center-front stitch before attaching the vamp. A displacement of only two stitches can make a 9 cm shoe visibly asymmetric.
- Check sole cupping: If the oval curls upward before the sidewall begins, the expansion does not match your gauge. Lay the sole flat after each expansion round and check its shape before continuing.
- Control decrease ridges: Standard sc2tog decreases can produce visible bumps across a compact upper. Use invisible decreases through the front loops where the vamp narrows.
- Watch the ankle opening: A tight slip-stitch border can reduce the circumference and pull the quarter panels inward. Change to a hook approximately 0.5 mm larger if the edging contracts.
- Measure cotton gauge: Cotton yarn can produce substantially different dimensions depending on tension and hook size. Stop when the sole reaches the target 9 cm instead of adding rounds automatically.
- Align both appliqués: Pin both black accents before sewing either one permanently. Position their lower edges approximately 8–10 mm above the sole ridge and compare the angles from the heel.
- Secure yarn tails: Short tails can work through dense cotton stitches during handling. Weave structural ends for at least 3 cm, reverse direction once, then trim.
Finishing the Crochet Baby Sneakers
Place both shoes on a flat surface with the toes pointing forward. Compare the sole length, vamp height, ankle opening and position of the side appliqués. Correct visible differences before weaving the final tails.
Check every sewn component by hand. Decorative pieces should sit flat against the crochet fabric, and no hard attachment should project into the interior of the shoe.
Measure the first sole before making its pair: 9 cm is the controlling dimension for this version, and the yarn label cannot substitute for that measurement. Once the sole is correct, mark the toe and heel centers, assemble the low vamp, then compare both shoes before adding the black details. That sequence keeps the finished pair symmetrical and makes the crochet baby sneakers pattern easier to resize from physical measurements.
Save the finished project to Pinterest or share the pair on Instagram with #LowTopCrochetSneakers. For the next version, record your hook, yarn and final sole length. Which detail would you change first on these specific low-top sneakers: the vamp height, black piping or curved side accent?









