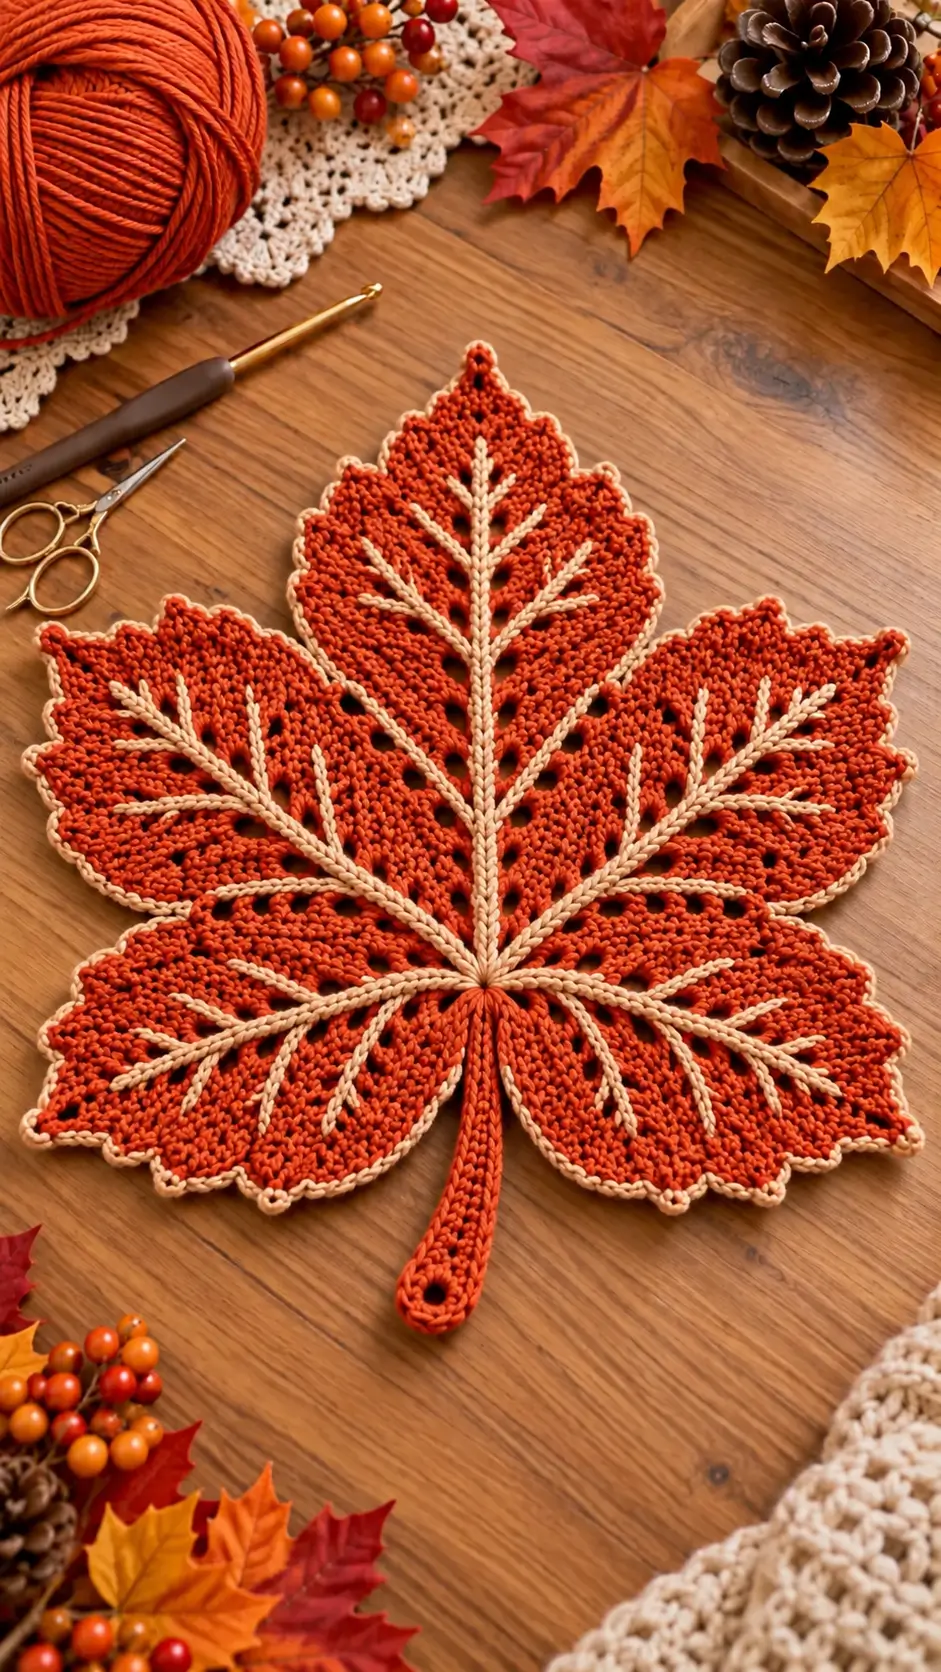
A maple leaf loses its identity when the central point is shortened or the side lobes become symmetrical ovals. This crochet maple leaf placemat pattern uses five dominant lobes, deep valleys, a long stem and raised cream veins to reproduce the photographed autumn leaf. Work it in firm cotton or cotton-blend worsted yarn with a 4 mm hook for a structured table mat approximately 30–35 cm across.
The Design: What Makes This Maple Leaf Different
The photographed piece depends on three structural elements. First, five major lobes radiate from one compact junction: a tall central lobe, two upper side lobes and two broad lower lobes. Smaller points along the perimeter create the serrated maple outline.
Second, the cream vein system is raised above the orange fabric rather than incorporated as ordinary color changes. Surface crochet creates a central spine and paired branches without breaking the main leaf into separate color sections.
Finally, a narrow cream edging follows every point and valley. This contrast line emphasizes the silhouette and keeps the orange lobes visually separate from the wooden surface beneath them.
A common mistake with a crochet maple leaf placemat is making all five lobes equal. The central lobe needs greater height, while the lower pair should spread outward to establish the characteristic maple shape.
Project Info at a Glance
| Skill Level | Time | Finished Size | Hook | Best For |
|---|---|---|---|---|
| Intermediate | 4–6 hours | Approx. 30–35 cm wide | 4 mm | Placemat, centerpiece, fall table décor |
The 30–35 cm measurement is a photo-inspired target rather than a measurement taken directly from the pictured piece. Published crochet maple leaves vary considerably with yarn weight: documented worsted-weight versions measure about 23–25.5 cm, while smaller cotton and thread motifs commonly measure approximately 10–12 cm.
Materials and Tools
Yarn
- Burnt orange — worsted weight/category 4 cotton or cotton blend — approximately 100–130 g
- Warm cream — worsted weight/category 4 cotton or cotton blend — approximately 20–30 g
Firm cotton is preferable for a table mat because it gives the lobe points enough structure to remain defined after blocking. Use the same yarn weight for the orange body and cream surface details.
Tools
- 4 mm crochet hook
- Locking stitch markers
- Yarn needle
- Scissors
- Blocking pins
- Blocking mat
- Flexible tape measure
Abbreviations
- ch — chain
- sc — single crochet
- hdc — half double crochet
- dc — double crochet
- tr — treble crochet
- sl st — slip stitch
- inc — increase
- dec — decrease
- st/sts — stitch/stitches
- sp — space
- sk — skip
- RS — right side
- WS — wrong side
Keep decreases compact at the valleys between lobes. Loose decreases round those indentations and weaken the maple-leaf silhouette.
Gauge and Finished Size
Exact gauge is less important than obtaining a flat, structured fabric. Make a small swatch before beginning the leaf.
Foundation: Ch 17.
Row 1: Sc in second ch from hook and across. (16)
Rows 2–10: Ch 1, turn, sc across. (16)
The swatch should lie flat without feeling rigid. Move down to a 3.5 mm hook if the stitches leave large openings. Move up to 4.5 mm if the fabric curls severely or becomes difficult to work.
Published maple-leaf patterns demonstrate how strongly yarn and hook choice affect finished dimensions. Worsted-weight examples use hooks around 3.25–4.25 mm, while smaller thread and sport-weight versions use hooks around 2.25–3 mm.
Pattern — Step by Step
This is a photo-inspired construction rather than a transcription of another designer’s pattern. The leaf is assembled from five shaped lobe sections joined around one lower central junction. Cream surface crochet is added afterward to create the prominent vein system.
Central Lobe
Yarn: burnt orange.
Ch 17.
Row 1: Sc in second ch from hook and across. (16)
Row 2: Ch 1, turn. Sc across. (16)
Row 3: Ch 1, turn. 2 sc in first st, sc across to final st, 2 sc in final st. (18)
Row 4: Ch 1, turn. Sc across. (18)
Row 5: Ch 1, turn. 2 sc in first st, sc across to final st, 2 sc in final st. (20)
Row 6: Ch 1, turn. Sc across. (20)
Row 7: Ch 1, turn. 2 sc in first st, sc across to final st, 2 sc in final st. (22)
Rows 8–12: Ch 1, turn. Sc across. (22)
Begin narrowing the upper section.
Row 13: Ch 1, turn. Dec, sc across to final 2 sts, dec. (20)
Row 14: Ch 1, turn. Sc across. (20)
Row 15: Ch 1, turn. Dec, sc across to final 2 sts, dec. (18)
Row 16: Ch 1, turn. Sc across. (18)
Row 17: Ch 1, turn. Dec, sc across to final 2 sts, dec. (16)
Row 18: Ch 1, turn. Dec, sc across to final 2 sts, dec. (14)
Row 19: Ch 1, turn. Dec, sc across to final 2 sts, dec. (12)
Row 20: Ch 1, turn. Dec, sc across to final 2 sts, dec. (10)
Row 21: Ch 1, turn. Dec, sc across to final 2 sts, dec. (8)
Row 22: Ch 1, turn. Dec, sc across to final 2 sts, dec. (6)
Row 23: Ch 1, turn. Dec, sc 2, dec. (4)
Row 24: Ch 1, turn. Dec twice. (2)
Row 25: Ch 1, turn. Dec. (1)
Fasten off with a 30 cm tail.
The final stitch forms the highest point of the leaf. Keep this lobe visibly taller than all four side sections.
Upper Left Lobe
Yarn: burnt orange.
Ch 14.
Row 1: Sc in second ch from hook and across. (13)
Row 2: Ch 1, turn. Sc across. (13)
Row 3: Ch 1, turn. 2 sc in first st, sc across to final st, 2 sc in final st. (15)
Row 4: Ch 1, turn. Sc across. (15)
Row 5: Ch 1, turn. 2 sc in first st, sc across to final st, 2 sc in final st. (17)
Rows 6–9: Ch 1, turn. Sc across. (17)
Row 10: Ch 1, turn. Dec, sc across to final 2 sts, dec. (15)
Row 11: Ch 1, turn. Sc across. (15)
Row 12: Ch 1, turn. Dec, sc across to final 2 sts, dec. (13)
Row 13: Ch 1, turn. Dec, sc across to final 2 sts, dec. (11)
Row 14: Ch 1, turn. Dec, sc across to final 2 sts, dec. (9)
Row 15: Ch 1, turn. Dec, sc across to final 2 sts, dec. (7)
Row 16: Ch 1, turn. Dec, sc 3, dec. (5)
Row 17: Ch 1, turn. Dec, sc 1, dec. (3)
Row 18: Ch 1, turn. Sc3tog. (1)
Fasten off with a 30 cm tail.
Upper Right Lobe
Make a second upper lobe following the same instructions.
Before fastening off, compare both pieces. Their widest rows and pointed ends should match within approximately 5 mm.
Lower Left Lobe
Yarn: burnt orange.
The lower lobe is shorter but broader relative to its height.
Ch 12.
Row 1: Sc in second ch from hook and across. (11)
Row 2: Ch 1, turn. 2 sc in first st, sc across to final st, 2 sc in final st. (13)
Row 3: Ch 1, turn. Sc across. (13)
Row 4: Ch 1, turn. 2 sc in first st, sc across to final st, 2 sc in final st. (15)
Rows 5–8: Ch 1, turn. Sc across. (15)
Row 9: Ch 1, turn. Dec, sc across to final 2 sts, dec. (13)
Row 10: Ch 1, turn. Sc across. (13)
Row 11: Ch 1, turn. Dec, sc across to final 2 sts, dec. (11)
Row 12: Ch 1, turn. Dec, sc across to final 2 sts, dec. (9)
Row 13: Ch 1, turn. Dec, sc across to final 2 sts, dec. (7)
Row 14: Ch 1, turn. Dec, sc 3, dec. (5)
Row 15: Ch 1, turn. Dec, sc 1, dec. (3)
Row 16: Ch 1, turn. Sc3tog. (1)
Fasten off with a 30 cm tail.
Lower Right Lobe
Repeat the lower-left lobe instructions.
Keep both lower points shorter than the upper side lobes. This difference is necessary for the maple silhouette.
Joining the Five Lobes
Block the five sections lightly before joining them.
Place the central lobe vertically. Position one upper lobe on each side at approximately a 35–45 degree angle.
Place the lower lobes beneath them so their points extend more horizontally.
The five lower edges should meet around one compact central junction.
Using orange yarn and a tapestry needle, whipstitch the overlapping inner edges together from the wrong side.
Keep the joins flat. Thick seams at the center will become more noticeable after the cream veins are applied.
Creating the Smaller Maple Points
Join orange yarn along the outside edge.
Work around the perimeter using stitch heights to sharpen the outline.
Along relatively straight sections, work sc.
Approaching a small point, work:
sc, hdc, dc, tr, ch 2, sl st in second ch from hook, tr, dc, hdc, sc.
Space these secondary points between the five major lobes and along their broader outer edges.
At each deep valley between two main lobes, work sl st, sc, sl st across the lowest section.
Do not fill the valleys with tall stitches. The indentations must remain visibly deeper than the minor serrations.
Burnt Orange Stem
Yarn: burnt orange.
Join yarn at the bottom central junction.
Ch 25.
Beginning in the second ch from the hook:
Sl st in next 3 ch, sc in next 5 ch, hdc in next 12 ch, sc in next 3 ch.
Work 5 sc into the final attachment area and rotate to work along the opposite side of the foundation chain.
Work:
Sc in next 3 sts, hdc in next 12 sts, sc in next 5 sts, sl st in final 3 sts.
Work 3 sc around the stem tip for a rounded end.
Sl st to join.
Fasten off and weave the tail into the wrong side.
Central Cream Vein
Yarn: warm cream.
Place the leaf right side up.
Join cream yarn near the center where the five lobes meet.
Work surface slip stitches directly toward the tip of the tall central lobe.
Follow the visual center line rather than individual orange rows.
Keep every surface stitch relaxed. Tight surface crochet will shorten the orange fabric and make the central lobe curl.
Stop approximately 1 cm before the upper point.
Fasten off on the wrong side.
Upper Cream Veins — Make 2
Join cream yarn close to the lower section of the central vein.
Surface sl st diagonally toward the tip of one upper side lobe.
Stop approximately 1–1.5 cm before the point.
Fasten off.
Repeat on the opposite side.
Keep the left and right branches similar in angle and length.
Lower Cream Veins — Make 2
Return to the central junction.
Surface sl st outward toward the lower-left lobe.
The lower vein should travel more horizontally than the upper branch.
Stop approximately 1–1.5 cm before the lobe point.
Fasten off.
Repeat for the lower-right side.
Secondary Cream Veins
The photograph contains smaller branches extending from each primary vein.
Add 2–4 secondary branches to each major lobe.
Start each branch against a main cream vein and work surface slip stitches toward the nearest outer edge.
Make the lower branches longer than those near the lobe tip.
Stop every branch before reaching the perimeter. Leaving approximately 1–2 cm of orange fabric between the vein and edge keeps the surface pattern readable.
Cream Perimeter Edging
Yarn: warm cream.
Join cream at the base beside the stem.
Work one round of surface slip stitch or tightly controlled single crochet around the complete outer edge.
Follow every minor point and deep valley.
At a sharp point, work:
(sc, ch 1, sc) into the tip.
At a deep valley, work one sl st into the lowest orange stitch.
Continue around all five major lobes and return to the stem base.
Fasten off.
The edging should outline the existing shape rather than changing its dimensions.
Cream Stem Detail
Join cream yarn at the base of the stem.
Surface sl st along the center toward the rounded tip.
Stop approximately 1 cm before the end.
Fasten off and weave both tails into the wrong side.
Assembly
- Make the tall central lobe and block it flat before positioning the side sections.
- Crochet two matching upper lobes and compare their dimensions before fastening the final tails.
- Make two shorter lower lobes and arrange all five sections around one compact center.
- Whipstitch the inner lobe edges together from the wrong side without creating bulky seams.
- Add the smaller orange perimeter points while preserving deep valleys between the five primary lobes.
- Crochet the long orange stem directly from the lower central junction.
- Surface crochet the main cream vein from the center toward the tallest point.
- Add four major side veins and the smaller branching veins.
- Work the cream edging around the complete maple outline and add the stem detail.
- Wet-block the finished leaf, pinning every major point and valley separately until completely dry.
The finished piece should have five dominant lobes, a visibly taller center point, four radiating side veins, a long aligned stem and a flat serrated perimeter.
7 Technical Tips
- Mark all five major points before joining. If the upper and lower side lobes are accidentally placed at similar angles, the finished piece becomes star-shaped rather than maple-shaped.
- Keep corresponding side lobes within 5 mm of each other. A larger difference becomes obvious after the cream veins create strong left-right visual lines.
- Do not overfill the valleys with edging stitches. More than one or two extra stitches at a valley can round the indentation and reduce the separation between adjacent lobes.
- Keep surface slip stitches loose. A tight central vein can shorten the middle lobe by 1–2 cm and cause the orange fabric to cup upward.
- Stop secondary veins 1–2 cm before the perimeter. Running every branch directly into the cream border produces a crowded surface and weakens the branching effect.
- Pin each major point individually during blocking. Pinning only the outside corners leaves the smaller serrations rounded instead of sharply defined.
- Use cotton for hot-table applications. If the piece will contact warm serving dishes, avoid polyester yarn because synthetic fibers can be damaged by high heat.
Why the Five-Lobe Structure Matters
The central point is the primary visual axis of a maple leaf. Two upper lobes angle diagonally away from that axis, while the lower pair spread closer to horizontal. Maintaining those different angles is more important than making every section identical.
Published crochet maple-leaf designs use several construction methods. Some are made in one piece with Irish-crochet techniques and back-loop single crochet, while others build the motif through rounds followed by partial rows that form the points. Both methods demonstrate the same underlying requirement: controlled increases, decreases and pointed sections are necessary to establish the characteristic outline.
The photographed design adds another layer by using contrasting veins. Those lines visually connect all five lobes to the same central junction and make the leaf read as one structure despite its highly segmented perimeter.
Adjusting the Finished Size
For a coaster-sized maple leaf, use DK or sport-weight cotton with a 3–3.5 mm hook. Published DK and sport-weight maple leaves commonly finish around 10–12 cm.
For the photographed placemat scale, use worsted cotton with a 4 mm hook and target approximately 30–35 cm across after blocking.
For an oversized centerpiece, move to bulky cotton or a cotton blend with an appropriately larger hook. Make a complete central lobe first and calculate the remaining dimensions from that sample rather than increasing every stitch count without testing.
Changing yarn weight is usually cleaner than adding random rows to individual lobes. All five sections need to remain proportional.
Choosing Yarn for a Maple Leaf Placemat
Cotton provides the most controlled result for this design because the finished points can be blocked sharply and the surface veins remain visible. A cotton-acrylic blend can also work when the piece is intended only as decorative table décor.
Choose a burnt orange with enough contrast against the cream vein yarn. Two colors that are too close in value will hide the branching structure visible in the reference image.
For a more traditional autumn palette, substitute rust, burgundy, mustard or dark red for the orange body while keeping the vein color light.
Do not change yarn weight between the main body and edging unless you deliberately want a thinner outline. Matching weights produce the pronounced cream border shown in the photograph.
Blocking the Maple Leaf
Blocking is a construction step for this project rather than an optional finishing treatment. The numerous points and valleys can look irregular immediately after crocheting.
Wet the finished cotton piece and remove excess water without twisting it. Place it on a blocking mat with the right side facing upward.
Pin the central lobe first. Align the stem directly beneath it to establish the vertical axis.
Next, pin the two upper lobes at matching angles. Position the two lower lobes last.
Add separate pins to the smaller perimeter points and valleys. Measure from the central junction to corresponding left and right points to maintain symmetry.
Allow the leaf to dry completely before removing the pins.
Using the Finished Leaf
The photo-inspired dimensions make this piece suitable as a decorative placemat, fall centerpiece or layered table mat. Multiple leaves can also be made in different autumn colors and arranged down the center of a dining table.
For placemat use, make every leaf from the same yarn brand, hook and stitch tension. Even small gauge changes can produce visibly different dimensions across a matching set.
If using the piece beneath dishes, keep the raised vein work moderately flat. Excessively thick surface crochet can make plates or bowls less stable.
For purely decorative use, the veins can be made heavier by working a second line of surface crochet beside the first.
Conclusion
Block the five-lobe structure before judging the final silhouette; the central point should remain tallest, the upper pair should angle diagonally, and the lower lobes should spread outward. Add the cream veins only after the orange body lies flat, because tight surface crochet can distort otherwise accurate shaping. The final edging should trace each serration without filling the valleys. Save this crochet maple leaf placemat pattern to Pinterest or share the finished autumn table piece on Instagram with #BurntOrangeMapleLeaf. For this specific leaf, would you keep the cream vein network shown in the photo or work the veins in gold for a lower-contrast autumn palette? “`0









