Introduction
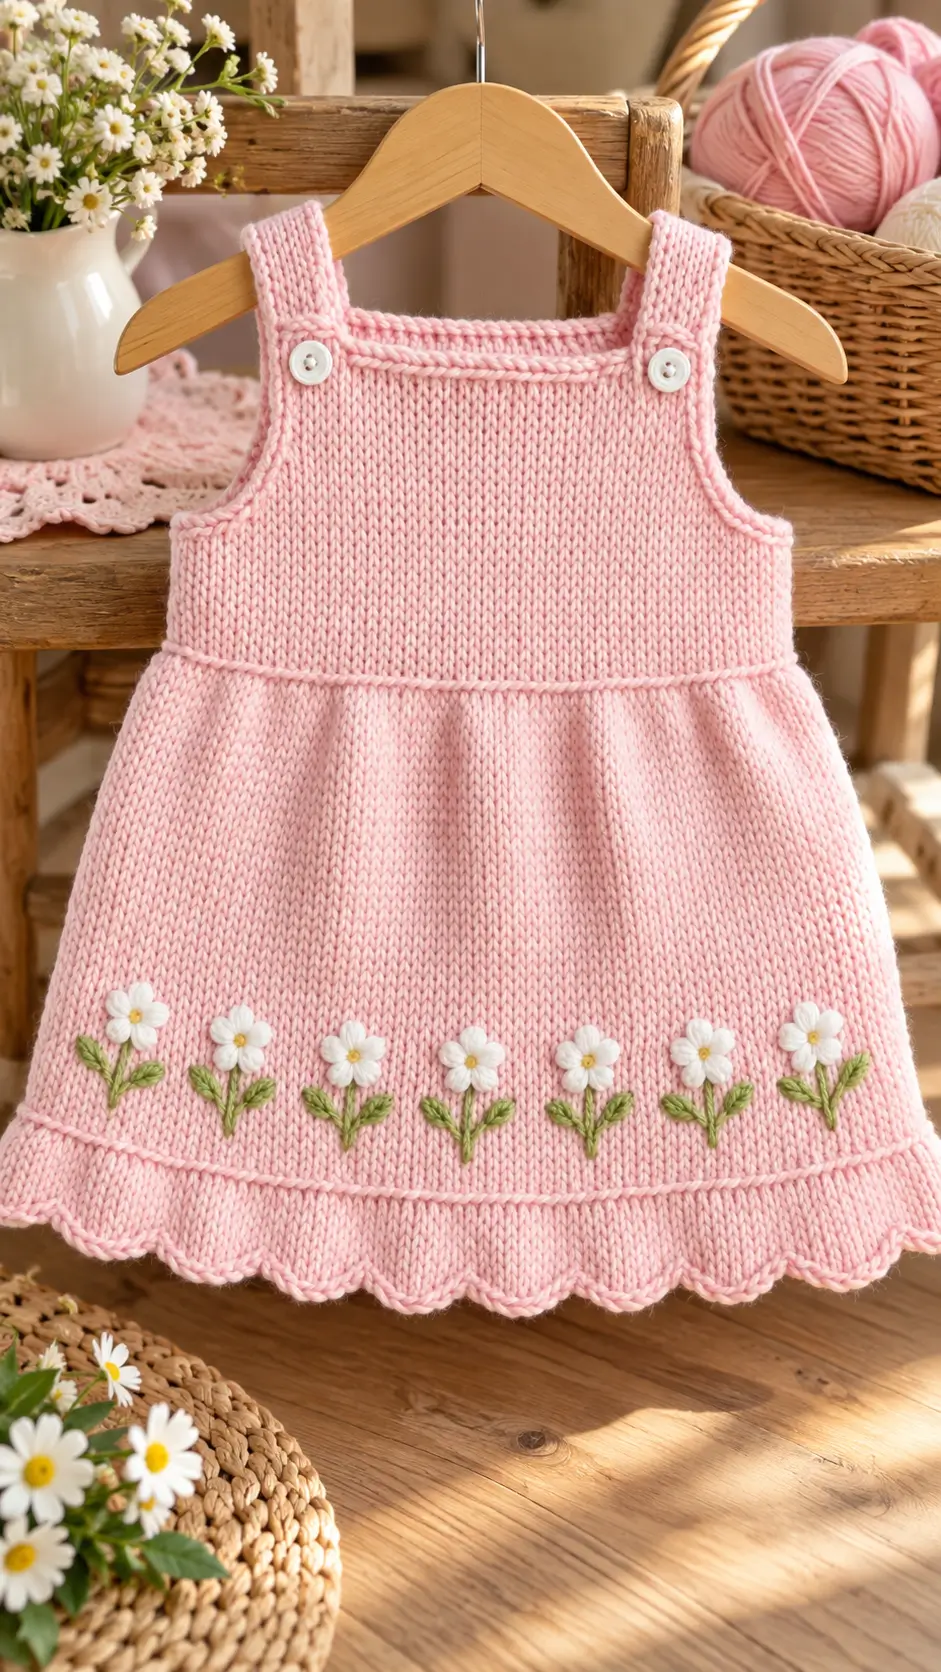
Seven daisies across the skirt change the construction problem: the hem must stay flat enough for evenly spaced stems. This pink knitted baby dress pattern uses DK yarn, 4 mm needles and a 6–12-month reference size of roughly 36–38 cm long. It is an intermediate garment project combining stockinette, gathering, straps, buttons and applied floral decoration, with a sleeveless shape suited to layering.
The Design: What Makes This Daisy Dress Different
The photographed dress depends on three structural decisions. First, the skirt carries substantially more fabric than the bodice, creating fullness without making the chest oversized. Second, narrow shoulder straps replace a conventional sleeved yoke; button attachment gives the pinafore its characteristic square neckline. Third, the decorative border is positioned above the scallops rather than inside them, giving each daisy a relatively stable stockinette background.
For a knitted baby pinafore pattern, gauge matters most at the chest. Comparable DK patterns commonly use about 22 stitches per 10 cm, making that a practical starting point rather than a measurement inferred solely from the photograph. A common mistake in a daisy baby dress is adding embroidery before blocking. That can distort flower spacing when the skirt reaches its final width.
Project Info at a Glance
| Skill Level | Time | Finished Size | Needles | Best For |
|---|---|---|---|---|
| Intermediate | Multi-session garment | Approx. 36–38 cm length for comparable 6–12M sizing | 4 mm | Layered baby pinafore |
The finished measurements are reference dimensions from comparable published patterns, not measurements extracted directly from the photograph. Always check the intended chest circumference and garment length before starting.
Materials and Tools
Yarn
- Blush pink — DK/8-ply — approximately 150 g for the main dress.
- White — DK or embroidery-compatible yarn — small quantity for seven flower heads.
- Leaf green — DK or embroidery yarn — small quantity for stems and leaves.
- Yellow — small remnant for seven flower centers.
Yarn quantity varies with size, gauge, skirt fullness and yarn composition. Buying an additional ball is useful when the project requires matching dye lots.
Tools
- 4 mm knitting needles
- 2 white buttons
- Tapestry needle
- Stitch markers
- Waste yarn or stitch holders
- Measuring tape
- Embroidery needle
- Blocking supplies
For a garment intended for a young child, attach buttons securely and inspect them before each use. Small detachable components can present a choking hazard.
Abbreviations
- K — knit
- P — purl
- st/sts — stitch/stitches
- RS — right side
- WS — wrong side
- k2tog — knit 2 together
- ssk — slip, slip, knit
- M1 — make 1
- BO — bind off
- CO — cast on
- rep — repeat
- St st — stockinette stitch
This is a knitted garment, so amigurumi abbreviations such as MR, sc and invisible decrease do not apply.
Construction — Step by Step
1. Establish Gauge Before Calculating the Dress
Work a stockinette swatch larger than 10 × 10 cm and wash or block it in the same way the finished garment will be treated. Measure the center of the swatch rather than the edges.
A practical reference gauge for DK baby garments is approximately 22 stitches per 10 cm. Your washed gauge takes priority over any reference number.
Calculate the required circumference from the target measurement and your blocked gauge instead of copying the stitch count from an unrelated garment.
At 22 stitches per 10 cm, the basic calculation is:
Required circumference in cm × 2.2 = approximate stitch count
Round the resulting number to suit the shaping method and stitch repeat used in your version.
2. Skirt
The reference dress uses a flared, gathered skirt rather than a narrow A-line shape. The additional circumference creates the vertical folds visible beneath the waist.
Cast on enough stitches for the required lower circumference according to your blocked gauge calculation. The skirt can be worked in the round or knitted flat and seamed later.
Work the decorative lower edge first. The photographed design has rounded scallops of approximately equal width followed by a narrow horizontal transition before the main stockinette section.
Continue in stockinette until the skirt reaches the planned floral area. Keep this portion of the fabric plain because the daisy decoration requires a stable background.
Measure the skirt regularly. Do not judge the finished width from unblocked stockinette because the edges naturally curl and the fabric can change dimensions after washing.
3. Daisy Placement Zone
Do not embroider the flowers before blocking the main garment.
Mark the intended flower centers with removable markers or contrasting waste yarn. The reference image shows seven visible daisies distributed across the front of the skirt.
Find the horizontal center of the front skirt and mark the middle flower first. Position three additional flower centers on each side at equal intervals.
Equal center-to-center spacing is more important than forcing every stem onto exactly the same knitting column.
Leave enough clearance above the lower decorative border for the stems and leaves. The top petals should also remain clearly separated from the waist transition.
4. Shape the Waist
The skirt changes from a generous lower circumference to a considerably narrower bodice. This can be produced with an evenly distributed decrease row.
Calculate the final bodice circumference from the required chest measurement. For a 6–12-month reference garment, a finished chest around 50–51 cm provides a useful comparison point, but measurements should be adjusted for the intended wearer and desired ease.
Divide the skirt into equal sections with stitch markers before decreasing. Spread reductions evenly around the waist.
Concentrating too many decreases in a small area produces distinct pleats rather than the softer gathering shown in the reference image.
A narrow stabilizing row or textured ridge can be worked after the decrease section to reproduce the visible horizontal waist line.
5. Bodice
Continue upward in stockinette using the calculated chest circumference.
The bodice should remain relatively plain. It supports the skirt while providing stable attachment points for the two shoulder straps.
For flat construction, divide the work into front and back sections when the knitting reaches the armholes. For circular construction, place the required sections on stitch holders and work the upper sections separately.
Measure the vertical length in centimeters rather than relying entirely on row count. Two knitters can obtain the same stitch gauge while producing different row gauges.
6. Armhole Shaping
The photographed garment has deep, smoothly curved arm openings.
Shape each side symmetrically. An initial bind-off followed by progressively smaller decreases generally produces a smoother curve than removing the entire armhole depth in a single row.
Compare the left and right sides after every shaping sequence. A small discrepancy becomes much more noticeable once the narrow straps are attached.
Record every shaping row as you work it so the second side can be reproduced accurately.
7. Upper Front
Continue the front section until the required square neckline height is reached.
A narrow horizontal finishing band can stabilize the upper edge. Keep the border compact so it does not overpower the simple pinafore structure.
Check the finished front width against the intended chest measurement. Allow for any dimensional change identified during washing and blocking of the gauge swatch.
8. Shoulder Straps — Make 2
The shoulder straps should be identical in width and finished length.
Pick up stitches from the back section or knit the straps separately and sew them into position. Work each strap until it reaches the front comfortably without pulling the armhole upward.
The reference design has straps overlapping the front bodice and fastening near two white buttons.
Test the actual buttons before finalizing the buttonholes. Blocking can enlarge an opening that initially appears correctly sized.
Attach both buttons with multiple secure passes. Check them periodically if the finished garment will be worn by a young child.
9. Scalloped Hem
The scalloped lower border is one of the strongest visual features of this dress.
Calculate the repeat against the complete hem stitch count before beginning. Complete repeats should meet without leaving a partial scallop at the end of the round or row.
If the stitch total does not divide correctly, make the required adjustment before beginning the decorative section rather than hiding surplus stitches inside the final motif.
Keep the scallops relatively shallow. Excessively deep motifs add weight and can cause the lower edge to turn outward.
Block the complete hem before deciding whether its shape needs adjustment.
10. Daisy Flowers — Make 7
The flower decoration can be embroidered directly onto the skirt or constructed as small appliqués and attached afterward. The photograph alone does not provide enough information to establish which method was used on the original garment.
For a similar visual result, create five white petals around a small yellow center.
Keep all seven flower heads approximately equal in diameter.
Begin with the central daisy. Add the remaining flowers in mirrored pairs, moving toward the outer edges of the skirt.
This sequence prevents small spacing errors from accumulating in one direction.
11. Stems and Leaves
Work one green stem beneath each daisy.
The stems in the reference are relatively short and mostly vertical. Each includes two small green leaves branching from the lower portion.
Slightly alternate the leaf angles from flower to flower while maintaining similar overall dimensions.
Do not pull the embroidery yarn tightly across the reverse side of the stockinette. Excessive tension can pucker the pink fabric and reduce the width of the skirt locally.
Secure motifs individually where practical instead of carrying long yarn floats between separate flowers.
Assembly
- Block the skirt and bodice components to the planned measurements before adding permanent floral decoration.
- Join the garment seam if the main body was knitted flat, matching the waist and hem lines accurately.
- Finish both armholes while avoiding excessive tension along the curved edges.
- Finish the square upper edge and confirm that the front remains centered.
- Attach or complete both shoulder straps at matching positions.
- Make buttonholes according to the actual button diameter and blocked strap gauge.
- Sew the two buttons securely with repeated passes and inspect each attachment.
- Mark seven daisy centers across the front before stitching the first flower.
- Add white petals, yellow centers, green stems and paired leaves while keeping reverse-side floats short.
- Weave in all yarn ends, complete the final blocking and verify the finished chest and garment length.
The completed garment should have a stable bodice, symmetrical straps, evenly distributed skirt fullness and a centered seven-flower border.
7 Technical Tips
- Gauge drift: Measure a washed swatch across a full 10 cm section rather than a narrow strip directly from the needles. A change from 22 to 20 stitches per 10 cm creates roughly a 10% difference in calculated width.
- Uneven gathering: Divide the waist into four equal sections before distributing decreases. Concentrating reductions in one area produces accidental pleats and moves fullness away from the center front.
- Asymmetric straps: Measure both straps from the same attachment reference point. Even a 5 mm difference can become visible against the horizontal neckline.
- Puckered embroidery: Keep the green stem stitches at the resting tension of the knitted fabric. Pulling the embroidery too tightly contracts the stockinette behind the floral border.
- Misplaced flowers: Establish the center daisy first, then work outward in mirrored pairs. Starting at one side allows small spacing errors to accumulate across all seven flowers.
- Loose buttonholes: Make a test buttonhole using the same yarn and stitch structure as the straps. Block the sample before deciding the final opening size because washing can enlarge it.
- Uneven scallops: Block every lower repeat to the same depth and align the outer points. Different scallop depths can make a level skirt appear longer on one side.
Conclusion
Block the plain dress before adding flowers; that ordering makes the seven-daisy spacing easier to control. For a 6–12-month reference garment, approximately 36–38 cm in finished length provides a useful comparison, but the wearer’s measurements and blocked gauge should determine the final dimensions. Your next step is to knit and wash a gauge swatch, record the stitches per 10 cm, and calculate the required chest circumference before casting on the pink knitted baby dress pattern. Save the finished design to Pinterest or share the floral border on Instagram with #PinkDaisyPinafore. Would you keep all seven daisies white, or use a second flower color for the two outer motifs?









